In this guide, you’ll learn what visual regression testing is and why visual regression tests are important. We’ll go through a use case with an example and talk about how to get started and choose the best tool for your needs.
What is Visual Regression Testing?
Visual regression testing is a method of validating that changes made to an application do not negatively affect the visual appearance of the application’s user interface (UI). By verifying that the layout and visual elements align with expectations, the goal of visual regression testing is to ensure the user experience is visually perfect.
Visual regression testing is a kind of regression testing. In regression testing, an application is tested to ensure that a new change to the code doesn’t break existing functionality. Visual regression testing specifically focuses on verifying the appearance and the usability of the UI after a code change.
In other words, visual regression testing (also called just visual testing or UI testing) is focused on validating the appearance of all the visual elements a user interacts with or sees. These visual validations include the location, brightness, contrast and color of buttons, menus, components, text and much more.
Why is Visual Regression Testing Important?
Visual regression tests are important to prevent costly visual bugs from escaping into production. Failure to visually validate can severely compromise the user experience and in many cases lead directly to lost sales. This is because traditional functional testing works by simply validating data input and output. This method of testing catches many bugs, but it can’t discover visual bugs. Without visual testing these bugs are prone to slipping through even on an otherwise well tested application.
As an example, here is a screenshot of a visual bug in production on the Southwest Airlines website:
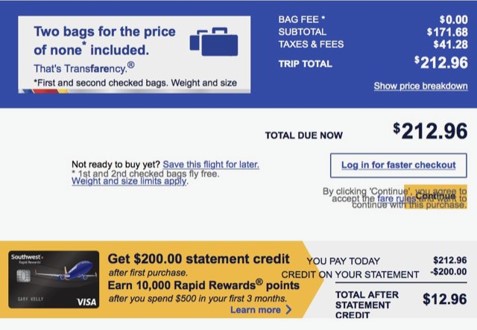
This page would pass a typical suite of functional tests because all of the elements are present on the page and have loaded successfully. However, the visual bug is obvious. Not only that, but because the Terms and Conditions are inadvertently overlapping the button, the user literally cannot check out and complete their purchase. Visual regression testing would catch this kind of bug easily before it slipped into production.
Visual testing can also enhance functional testing practices and make them more efficient. Because visual tests can “see” the elements on a page they do not have to rely on individual coded assertions using unique selectors to validate each element. In a traditional functional testing suite, these assertions are often time-consuming to create and maintain as the application changes. Visual testing greatly simplifies that process.
How Do Visual Regression Tests Work?
At its core, visual regression testing works by capturing screenshots of the UI before a change is made and comparing it to a screenshot taken after. Differences are then highlighted for a test engineer to review. In practice, there are several different visual regression testing techniques available.
Types of Visual Regression Testing
- Manual visual testing: Visual regression testing can be done manually and without any tools. Designers and developers take time during every release to scan pages, manually looking for visual defects. While it is slow and extremely cumbersome to do this for an entire application, not to mention prone to human error, manual testing in this way can allow for ad-hoc or exploratory testing of the UI, especially at early stages of development.
- Pixel-by-Pixel comparison: This approach compares the two screenshots and analyzes each at the pixel level, alerting the test engineer of any discrepancies found. Pixel comparison, also called pixel diffs, will be certain to flag all possible issues, but will also include many irrelevant differences that are invisible to the human eye and have no effect on usability (such as rendering, anti-aliasing, or padding/margin differences). These “false-positives” must be painstakingly sifted through manually by the test engineer with every test run.
- DOM-based comparison: A comparison based on the Document Object Model (DOM) analyzes the DOM before and after a state change and flags any differences. This will be effective in drawing attention to any alterations in the code that comprises the DOM, but is not truly a visual comparison. False negatives/positives are frequently produced when the code does not change but the UI does (e.g.: dynamic content, embedded content, etc.) or when the code changes but the UI does not. As a result, test results are often flaky and must be slowly and carefully reviewed to avoid escaped visual bugs.
- Visual AI comparison: This type of visual regression testing leverages Visual AI, which uses computer vision to “see” the UI the same way a human would. A well-trained AI will be able to assist test engineers by only surfacing the kind of differences a human would notice, eliminating the time-consuming “false-positive” issues that plague pixel and DOM comparison tests. It can also include other capabilities, such as the ability to test dynamic content and flag issues only in the areas or regions where changes are not expected.
Automated Visual Testing Use Case and Example
Getting started with automated visual regression testing takes only a few steps. Let’s walk through the typical visual regression testing process and then consider a brief example.
- Define your test scenarios. What will be captured in the screenshots, and at what point in the test will they be taken? With some automated tools, a basic test can be as simple as a single line of code that will take a screenshot of an entire page at the end of a test.
- Use an automated testing tool to compare the new screenshots against a baseline image. The baseline is the most recent existing screenshot of the application that has already been approved by a tester.
- The tool will automatically generate a report highlighting the differences found between the two images. Using pixel diff this will be every pixel difference found, or with Visual AI, you will see a report showing only meaningful differences.
- A test engineer reviews the report and determines what is a bug and what is an acceptable or valid change (a false positive). After all bugs are resolved, the baseline is updated with the new screenshot.
Visual Regression Testing Example
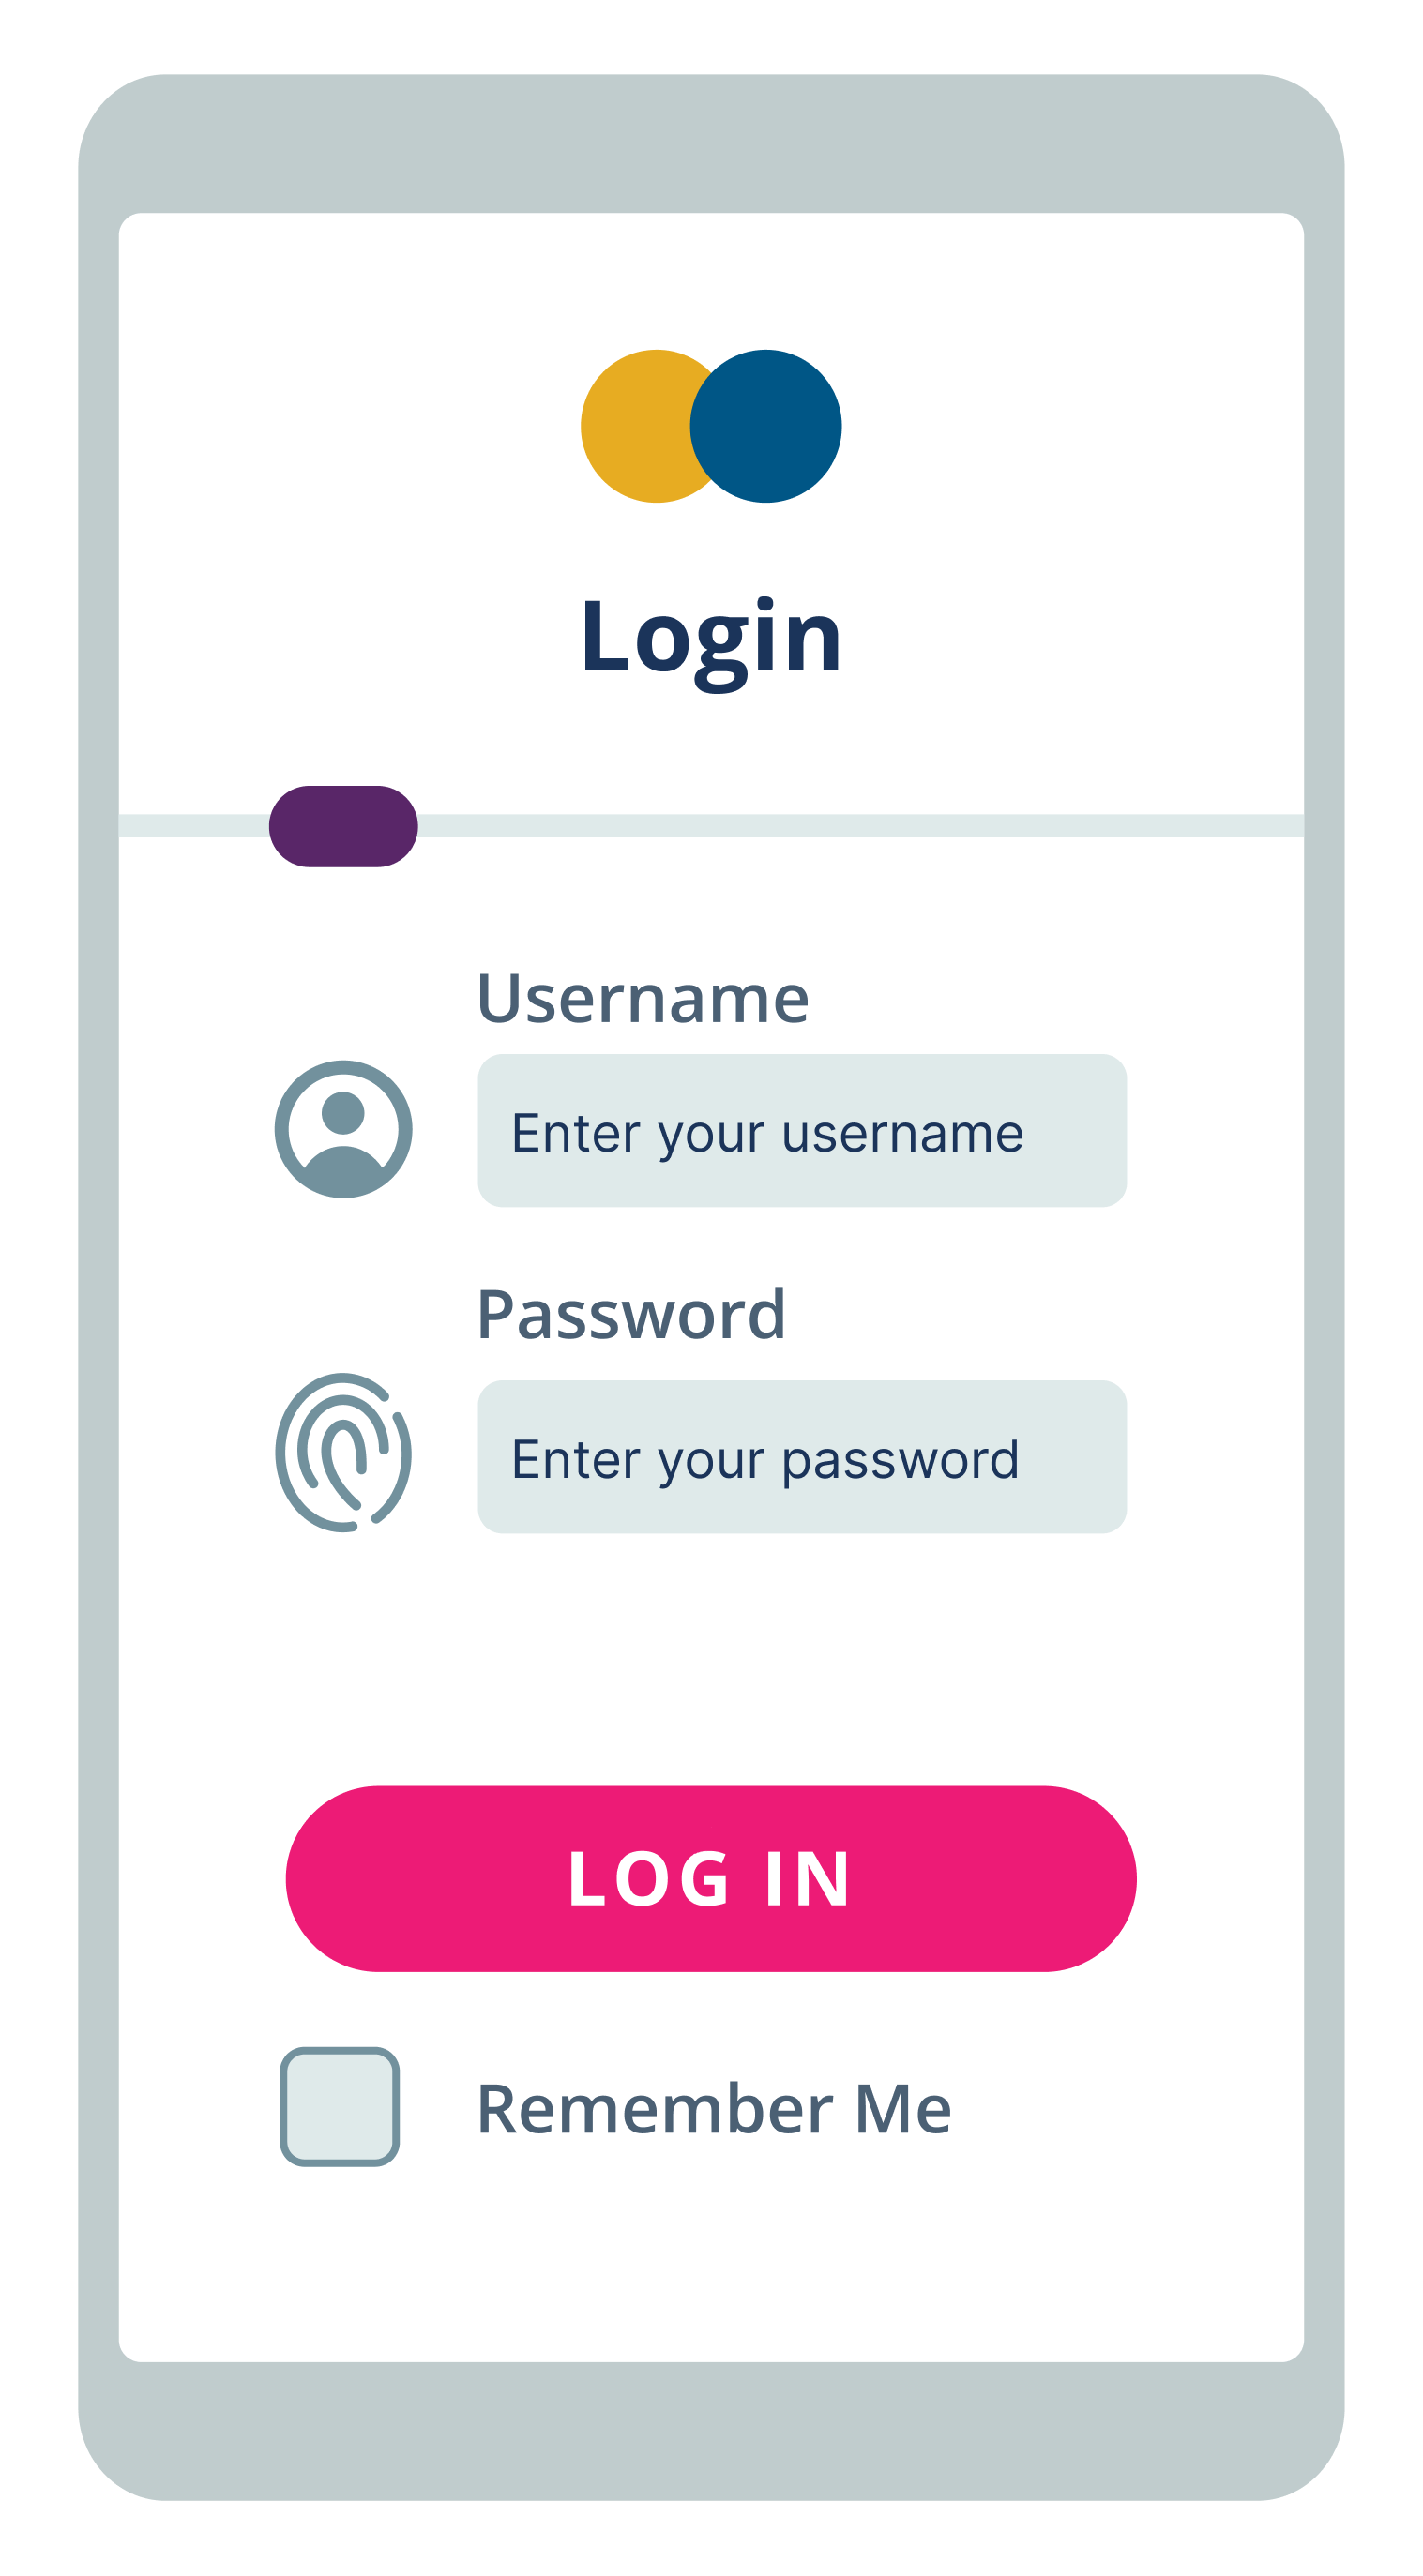
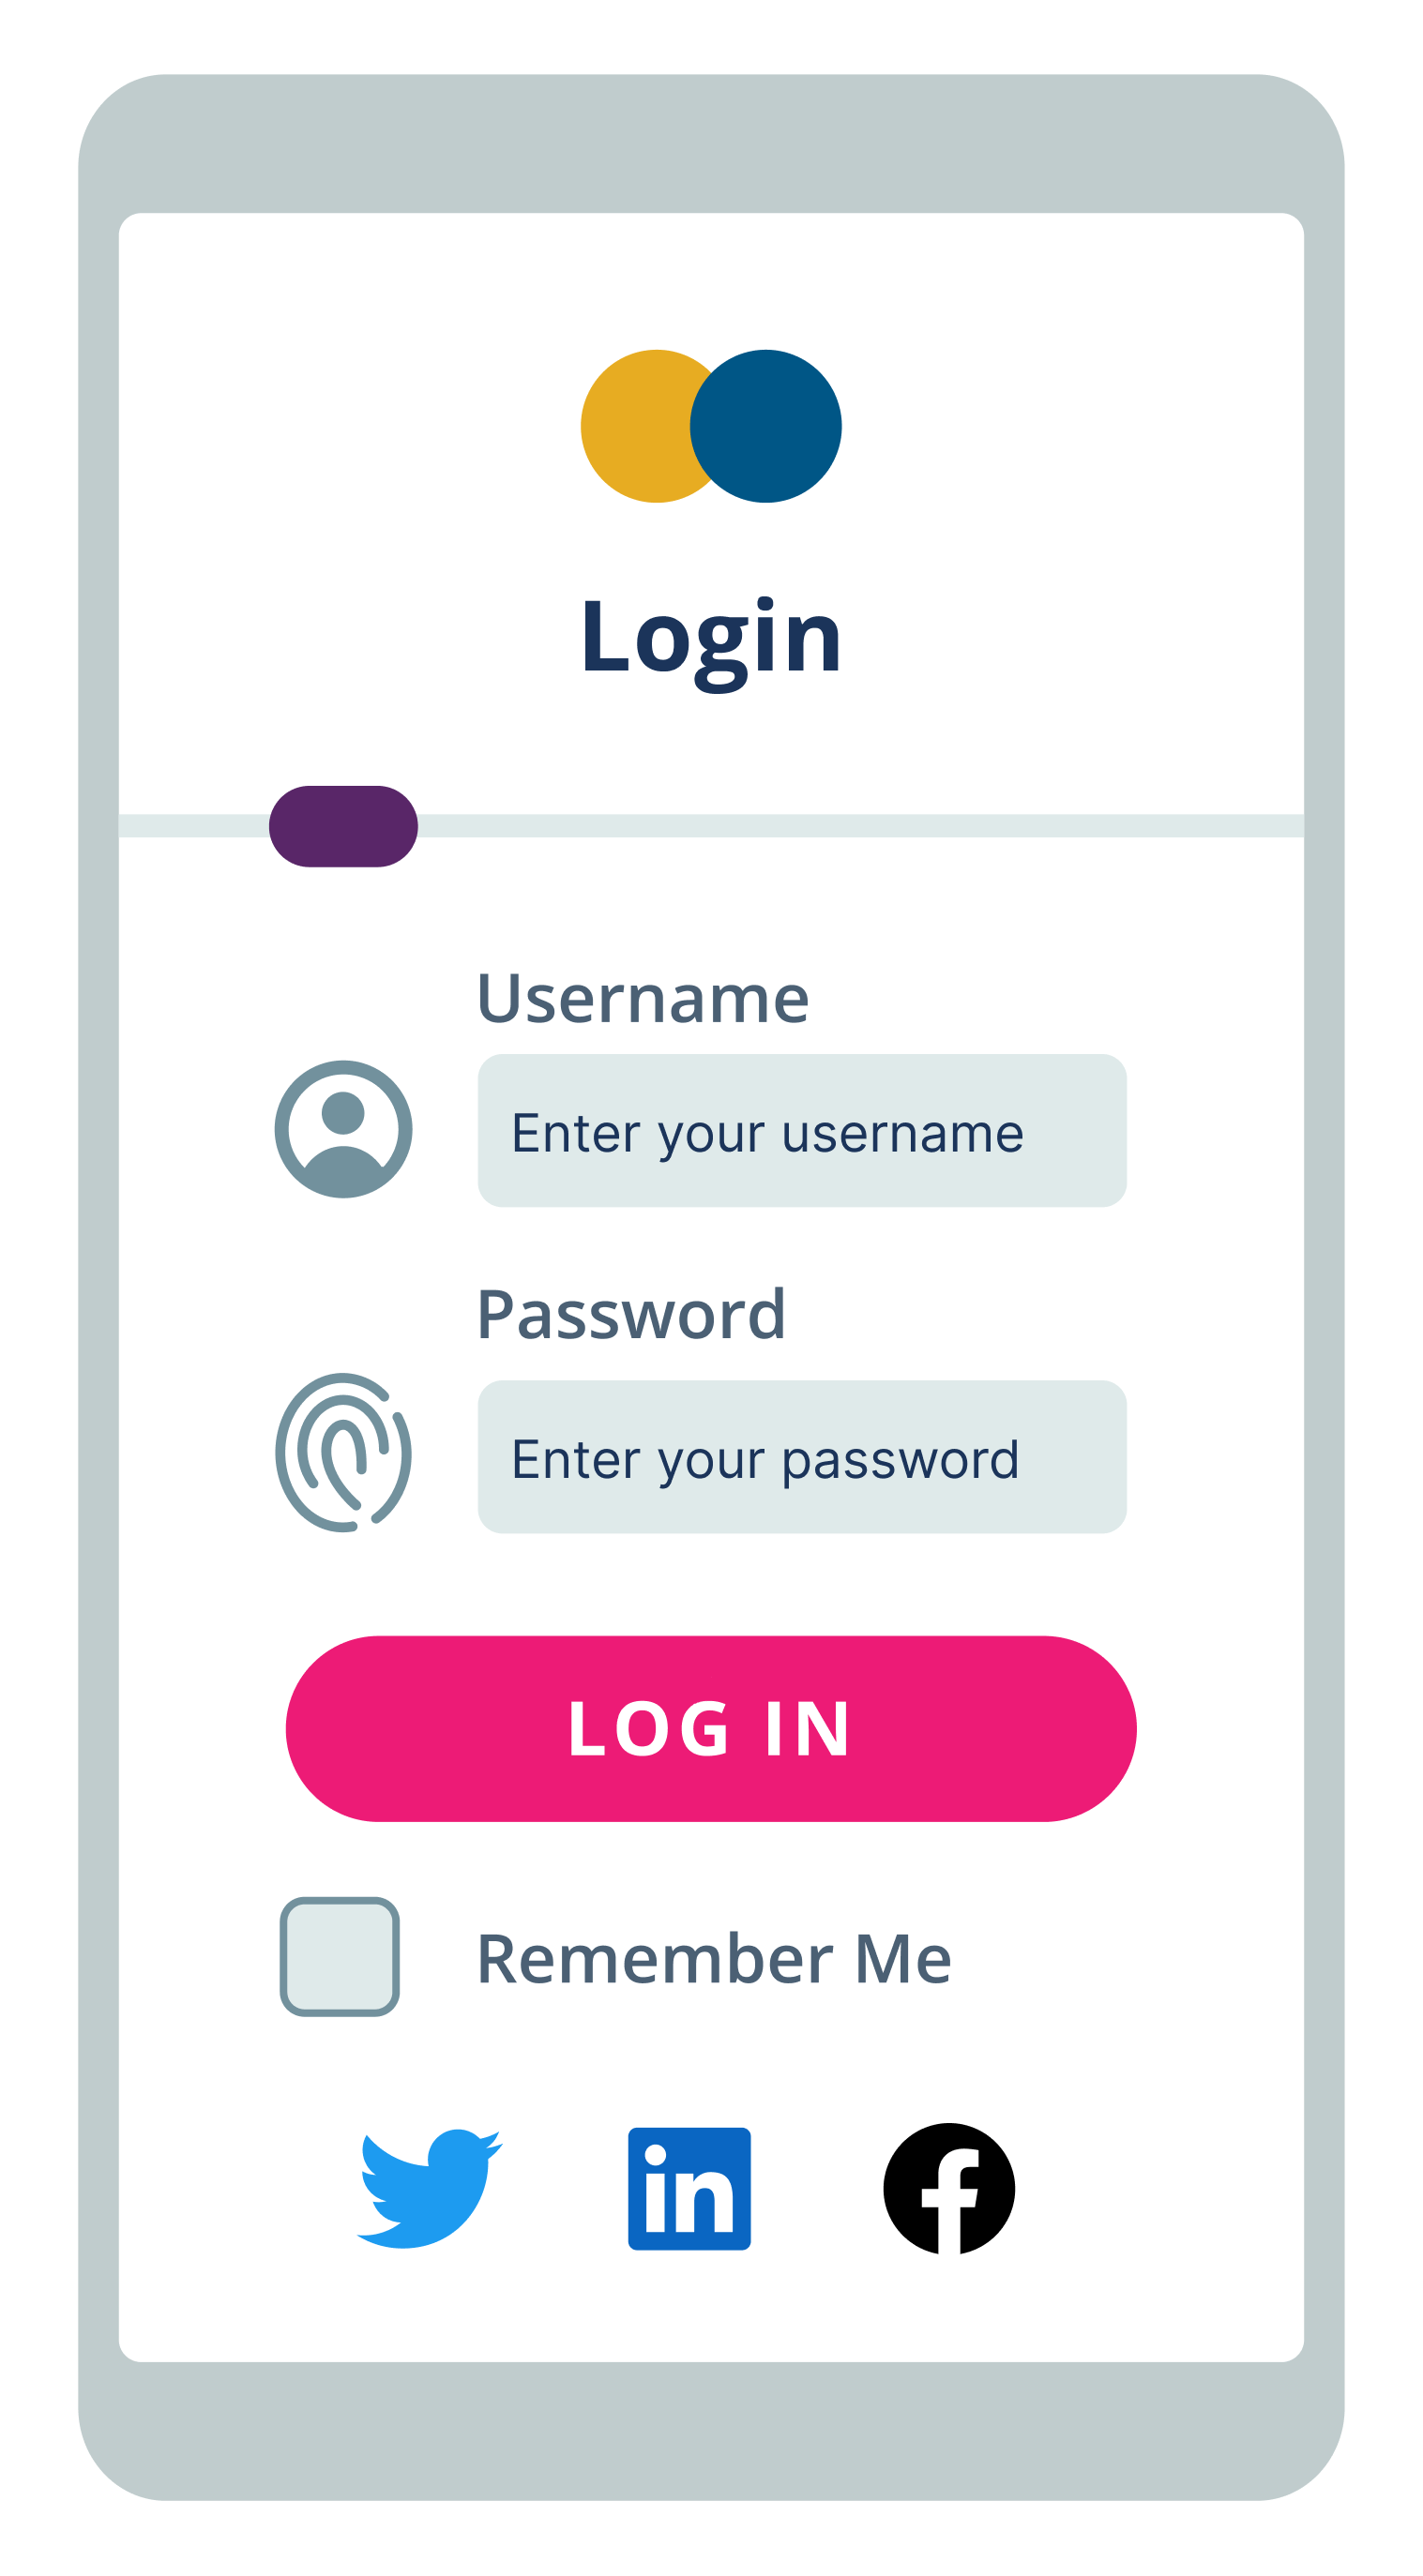
Let’s review a quick example of the four steps above with a basic use case, such as a login screen.
- Define your test scenario: In this case, we’ll capture the entire screen and review for any changes. Our baseline might look like this:
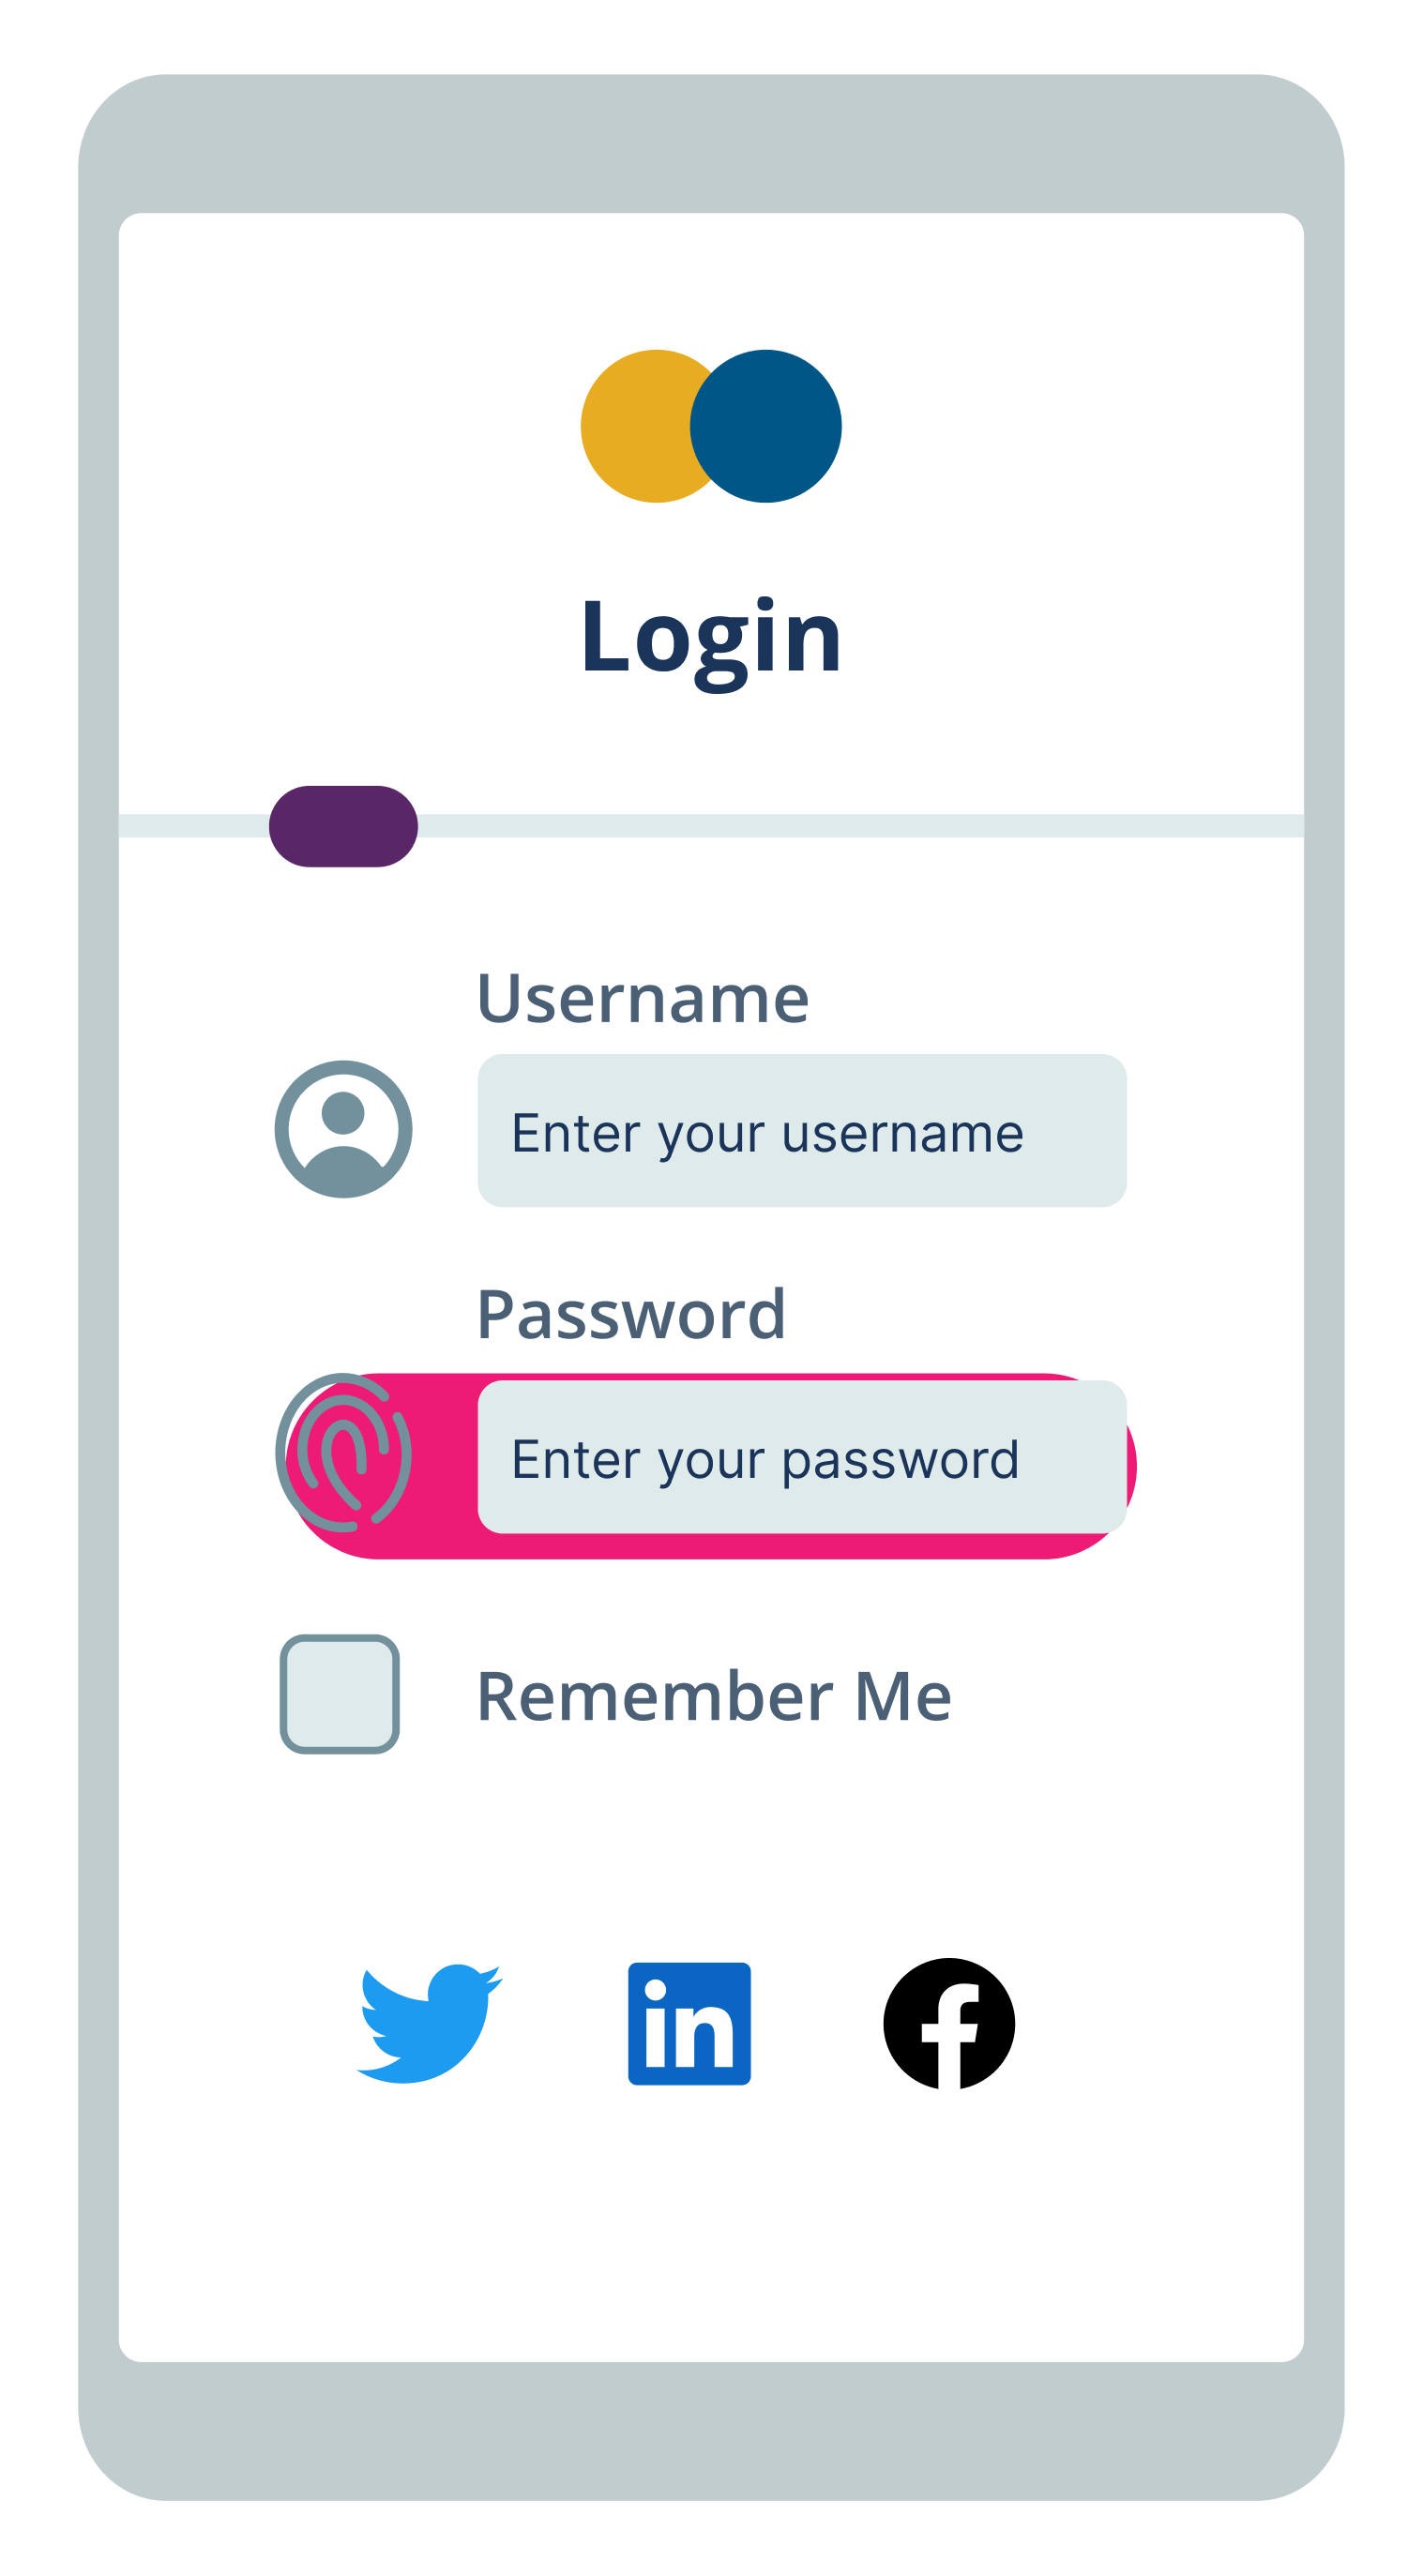
- Next, we’ll make some changes to the code, such as adding a row of social buttons. Unfortunately, doing so has pushed up the login button so that it is unusable. Our new login screen might look like this:
- The tool will then compare the two and generate a report. In our example, we’ll use Visual AI, which will highlight only the relevant areas of change that a user would notice. In this case, that’s the row with the new social buttons, and the area with the now unusable button. The comparison would look like this:
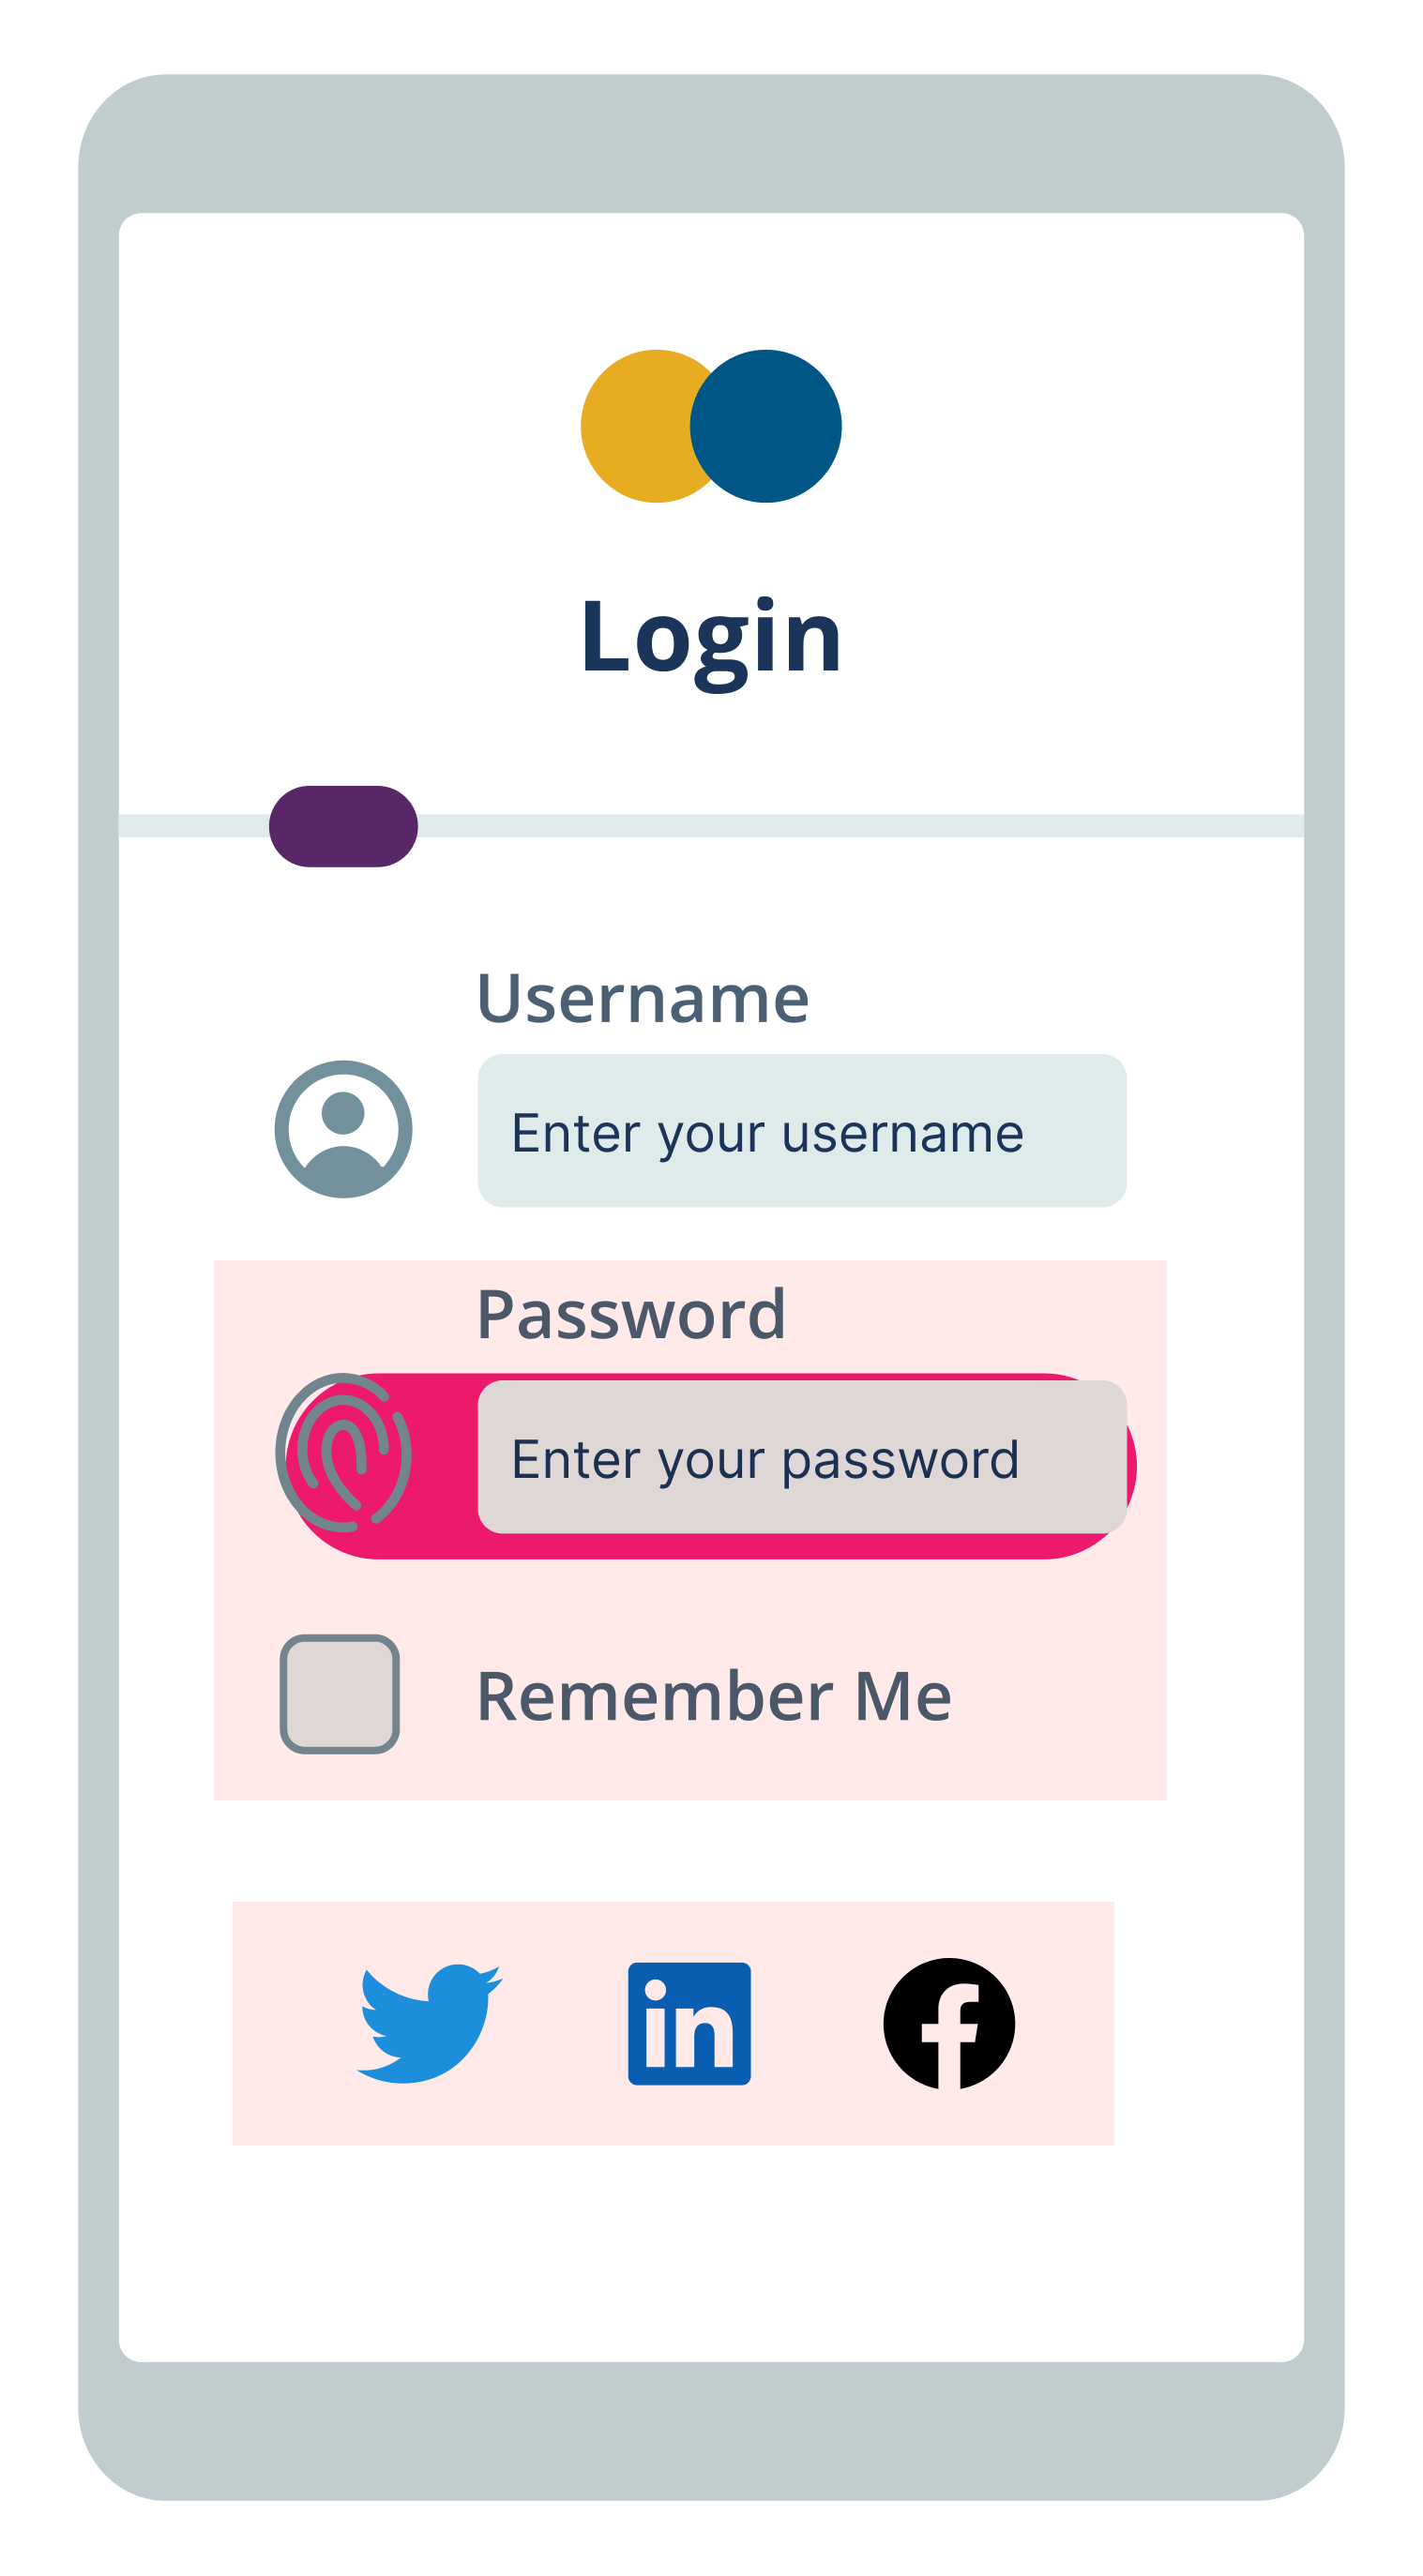
- A test engineer will then review the comparison. If any intentional changes were flagged, these are marked as accepted changes. Similarly, if there are expected changes in dynamic areas, these can be flagged for Visual AI to ignore going forward. Remaining areas flagged are marked as bugs to be addressed. In this case, every area flagged in red is problematic – the social buttons need to be shifted down, and the button needs to come down out of the password field. Once these are addressed, the test is run again, and a new baseline is created only when everything passes. The end result is free of visual defects:
How to Choose a Visual Testing Tool
Choosing the best tool for your visual regression tests will depend on your needs, as there are many options available. Here are some questions you should be asking as you consider a new tool:
- Automated or Manual? How frequently do you want to conduct visual tests? For occasional spot checks, manual testing may suffice. If you want to run tests with every change to ensure no visual bugs escape, automated testing will be much more efficient. For automated testing, consider the learning curve of the tool and how easy it is to integrate into your existing CI/CD workflow.
- Is your UI dynamic or static? How often does your user interface change? For completely static pages, simpler tools may serve to spot any visual bugs. Pages with dynamic content that changes regularly may be better served by tools with advanced capabilities like Visual AI.
- How many browsers/devices/platforms? Do you have many browsers, devices or platforms to cover with your tests? A tool may be efficient for a single combination but quite inefficient when attempting to cover a wide range of configurations. If you need to cover a broad range of situations, you need to make sure you pick a tool that can quickly re-render visual snapshots on different configurations, or achieving full coverage can become a time-consuming headache.
- Does your team have time? How much time does your QA team have to spend on UI testing? If they have capacity, sifting through potential false positives from pixel diff tools may not be an issue, or manual testing could be an option. For teams looking to be as efficient as possible, particularly with large or dynamic applications, automated visual testing with Visual AI will save time.
- What is your build/release frequency? Are you running tests infrequently, daily, or even multiple times a day? If testing is quite infrequent, you may be able to absorb some inefficiency in test execution. Organizations running tests regularly, or seeking to increase their test velocity, should place significant value in a tool that can enable their QA team to achieve full coverage by easily executing a large quantity of tests quickly.
- How many bugs are slipping through? For many teams, due to the increasing complexity of web and mobile development, visual bugs that can harm a company’s reputation or even sales escape more than they would like. In this case the value of automated visual testing is clear. However, if your team is catching all bugs or you can live with the level of bugs escaping, you may not need to invest in visual testing, at least for now.
Automated visual testing tools can be paid or open source. Visual testing tools are typically paired with an automated testing tool to automatically handle interactions and take screenshots. Some popular open source automated testing tools compatible with visual testing include Selenium for web testing and Appium for mobile testing.
Why Choose Automated Visual Regression Testing with Applitools
Applitools has pioneered the best Visual AI in the industry, and it’s able to automatically detect visual and functional bugs just as a human would. Our Visual AI has been trained on billions of images with 99.9999% accuracy and includes advanced features to reduce test flakiness and save time, even across the most complicated test suites.
The Applitools Ultrafast Test Cloud includes unique features like the Ultrafast Grid, which can run your functional & visual tests once locally and instantly render them across any combination of browsers, devices, and viewports. Our automated maintenance capabilities make use of Visual AI to identify and group similar differences found across your test suite, allowing you to verify multiple checkpoint images at once and to replicate maintenance actions you perform for one step in other relevant steps within a batch.
You can find out more about the power of Visual AI through our free report on the Impact of Visual AI on Test Automation. Check out the entire Applitools platform and sign up for your own free account today.
Happy Testing!
Read More
- How do Baseline Comparisons Work in Applitools? [Video, 2:11]
- What is Visual Testing [blog]
- What is Visual AI [blog]
- Visual Testing for Mobile Apps [blog]
- The Impact of Visual AI On Test Automation [webinar recap]
- Modern Functional Test Automation Through Visual AI [free course]