Learn how to automatically do ultrafast cross-browser testing for Storybook components without needing to write any new test automation code.
Let’s face it: modern web apps are complex. If a team wants to provide a seamless user experience on a deadline, they need to squeeze the most out of the development resources they have. Component libraries help tremendously. Developers can build individual components for small things like buttons and big things like headers to be used anywhere in the frontend with a consistent look and feel.
Storybook is one of the most popular tools for building web components. It works with all the popular frameworks, like React, Angular, and Vue. With Storybook, you can view tweaks to components as you develop their “stories.” It’s awesome! However, manually inspecting components only works small-scale when you, as the developer, are actively working on any given component. How can a team test their Storybook components at scale? And how does that fit into a broader web app testing strategy?
What if I told you that you could automatically do cross-browser testing for Storybook components without needing to define any new tests or write any new automation code? And what if I told you that it could fit seamlessly into your existing development workflow? You can do this with the power of Applitools and your favorite CI tool! Let’s see how.
Adding Visual Component Testing to Your Strategy
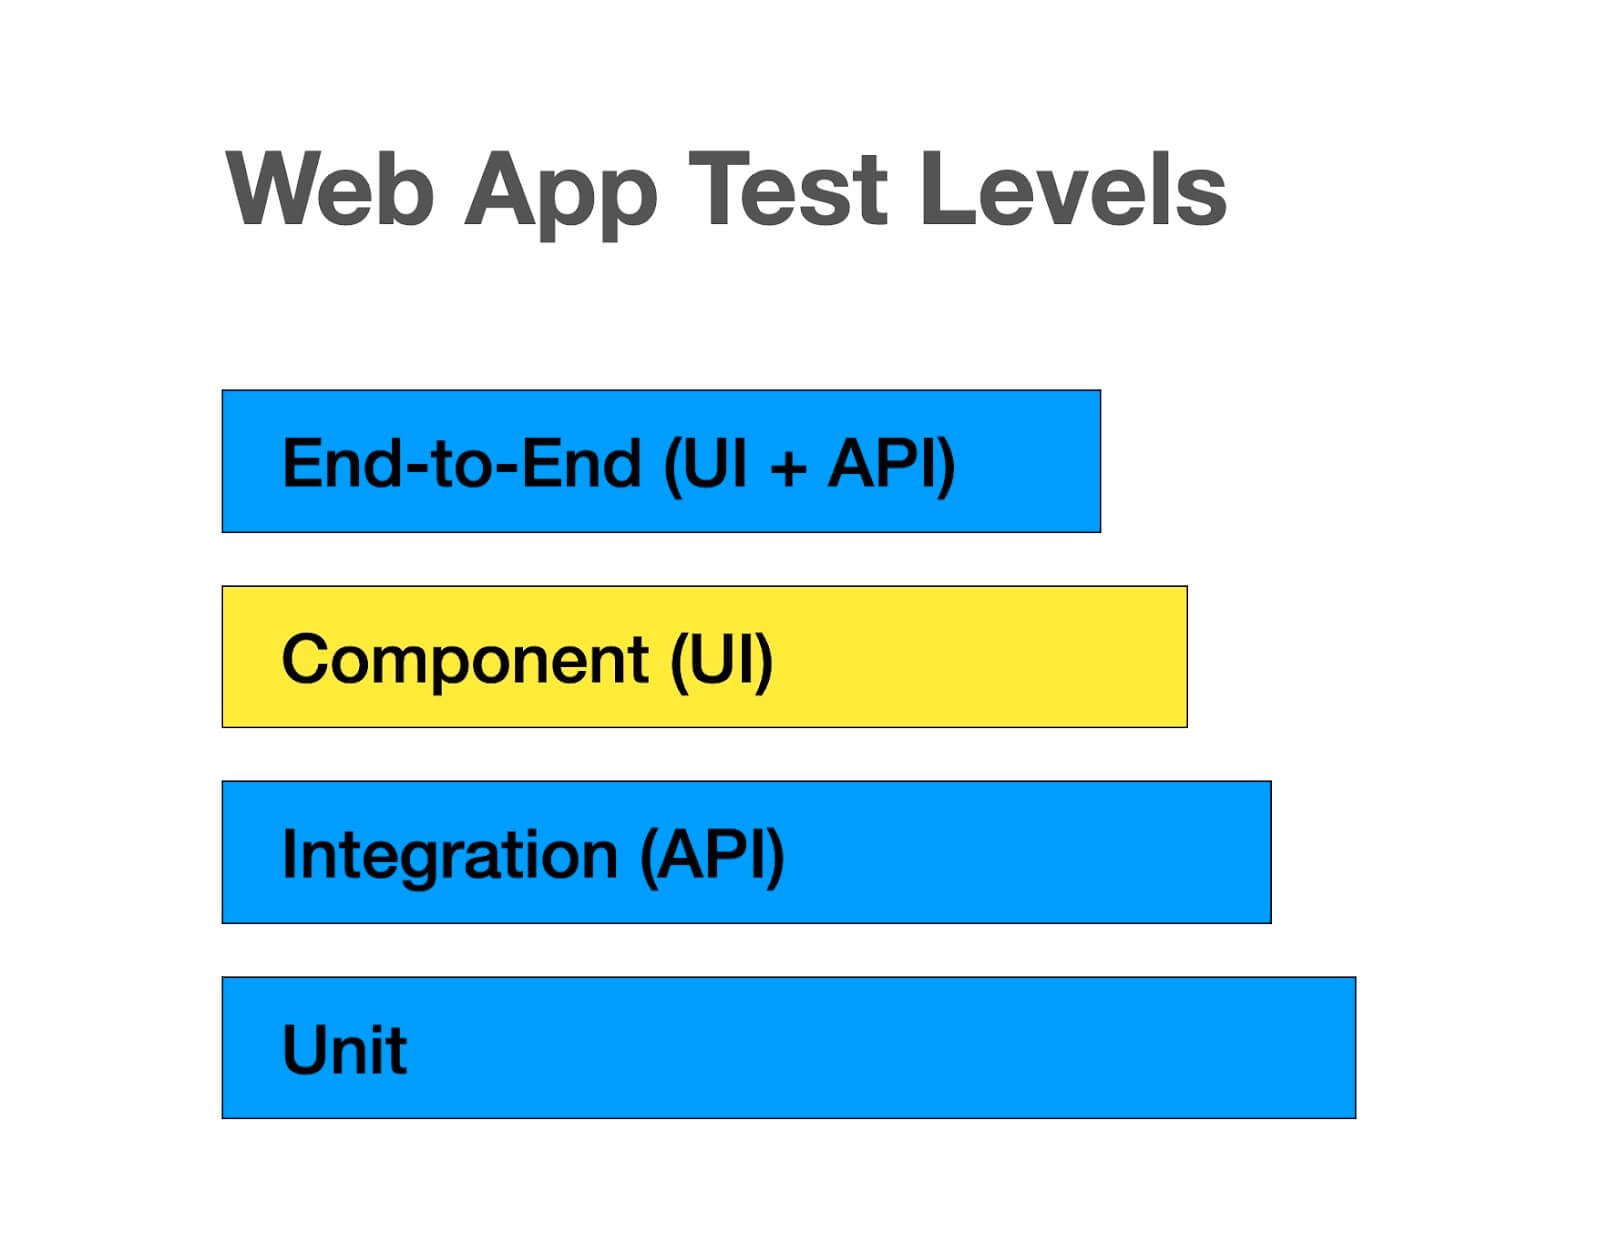
Historically, web app testing strategies divide functional testing into three main levels:
- Unit testing
- Integration testing for APIs
- End-to-end testing for UIs and APIs
These three levels make up the classic Testing Pyramid. Each level of testing mitigates a unique type of risk. Unit tests pinpoint problems in code, integration tests catch problems where entities meet, and end-to-end tests exercise behaviors like a user.
The rise of frontend component libraries raises an interesting question: Where do components belong among these levels? Components are essentially units of the UI. In that sense, they should be tested individually as “UI units” to catch problems before they become widespread across multiple app views. One buggy component could unexpectedly break several pages. However, to test them properly, they should be rendered in a browser as if they were “live.” They might even call APIs indirectly. Thus, arguably, component testing should be sandwiched between traditional integration and end-to-end testing.
Wait, another level of testing? Nobody has time for that! It’s hard enough to test adequate coverage at the three other levels, let alone automate those tests. Believe me, I understand the frustration. Unfortunately, component libraries bring new risks that ought to be mitigated.
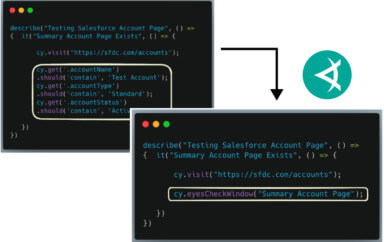
Thankfully, Applitools provides a way to visually test all the components in a Storybook library with the Applitools Eyes SDK for Storybook. All you need to do is install the @applitools/eyes-storybook package into your web app project, configure a few settings, and run a short command to launch the tests. Applitools Eyes will turn each story for each component into a visual test case. On the first run, it will capture a visual snapshot for each story as a “baseline” image. Then, subsequent runs will capture “checkpoint” snapshots and use Visual AI to detect any changes. You don’t need to write any new test code – tests become a side effect of creating new components and stories!
In this sense, visual component testing with Applitools is like autonomous testing. Test generation and execution is completely automated, and humans review the results. Since testing can be done autonomously, component testing is easy to add to an existing testing strategy. It mitigates lots of risk for low effort. Since it covers components very well, it can also reduce the number of tests at other layers. Remember, the goal of a testing strategy is not to cover all the things but rather to use available resources to mitigate as much risk as possible. Covering a whole component library with an autonomous test run frees up folks to focus on other areas.
Adding Applitools Eyes to Your Web App
Let’s walk through how to set up visual component tests for a Storybook library. You can follow the steps below to add visual component tests to any web app that has a Storybook library. Give it a try on one of your own apps, or use my example React app that I’ll use as an example below. You’ll also need Node.js installed as a prerequisite.
To get started, you’ll need an Applitools account to run visual tests. If you don’t already have an Applitools account, you can register for free using your email or GitHub account. That will let you run visual tests with basic features.
Once you get your account, store your API key as an environment variable. On macOS or Linux, use this command:
export APPLITOOLS_API_KEY=<your-api-key>On Windows:
set APPLITOOLS_API_KEY=<your-api-key>Next, you need to add the eyes-storybook package to your project. To install this package into a new project, run:
npm install --save-dev @applitools/eyes-storybookFinally, you’ll need to add a little configuration for the visual tests. Add a file named applitools.config.js to the project’s root directory, and add the following contents:
module.exports = {
    concurrency: 1,
    batchName: "Visually Testing Storybook Components"
}
The concurrency setting defines how many visual snapshot comparisons the Applitools Ultrafast Test Cloud will perform in parallel. (With a free account, you are limited to 1.) The batchName setting defines a name for the batch of tests that will appear in the Applitools dashboard. You can learn about these settings and more under Advanced Configuration in the docs.
That’s it! Now, we’re ready to run some tests. Launch them with this command:
npx eyes-storybookNote: If your components use static assets like image files, then you will need to append the
-soption with the path to the directory for static files. In my example React app, this would be-s public.
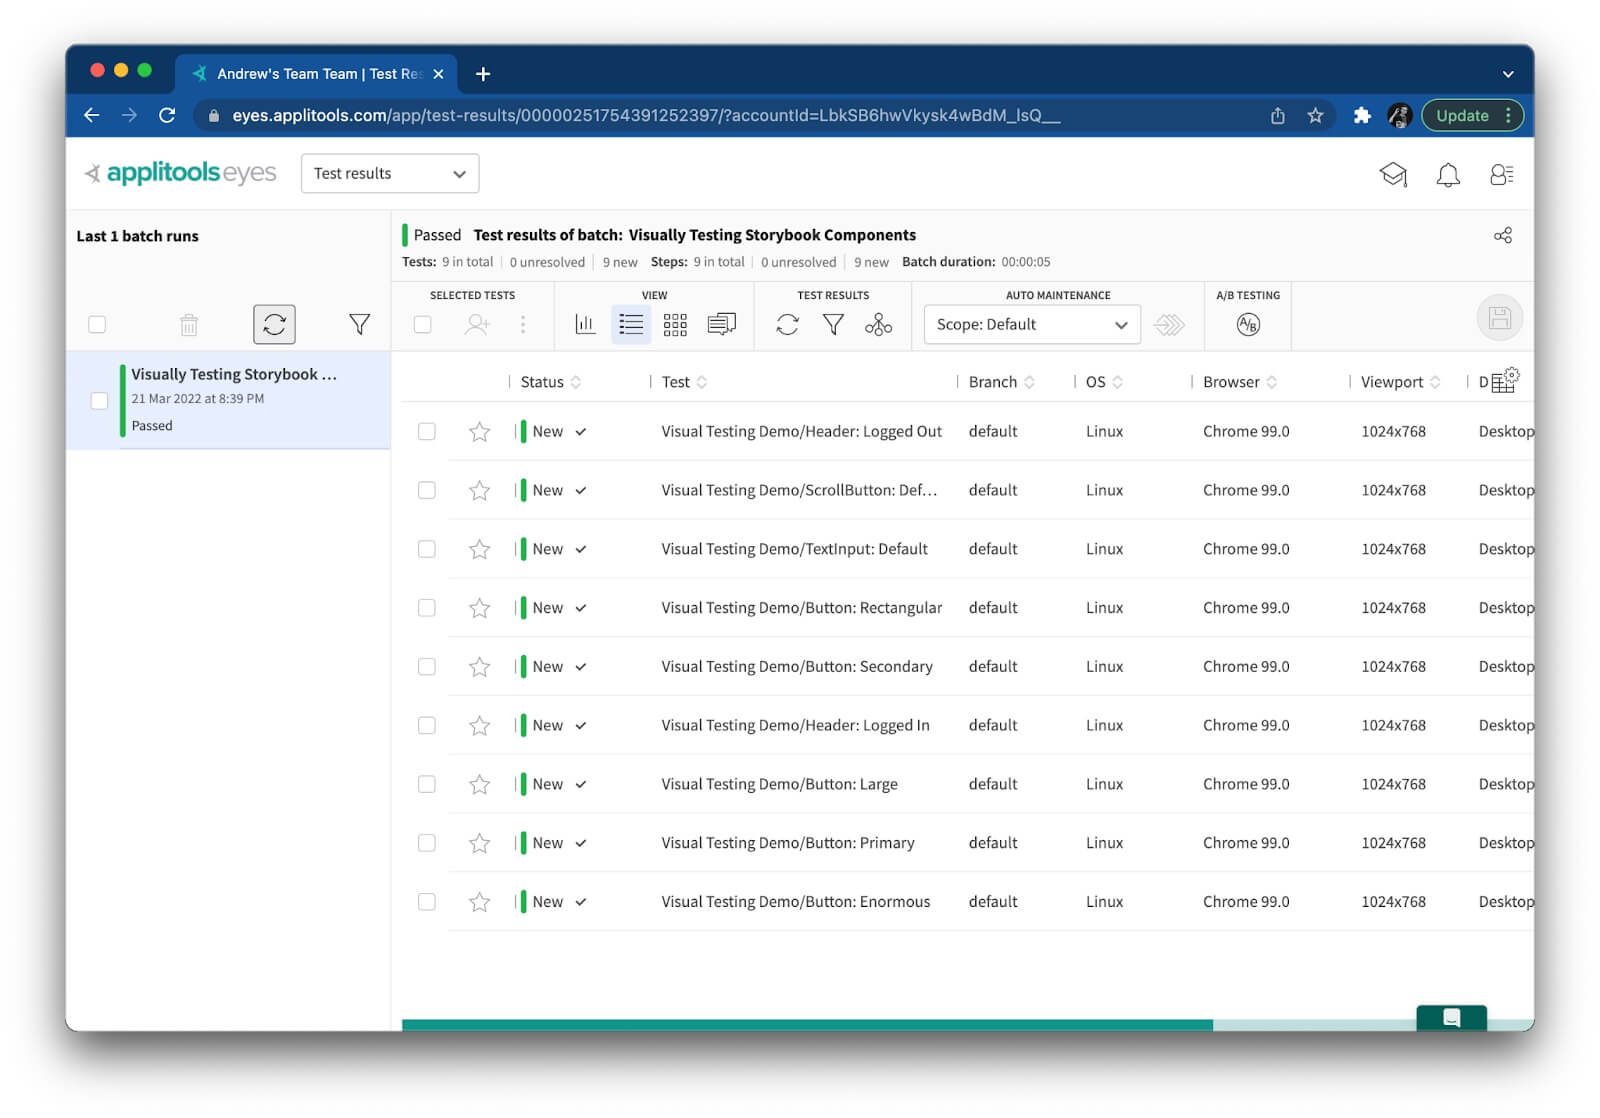
The command line will print progress as it tests each story. Once testing is done, you can see all the results in the Applitools dashboard:
Run the tests a second time for checkpoint comparisons:

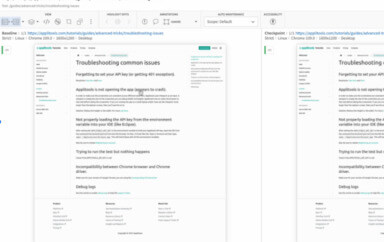
If you change any of your components, then tests should identify the changes and report them as “Unresolved.” You can then visually compare differences side-by-side in the Applitools dashboard. Applitools Eyes will highlight the differences for you. Below is the result when I changed a button’s color in my React app:
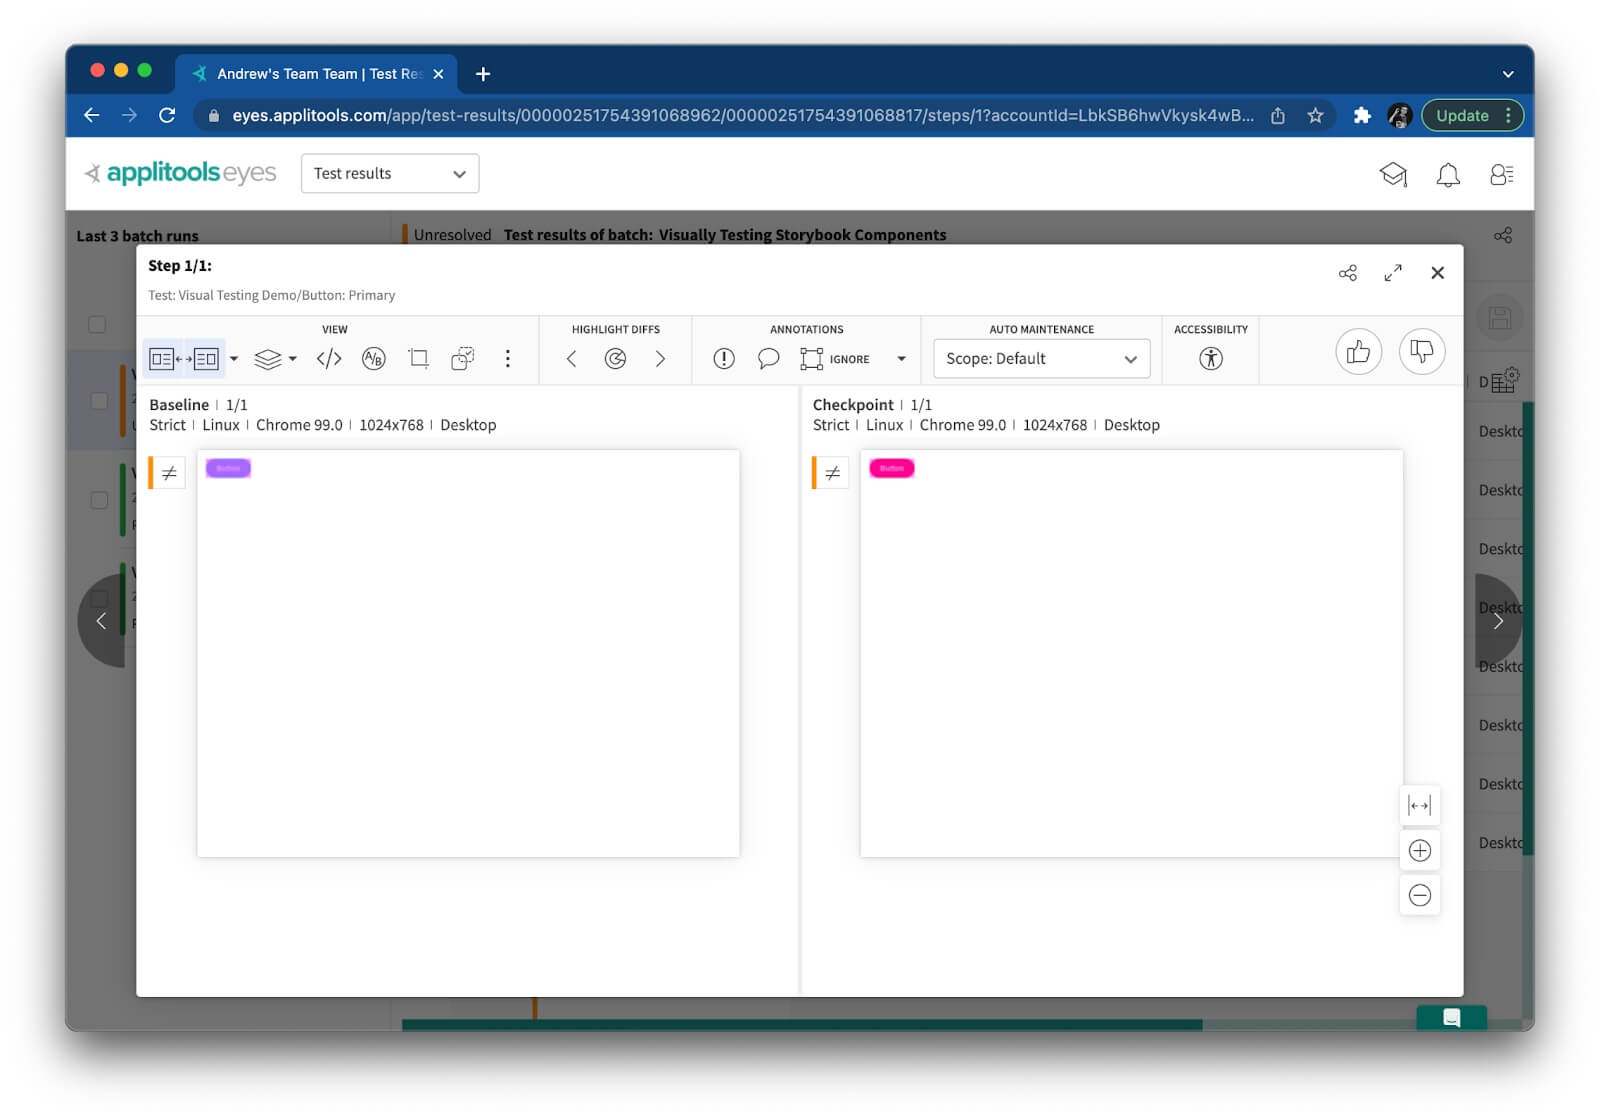
You can give the changes a thumbs-up if they are “right” or a thumbs-down if they are due to a regression. Applitools makes it easy to pinpoint changes. It also provides auto-maintenance features to minimize the number of times you need to accept or reject changes.
Adding Cross-Browser Tests for All Components
When Applitools performs visual testing, it captures snapshots from tests running on your local machine, but it does everything else in the Ultrafast Test Cloud. It rerenders those snapshots – which contain everything on the page – against different browser configurations and uses Visual AI to detect any changes relative to baselines.
If no browsers are specified for Storybook components, Applitools will run visual component tests against Google Chrome running on Linux. However, you can explicitly tell Applitools to run your tests against any browser or mobile device.
You might not think you need to do cross-browser testing for components at first. They’re just small “UI units,” right? Well, however big or small, different browsers render components differently. For example, a button may have rectangular edges instead of round ones. Bigger components are more susceptible to cross-browser inconsistencies. Think about a navbar with responsive rendering based on viewport size. Cross-browser testing is just as applicable for components as it is for full pages.
Configuring cross-browser testing for Storybook components is easy. All you need to do is add a list of browser configs to your applitools.config.js file like this:
module.exports = {
  concurrency: 1,
  batchName: "Visually Testing Storybook Components",
  browser: [
    // Desktop
    {width: 800, height: 600, name: 'chrome'},
    {width: 700, height: 500, name: 'firefox'},
    {width: 1600, height: 1200, name: 'ie11'},
    {width: 1024, height: 768, name: 'edgechromium'},
    {width: 800, height: 600, name: 'safari'},
    // Mobile
    {deviceName: 'iPhone X', screenOrientation: 'portrait'},
    {deviceName: 'Pixel 2', screenOrientation: 'portrait'},
    {deviceName: 'Galaxy S5', screenOrientation: 'portrait'},
    {deviceName: 'Nexus 10', screenOrientation: 'portrait'},
    {deviceName: 'iPad Pro', screenOrientation: 'landscape'},
  ]
}
This declaration includes ten unique browser configurations: five desktop browsers with different viewport sizes, and five mobile devices with both portrait and landscape orientations. Every story will run against every specified browser. If you run the test suite again, there will be ten times as many results!
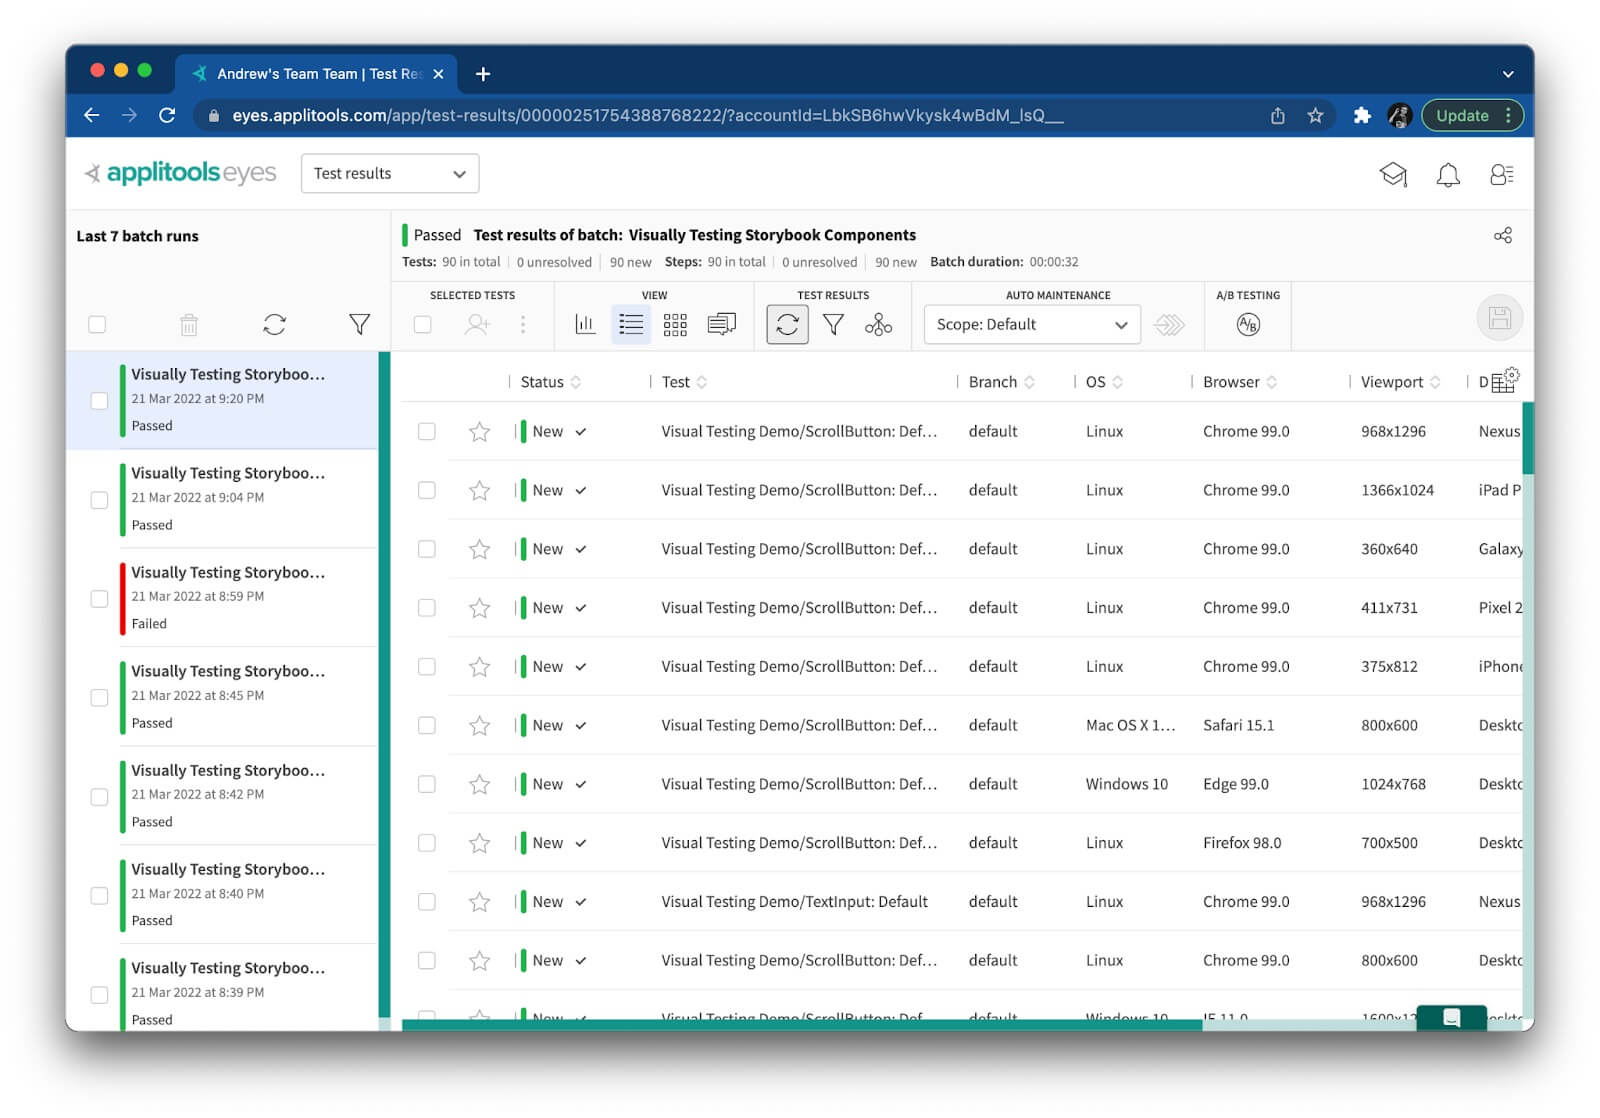
As shown above, my batch included 90 unique test instances. Even though that’s a high number of tests, Applitools Ultrafast Test Cloud ran them in only 32 seconds! That really is ultrafast for UI tests.
Running Visual Component Tests Autonomously
Applitools Eyes makes it easy to run visual component tests, but to become truly autonomous, these tests should be triggered automatically as part of regular development workflows. Any time someone makes a change to these components, tests should run, and the team should receive feedback.
We can configure Continuous Integration (CI) tools like Jenkins, CircleCI, and others for this purpose. Personally, I like to use GitHub Actions because they work right within your GitHub repository. Here’s a GitHub Action I created to run visual component tests against my example app every time a change is pushed or a pull request is opened for the main branch:
name: Run Visual Component Tests

on:
  push:
  pull_request:
    branches:
      - main

jobs:
  test:
    runs-on: ubuntu-latest

    steps:
      - name: Checkout
        uses: actions/checkout@v2

      - name: Set up Node.js
        uses: actions/setup-node@v2

      - name: Install dependencies
        run: npm install

      - name: Run visual component tests
        run: npx eyes-storybook -s public
        env:
          APPLITOOLS_API_KEY: ${{ secrets.APPLITOOLS_API_KEY }}
The only extra configuration needed was to add my Applitools API key as a repository secret.
Maximizing Your Testing Value
Components are just one layer of complex modern web apps. A robust testing strategy should include adequate testing at all levels. Thankfully, visual testing with Applitools can take care of the component layer with minimal effort. Unit tests can cover how the code works, such as a component’s play method. Integration tests can cover API requests, and end-to-end tests can cover user-centric behaviors. Tests at all these levels together provide great protection for your app. Don’t neglect any one of them!