Learn how you can run cross browser tests against any stock browser using Playwright – not just the browser projects like Chromium, Firefox, and WebKit, and not just Chrome and Edge.
These days, there are a plethora of great web test automation tools. Although Selenium WebDriver seems to retain its top spot in popularity, alternatives like Playwright are quickly growing their market share. Playwright is an open source test framework developed by Microsoft by the same folks who worked on Puppeteer. It is notable for its concise syntax, execution speed, and advanced features. Things like automatic waiting and carefully-designed assertions protect tests against flakiness. And like Selenium, Playwright has bindings for multiple languages: TypeScript, JavaScript, Python, .NET, and Java.
However, Playwright has one oddity that sets it apart from other frameworks: Instead of testing browser applications, Playwright tests browser projects. What does this mean? Major modern browser applications like Chrome, Edge, and Safari are based on browser projects that they use internally as their bases. For example, Google Chrome is based on the Chromium project. Typically, these internal projects are open source and provide a rendering engine for web pages.
The table below shows the browser projects used by major browser apps:
| Browser project | Browser app |
|---|---|
| Chromium | Google Chrome, Microsoft Edge, Opera |
| Firefox (Gecko) | Mozilla Firefox |
| WebKit | Apple Safari |
Browser projects offer Playwright unique advantages. Setup is super easy, and tests are faster using browser contexts. However, some folks need to test full browser applications, not just browser projects. Some teams are required to test specific configurations for compliance or regulations. Other teams may feel like testing projects instead of “stock” browsers is too risky. Playwright can run tests directly against Google Chrome and Microsoft Edge with a little extra configuration, but it can’t hit Firefox, Safari, or IE, and in my anecdotal experience, tests against Chrome and Edge run many times slower than the same tests against Chromium. Playwright’s focus on browser projects over browser apps is a double-edged sword: While it arguably helps most testers, it inherently precludes others.
Thankfully, there is a way to run Playwright tests against full browser apps, not just browser projects: using Applitools Visual AI with the Ultrafast Test Cloud. With the help of Applitools, you can achieve true cross-browser testing with Playwright at lightning speed, even for large test suites. Let’s see how it’s done. We’ll start with a basic Playwright test JavaScript, and then we’ll add visual snapshots that can be rendered using any browser in the Applitools cloud.
Defining a Test Case
Let’s define a basic web app login test for the Applitools demo site. The site mimics a basic banking app. The first page is a login screen:
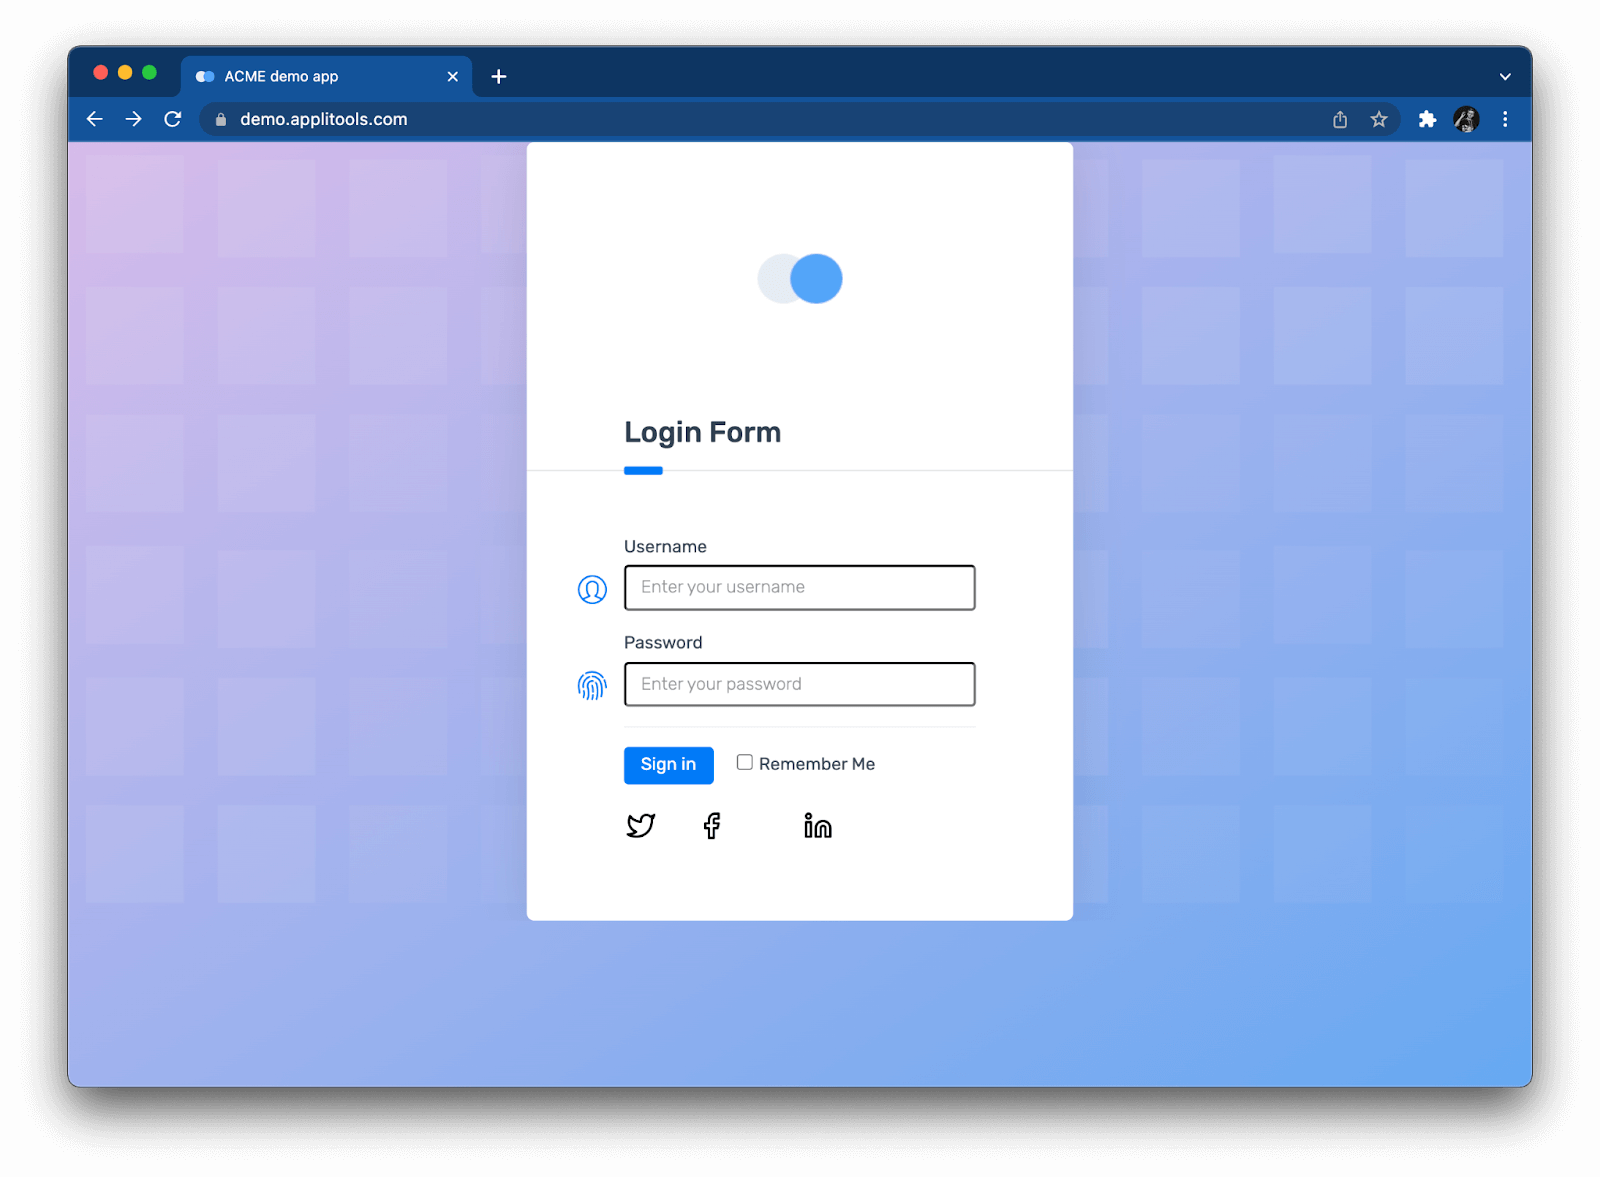
You can enter any username or password to login. Then, the main page appears:
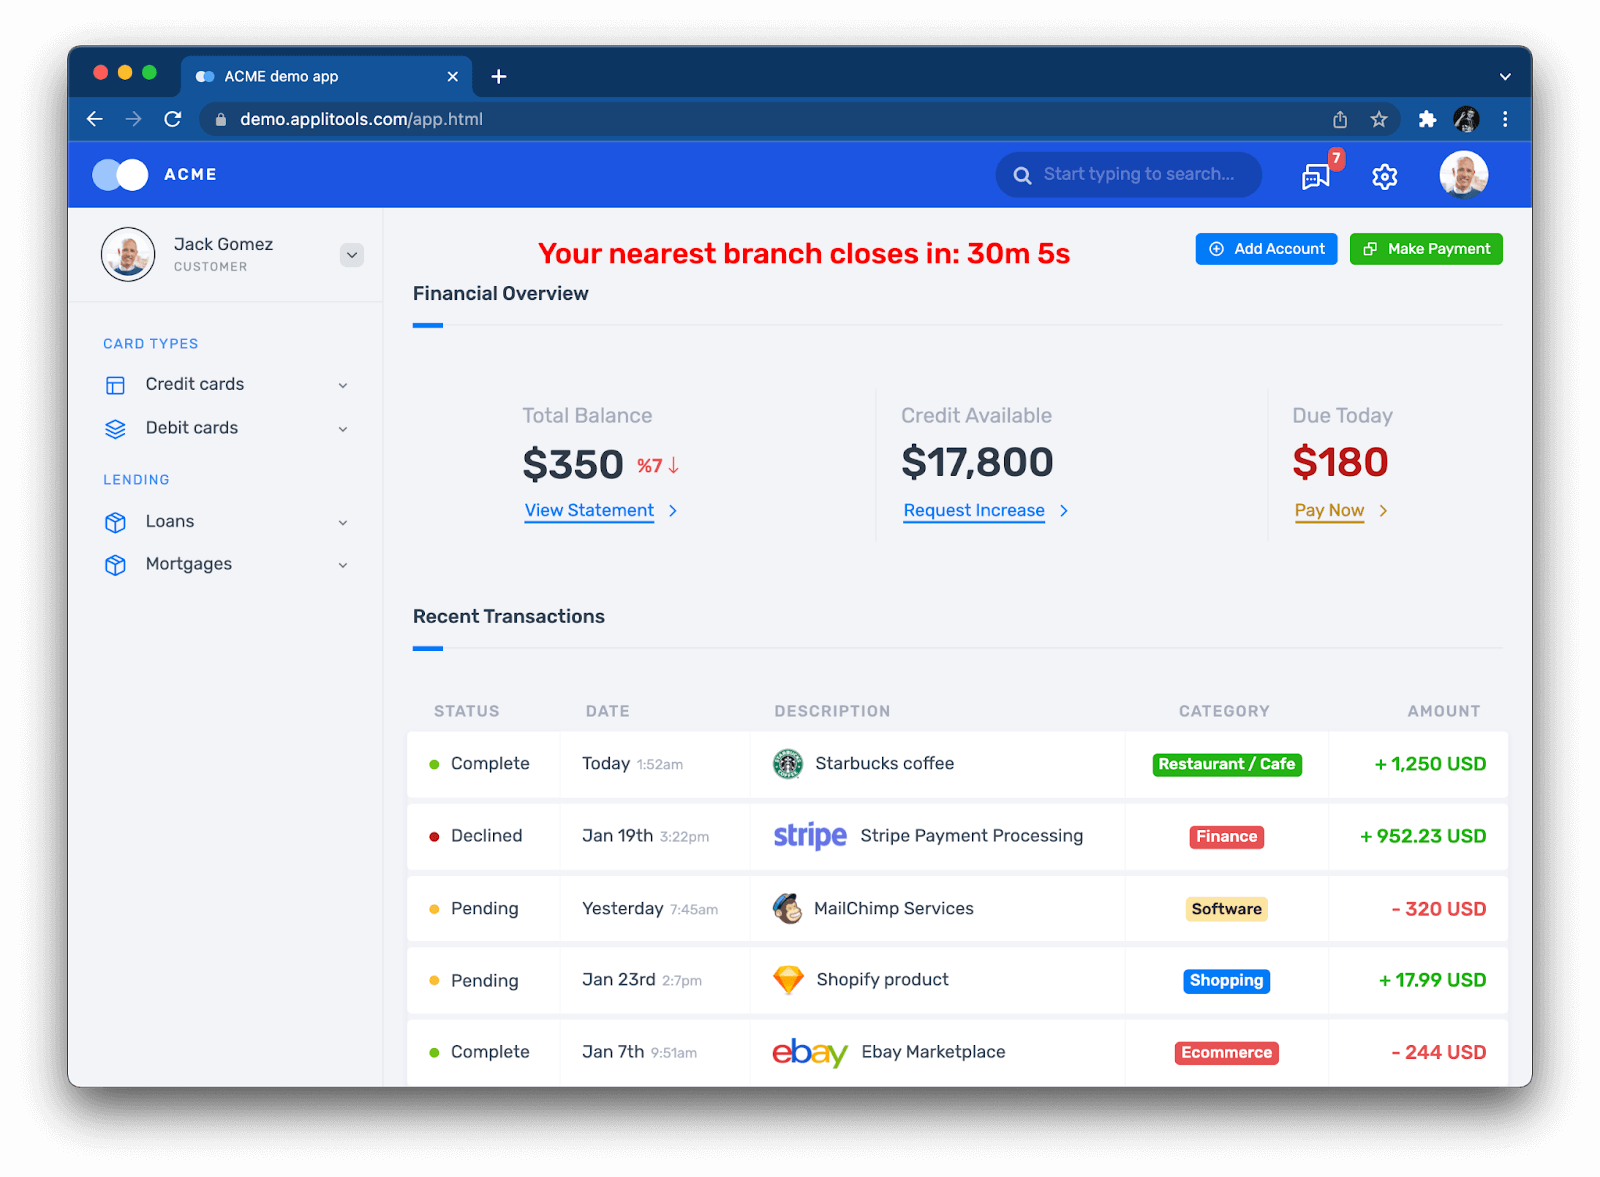
Nothing fancy here. The steps for our test case are straightforward:
Scenario: Successful login
  Given the login page is displayed
  When the user enters their username and password
  And the user clicks the login button
  Then the main page is displayed
These steps would be the same for the login behavior of any other application.
Automating a Playwright Test
Let’s automate our login test in JavaScript using Playwright. We could automate our test in TypeScript (which is arguably better), but I’ll use JavaScript for this example to keep the code plain and simple.
Create a new project, and install Playwright. Under the tests folder, create a new file named login.spec.js, and add the following test stub:
const { test, expect } = require('@playwright/test');

test.describe.configure({ mode: 'parallel' })

test.describe('Login', () => {

   test.beforeEach(async ({ page }) => {
       await page.setViewportSize({width: 1600, height: 1200});
   });

   test('should log into the demo app', async ({ page }) => {

       // Load login page
       // ...

       // Verify login page
       // ...

       // Perform login
       // ...

       // Verify main page
       // ...
   });
})
Playwright uses a Mocha-like structure for test cases. The test.beforeEach(...) call sets an explicit viewport size for testing to make sure the responsive layout renders as expected. The test(...) call includes sections for each step.
Let’s implement the steps using Playwright calls. Here’s the first step to load the login page:
       // Load login page
       await page.goto('https://demo.applitools.com');
The second step verifies that elements like username and password fields appear on the login page. Playwright’s assertions automatically wait for the elements to appear:
// Verify login page
       await expect(page.locator('div.logo-w')).toBeVisible();
       await expect(page.locator('id=username')).toBeVisible();
       await expect(page.locator('id=password')).toBeVisible();
       await expect(page.locator('id=log-in')).toBeVisible();
       await expect(page.locator('input.form-check-input')).toBeVisible();
The third step actually logs into the site like a human user:
       // Perform login
       await page.fill('id=username', 'andy')
       await page.fill('id=password', 'i<3pandas')
       await page.click('id=log-in')
The fourth and final step makes sure the main page loads correctly. Again, assertions automatically wait for elements to appear:
       // Verify main page

       //   Check various page elements
       await expect.soft(page.locator('div.logo-w')).toBeVisible();
       await expect.soft(page.locator('ul.main-menu')).toBeVisible();
       await expect.soft(page.locator('div.avatar-w img')).toHaveCount(2);
       await expect.soft(page.locator('text=Add Account')).toBeVisible();
       await expect.soft(page.locator('text=Make Payment')).toBeVisible();
       await expect.soft(page.locator('text=View Statement')).toBeVisible();
       await expect.soft(page.locator('text=Request Increase')).toBeVisible();
       await expect.soft(page.locator('text=Pay Now')).toBeVisible();
       await expect.soft(page.locator(
           'div.element-search.autosuggest-search-activator > input'
       )).toBeVisible();

       //    Check time message
       await expect.soft(page.locator('id=time')).toContainText(
           /Your nearest branch closes in:( \d+[hms])+/);

       //    Check menu element names
       await expect.soft(page.locator('ul.main-menu li span')).toHaveText([
           'Card types',
           'Credit cards',
           'Debit cards',
           'Lending',
           'Loans',
           'Mortgages'
       ]);

       //    Check transaction statuses
       let statuses =
           await page.locator('span.status-pill + span').allTextContents();
       statuses.forEach(item => {
           expect.soft(['Complete', 'Pending', 'Declined']).toContain(item);
       });
The first three steps are nice and concise, but the code for the fourth step is quite long. Despite making several assertions for various page elements, there are still things left unchecked!
Run the test locally to make sure it works:
$ npx playwright test
This command will run the test against all three Playwright browsers – Chromium, Firefox, and WebKit – in headless mode and in parallel. You can append the “--headed” option to see the browsers open and render the pages. The tests should take only a few short seconds to complete, and they should all pass.
Introducing Visual Snapshots
You could run this login test on your local machine or from your Continuous Integration (CI) service, but in its present form, it can’t run against certain “stock” browsers like Apple Safari or Internet Explorer. If you attempt to use a browser channel to test stock Chrome or Edge browsers, tests would probably run much slower compared to Chromium. To run against any browser at lightning speed, we need the help of visual testing techniques using Applitools Visual AI and the Ultrafast Test Cloud.
Visual testing is the practice of inspecting visual differences between snapshots of screens in the app you are testing. You start by capturing a “baseline” snapshot of, say, the login page to consider as “right” or “expected.” Then, every time you run the tests, you capture a new snapshot of the same page and compare it to the baseline. By comparing the two snapshots side-by-side, you can detect any visual differences. Did a button go missing? Did the layout shift to the left? Did the colors change? If nothing changes, then the test passes. However, if there are changes, a human tester should review the differences to decide if the change is good or bad.
Manual testers have done visual testing since the dawn of computer screens. Applitools Visual AI simply automates the process. It highlights differences in side-by-side snapshots so you don’t miss them. Furthermore, Visual AI focuses on meaningful changes that human eyes would notice. If an element shifts one pixel to the right, that’s not a problem. Visual AI won’t bother you with that noise.
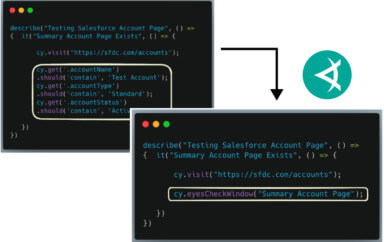
If a picture is worth a thousand words, then a visual snapshot is worth a thousand assertions. We could update our login test to take visual snapshots using Applitools Eyes SDK in place of lengthy assertions. Visual snapshots provide stronger coverage than the previous assertions. Remember how our login test made several checks but still didn’t cover all the elements on the page? A visual snapshot would implicitly capture everything with only one line of code. Visual testing like this enables more effective functional testing than traditional assertions.
But back to the original problem: how does this enable us to run Playwright tests against any stock browser? That’s the magic of snapshots. Notice how I said “snapshot” and not “screenshot.” A screenshot is merely a grid of static pixels. A snapshot, however, captures full page content – HTML, CSS, and JavaScript – that can be re-rendered in any browser configuration. If we update our Playwright test to take visual snapshots of the login page and the main page, then we could run our test one time locally to capture the snapshots, Then, the Applitools Eyes SDK would upload the snapshots to the Applitools Ultrafast Test Cloud to render them in any target browser – including browsers not natively supported by Playwright – and compare them against baselines. All the heavy work for visual checkpoints would be done by the Applitools Ultrafast Test Cloud, not by the local machine. It also works fast, since re-rendering snapshots takes much less time than re-running full tests.
Updating the Playwright Test
Let’s turn our login test into a visual test. First, make sure you have an Applitools account. You can register for a free account to get started.
Next, install the Applitools Eyes SDK for Playwright into your project:
$ npm install -D @applitools/eyes-playwright
Add the following import statement to login.spec.js:
const {
   VisualGridRunner,
   Eyes,
   Configuration,
   BatchInfo,
   BrowserType,
   DeviceName,
   ScreenOrientation,
   Target,
   MatchLevel
} = require('@applitools/eyes-playwright');
Next, we need to specify which browser configurations to run in Applitools Ultrafast Grid. Update the test.beforeEach(...) call to look like this:
test.describe('Login', () => {
   let eyes, runner;

   test.beforeEach(async ({ page }) => {
       await page.setViewportSize({width: 1600, height: 1200});

       runner = new VisualGridRunner({ testConcurrency: 5 });
       eyes = new Eyes(runner);

       const configuration = new Configuration();
       configuration.setBatch(new BatchInfo('Modern Cross Browser Testing Workshop'));

       configuration.addBrowser(800, 600, BrowserType.CHROME);
       configuration.addBrowser(700, 500, BrowserType.FIREFOX);
       configuration.addBrowser(1600, 1200, BrowserType.IE_11);
       configuration.addBrowser(1024, 768, BrowserType.EDGE_CHROMIUM);
       configuration.addBrowser(800, 600, BrowserType.SAFARI);

       configuration.addDeviceEmulation(DeviceName.iPhone_X, ScreenOrientation.PORTRAIT);
       configuration.addDeviceEmulation(DeviceName.Pixel_2, ScreenOrientation.PORTRAIT);
       configuration.addDeviceEmulation(DeviceName.Galaxy_S5, ScreenOrientation.PORTRAIT);
       configuration.addDeviceEmulation(DeviceName.Nexus_10, ScreenOrientation.PORTRAIT);
       configuration.addDeviceEmulation(DeviceName.iPad_Pro, ScreenOrientation.LANDSCAPE);

       eyes.setConfiguration(configuration);
   });
})
That’s a lot of new code! Let’s break it down:
- The
page.setViewportSize(...)call remains unchanged. It will set the viewport only for the local test run. - The
runnerobject points visual tests to the Ultrafast Grid. - The
testConcurrencysetting controls how many visual tests will run in parallel in the Ultrafast Grid. A higher concurrency means shorter overall execution time. (Warning: if you have a free account, your concurrency limit will be 1.) - The
eyesobject watches the browser for taking visual snapshots. - The
configurationobject sets the test batch name and the various browser configurations to test in the Ultrafast Grid.
This configuration will run our visual login test against 10 different browsers: 5 desktop browsers of various viewports, and 5 mobile browsers of various orientations.
Time to update the test case. We must “open” Applitools Eyes at the beginning of the test to capture screenshots, and we must “close” Eyes at the end:
test('should log into the demo app', async ({ page }) => {

       // Open Applitools Eyes
       await eyes.open(page, 'Applitools Demo App', 'Login');

       // Test steps
       // ...

       // Close Applitools Eyes
       await eyes.close(false)
   });
The load and login steps do not need any changes because the interactions are the same. However, the “verify” steps reduce drastically to one-line snapshot calls:
   test('should log into the demo app', async ({ page }) => {

       // ...

       // Verify login page
       await eyes.check('Login page', Target.window().fully());

       // ...

       // Verify main page
       await eyes.check('Main page', Target.window().matchLevel(MatchLevel.Layout).fully());

       // ...

   });
These snapshots capture the full window for both pages. The main page also sets a match level to “layout” so that differences in text and color are ignored. Snapshots will be captured once locally and uploaded to the Ultrafast Grid to be rendered on each target browser. Bye bye, long and complicated assertions!
Finally, after each test, we should add safety handling and result dumping:
   test.afterEach(async () => {
       await eyes.abort();

       const results = await runner.getAllTestResults(false);
       console.log('Visual test results', results);
   });
The completed code for login.spec.js should look like this:
const { test } = require('@playwright/test');
const {
   VisualGridRunner,
   Eyes,
   Configuration,
   BatchInfo,
   BrowserType,
   DeviceName,
   ScreenOrientation,
   Target,
   MatchLevel
} = require('@applitools/eyes-playwright');


test.describe.configure({ mode: 'parallel' })

test.describe('A visual test', () => {
   let eyes, runner;

   test.beforeEach(async ({ page }) => {
       await page.setViewportSize({width: 1600, height: 1200});

       runner = new VisualGridRunner({ testConcurrency: 5 });
       eyes = new Eyes(runner);

       const configuration = new Configuration();
       configuration.setBatch(new BatchInfo('Modern Cross Browser Testing Workshop'));

       configuration.addBrowser(800, 600, BrowserType.CHROME);
       configuration.addBrowser(700, 500, BrowserType.FIREFOX);
       configuration.addBrowser(1600, 1200, BrowserType.IE_11);
       configuration.addBrowser(1024, 768, BrowserType.EDGE_CHROMIUM);
       configuration.addBrowser(800, 600, BrowserType.SAFARI);

       configuration.addDeviceEmulation(DeviceName.iPhone_X, ScreenOrientation.PORTRAIT);
       configuration.addDeviceEmulation(DeviceName.Pixel_2, ScreenOrientation.PORTRAIT);
       configuration.addDeviceEmulation(DeviceName.Galaxy_S5, ScreenOrientation.PORTRAIT);
       configuration.addDeviceEmulation(DeviceName.Nexus_10, ScreenOrientation.PORTRAIT);
       configuration.addDeviceEmulation(DeviceName.iPad_Pro, ScreenOrientation.LANDSCAPE);

       eyes.setConfiguration(configuration);
   });

   test('should log into the demo app', async ({ page }) => {

       // Open Applitools Eyes
       await eyes.open(page, 'Applitools Demo App', 'Login');

       // Load login page
       await page.goto('https://demo.applitools.com');

       // Verify login page
       await eyes.check('Login page', Target.window().fully());

       // Perform login
       await page.fill('id=username', 'andy')
       await page.fill('id=password', 'i<3pandas')
       await page.click('id=log-in')

       // Verify main page
       await eyes.check('Main page', Target.window().matchLevel(MatchLevel.Layout).fully());

       // Close Applitools Eyes
       await eyes.close(false)
   });

   test.afterEach(async () => {
       await eyes.abort();

       const results = await runner.getAllTestResults(false);
       console.log('Visual test results', results);
   });
})
Now, it’s a visual test! Let’s run it.
Running the Test
Your account comes with an API key. Visual tests using Applitools Eyes need this API key for uploading results to your account. On your machine, set this key as an environment variable.
On Linux and macOS:
$ export APPLITOOLS_API_KEY=<value>
On Windows:
> set APPLITOOLS_API_KEY=<value>
Then, launch the test using only one browser locally:
$ npx playwright test —-browser=chromium
(Warning: If your playwright.config.js file has projects configured, you will need to use the “--project” option instead of the “--browser” option. Playwright may automatically configure this if you run npm init playwright to set up the project.)
When this test runs, it will upload snapshots for both the login page and the main page to the Applitools test cloud. It needs to run only one time locally to capture the snapshots. That’s why we set the command to run using only Chromium.
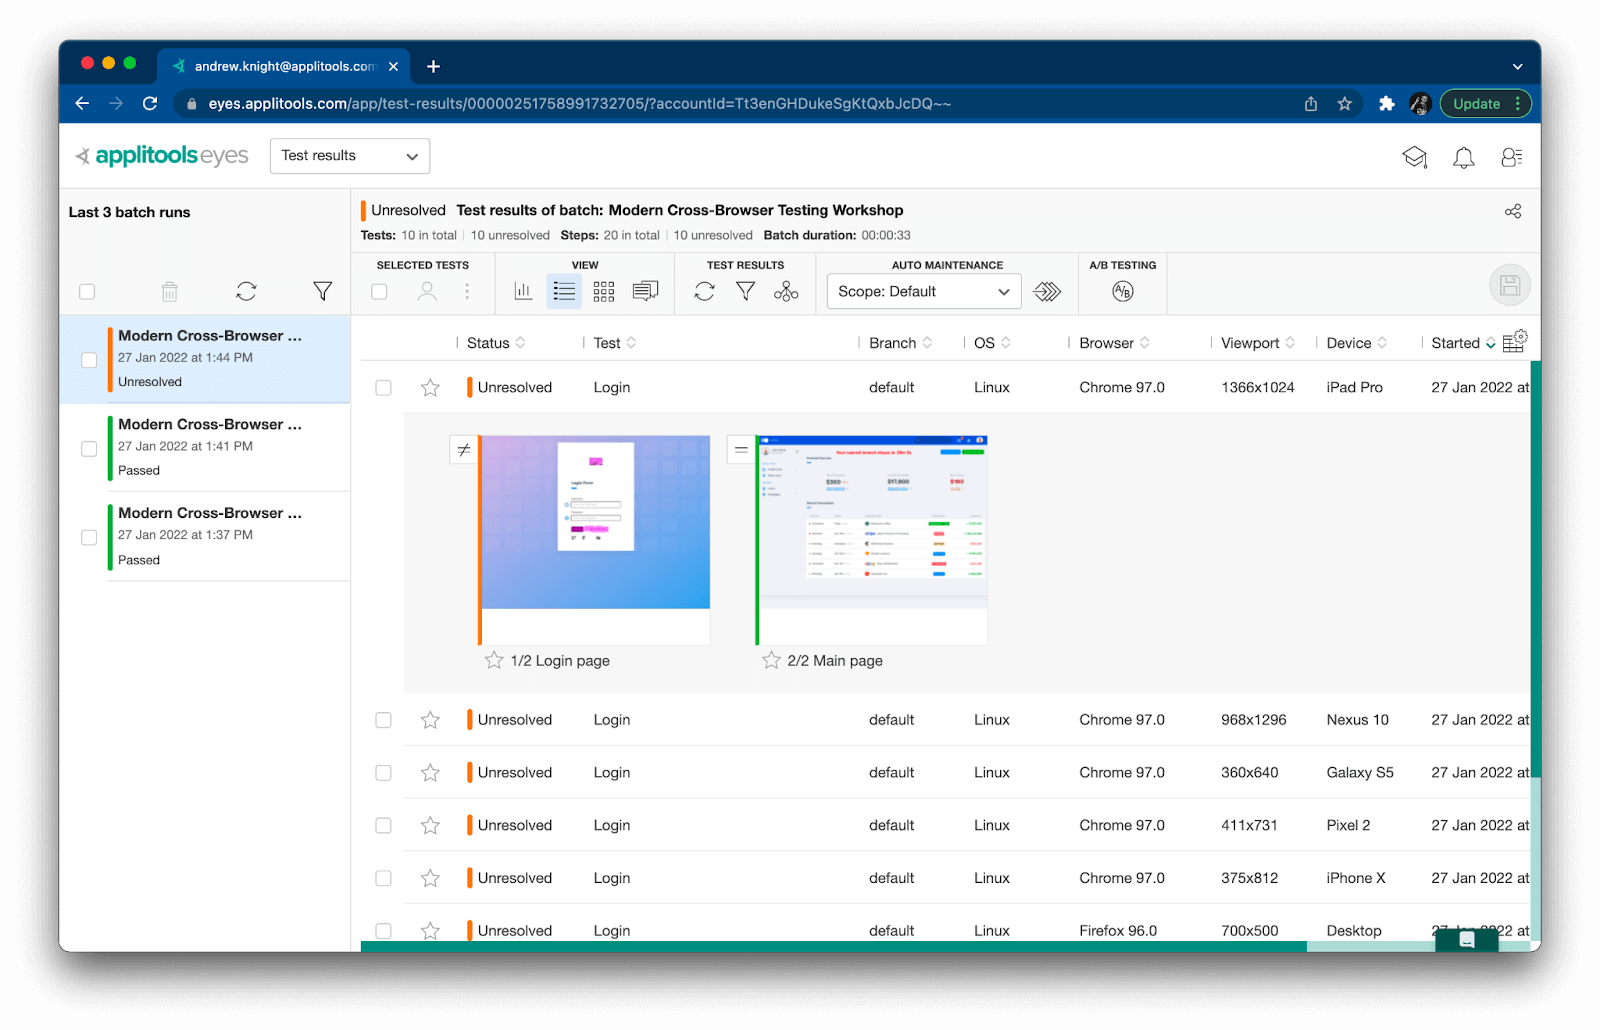
Open the Applitools dashboard to view the visual results:

Notice how this one login test has one result for each target configuration. All results have “New” status because they are establishing baselines. Also, notice how little time it took to run this batch of tests:

Running our test across 10 different browser configurations with 2 visual checkpoints each at a concurrency level of 5 took only 36 seconds to complete. That’s ultra fast! Running that many test iterations with a Selenium Grid or similar scale-out platform could take several minutes.
Run the test again. The second run should succeed just like the first. However, the new dashboard results now say “Passed” because Applitools compared the latest snapshots to the baselines and verified that they had not changed:

This time, all variations took 32 seconds to complete – about half a minute.
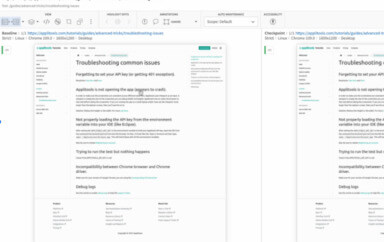
Passing tests are great, but what happens if a page changes? Consider an alternate version of the login page:
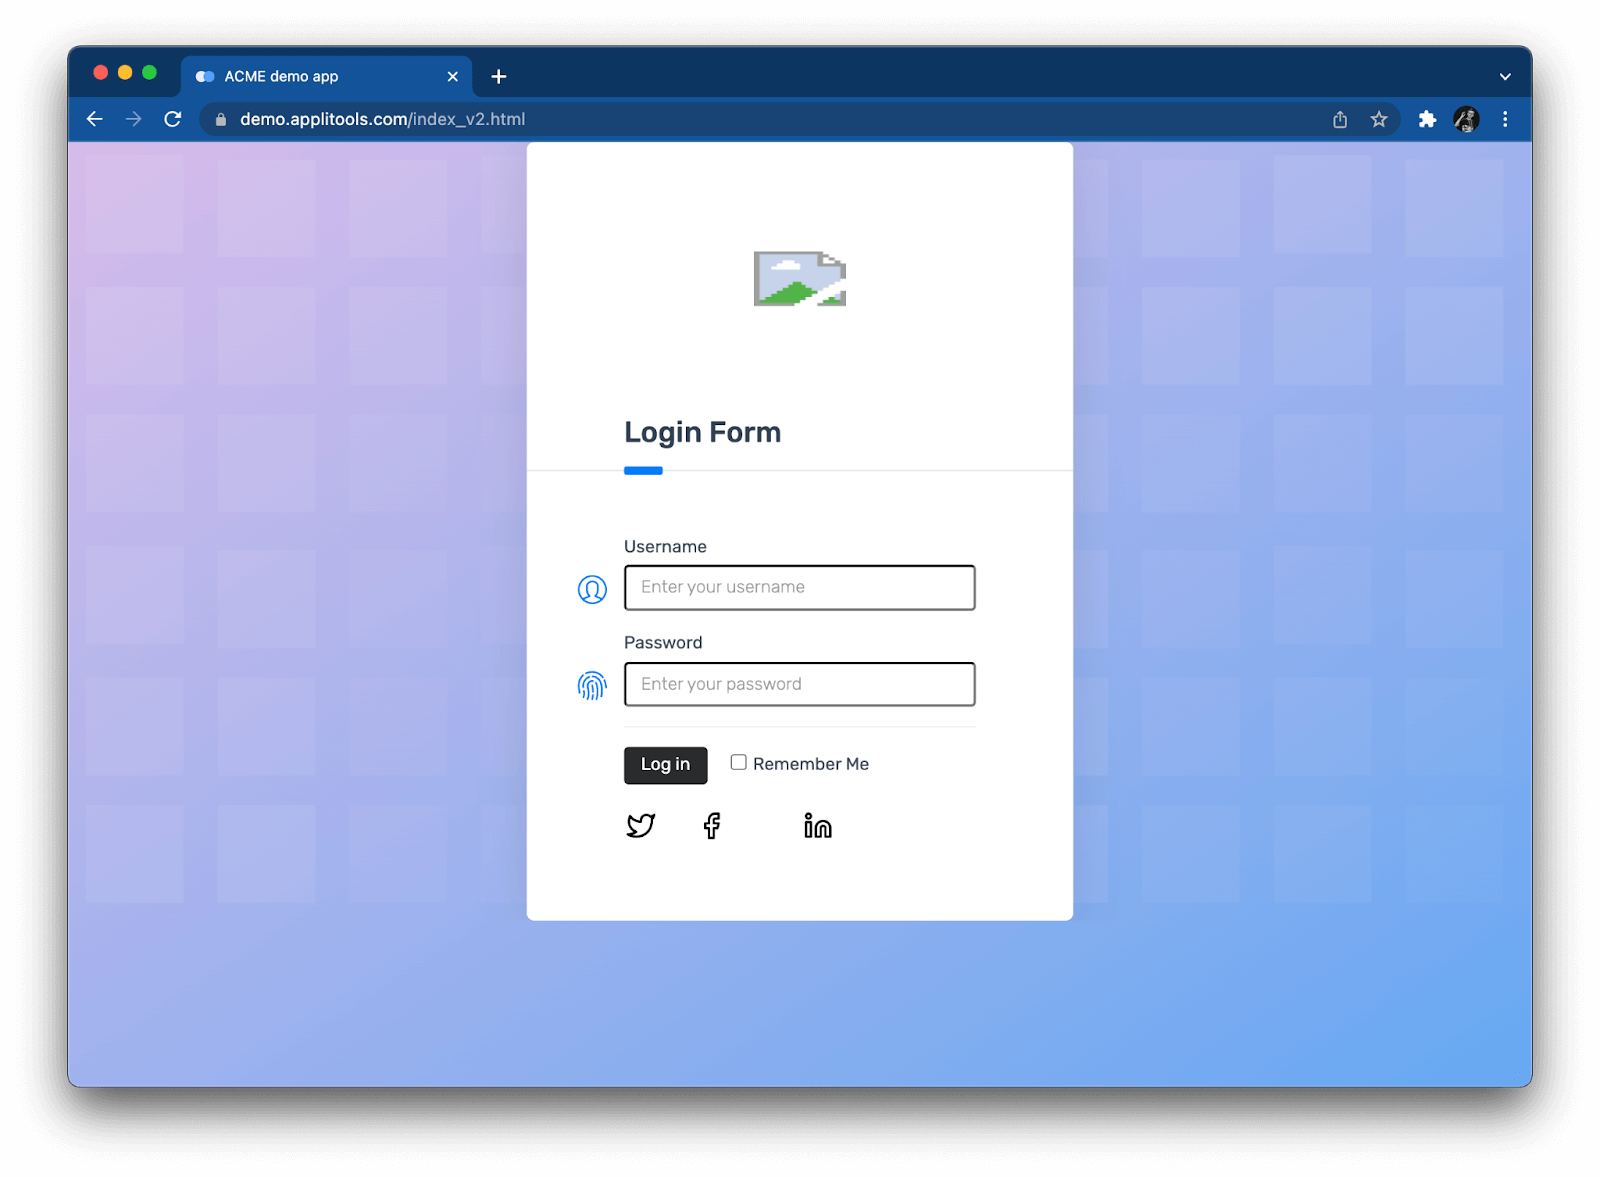
This version has a broken icon and a different login button. Modify the Playwright call to load the login page to test this version of the site like this:
await page.goto('https://demo.applitools.com/index_v2.html');Now, when you rerun the test, results appear as “Unresolved” in the Applitools dashboard:
When you open each result, the dashboard will display visual comparisons for each snapshot. If you click the snapshot, it opens the comparison window:
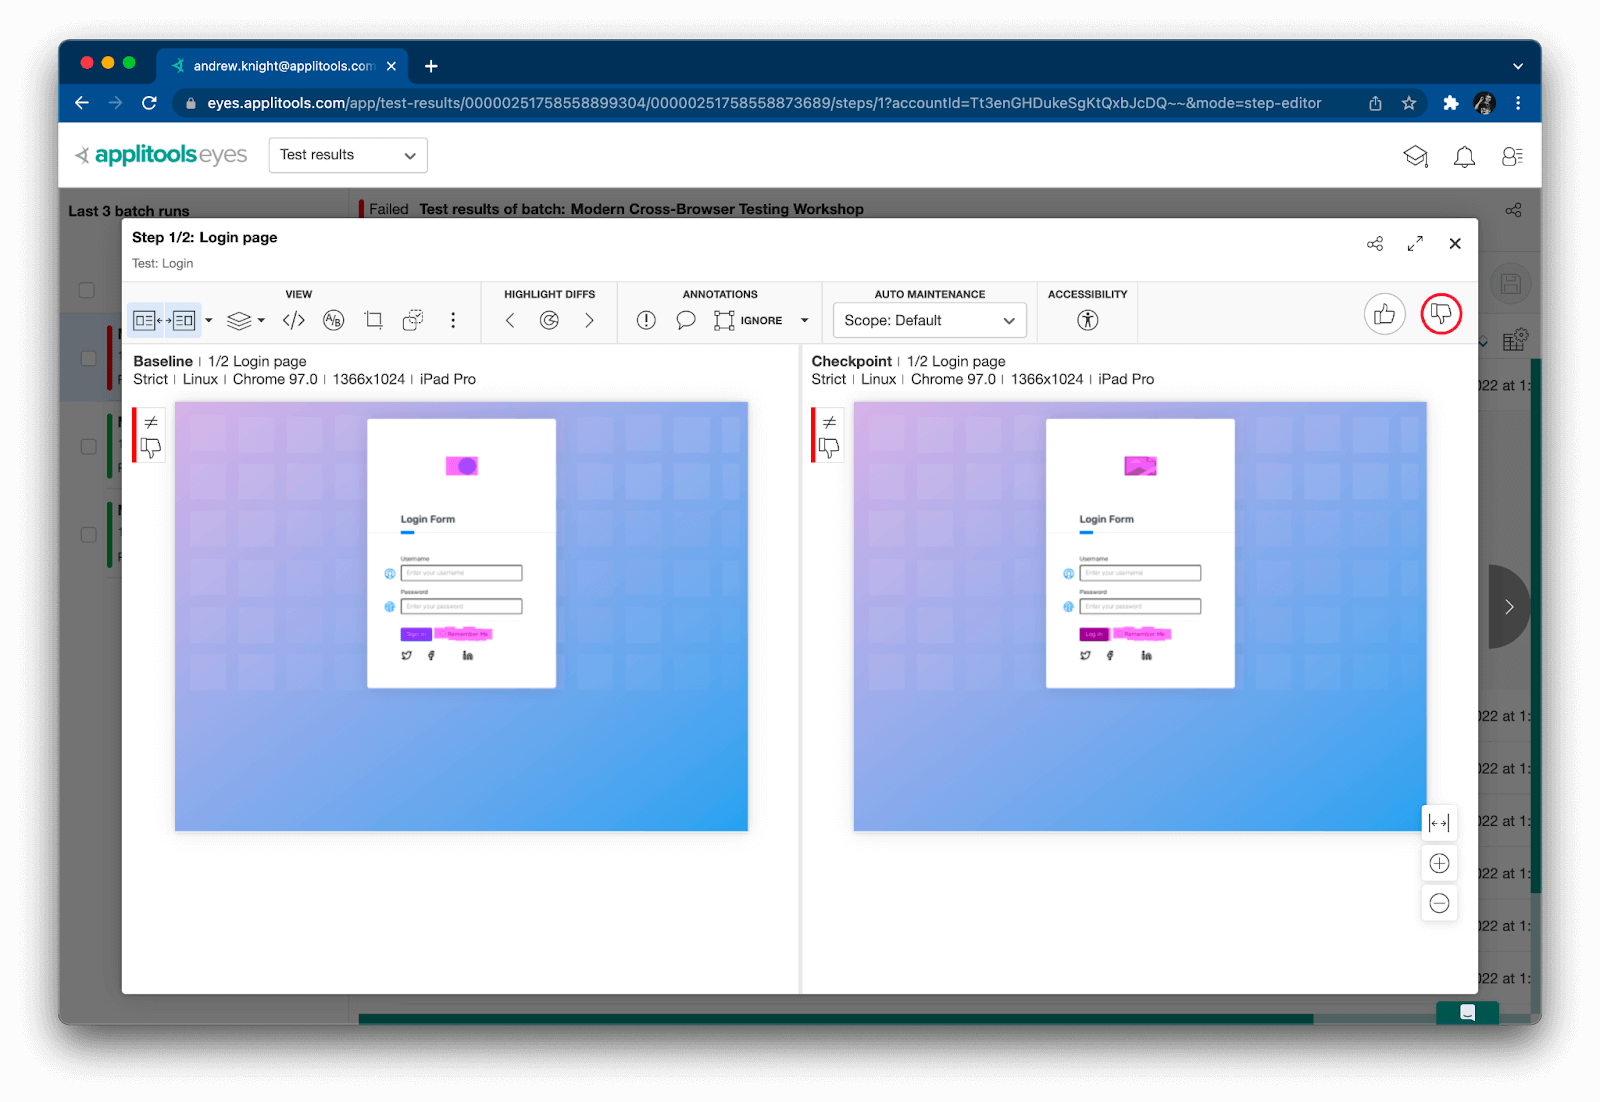
The baseline snapshot appears on the left, while the latest checkpoint snapshot appears on the right. Differences will be highlighted in magenta. As the tester, you can choose to either accept the change as a new baseline or reject it as a failure.
Taking the Next Steps
Playwright truly is a nifty framework. Thanks to the Applitools Ultrafast Grid, you can upgrade any Playwright test with visual snapshots and run them against any browsers, even ones not natively supported by Playwright. Applitools enables Playwright tests to become cross-browser tests. Just note that this style of testing focuses on cross-browser page rendering, not cross-browser page interactions. You may still want to run your Playwright tests locally against Firefox and WebKit in addition to Chromium, while using the Applitools Ultrafast Grid to validate rendering on different browser and viewport configurations.
Want to see the full code? Check out this GitHub repository: applitools/workshop-cbt-playwright-js.
Want to try visual testing for yourself? Register for a free Applitools account.
Want to see how to do this type of cross-browser testing with Cypress? Check out this article.