In the previous blog post we discussed Appium 2.0 Drivers and Plugins usage and its installation. This article is aimed at creating your own Appium Plugin and its use cases.
Plugins in Appium 2.0:
Appium plugins are here to help with the various use cases that require a change to Appium’s default behavior.
- Plugins add arbitrary functionality that executes before or after the actual appium commands
- Plugins alter the Appium server to introduce new commands and distribute it.
There are already official Appium plugins created by the project, as well as community-created Appium plugins.
Build your own Appium plugin:
Let’s say we want to improve the way we write appium tests, for example, let appium server take care of element waits and we focus on the user journey in tests rather than element waits all over it.
Below are the steps to create a new plugin to wait for the presence of an element:
Initialize a new node project
npm initInstall Appium base plugin as a dependency inside the new project created in above step
npm i @appium/base-pluginNavigate to the package.json and add an appium object as described below:
"appium": {
    "pluginName": "element-wait",
    "mainClass": "WaitCommandPlugin"
  }
Create a new file called plugin.js in the root directory of the project
In plugin.js, create a class which extends appium base plugin.
export default class WaitCommandPlugin extends BasePlugin {}Here is the list of supported Appium commands. As per our use case, we need to override the appium findElement command.
Override the appium command implementation in our new class
async findElement(next, driver, ...args) {
    // Custom Implementation of Appium’s FindElement command
 }
We can extract strategy and selector from the arguments of the findElement command and then make an API call to the /element endpoint to check if it exists in the DOM (document object model):
const response = await fetch(
      `${baseUrl}wd/hub/session/${this.driver.sessionId}/element`,
      {
        body: JSON.stringify({
          strategy: this.strategy,
          selector: this.selector,
          context: '',
          multiple: false,
        }),
        method: 'POST',
        headers: { 'Content-Type': 'application/json' },
      }
    );
Keep polling the endpoint consistently for a constant period of time until the element exists, if it exists check for element displayed status as below:
const response = await fetch(
   `${baseUrl}wd/hub/session/${this.driver.sessionId}/element/${this.element}/attribute/displayed`,
      {
        method: 'GET',
        headers: { 'Content-Type': 'application/json' },
      }
    );
    return await response.json();
  }
Call await next() to execute the default behaviour of the findElement command. Refer here for more details on plugin.js
Export the plugin
Create a new file called index.js in the root directory of the project to export the plugin
export default WaitCommandPlugin;Install the plugin
Transpile and build the plugin using babel or Typescript. Install the plugin from local source using the below command:
appium plugin install --source=local <path to plugin>Activate the plugin
The plugin can be activated using the following command while starting the Appium server. In this example, “element-wait” is the name of the plugin.
appium --plugins=element-waitPlugin usage
The element wait plugin is activated while starting the appium server so the client code can be simplified without using webdriver waits.
Without Wait plugin
wait = new WebDriverWait(driver, 30);
wait.until(presenceOfElementLocated(MobileBy.AccessibilityId("login"))).click();
wait.until(presenceOfElementLocated(MobileBy.AccessibilityId("slider")));
driver.findElementByAccessibilityId("slider").click();
With Wait plugin
driver.findElementByAccessibilityId("login").click();
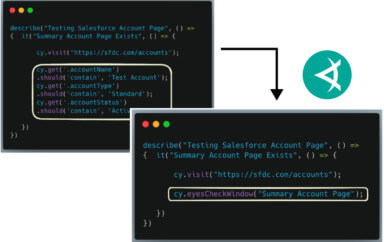
driver.findElementByAccessibilityId("slider").click();In the example above, we altered the existing appium command to find an element, but Appium plugins can also be used to create our own custom commands on top of Appium supported commands.
To implement custom commands or adding new routes in appium we need to implement on both the Appium server and client-side.
A server-side plugin includes adding a new method map where we define the route and the new Appium command and its implementation.
static newMethodMap = {
    '/session/:sessionId/fake_data': {
      GET: {command: 'getFakeSessionData'}
    },
};

async getFakeSessionData (next, driver) {
    await B.delay(1);
    return driver.fakeSessionData || null;
}
As of today custom commands can be added only in Appium Ruby, Appium Python and in WebdriverIO. Below is an example from Appium Ruby client:
@driver.add_command(
              method: :post,
              url: 'session/:session_id/path/to/custom/bug/report,
              name: :bug_report
            ) do
              def bug_report(argument)
                execute(:bug_report, {}, { sample: argument })
              end
            end

 @driver.bug_report(1)
Using this approach, the Appium plugin adds custom commands and overrides or modifies the existing Appium commands.
Summary
Decoupled Appium 2.0 architecture will help create new plugins to solve many interesting use cases. For more on Appium 2.0, check out our talk at the Future of Testing event.