Applitools provides a number of SDKs that allows you to easily integrate it into your existing workflow. Using tools like Cypress, Espresso, Selenium, Appium, and a wide variety of others, web and native platforms can get automated visual testing coverage with the power of Applitools Eyes.
But what if you’re not looking to integrate it directly to an existing testing workflow because maybe you don’t have one or maybe you don’t have access to it? Or what if you want to provide blanket visual testing coverage on a website without having to maintain which pages get checked?
We’ll walk through how we were able to take advantage of the power of Applitools Eyes and flexibility of GitHub Actions to create a solution that can fit into any GitHub-based workflow.
Note: if you want to skip the “How it Works” and go directly to how to use it, you can check out the Applitools Eyes GitHub Action on github.com. https://github.com/colbyfayock/applitools-eyes-action
What are GitHub Actions?
To start, GitHub Actions are CI/CD-like workflows that you’re able to run right inside of your GitHub repository.
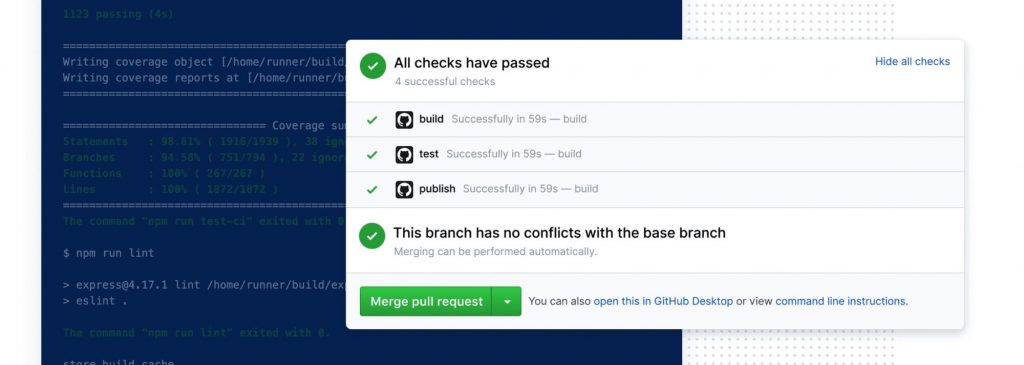
Using a YAML file, we can set up our project to run tests or really any kind of script based on events such as a commit, pull request, or even on a schedule with cron.
name: Tests

on:
  push:
	branches: [ main ]
  pull_request:
	branches: [ main ]

jobs:
  test:
	runs-on: ubuntu-latest
	steps:
	- uses: actions/checkout@v2
	- uses: actions/setup-node@v2
	  with:
		node-version: '12'
	- run: npm ci
	- run: npm test
Setting up simpler workflows like our example above, where we’re installing our dependencies and running our tests, is a great example of how we can automate critical code tasks, but GitHub also gives developers a way to package up complex scripts that can reach beyond what a configurable YML file can do.
Using custom GitHub Actions to simplify complex workflows
When creating a custom GitHub Action, we unlock the ability to use scripting tools like shell and node to a greater extent, as well as the ability to stand up entire environments using Docker, which can allow us to really take advantage of our allotted environment just like we could on any other CI/CD platform.
In our case, we want to allow someone to run Applitools Eyes without ever having to think about setting up a test runner.
To achieve this, we can include Cypress (or another test runner) right along with our Action, which would then get installed as a dependency on the workflow environment. This allows us to hook right into the environment to run our tests.
Scaffolding a Cypress environment in a GitHub Action workflow with Docker
Setting up Cypress is typically a somewhat simple process. You can install it locally using npm or yarn where Cypress will manage configuring it for your environment.

This works roughly the same inside of a standard YAML-based GitHub Action workflow. When we use the included environment, GitHub gives us access to a workspace where we can install our packages just like we would locally.
It becomes a bit trickier however when trying to run a custom GitHub Action, where you would want to potentially have access to both the project and the Action’s code to set up the environment and run the tests.
While it might be possible to figure out a solution using only node, Cypress additionally ships a variety of publicly available Docker images which let’s us confidently spin up an environment that Cypress supports. It also gives us a bit more control over how we can configure and run our code inside of that environment in a repeatable way.
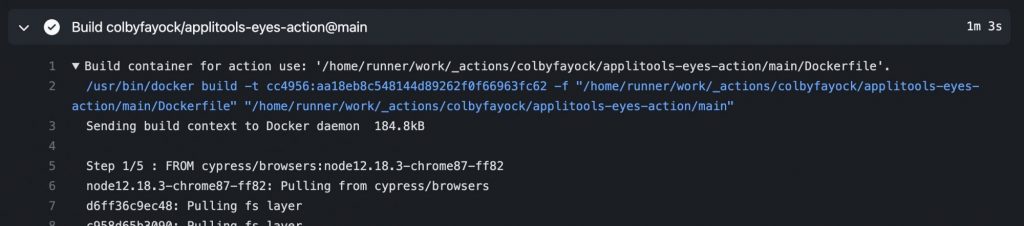
Because one of our options for creating a custom Action is Docker, we can easily reference one of the Cypress images right from the start:
FROM cypress/browsers:node12.18.3-chrome87-ff82In this particular instance, we’re spinning up a new Cypress-supported environment with node 12.18.3 installed along with Chrome 87 and Firefox 82.
Installing Cypress and Action dependencies
With our base environment set up, we move to installing dependencies and starting the script. While we’re using a Cypress image that has built-in support, Cypress doesn’t actually come already installed.
When installing Cypress, it uses cache directories to store download binaries of Cypress itself. When using Docker and working with different environments, its important to have predictable locations of where these caches exist, so that we’re able to reference it later.

In our Docker file, we additionally configure that environment with:
ENV NPM_CACHE_FOLDER=/root/.cache/npm
ENV CYPRESS_CACHE_FOLDER=/root/.cache/Cypress
When npm and Cypress goes to install, they’ll use those directories for caching.
We also need to set up an entrypoint which tells Docker what script to run to initiate our Action.
Inside of our Dockerfile, we add:
COPY entrypoint.sh /entrypoint.sh

ENTRYPOINT ["/entrypoint.sh"]
We’ll use a shell script to initiate our initial installation procedure so we can have a little more control over setting things up.
Finally, inside of our referenced shell script, we include:
#!/bin/sh -l

cd $GITHUB_WORKSPACE

git clone https://github.com/colbyfayock/applitools-eyes-action
cd applitools-eyes-action

npm ci

node ./src/action.js
This will first navigate into our GitHub’s Workspace directory, to make sure our session is in the right location.
We then clone down a copy of our custom Action’s code, which is referencing itself at this point, but it allows us to have a fresh copy in our Workspace directory, giving us access to the script and dependencies we ultimately need.
And with our Action cloned within our working environment, we can now install the dependencies of our action and run the script that will coordinate our tests.
Dynamically creating a sitemap in node
Once our node script is kicked off, the first few steps are to find environment variables and gather Action inputs that will allow our script to be configured by the person using it.
But before we can actually run any tests, we need to know what pages we can run the tests on.
To add some flexibility, we added a few options:
- Base URL: the URL that the tests will run on
- Sitemap URL: this allows someone to pass in an already sitemap URL, rather than trying to dynamically create one
- Max Depth: how deep should we dynamically crawl the site? We’ll touch on this a little more in a bit
With these settings, we can have an idea on how the Action should run.
If no sitemap is provided, we have the ability to create one.
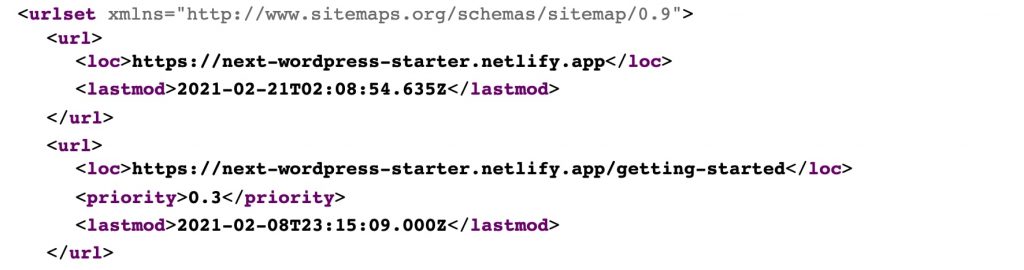
Specifically, we can use a Sitemap Generator package that’s available right on npm that will handle this for us.
const generator = SitemapGenerator(url, {
  stripQuerystring: false,
  filepath,
  maxDepth
});
Once we plug in a URL, Sitemap Generator will find all of the links on our page and crawl the site just like Google would with it’s search robots.
We need this crawling to be configurable though, which is where Max Depth comes in. We might not necessarily want our crawler to drill down link after link, which could cause performance issues, but it could also include pages or other websites that we aren’t interested in including in our sitemap.
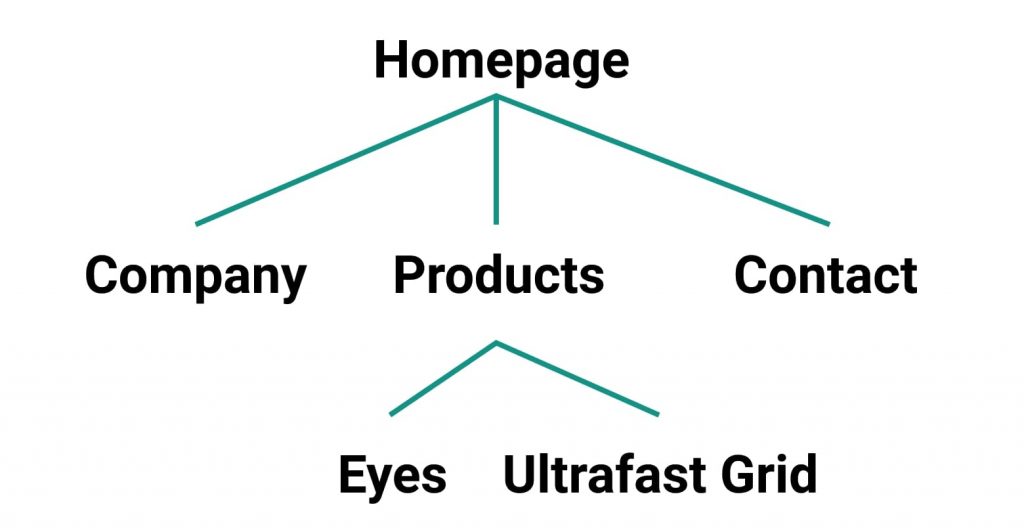
With Max Depth, we can tell our Sitemap Generator how deep we want it to crawl. A value of 1 would only scrape the top level page, where a value of 2 would follow the links on the first page, and then follow the links on the second page, to find pages to include in our dynamically generated sitemap.
But at this point, whether dynamically generated or provided to us with the Sitemap URL, we should now have a list of pages that we want to run our tests on.
Running Cypress as a script in node
Most of the time when we’re running Cypress, we use the command line or include it as a script inside of our package.json. Because Cypress is available as a node package, we additionally have the ability to run it right inside of a node script just like we would any other function.
Because we already have our environment configured and we’ve determined the settings we want, we can plug these values directly into Cypress:
const results = await cypress.run({
  browser: cypressBrowser,
  config: {
	baseUrl
  },
  env: {
	APPLITOOLS_APP_NAME: appName,
	APPLITOOLS_BATCH_NAME: batchName,
	APPLITOOLS_CONCURRENCY: concurrency,
	APPLITOOLS_SERVER_URL: serverUrl,
	PAGES_TO_CHECK: pagesToCheck
  },
  headless: true,
  record: false,
});
If you notice in the script though, we’re setting a few environment variables.
The trick with this is, we can’t directly pass in arguments that we may need inside of Cypress itself, such as settings for Applitools Eyes.
The way we can handle this is by creating Cypress environment variables, which end up roughly working the same as passing arguments into the function, we just need to access it slightly differently.
But beyond some Applitools-specific configurations, the important bits here are that we have a basic headless configuration of Cypress, we turn recording off as ultimately we won’t use that, and we pass in PAGES_TO_CHECK which is an array of pages that we’ll ultimately run through with Cypress and Applitools.
Using Cypress with GitHub Actions to dynamically run visual tests
Now that we’re finally to the point where we’re running Cypress, we can take advantage of the Applitools Eyes SDK for Cypress to easily check all of our pages.
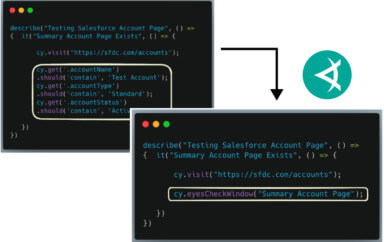
describe('Visual Regression Tests', () => {
  const pagesToCheck = Cypress.env('PAGES_TO_CHECK');

  pagesToCheck.forEach((route) => {
	it(`Visual Diff for ${route}`, () => {

	  cy.eyesOpen({
		appName: Cypress.env('APPLITOOLS_APP_NAME'),
		batchName: Cypress.env('APPLITOOLS_BATCH_NAME'),
		concurrency: Number(Cypress.env('APPLITOOLS_CONCURRENCY')),
		serverUrl: Cypress.env('APPLITOOLS_SERVER_URL'),
	  });

	  cy.visit(route);

	  cy.eyesCheckWindow({
		tag: route
	  });

	  cy.eyesClose();
	});
  });
});
Back to the critical part of how we ran Cypress, we first grab the pages that we want to check. We can use Cypress.env to grab our PAGES_TO_CHECK variable which is what we’ll use for Eyes coverage.
With that array, we can simply run a forEach loop, where for every page that we have defined, we’ll create a new assertion for that route.
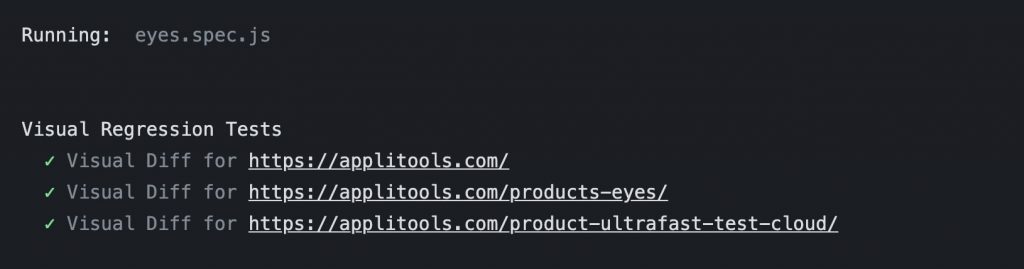
Inside of that assertion, we open up our Eyes, proceed to visit our active page, perform a check to grab a snapshot of that page, and finally close our Eyes.
With that brief snippet of code, we’re uploading a snapshot of each of our pages up to Applitools, where we’ll now be able to test and monitor our web project for issues!
Configuring Applitools Eyes GitHub Action into a workflow
Now for the fun part, we can see how this Action actually works.
To add the Applitools Eyes GitHub Action to a project, inside of an existing workflow, you can add the following as a new step:
steps:
- uses: colbyfayock/applitools-eyes-action@main
  with:
	APPLITOOLS_API_KEY: ${{secrets.APPLITOOLS_API_KEY}}
	appName: Applitools
	baseUrl: https://applitools.com
We first specify that we want to use the Action at its current location, then we pass in a few required input options such as an Applitools API Key (which is defined in a Secret), the name of our app, which will be used to label our tests in Applitools, and finally the base URL that we want our tests to run on (or we can optionally pass in a sitemap as noted before).
With just these few lines, any time our steps are triggered by our workflow, our Action will create a new environment where it will run Cypress and use Applitools Eyes to add Visual Testing to the pages on our site!
What’s next for Applitools Eyes GitHub Action?
We have a lot of flexibility with the current iteration of the custom GitHub Action, but it has a few limitations like having an environment already deployed that can be accessed by the script and generally not having some of the advanced Applitools feature customers would expect.
Because we’re using node inside of our own custom environment, we have the ability to provide advanced solutions for the project we want to run the tests on, such as providing an additional input for a static directory of files, which would allow our Action to spin up a local server and perform the tests on.
As far as adding additional Applitools features, we’re only limited to what the SDK allows, as we can scale our input options and configuration to allow customers to use whatever features they’d like.
This Action is still in an experimental stage as we try to figure out what direction we ultimately want to take it and what features could prove most useful for getting people up and running with Visual Testing, but even today, this Action can help immediately add broad coverage to a web project with a simple line in a GitHub Action workflow file.
To follow along with feature development, to report issues, or to help contribute, you can check out the Action on GitHub at https://github.com/colbyfayock/applitools-eyes-action.