I took Gil Tayar’s course on Cypress from Test Automation University recently and fell in love with the ease, speed, and efficiency of Cypress. Even though I’m a JavaScript novice, the course makes it easy to see how Cypress makes life easy for people writing tests – especially developers writing in JavaScript.
Want to know more? Read on.
Why use Cypress for functional testing
First – a few caveats. Cypress is JavaScript-only, so if you don’t know JavaScript, and don’t want to learn it, you can stop reading and go back to whatever was making you happy. (Of course, if you want to learn JavaScript, there are some resources here. And here. And here – just some ideas). Second, Cypress runs only in Chrome, so if you’re a browser bigot of some kind and couldn’t think of running on Chrome, this isn’t for you. And, lastly, it’s not mobile-native (but we can discuss that).
That’s it for caveats.
Cypress runs in the browser right along with the app you’re testing. You can use Cypress to do everything you would want to do in a test:
- Opening a web app
- Finding locators
- Taking actions
- Evaluating the app response.
You add Cypress easily into your application testing via npm or yarn. You can even launch Applitools and add visual testing to your application. Nice.
Course Structure
Gil provides a lot of clarity about Cypress. Every step of his course takes you on a clear path of, “this is how this works, this is how you set it up, this is how you run it, and here, try it yourself.” He gives you the tools, the code examples, and he lets you do everything he shows you in his course. How easy is that?
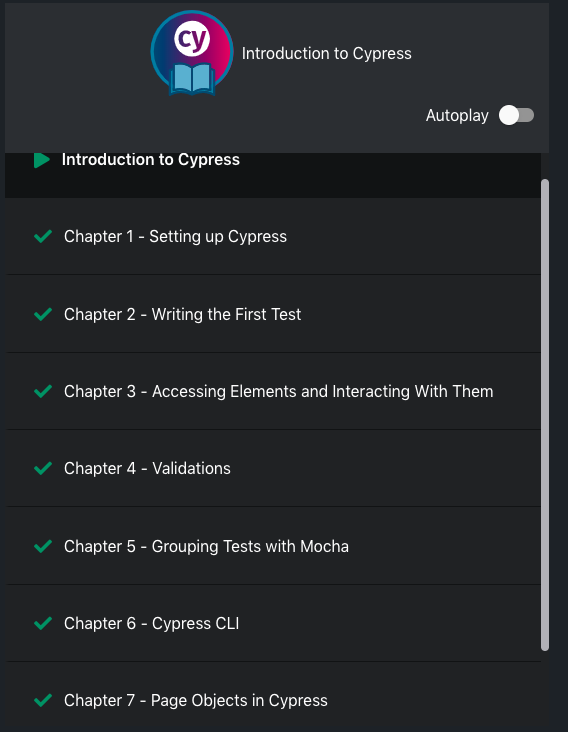
The course is broken up into the following chapters:
- Introduction to Cypress
- Setting up Cypress
- Writing the First Test
- Accessing Elements and Interacting With Them
- Validations
- Grouping Tests with Mocha
- Cypress CLI
- Page Objects in Cypress
- Visual Validation
Each chapter takes you deeper into using Cypress.
Gil shares the key ideas behind Cypress in the introduction, and I steal those to share with you here. Frontend developers created Cypress for frontend developers. Cypress consumes JavaScript because frontend developers write in JavaScript. Cypress runs in Chrome and comes with its own unique Chrome instance. And, Cypress leverages Mocha as its test runner, but Cypress provides all the infrastructure to run individual tests as well as to enable a complete test automation framework.
How to get started with Cypress functional testing
To get started, you need to install node.js and an integrated development environment (IDE). For the course, Gil lets you install node.js if you haven’t done so already. For an IDE, Gil uses Microsoft’s Visual Studio Code, and he recommends it for this course.
To run the course, you want internet access. The test “todo” application runs on an external system. You will stimulate the application and measure the application responses directly in Cypress, but you don’t need access to the server to instrument the application.
Once you have node.js set up, you can install Cypress. It’s all pretty straightforward.
I had never used VSCode and was surprised by its power and availability. Being so used to the days when Microsoft charged money for its coding tools, I happily downloaded VSCode and installed it on my laptop. VS Code runs on Windows, Max and Linux (both .rpm and .deb). If you haven’t used it, VSCode includes a built-in file explorer, a code editor with language autocomplete, and a built-in terminal and console.
VSCode comes with built-in language support for JavaScript, TypeScript, and Node.js. You can get language support for other languages, including C++, C#, Java, Python, PHP, and Go. There is a marketplace for extensions. I installed the extension for pretty icons in the UI.
Here is a screenshot from my own installation of VSCode:
I actually took this shot on my laptop running MacOS. I have already installed Cypress into my work folder for the course: todomvc-tests. Cypress has already been installed as part of the Set Up chapter. The icons come from the icon package I installed.
How to create functional tests with Cypress
Subsequent chapters focus on creating tests. The first tests involve defining a test in JavaScript that Mocha can run, and then showing the results of running the tests – which open up the test Todo page.
In the course, you run tests against a remote application, the todo test application. You don’t need to install the application The application runs external to your system, so you need network access to run the tests. In the course, you create tests in your work folder. The tests all sit in the integration subfolder in your work folder.
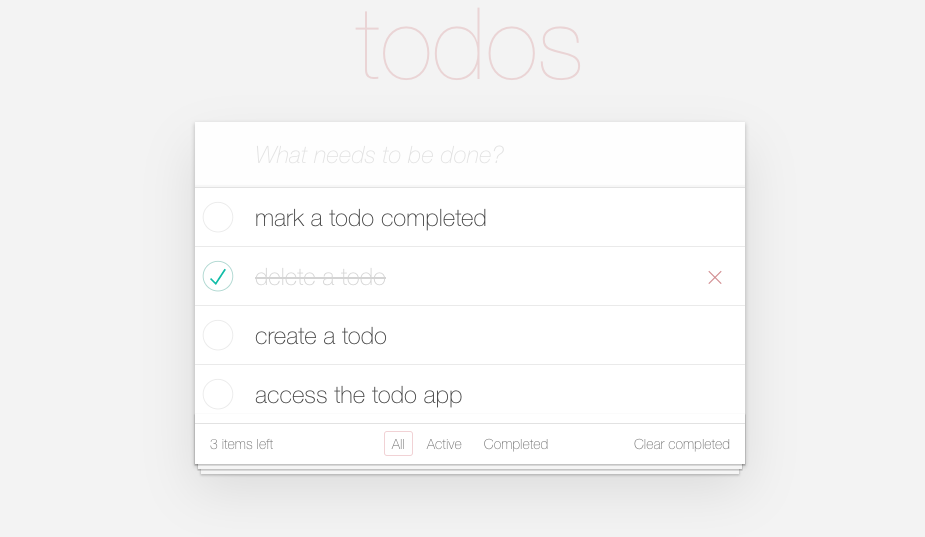
The todo application lets you create todo elements, mark elements as complete, filter to complete or incomplete tasks, delete a task, or delete all complete tasks. Using the it() function in Cypress, you create tests to control the browser:
it(‘should navigate to the TodoMVC App’, () => { ...
The cool part is creating the code in a JavaScript file using VSCode. With Cypress installed, all the function calls get color-coded for Cypress calls, and entering partial names for cypress functions results in handy autocomplete.
Cypress lets you write JavaScript to find elements, enter text, toggle buttons, and click selectors. And, Cypress runs right alongside the app in the browser, which means its really fast.
Once you know how to navigate, Cypress also includes the tools that let you validate the behavior of the app by asserting the output. For the todo app, you can make sure that, once you have marked a task completed, it shows up with the strikethrough style, or that a deleted todo reduces the total count by one.
Grouping and Running Functional Tests in Cypress
Once you write tests, you want to make them repeatable for automation. Cypress lets you group tests. You can run some preset app controls to precede your tests, so that each time you run a group of tests, they run consistently. And, you can group tests to run inside individual files, and chain all or some of the files.
You create individual tests within an ‘it()’ statement, as I mentioned earlier. You could create one big ‘it()’ statement to cover an entire app, but that would be painful. Instead, you create individual test clauses. In this case, we started with a single ‘it()’ statement that would:
- get to the todo app,
- create a new todo,
- mark it complete, and then
- delete completed items (and do checks along the way)
Part of our exercise turned the single test into three test steps – each within its own it() statement.
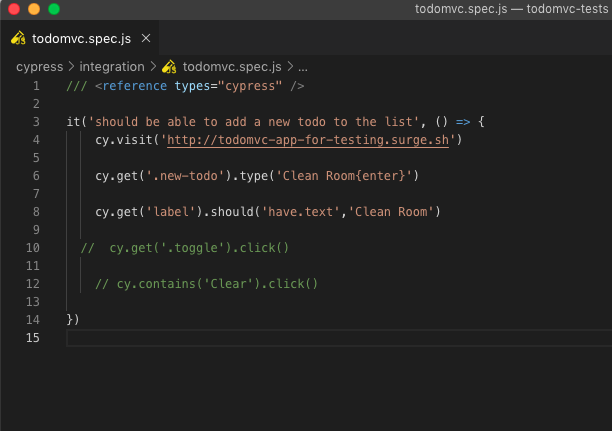
Here is part of the code.
Here’s what’s happening in the code above:
- Launch the ToDo app
- Create a new todo – “Clean room”
- Checking that the task (Clean room) was entered successfully
- Ensuring that the new task hasn’t been marked as completed
You can see the code here.
Next, we use the class or function ‘describe()’ to create a group of tests. The ‘it()’ statements that make up individual tests sit within the created ‘describe()’ statement. It looks like this:
Cypress lets you control the tests and build a flow around these test commands so that you can both drive Chrome to enter text and click buttons, as well as measure results. You can control the flow so that only a subset of individual tests inside a describe() statement run.
As you go from writing individual function tests to running test suites, you begin to create the test infrastructure that can grow with your app. While your app code remains independent of your test code, you have the ability to maintain your test groups and manage your test code.
In addition to running tests through the Chrome browser, Gil shows you how to run Cypress CLI using Chrome in headless mode. Cypress can both execute the tests and capture recorded screenshots from individual test states. So, even with no screen, you can see how your tests behaved. Headless still captures all the browser states from different Cypress tests – it’s generally faster than running the full browser.
How to do visual testing with Cypress
Gil’s final chapter covers visual testing. The ‘should()’ statements in Mocha test the outcomes of the ‘get()’ action steps. These tests validate the function of the page. What about the visual representation? You can build a graphical app that continues to function correctly but either looks wrong or cannot be used because of visual issues.
We think of this as functional test myopia. You enter data and/or initiate action in your test, and you measure the response showing that the action took place. However, the should() statements you write both define what you expect to see and are implicitly blind to anything you did not anticipate and for which you did not write a should() statement.
For example, here’s an example of Gmail incorrectly rendering a page, making it impossible to access the Contacts function since it’s covered up by the Tickets label.
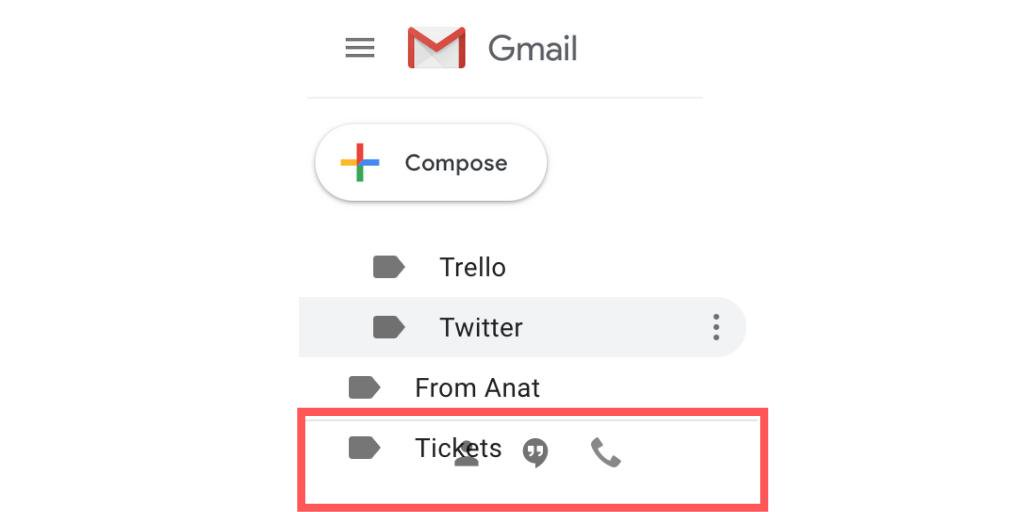
We see these issues all the time. Because they’re practically impossible to script for using traditional checkpoints, you need to catch them using visual validation.
To add visual validation, you need to add a plug-in to Cypress. In this case, Gil chose Applitools Eyes. And, why not? He and I both work for Applitools, and we know what Applitools provides.
You get started by registering for an Applitools account (it’s free), and then installing the Applitools Eyes plugin for Cypress via npm. I’ll show the command we used.
npm install @applitools/eyes-cypress@3
This command installs the eyes-cypress version 3 package. If you want to install the most current package, omit the @3 at the end.
From there, Gil shows you how to build a visual validation on top of the Cypress tests you have written already. Finally, you need to add an environment variable for Cypress that links your Applitools API Key to your Cypress instance. Gil shows you how to do this for both Windows and Unix/Linux/MacOS.
Once you have done these preparation steps, Gil demonstrates how Applitools adds easily into your tests. He uses the statement ‘cy.eyesCheckWindow(‘name of test’) to create a test called ‘name of test’. He also installs the instructions to open Eyes and close Eyes in a beforeEach() and afterEach() statement.
The balance of this chapter shows how Applitools Eyes works, and its workflow for creating baselines and comparing checkpoints against baselines. You can find much of this content in similar courses on Test Automation University that focus on visual testing, including Angie Jones’s Automated Visual Testing: A Fast Path to Test Automation Success. (I wrote a blog post about that course as well).
One of the important takeaways is that Applitools helps you expand beyond the Chrome-only limitations of Cypress. Applitools Ultrafast Grid lets you select other browsers like Firefox, Edge, and IE, a wide range of viewport sizes, and different user agent strings on which your web app’s pages are rendered. Each screen shot is captured, along with the DOM at the time of the capture, and recreated on each selected test platform. As a result, you can effectively use Cypress to test on browsers other than Chrome.
Conclusions
Gil’s course made me realize that Cypress provides a wonderful test infrastructure for application testing. Cypress tests and instructions run within the browser along with the application, so Cypress provides a wholly self-contained test infrastructure.
This course gave me a way to see how Cypress lets testers create, organize and manage tests. All I have to do is know the app and know what I want to test. Cypress gives me the tools to write and maintain my test code as I develop and update my application.
The course also shows how easily I can integrate visual testing with Applitools into Cypress. Gil helped clarify the differences between visual and functional tests.
I have more JavaScript learning to do to take full advantage of Cypress, but I know that the Visual Studio Code IDE can help me both with code autocomplete and other ways of keeping me from making dumb syntax errors as I learn. But, JavaScript knowledge was not necessary for me to succeed here.
As always, I post my certificate for passing a TAU course. My certificate for passing Gil’s Cypress course is here:
For More Information:
- Test Automation U: Introduction to Cypress
- Applitools for Cypress
- Tutorial – Cypress Visual Testing with Applitools
- Cypress, React, and Applitools
- Angular and Cypress UI Testing with Applitools
- How to visually test VueJS apps using Cypress.io