This is the second post in our Hello World introduction series to Appium, and we’ll discuss how to create your first Appium test for Android. You can read the first post where we discussed what Appium is, including its core concepts and how to set up the Appium server. You can also read the next post on setting up your first Appium iOS test.
Key Takeaways
In this post, we’ll build on top of earlier basics and focus on the below areas:
- Setup Android SDK
- Setup Android emulator/real devices
- Setup Appium Inspector
- Setup our first Android project with framework components
We have lots to cover but don’t worry, by the end of this post, you will have run your first Appium-based Android test. Excited? ✊? Let’s go.
Setup Android SDK
To run Android tests, we need to set up an Android SDK, ADB (Android debug bridge), and some other utilities.
- Android SDK will set up Android on your machine and provide you with all the tools required to do the development or in this case automation.
- Android Debug Bridge (ADB) is a CMD line tool that lets you communicate with the Android device (either emulator or physical device).
The easiest way to set these up is to go to the Android site and download Android Studio (An IDE to develop Android apps), which will install all the desired libraries and also give us everything we need to run our first Android test.
Setup SDK Platforms and Tools
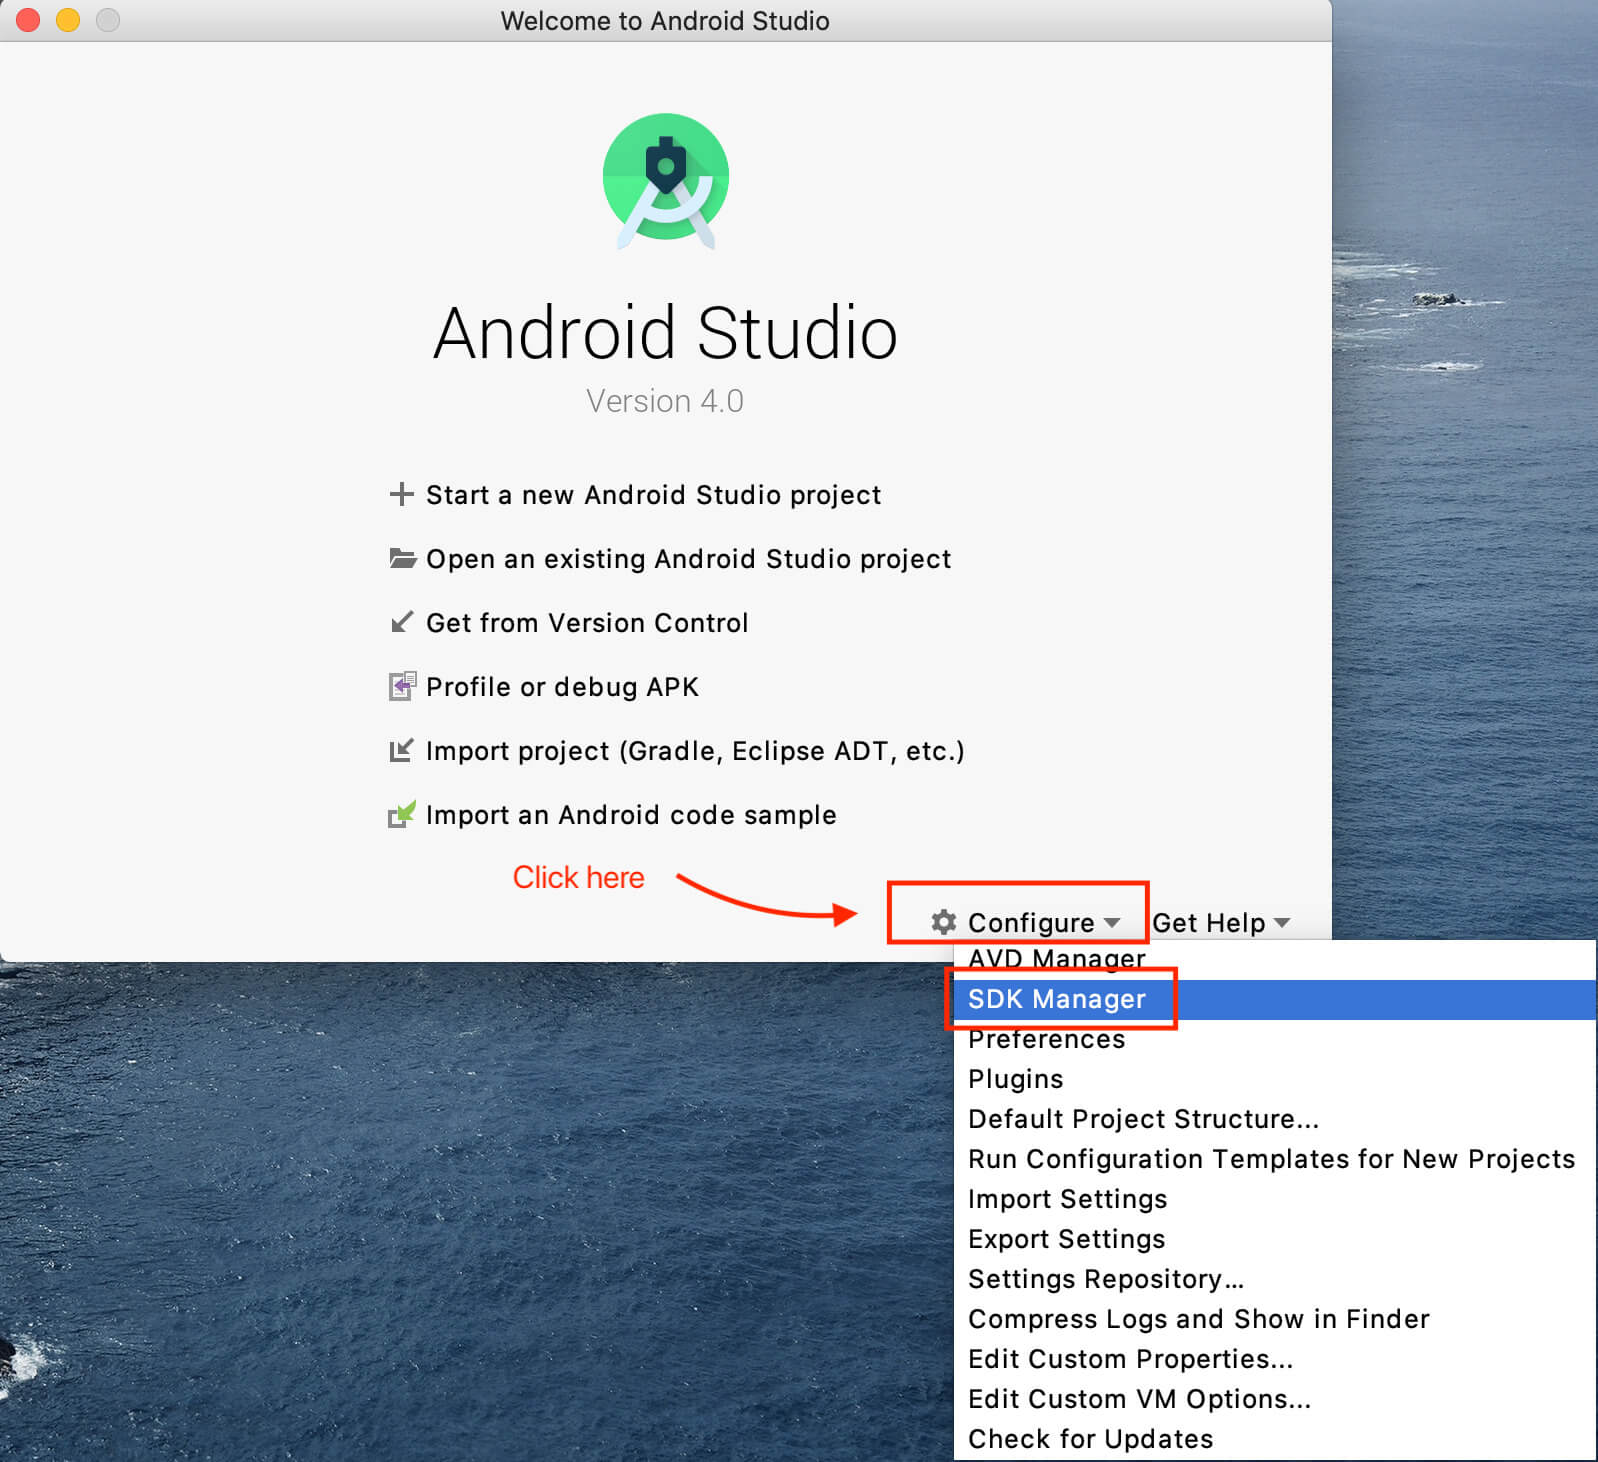
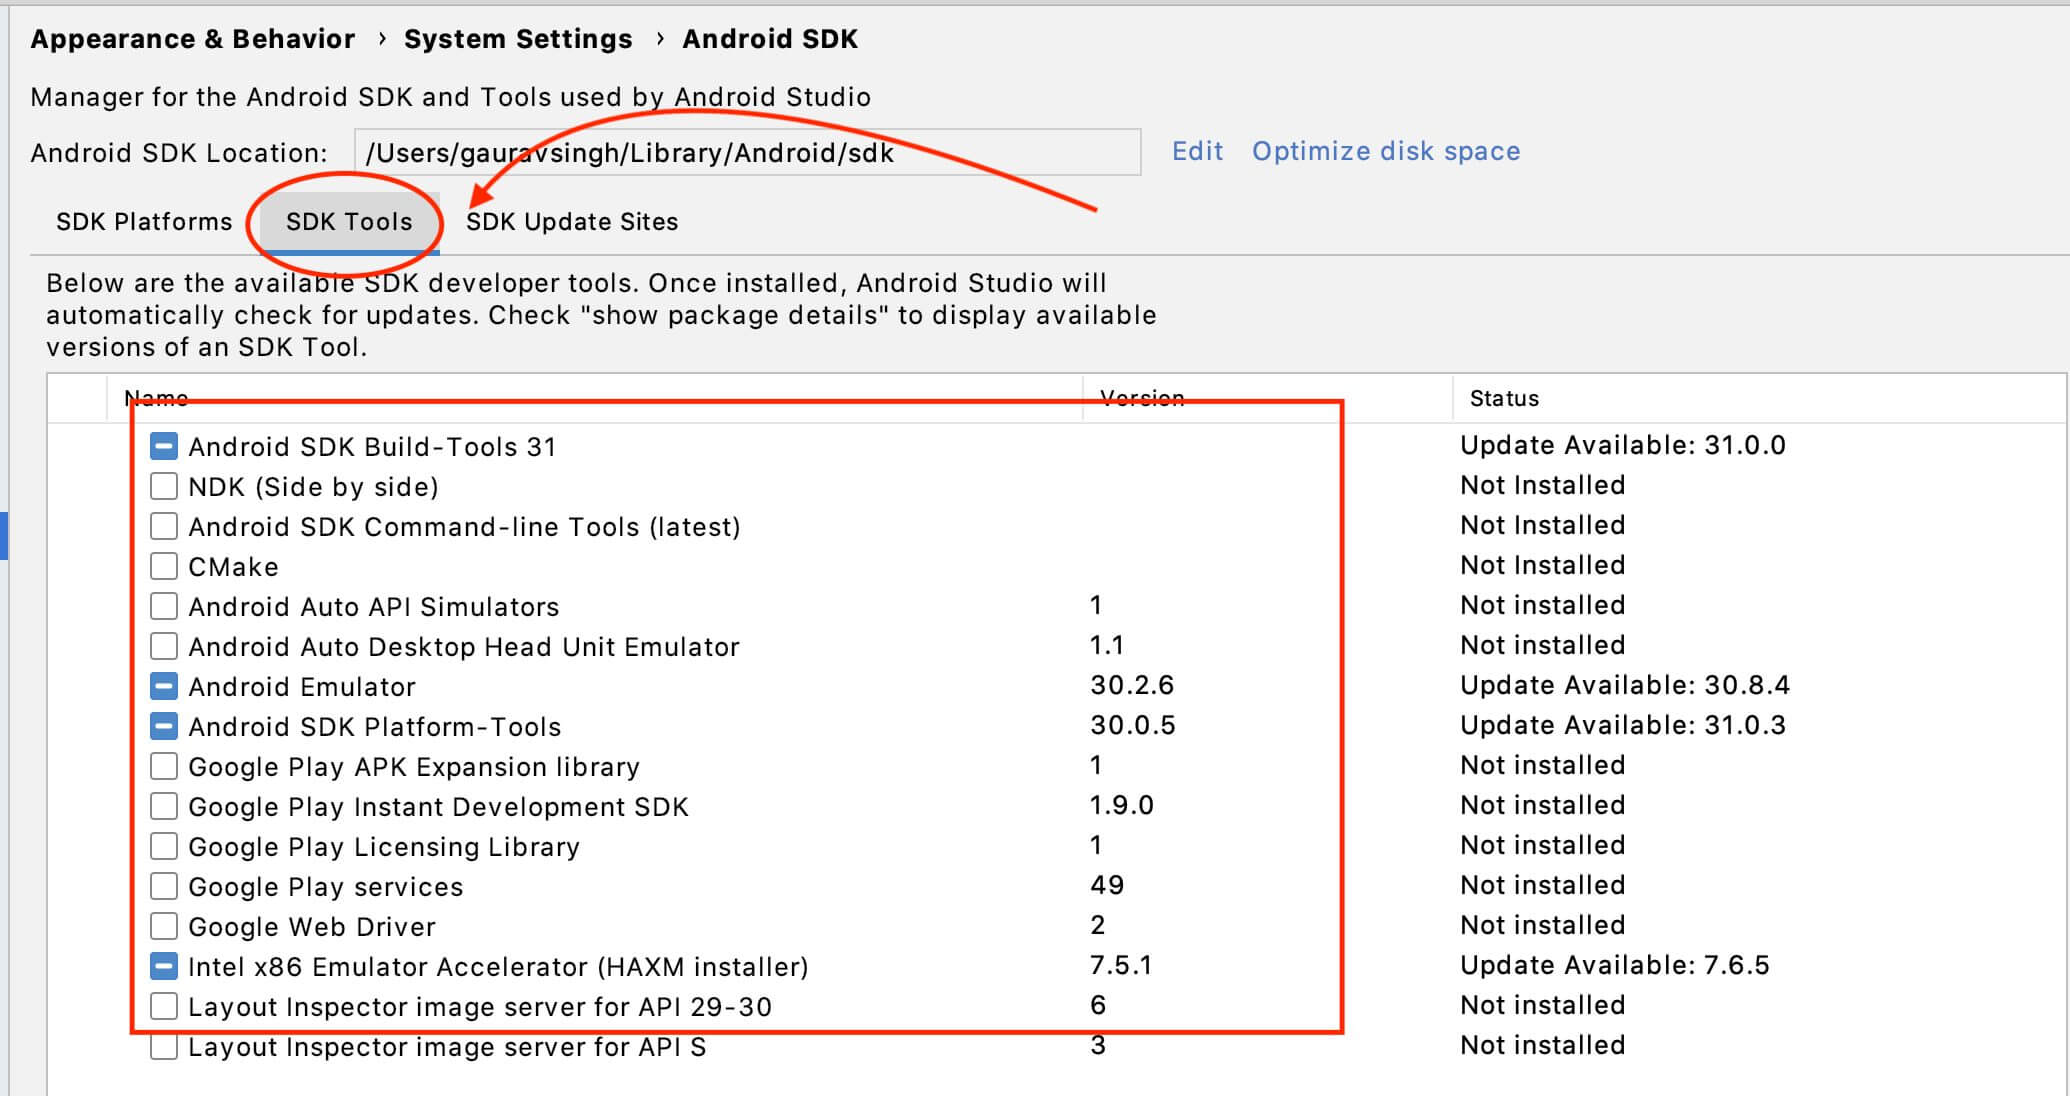
Once downloaded and installed, open Android Studio, click on Configure, and then SDK Manager. Using this you can download any android API version from SDK Platforms.
Also, You can install any desired SDK Tools from here.
We’ll go with the defaults for now. This tool can also install any required updates for these tools which is quite a convenient way of upgrading.
Add Android Home to Environment Variables
The Appium server needs to know where the Android SDK and other tools like Emulator, Platform Tools are present to help us run the tests.
We can do so by adding the below variables in the system environment.
On Mac/Linux:
- Add the below environment variables in the shell of your choice (.bash_profile for bash or .zshrc for zsh). These are usually the paths where Android studio installs these.
- Run
source <shell_profile_file_name>for e.g.source.zshrc
export ANDROID_HOME=$HOME/Library/Android/sdk
export PATH=$ANDROID_HOME/emulator:$PATH
export PATH=$ANDROID_HOME/tools:$PATH
export PATH=$ANDROID_HOME/tools/bin:$PATH
export PATH=$ANDROID_HOME/platform-tools:$PATH
If you are on Windows, you’ll need to add the path to Android SDK in the ANDROID_HOME variable under System environment variables.
Once done, run the adb command on the terminal to verify ADB is set up:
➜  appium-fast-boilerplate git:(main) adb
Android Debug Bridge version 1.0.41
Version 30.0.5-6877874
Installed as /Users/gauravsingh/Library/Android/sdk/platform-tools/adb
These are a lot of tedious steps and in case you want to set these up quickly, you can execute this excellent script written by Anand Bagmar.
Set up an Android Emulator or Real Device
Our Android tests will run either on an emulator or a real Android device plugged in. Let’s see how to create an Android emulator image.
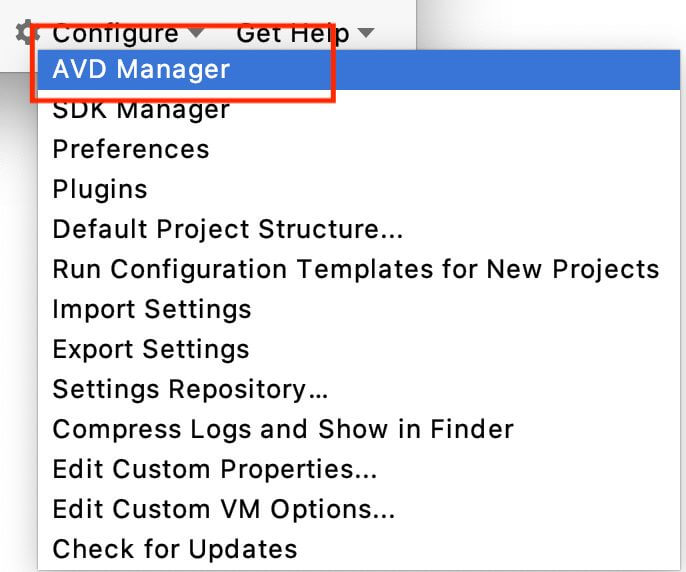
- Open Android Studio
- Click configure
- Click on AVD Manager
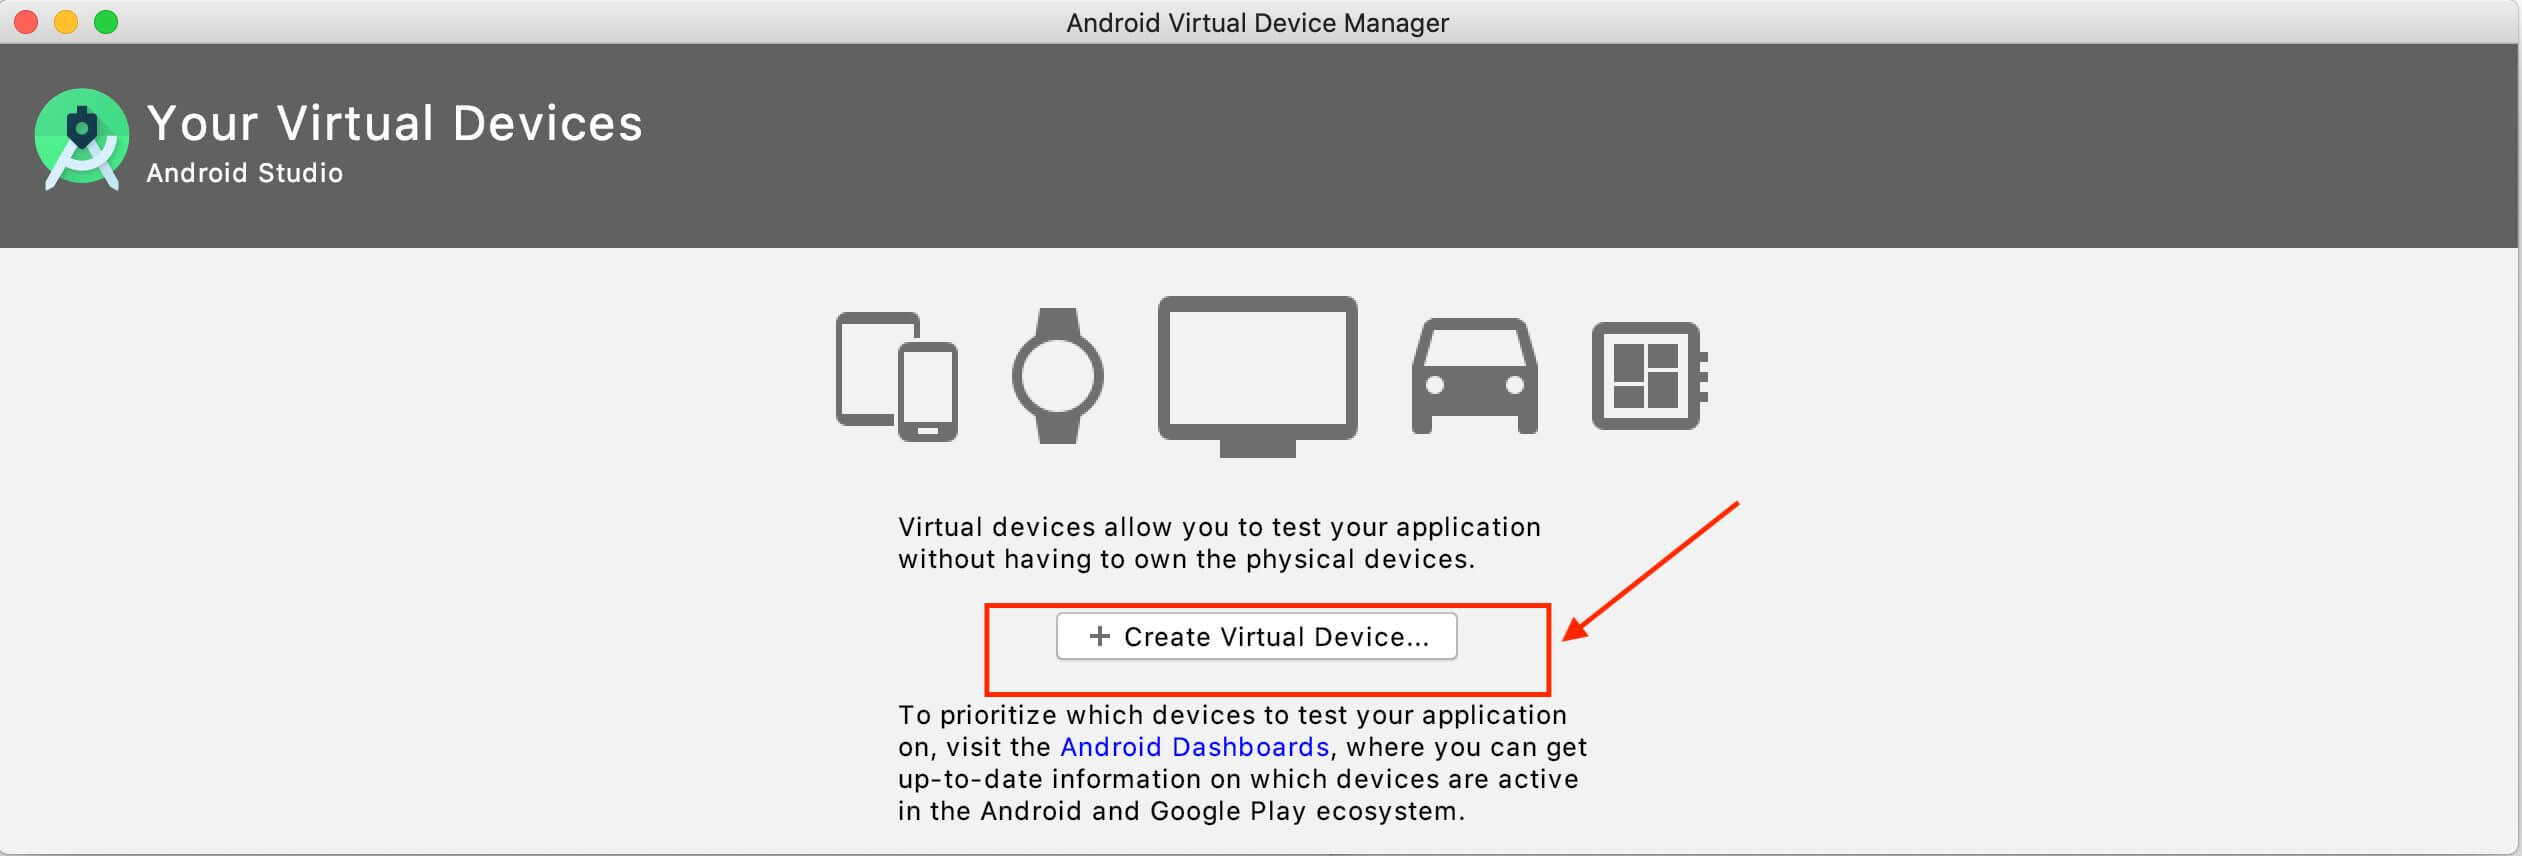
You’ll be greeted with a blank screen with no virtual devices listed. Tap on Create a virtual device to launch the Virtual device Configuration flow:
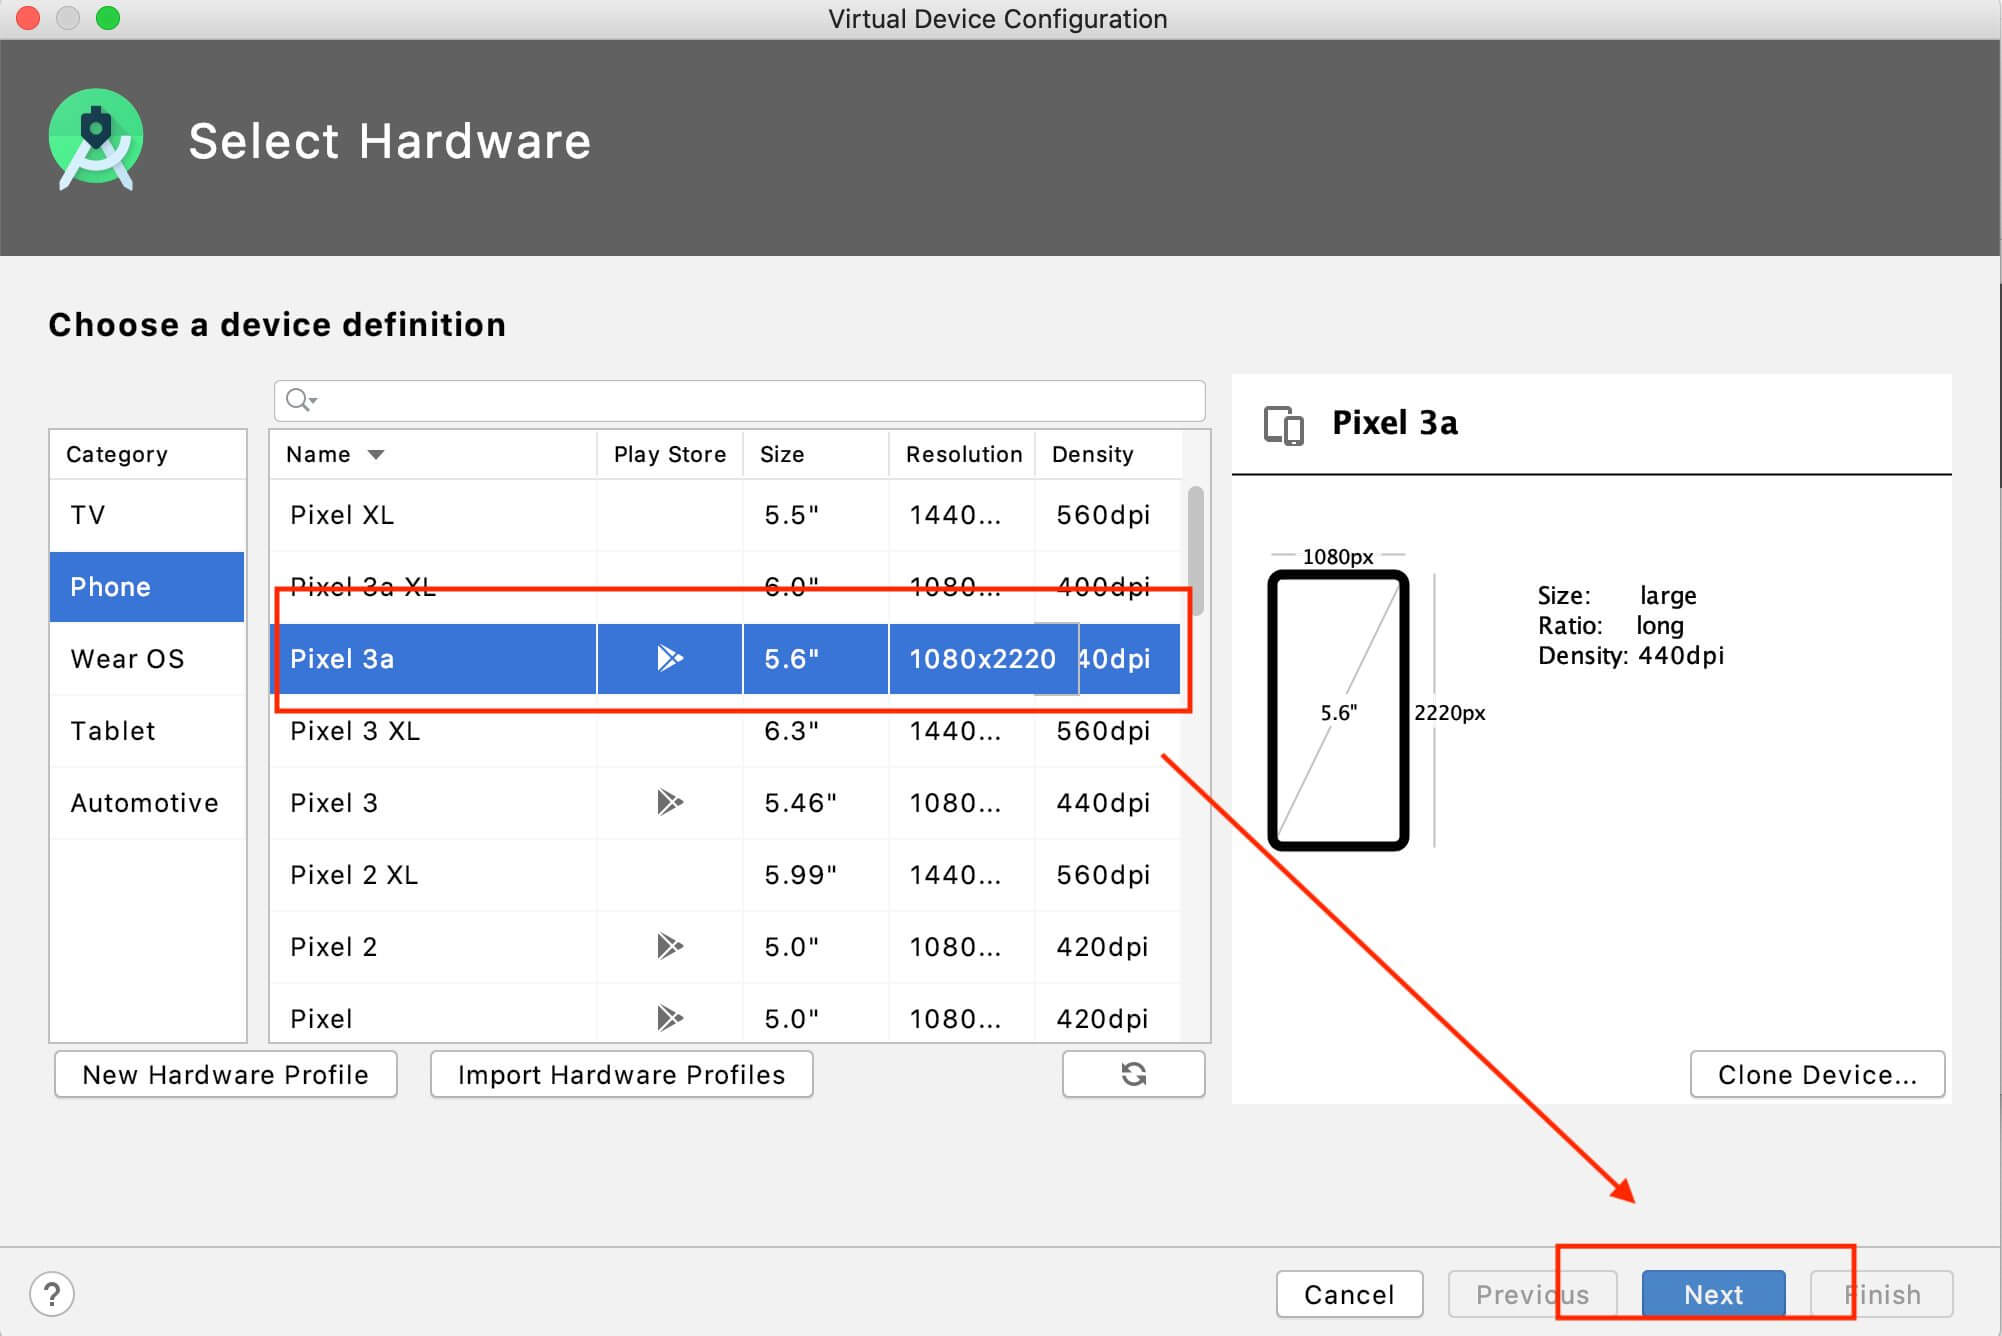
Next, select an Android device like TV, Phone, Tablet, etc., and the desired size and resolution combination.
It’s usually a good idea to set up an emulator with Play Store services available (see the Play Store icon under the column) as certain apps might need the latest play services to be installed.
We’ll go with Pixel 3a with Play Store available.
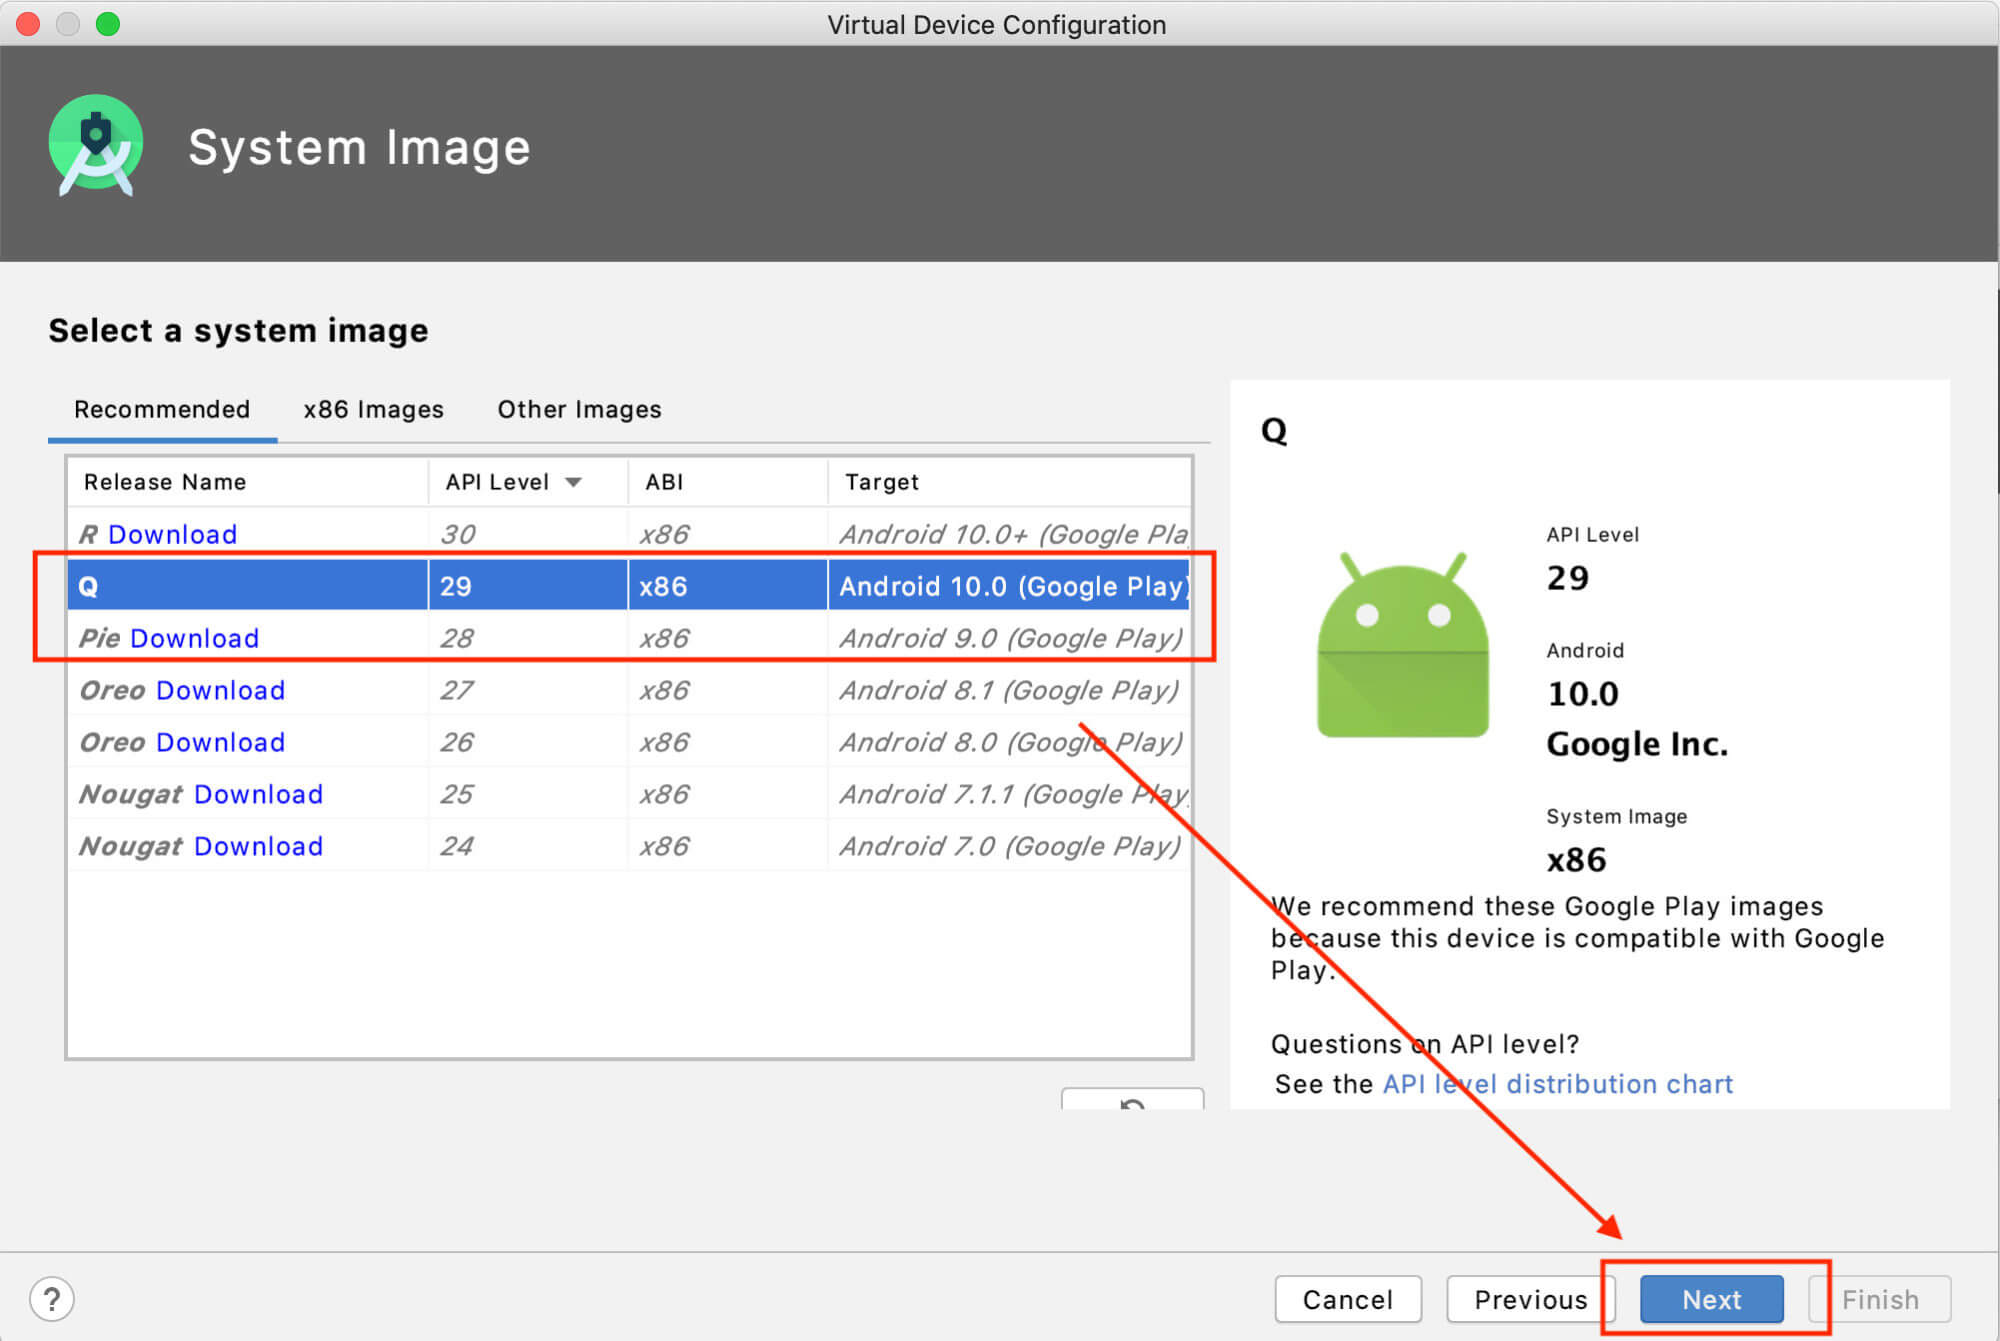
Next, we’ll need to select which Android version this emulator should have. You can choose any of the desired versions and download the image. We’ll choose Android Q (10.0 version).
You need to give this image a name. We’ll need to use this later in Appium capabilities so you can give any meaningful name or go with the default. We’ll name it Automation.
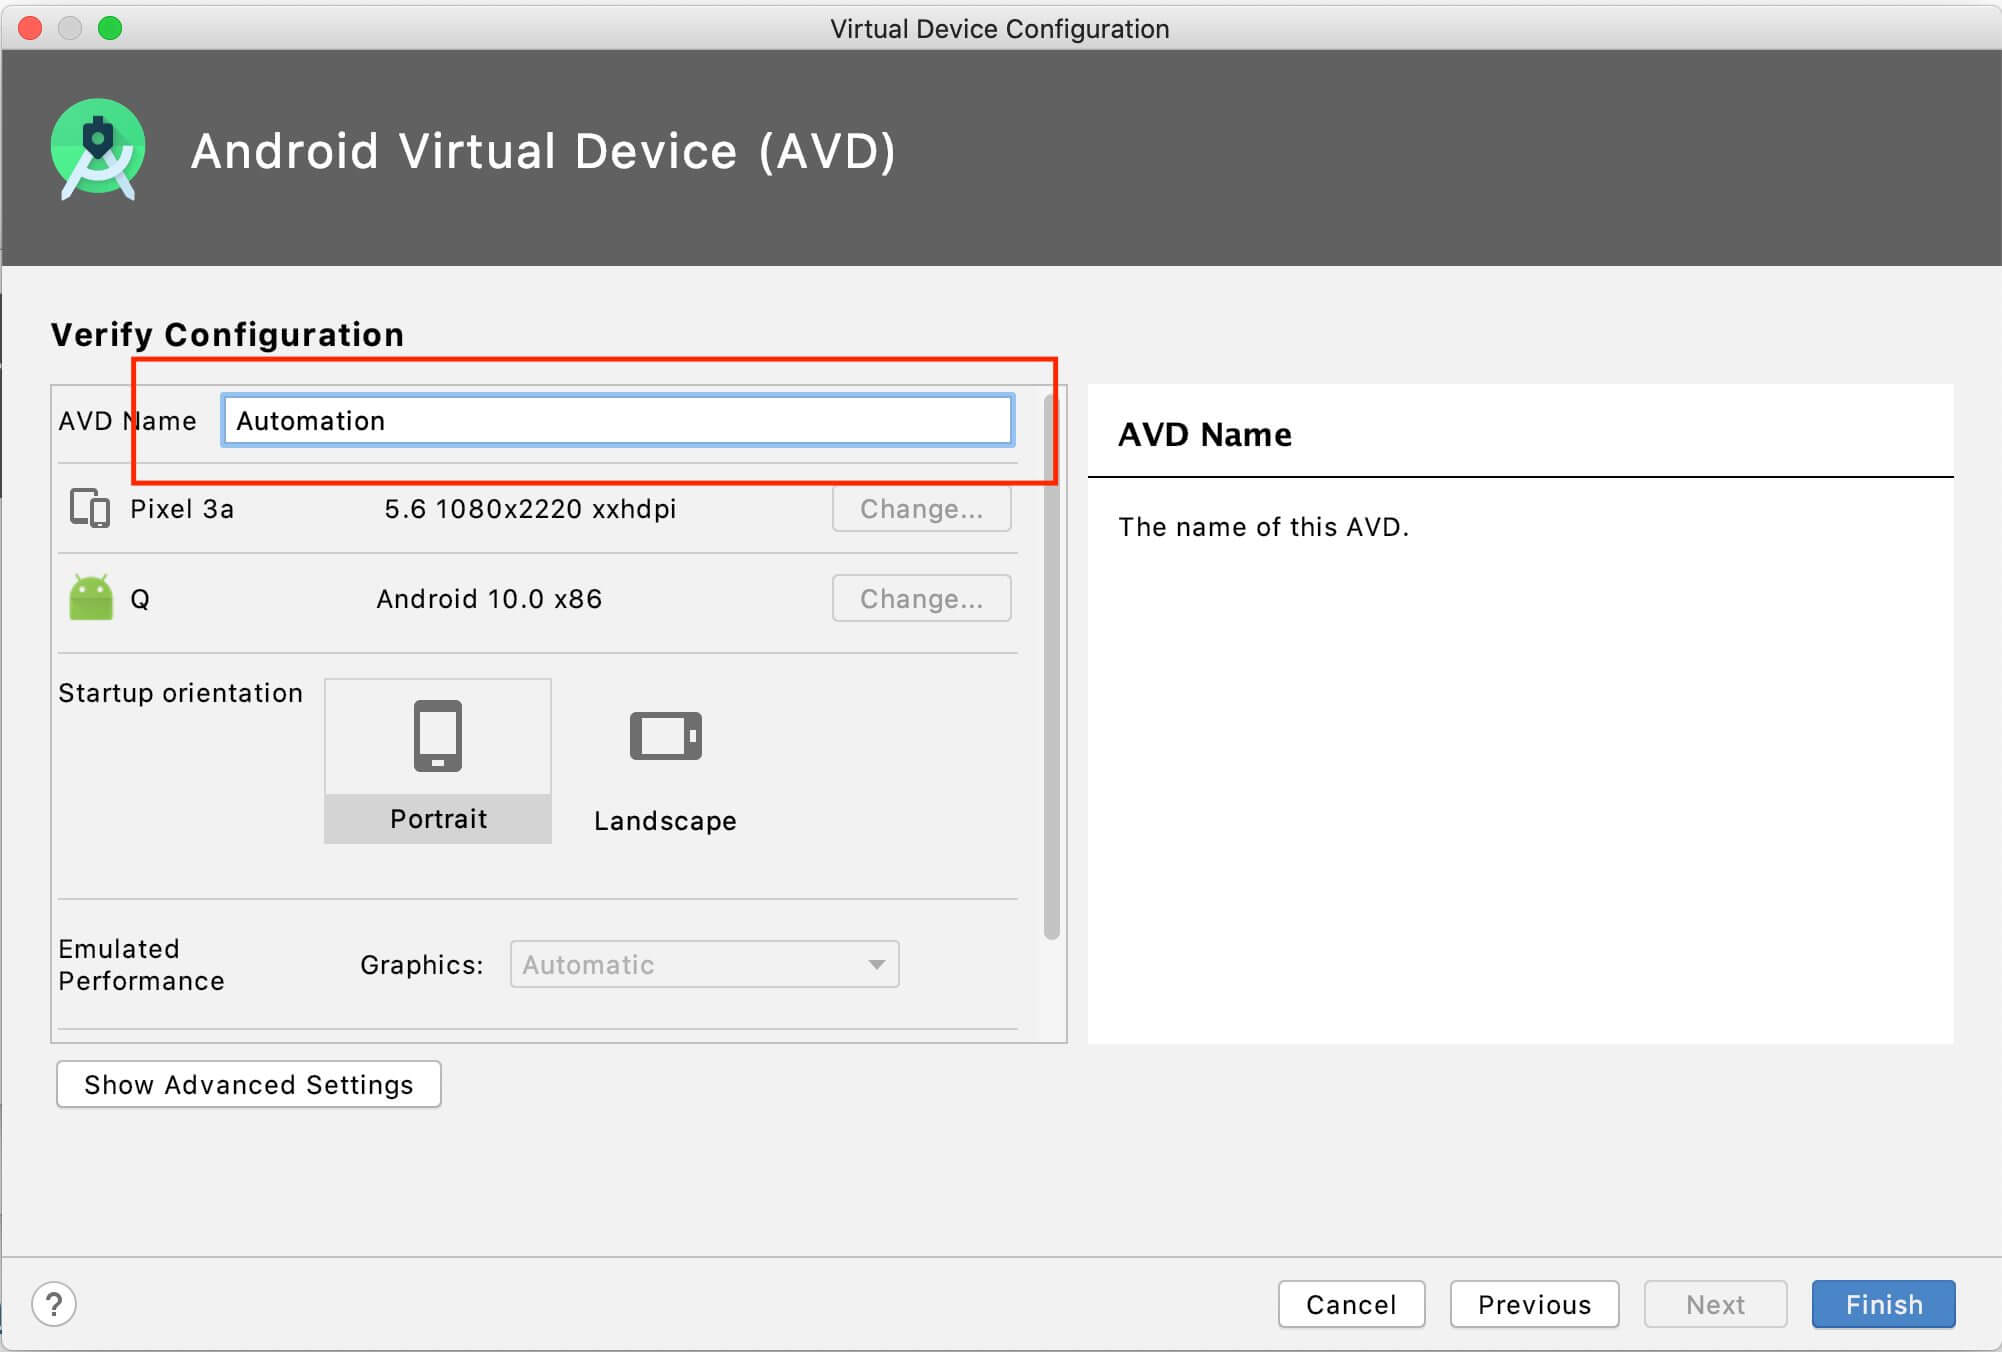
Nice, ✋?We have created our emulator. You can fire it up by tapping the Play icon under the Actions section.

You should see an emulator boot up on your device similar to a real phone.
Setting up a Real Device
While the emulator is an in-memory image of the Android OS that you can quickly spin up and destroy, it does take physical resources like Memory, RAM, and CPU. It’s always a good idea to verify your app on a real device.
We’ll see how to set up a real device so that we can run automation on it.
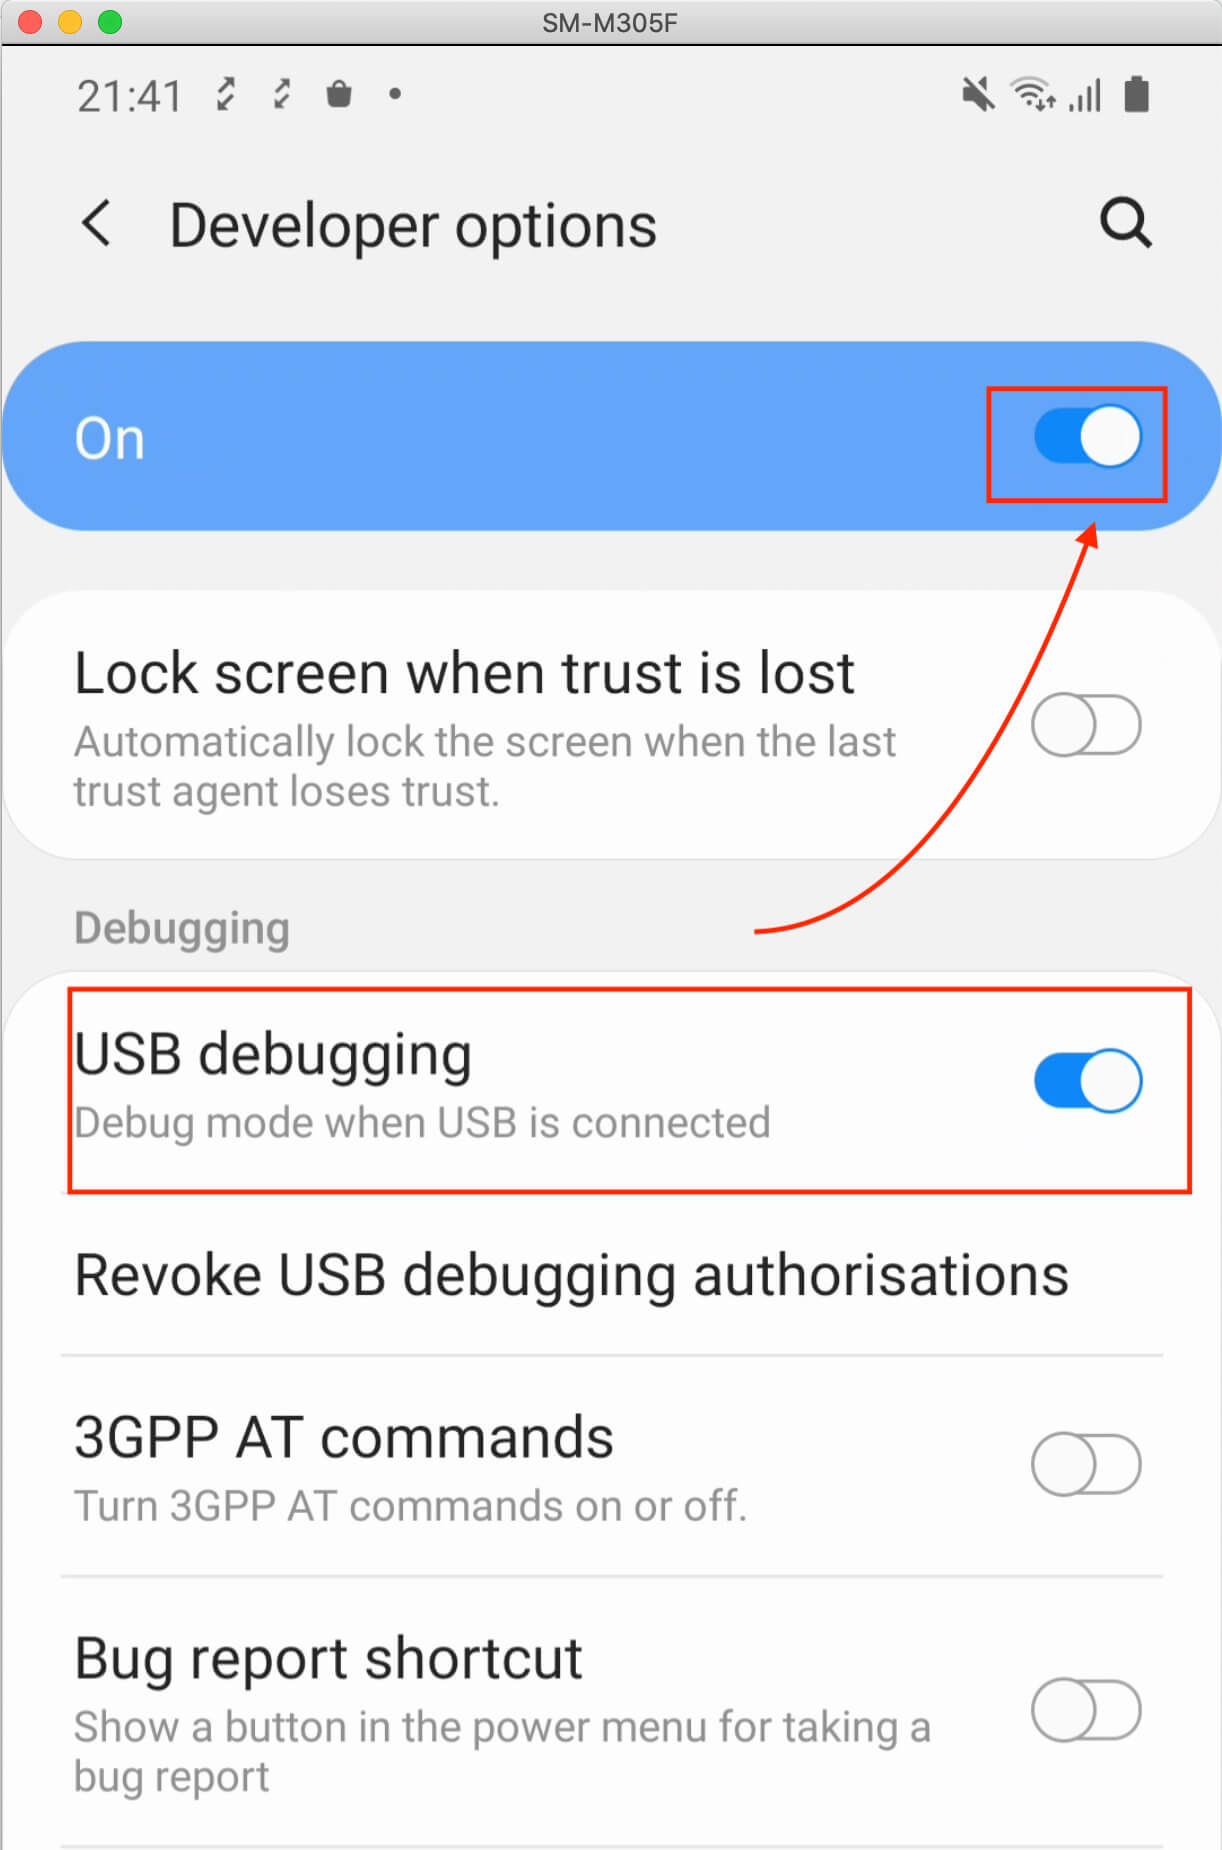
You need to connect your device to your machine via USB. Once done:
- Go to About Phone.
- Tap on Android build number multiple times until developer mode is enabled, you’ll see a Toast message show up under as you get closer to enabling this mode.
- Go to Developer Options and Enable USB Debugging.
And thats all you need to potentially run our automation on a connected real device.
Setting up Appium Inspector
Appium comes with a nifty inspector desktop app that can inspect your Application under test and help you identify element locators (i.e. ways to identify elements on the screen) and even play around with the app.
It can easily run on any running Appium server and is really a cool utility to help you identify element locators and develop Appium scripts.
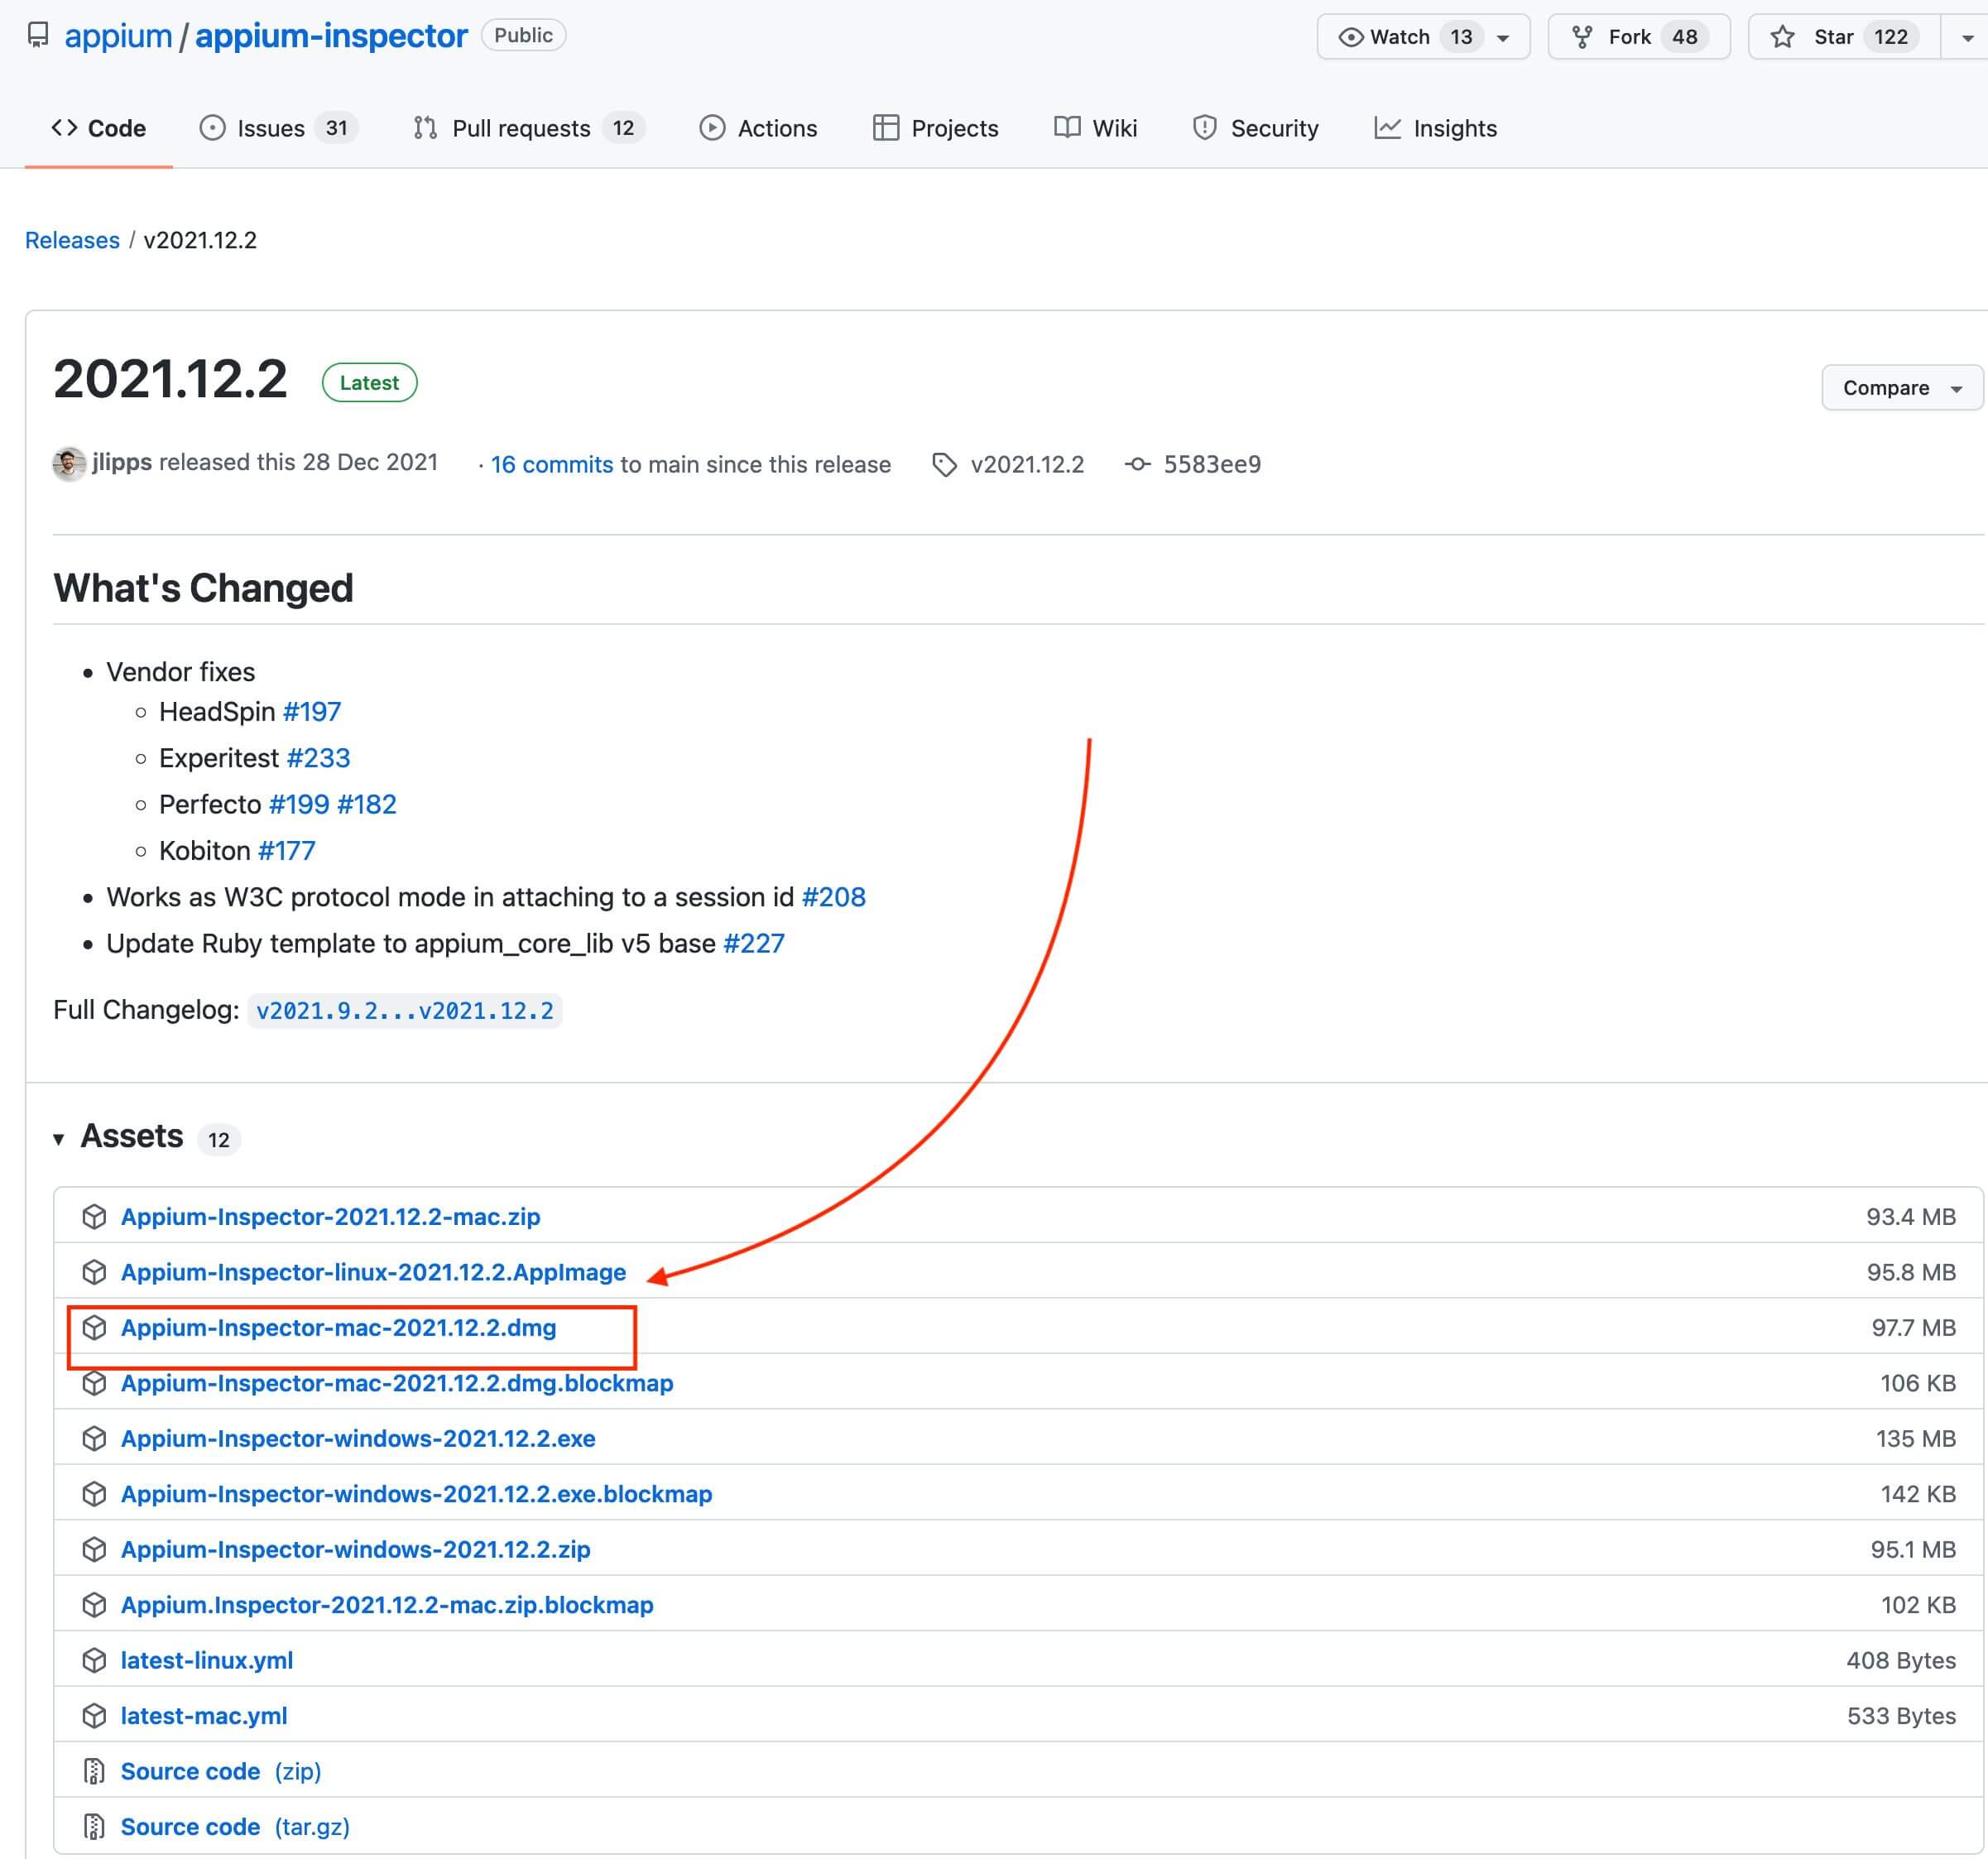
Download and Install Appium Inspector
You can download it by just going to the Appium Github repo, and searching for appium-inspector.
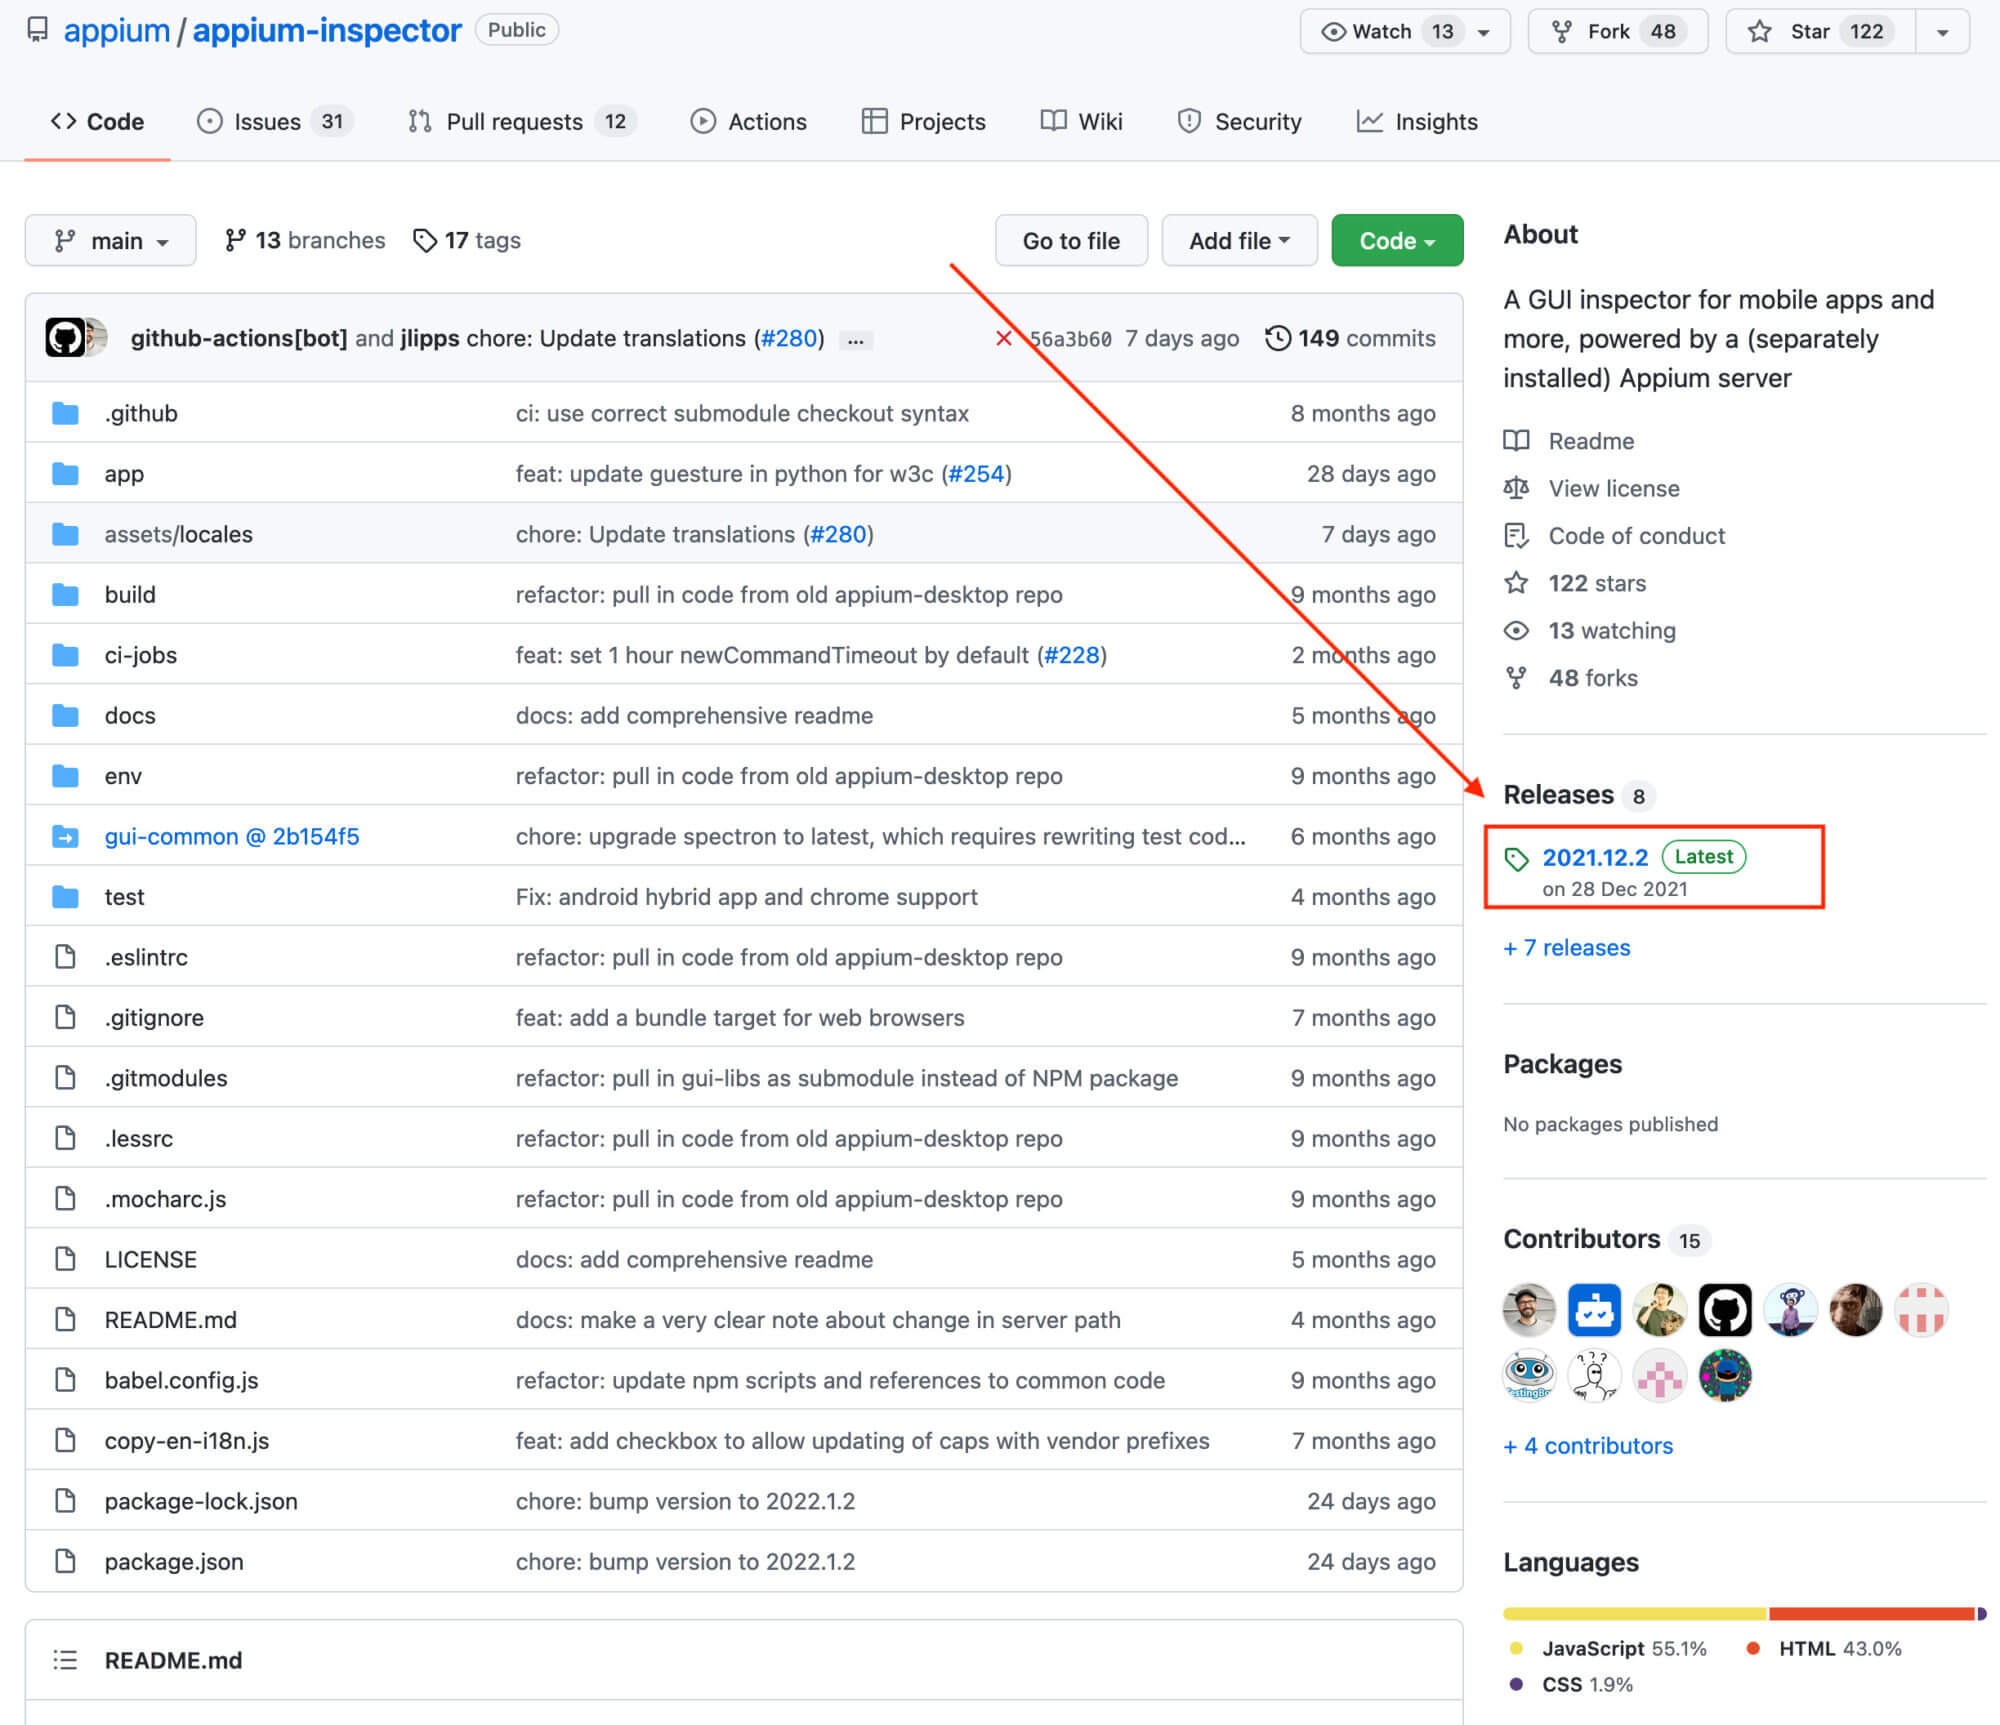
Go to release and find the latest .dmg (on Mac) or .exe (on Windows) to download and install.
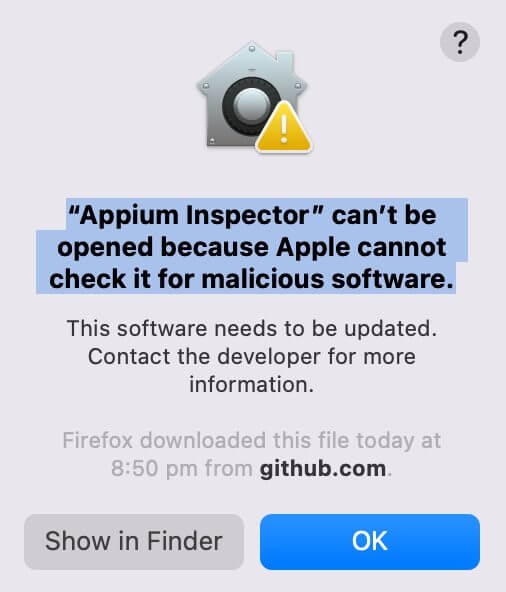
On Mac, you may get a warning stating: “Appium Inspector” can’t be opened because Apple cannot check it for malicious software.
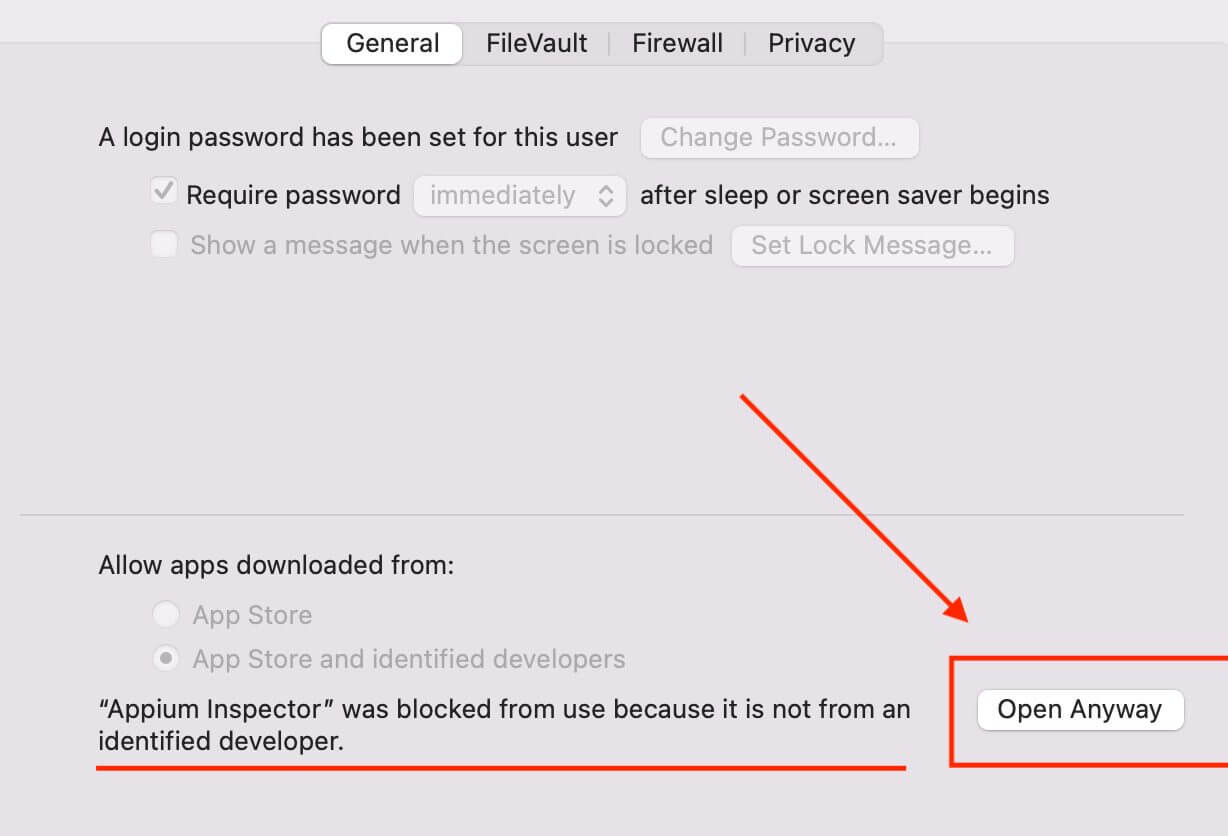
To mitigate this, just go to System preferences > Security & Privacy > General and say Open Anyway for Appium Inspector. For more details see Issue 1217.
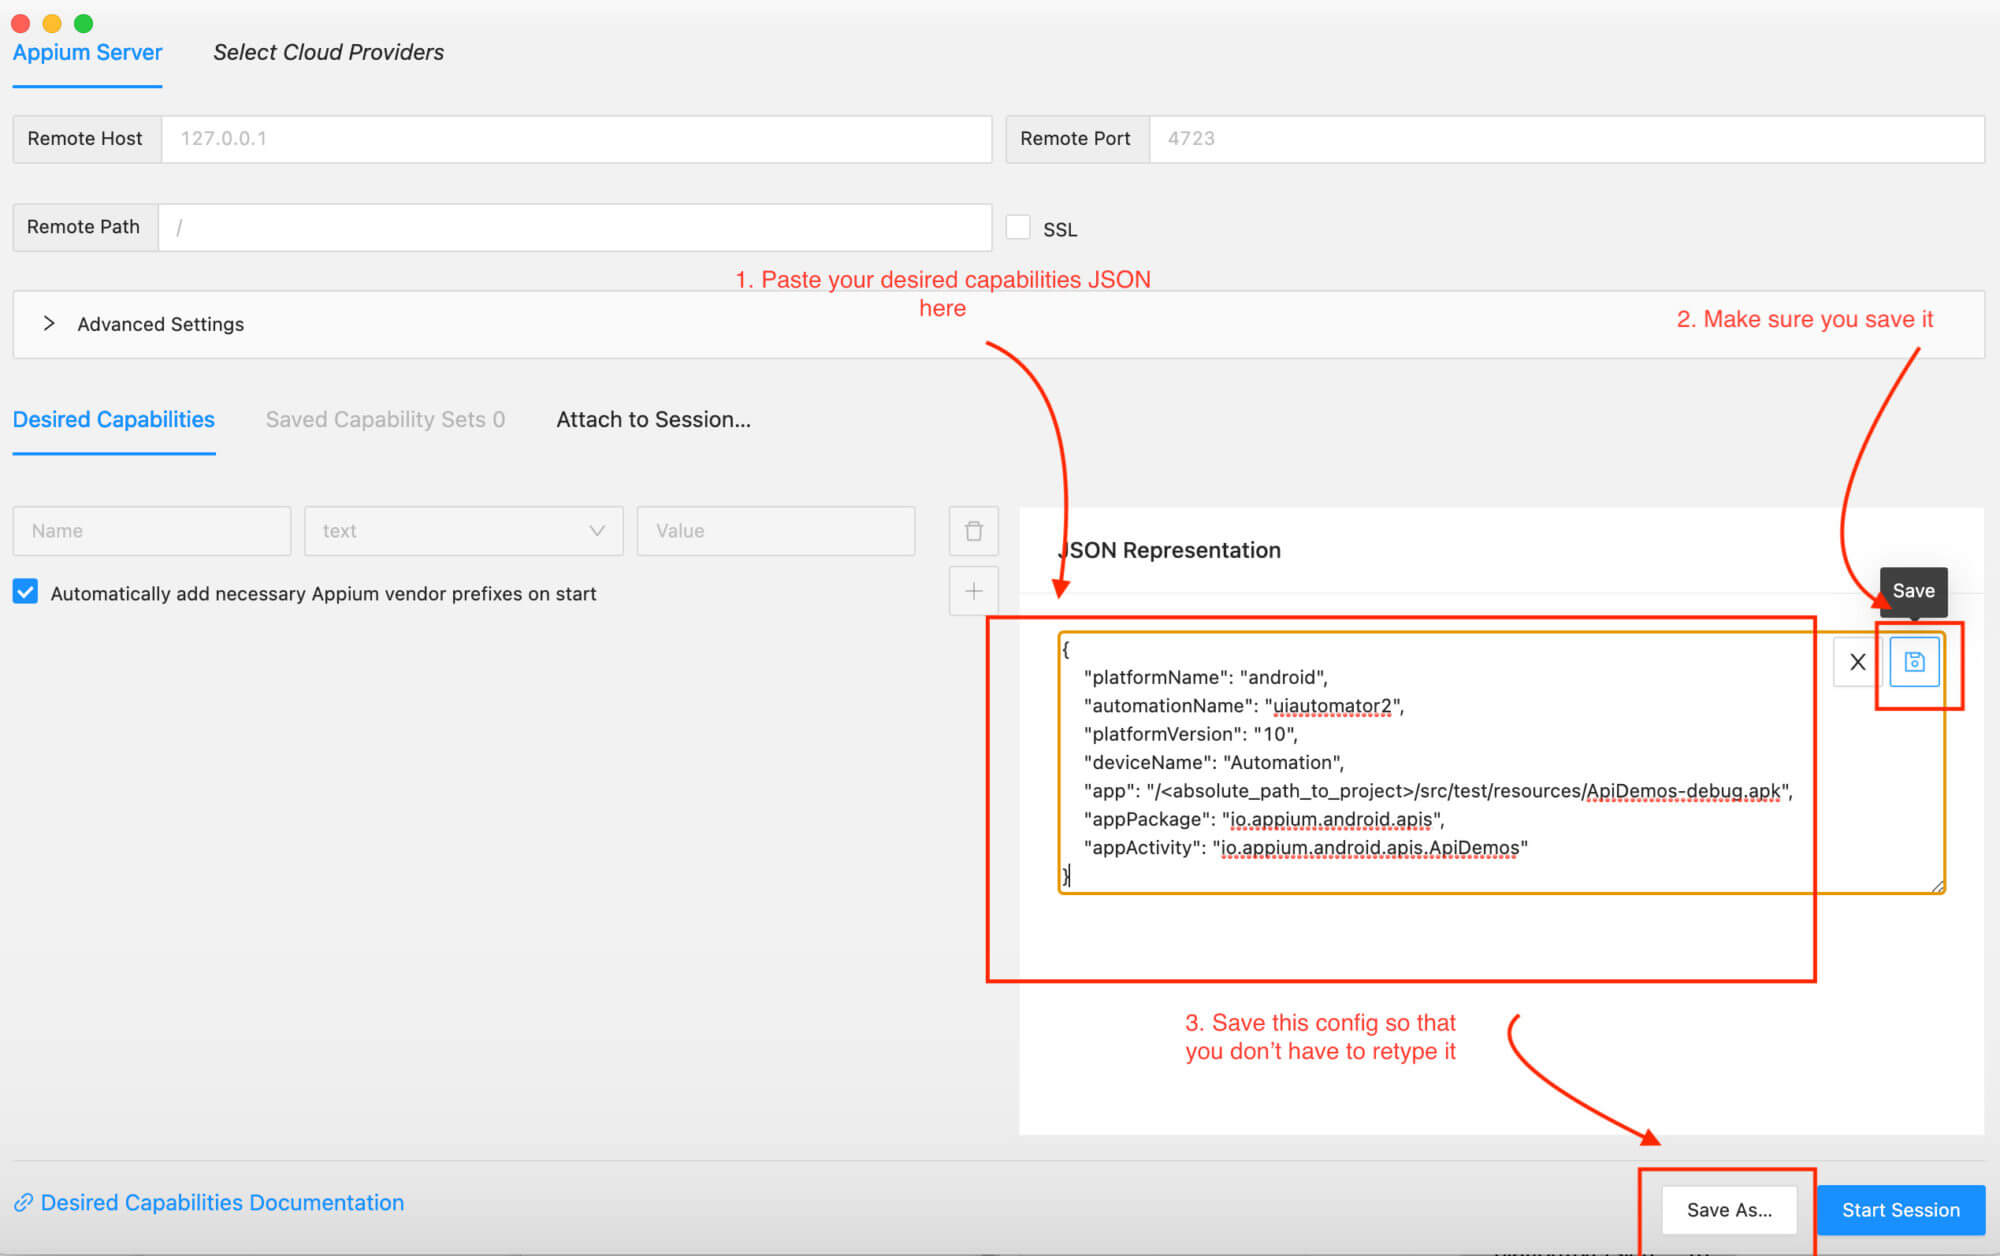
Setting up Desired Capabilities
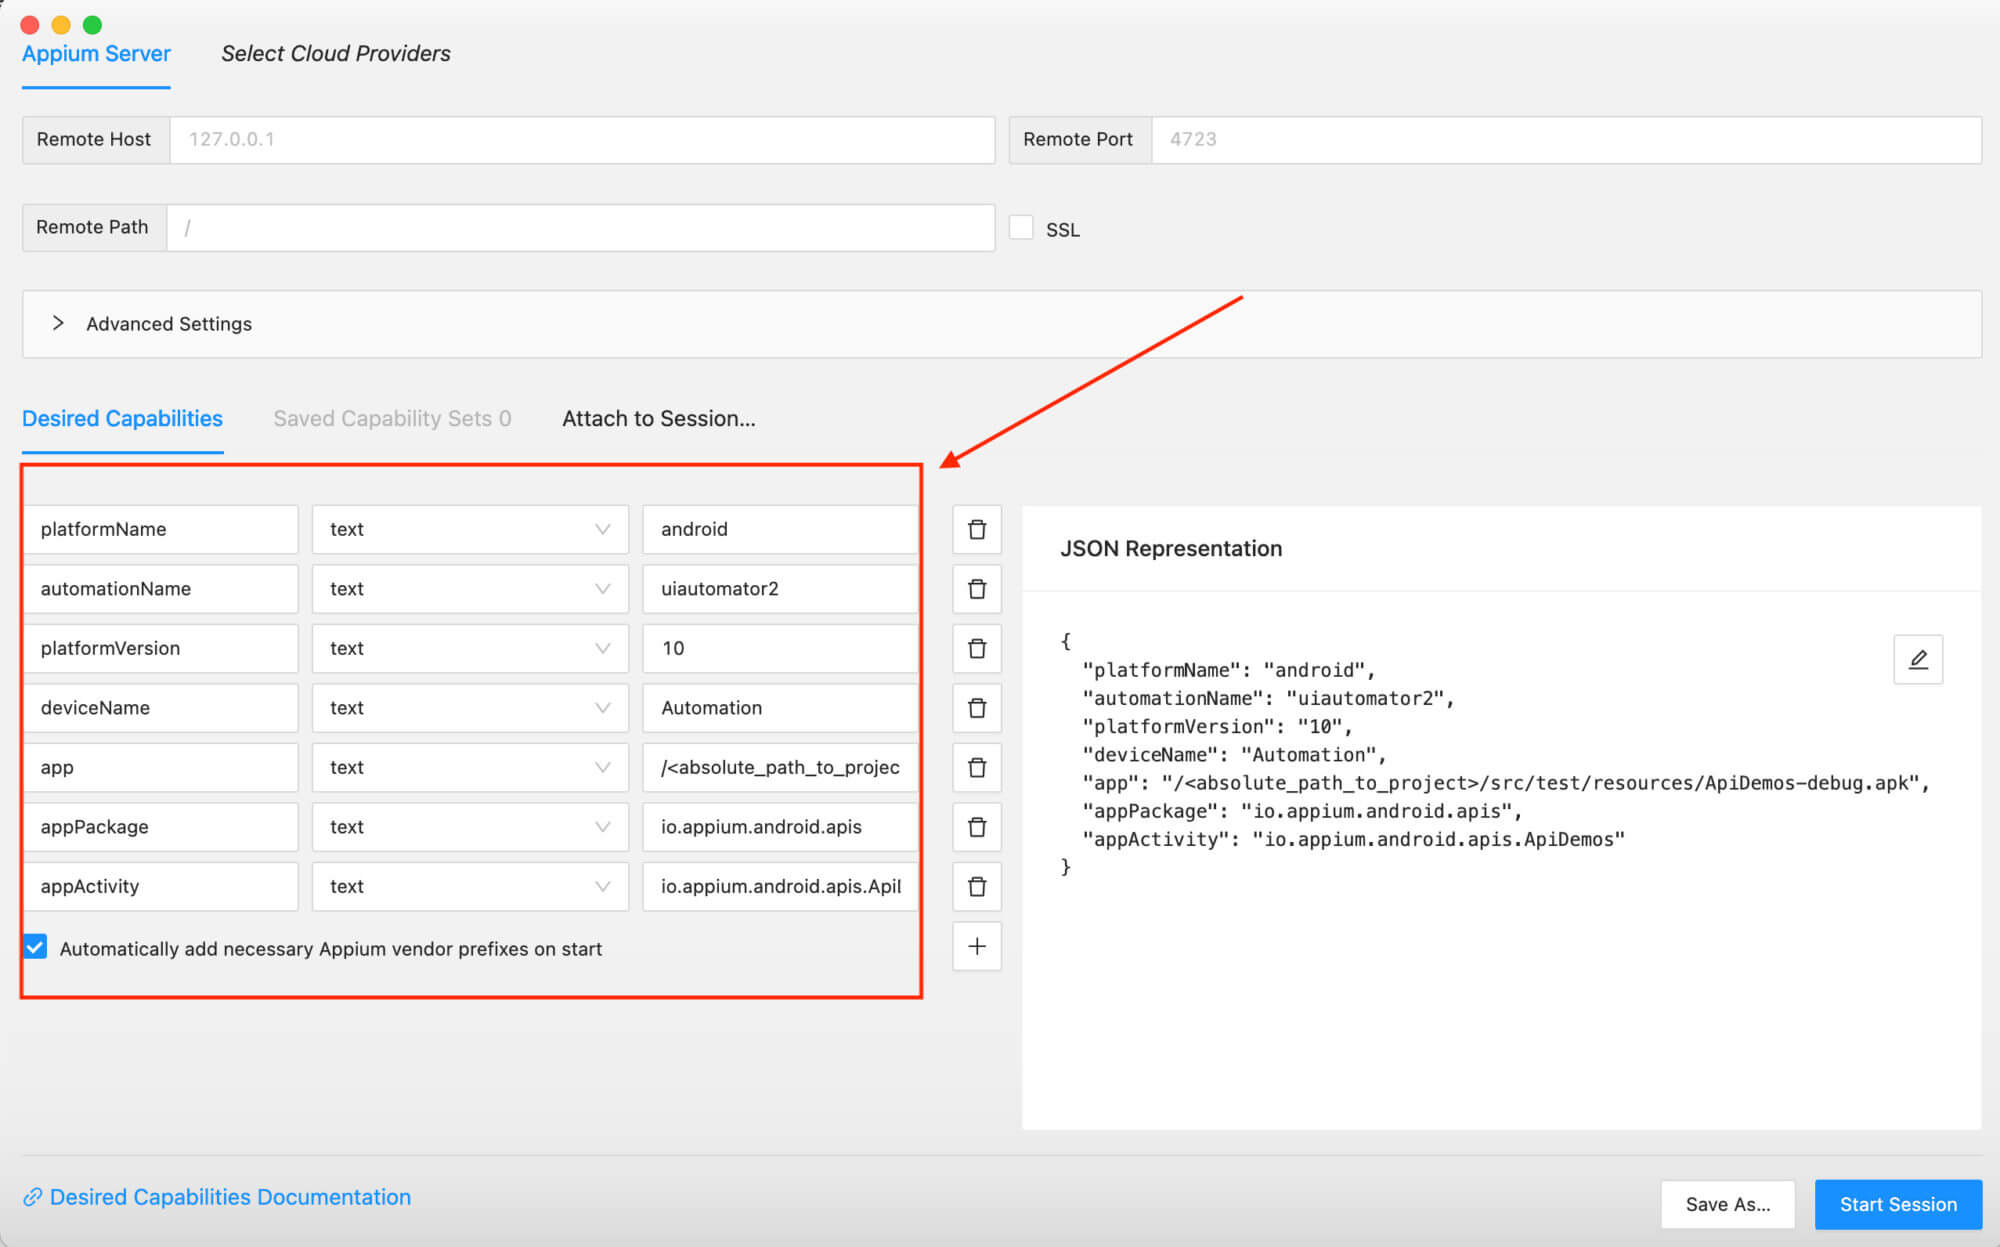
Once you launch Appium inspector, you’ll be greeted with the below home screen. If you see there is a JSON representation sector under Desired Capabilities section.
What are Desired Capabilities?
Think of them as properties that you want your driver’s session to have. For example, you may want to reset your app after your test, or launch the app in a particular orientation. These are all achievable by specifying a Key-Value pair in a JSON that we provide to the Appium server session.
Please see Appium docs for more idea on these capabilities.
Below are some sample capabilities we can give for Android:
{
    "platformName": "android",
    "automationName": "uiautomator2",
    "platformVersion": "10",
    "deviceName": "Automation",
    "app": "/<absolute_path_to_app>/ApiDemos-debug.apk",
    "appPackage": "io.appium.android.apis",
    "appActivity": "io.appium.android.apis.ApiDemos"
}
For this post, we’ll use the sample apps provided by Appium. You can see them here, once you’ve downloaded them. Keep track of its absolute path and update it in-app key in the JSON.
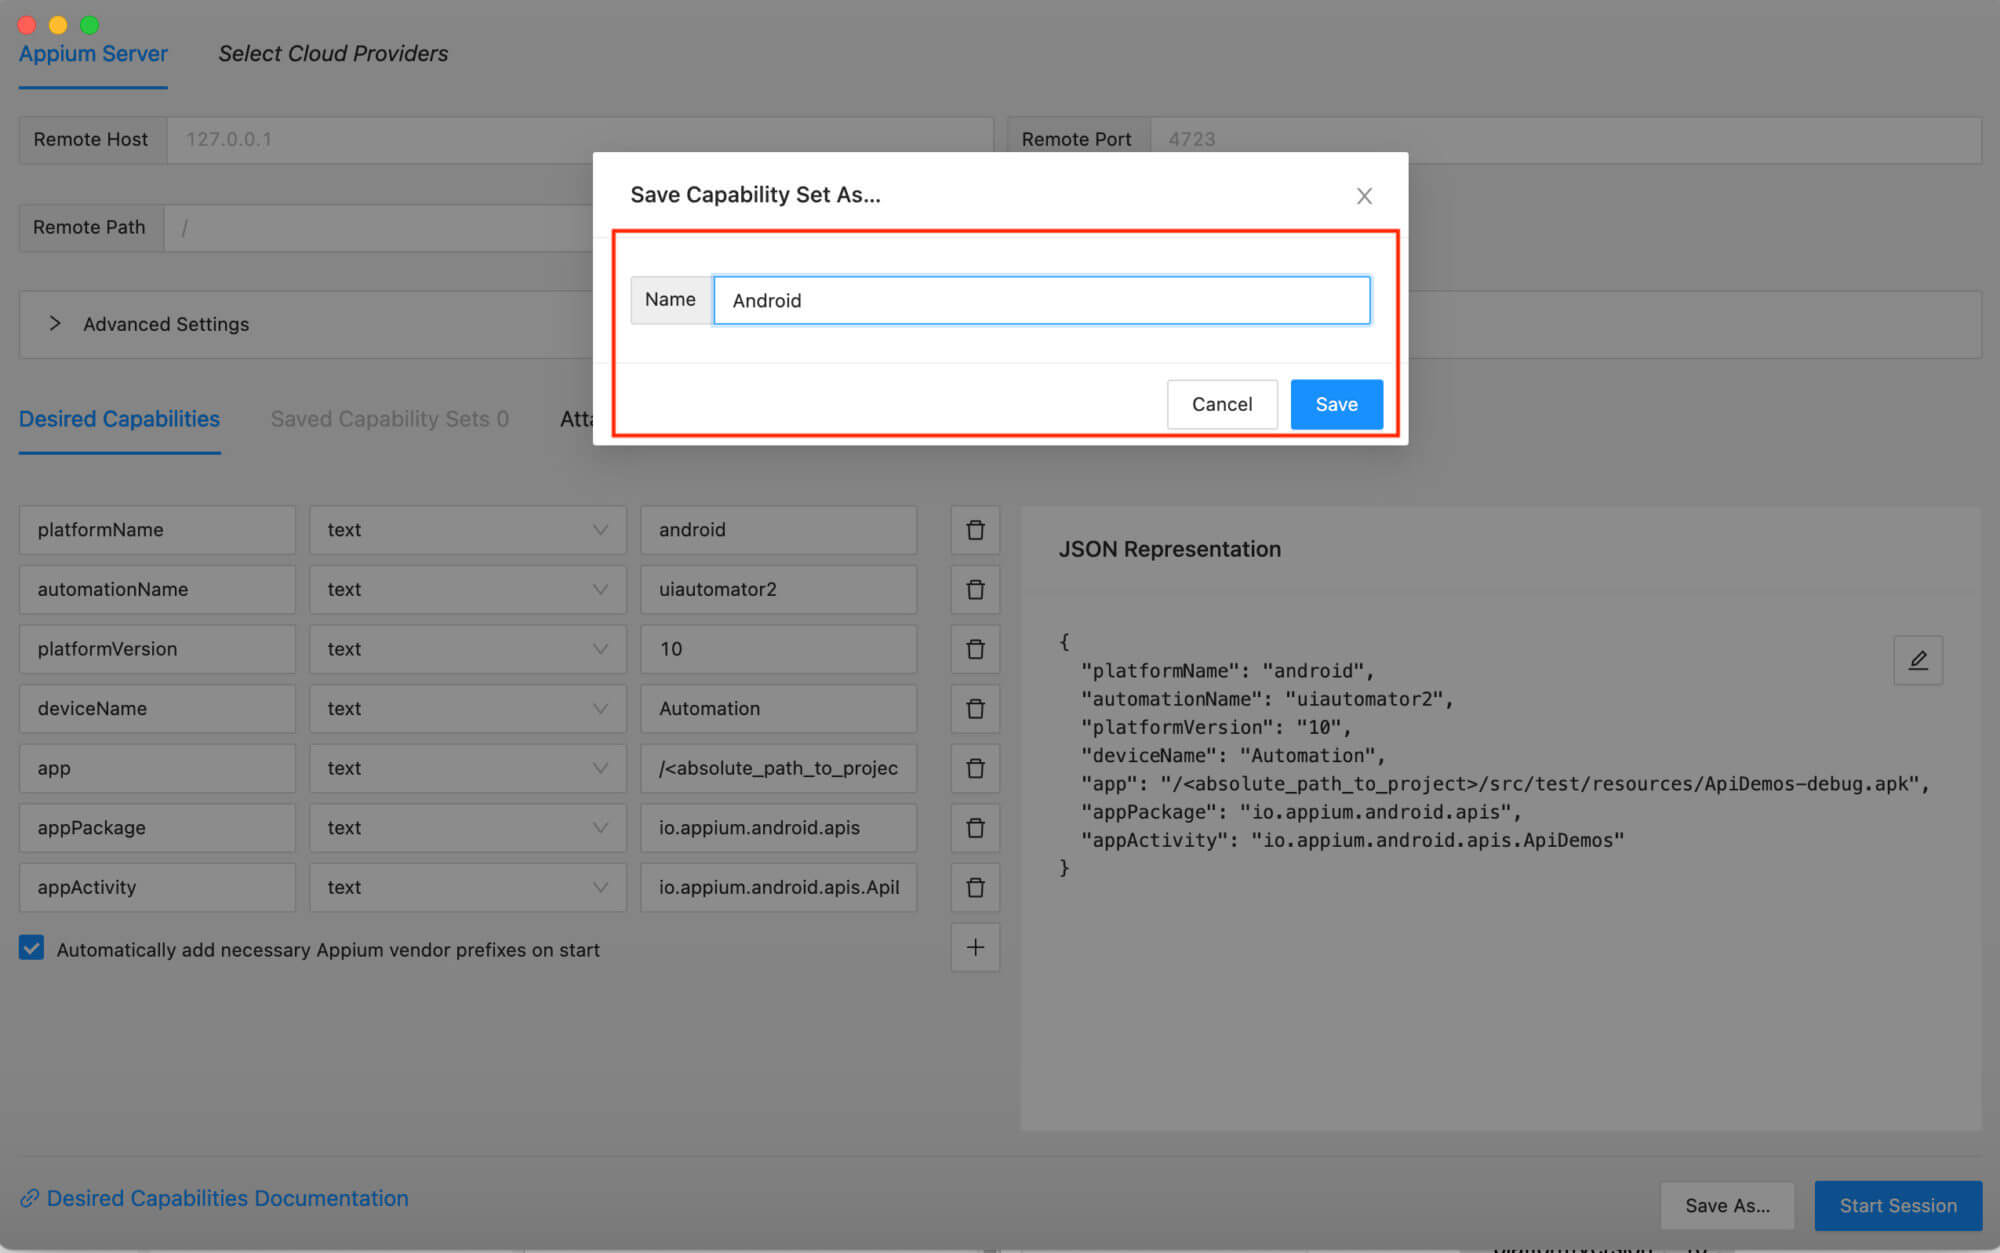
We’ll add this JSON under JSON representation and then tap on the Save button.
It would be a good idea to save this config for the future. You can tap on ‘Save as’ and give it a meaningful name.
Starting the Inspector Session
To start the inspection session, You need to have an Appium server run locally, run it via typing appium on the command line:
➜  appium-fast-boilerplate git:(main) appium
[Appium] Welcome to Appium v2.0.0-beta.25
[Appium] Attempting to load driver uiautomator2...
[Appium] Appium REST http interface listener started on 0.0.0.0:4723
[Appium] Available drivers:
[Appium]   - uiautomator2@2.0.1 (automationName 'UiAutomator2')
[Appium] No plugins have been installed. Use the "appium plugin" command to install the one(s) you want to use.
Let’s make sure our emulator is also up and running. We can start the emulator via AVD Manager in Android studio, or in case you are more command-line savvy, I have written an earlier post on how to do this via CMDline as well.
Once done, tap on the Start Session button, this should bring launch the API Demos app and show the inspector home screen.
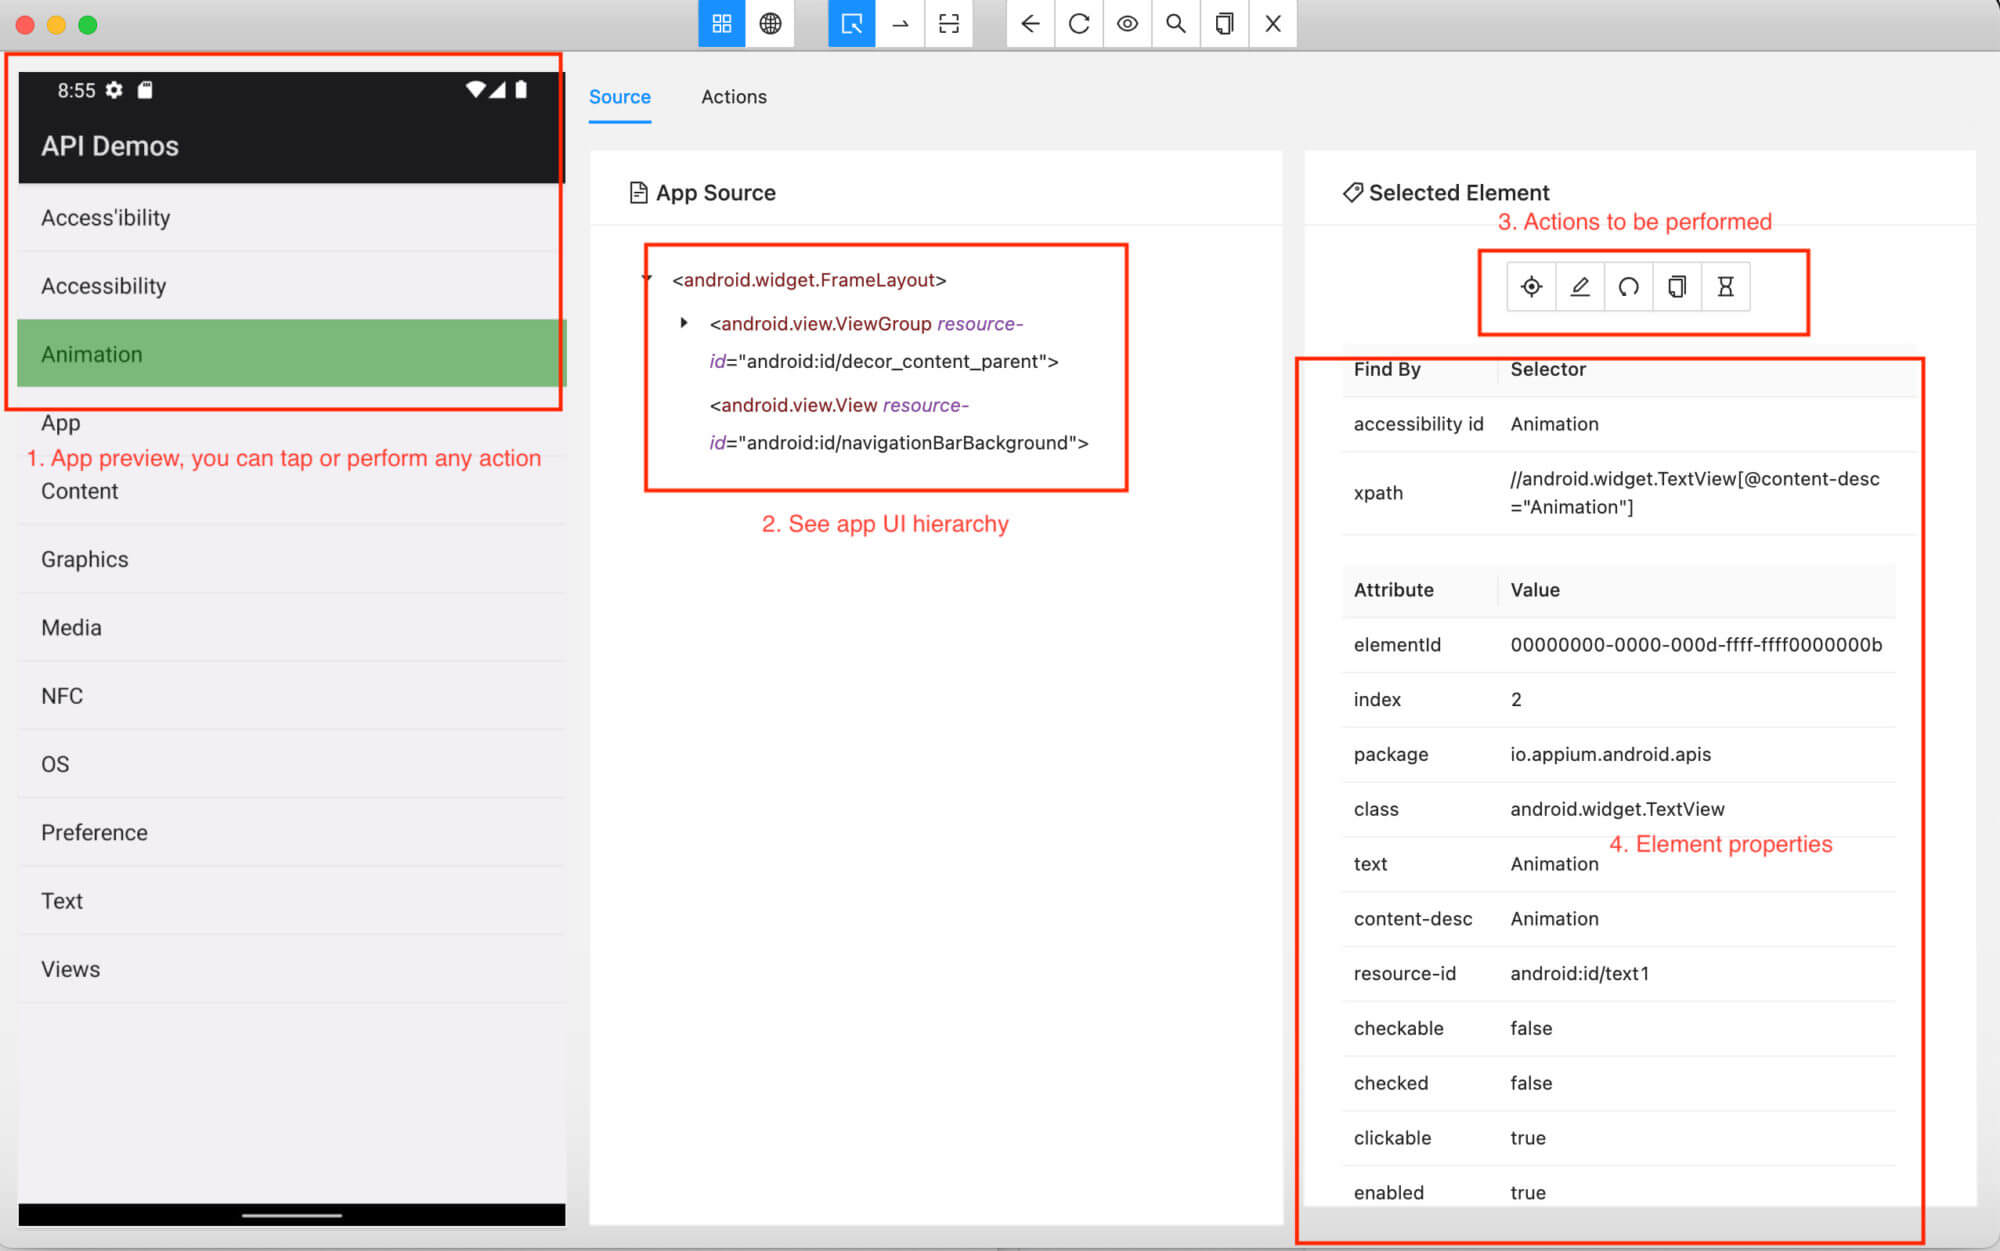
Using this you can tap on any element in the app and see its Element hierarchy, elements properties. This is very useful to author Appium scripts and I’ll encourage you to explore each section of this tool and get familiar since you’ll be using this a lot.
Writing Our First Android Test Using Appium
Phew, that seemed like a lot of setup steps but don’t worry, you only have to do this once and now we can get down to the real business of writing our first Automated test on Android.
You can download the project using Github from appium-fast-boilerplate.
We’ll also understand what the fundamental concepts of writing page objects and tests are based on these. Let’s take a look at the high-level architecture.

What Would This Test Do?
Before automating any test, we need to be clear on what is the purpose of that test. I’ve found the Arrange Act Assert pattern quite useful to reason about it. Read this post by Andrew Knight in case you are interested to know more about it.
Our test would perform the below:
- Opens API Demos app
- Taps around and navigates to Log Text box and taps on Add once
- Verify the log text is displayed
Our Test Class
Let’s start by seeing our test.
import constants.TestGroups;
import org.testng.Assert;
import org.testng.annotations.Test;
import pages.apidemos.home.APIDemosHomePage;

public class AndroidTest extends BaseTest {

    @Test(groups = {TestGroups.ANDROID})
    public void testLogText() {
        String logText = new APIDemosHomePage(this.driver)
                .openText()
                .tapOnLogTextBox()
                .tapOnAddButton()
                .getLogText();

        Assert.assertEquals(logText, "This is a test");
    }
}
There are a few things to notice above:
public class AndroidTest extends BaseTestOur class extends a BaseTest, this is useful since we can perform common setup and tear down functions, including setting up driver sessions and closing it once our script is done.
This ensures that the tests are as simple as possible and does not overload the reader with any more details than they need to see.
String logText = new APIDemosHomePage(this.driver)
                .openText()
                .tapOnLogTextBox()
                .tapOnAddButton()
                .getLogText();
We see our tests read like plain English with a series of actions following each other. This is called a Fluent pattern and we’ll see how this is set up in just a moment.
Base Test and Driver Setup
Let’s see our BaseTest class:
import constants.Target;
import core.driver.DriverManager;
import core.utils.PropertiesReader;
import exceptions.PlatformNotSupportException;
import io.appium.java_client.AppiumDriver;
import org.testng.ITestContext;
import org.testng.annotations.AfterMethod;
import org.testng.annotations.BeforeMethod;

import java.io.IOException;

public class BaseTest {
    protected AppiumDriver driver;
    protected PropertiesReader reader = new PropertiesReader();

    @BeforeMethod(alwaysRun = true)
    public void setup(ITestContext context) {
        context.setAttribute("target", reader.getTarget());

        try {
            Target target = (Target) context.getAttribute("target");
            this.driver = new DriverManager().getInstance(target);
        } catch (IOException | PlatformNotSupportException e) {
            e.printStackTrace();
        }
    }

    @AfterMethod(alwaysRun = true)
    public void teardown() {
        driver.quit();
    }
}
Let’s unpack this class.
protected AppiumDriver driver;We set our driver instance as protected so that all test classes will have access to it.
protected PropertiesReader reader = new PropertiesReader();We create an instance of PropertiesReader class to read relevant properties. This is useful since we want to be able to switch our driver instances based on different test environments and conditions. If curious, please see its implementation here.
Target target = (Target) context.getAttribute("target");
this.driver = new DriverManager().getInstance(target);
We get the relevant Target and then using that gets an instance of AppiumDriver from a class called DriverManager.
Driver Manager to Setup Appium Driver
We’ll use this reusable class to:
- Read capabilities JSON file based on platform (Android/iOS)
- Setup a local driver instance with these capabilities
- This class could independently evolve to setup desired driver instances, either local, the house or remote cloud lab
package core.driver;

import constants.Target;
import exceptions.PlatformNotSupportException;
import io.appium.java_client.AppiumDriver;
import org.openqa.selenium.remote.DesiredCapabilities;

import java.io.IOException;
import java.net.MalformedURLException;
import java.net.URL;
import java.util.HashMap;

import static core.utils.CapabilitiesHelper.readAndMakeCapabilities;

public class DriverManager {
    private static AppiumDriver driver;
    // For Appium < 2.0, append /wd/hub to the APPIUM_SERVER_URL
    String APPIUM_SERVER_URL = "http://127.0.0.1:4723";

    public AppiumDriver getInstance(Target target) throws IOException, PlatformNotSupportException {
        System.out.println("Getting instance of: " + target.name());
        switch (target) {
            case ANDROID:
                return getAndroidDriver();
            case IOS:
                return getIOSDriver();
            default:
                throw new PlatformNotSupportException("Please provide supported target");
        }
    }

    private AppiumDriver getAndroidDriver() throws IOException {
        HashMap map = readAndMakeCapabilities("android-caps.json");
        return getDriver(map);
    }

    private AppiumDriver getIOSDriver() throws IOException {
        HashMap map = readAndMakeCapabilities("ios-caps.json");
        return getDriver(map);
    }

    private AppiumDriver getDriver(HashMap map) {
        DesiredCapabilities desiredCapabilities = new DesiredCapabilities(map);

        try {
            driver = new AppiumDriver(
                    new URL(APPIUM_SERVER_URL), desiredCapabilities);
        } catch (MalformedURLException e) {
            e.printStackTrace();
        }

        return driver;
    }
}
You can observe:
- getInstance method takes a target and based on that tries to get either an Android or an IOS Driver. In the future, if we want to run our tests against a cloud provider like Headspin, SauceLabs, BrowserStack, Applitools, then this class could handle creating the relevant session.
- Both getAndroidDriver and getIOSDriver read a JSON file with similar capabilities as we saw in the Inspector section and then convert it into a Java Hashmap which could be passed into getDriver method that returns an Appium Instance. With this, we could later pass say an environmental context and based on that choose a different capabilities file.
A Simple Page Object with the Fluent Pattern
Let’s take a look at the example of a page object that enables a Fluent pattern.
package pages.apidemos.home;

import core.page.BasePage;
import io.appium.java_client.AppiumDriver;
import org.openqa.selenium.By;
import org.openqa.selenium.WebElement;
import pages.apidemos.logtextbox.LogTextBoxPage;

public class APIDemosHomePage extends BasePage {
    private final By textButton = By.xpath("//android.widget.TextView[@content-desc=\"Text\"]");
    private final By logTextBoxButton = By.xpath("//android.widget.TextView[@content-desc=\"LogTextBox\"]");

    public APIDemosHomePage(AppiumDriver driver) {
        super(driver);
    }

    public APIDemosHomePage openText() {
        WebElement text = getElement(textButton);
        click(text);

        return this;
    }

    public LogTextBoxPage tapOnLogTextBox() {
        WebElement logTextBoxButtonElement = getElement(logTextBoxButton);
        waitForElementToBeVisible(logTextBoxButtonElement);

        click(logTextBoxButtonElement);

        return new LogTextBoxPage(driver);
    }
}
Notice the following:
Above is an example page object class:
- With 2 XPath locators defined with By clause
- We init the driver in BasePage class
- The test actions return either this (i.e. current page) or next page object to enable a Fluent pattern. Following this, we can create a sort of action graph where any action that a test takes connects to the next set of actions this page can take and makes writing test scripts a breeze.
Base Page Class
package core.page;

import io.appium.java_client.AppiumDriver;
import org.openqa.selenium.By;
import org.openqa.selenium.WebElement;
import org.openqa.selenium.support.ui.ExpectedConditions;
import org.openqa.selenium.support.ui.WebDriverWait;

import java.util.List;

public class BasePage {
    protected AppiumDriver driver;

    public BasePage(AppiumDriver driver) {
        this.driver = driver;
    }

    public void click(WebElement elem) {
        elem.click();
    }

    public WebElement getElement(By by) {
        return driver.findElement(by);
    }

    public List<WebElement> getElements(By by) {
        return driver.findElements(by);
    }

    public String getText(WebElement elem) {
        return elem.getText();
    }

    public void waitForElementToBeVisible(WebElement elem) {
        WebDriverWait wait = new WebDriverWait(driver, 10);
        wait.until(ExpectedConditions.visibilityOf(elem));
    }

    public void waitForElementToBePresent(By by) {
        WebDriverWait wait = new WebDriverWait(driver, 10);
        wait.until(ExpectedConditions.presenceOfElementLocated(by));
    }

    public void type(WebElement elem, String text) {
        elem.sendKeys(text);
    }
}
Every page object inherits from a BasePage that wraps Appium methods.
- This provides us an abstraction and allows us to create our own project-specific reusable actions and methods. This is a very good pattern to follow for a few reasons
- Say we want to provide some custom functionality like adding a logger line in our own logging infrastructure whenever an Appium action is performed, we can wrap those methods and perform this.
- Also in the case in future Appium breaks an API, this change is not cascaded to all our page objects, rather only to this class where we can handle it in an appropriate manner to provide backward compatibility.
- A word of caution ⚠️: Do not dump every method in this class, try to compose only relevant actions.
Congratulations, you’ve written your first Appium Android test. You can run this either via the IDE or via a Gradle command
./gradlew clean build runTests -Dtag="ANDROID" -Ddevice="ANDROID"Conclusion
You can see the entire project on the Github appium-fast-boilerplate, clone it and play around with it. Hopefully, this post helps you a little bit in starting on Android automation using Appium.
In the next post, we’ll dive into the world of iOS Automation with Appium and write our first hello world test.
You could also check out https://automationhacks.io for other posts that I’ve written about software engineering and testing.
As always, do share this with your friends or colleagues and if you have thoughts or feedback, I’d be more than happy to chat over at Twitter or elsewhere. Until next time. Happy testing and coding.