This is the third and final post in our Hello World introduction series to Appium, and we’ll discuss how to create your first Appium test for iOS. You can read the first post for an introduction to Appium, or the second to learn how to create your first Appium test for Android.
Congratulations on having made it so far. I hope you are slowly becoming more comfortable with Appium and realizing just how powerful a tool it really is for mobile automation, and that it’s not that difficult to get started with it.
This is the final post in this short series on helping you start with Appium and write your first tests. If you need a refresher on what Appium is and writing your first Android test with it, you can read the earlier parts here:
- Hello Appium, Part 1: What is Appium? An Introduction to Appium and its Tooling
- Hello Appium, Part 2: Writing Your First Android Test
Say Hello to iOS! ?
In this post, we’ll learn how to set up your dev environment and write your first Appium based iOS test.
Setup Dependencies
We’ll need some dependencies to be preinstalled on your dev machine.
Let’s go over them one by one.
Also, remember it’s completely okay if you don’t understand all the details of these in the beginning since Appium pretty much abstracts those details away and you can always dig deeper later on if you need some very specific capabilities of these libraries.
Step 1: Install XCode Select
To run iOS tests, we need a machine running macOS with Xcode installed.
The below command would setup Command-line scripts that are needed for us to be able to run our first test:
xcode-select --installStep 2: Install Carthage
You can think of Carthage as a tool to allow adding frameworks to your Cocoa applications and to build required dependencies:
brew install carthageStep 3: Install libimobiledevice
libimobiledevice library allows Appium to talk to iOS devices using native protocols:
brew install libimobiledeviceStep 4: Install ios-deploy
ios-deploy helps to install and debug iOS apps from the command line:
brew install ios-deployStep 5: Install ios-webkit-debug-proxy
- ios_webkit_debug_proxy (aka iwdp) proxies requests from usbmuxd daemon over a web socket connection
- Allows developers to send commands to MobileSafari and UIWebViews on real and simulated iOS devices.
brew install ios-webkit-debug-proxyStep 6: Optional Dependencies
IDB (iOS Device bridge) is a node JS wrapper over IDB that are a set of utilities made by Facebook:
brew tap facebook/fb
brew install idb-companion
pip3.6 install fb-idb
If you are curious, you could read the below reference blogs below that helped me come up with this shortlist of dependencies and are good reads for more context:
- appium-xcuitest-driver
- The XCUITest Driver for iOS
- Real device setup
- How to setup iOS Automation on Mac OS by Automation step by step
- How To Test On Real iOS Devices With Appium, Part 1 from Appium pro
Your First Appium iOS Test
For our first iOS test, we’ll use a sample demo app provided by Appium.
You can download the zip file from here, unzip it and ensure you copy it under src/test/resources dir in the project, such that we have a TestApp.app file under the test resources folder.
If you are following these tests along by checking out the GitHub repo appium-fast-boilerplate, you’ll see the iOS app path is mentioned under a file ios-caps.json under src/main/resources/.
This file represents Appium capabilities in JSON format and you can change them based on which iOS device you want to run them on.
When we run the test DriverManager will pick these up and help create the Appium session. You can read part 2 of this blog series to know more about this flow.
{
  "platformName": "iOS",
  "automationName": "XCUITest",
  "deviceName": "iPhone 13",
  "app": "src/test/resources/TestApp.app"
}
Which Steps Would We Automate?
Our app has a set of UI controls with one section representing a calculator wherein we could enter two numbers and get their sum (see below snapshot):
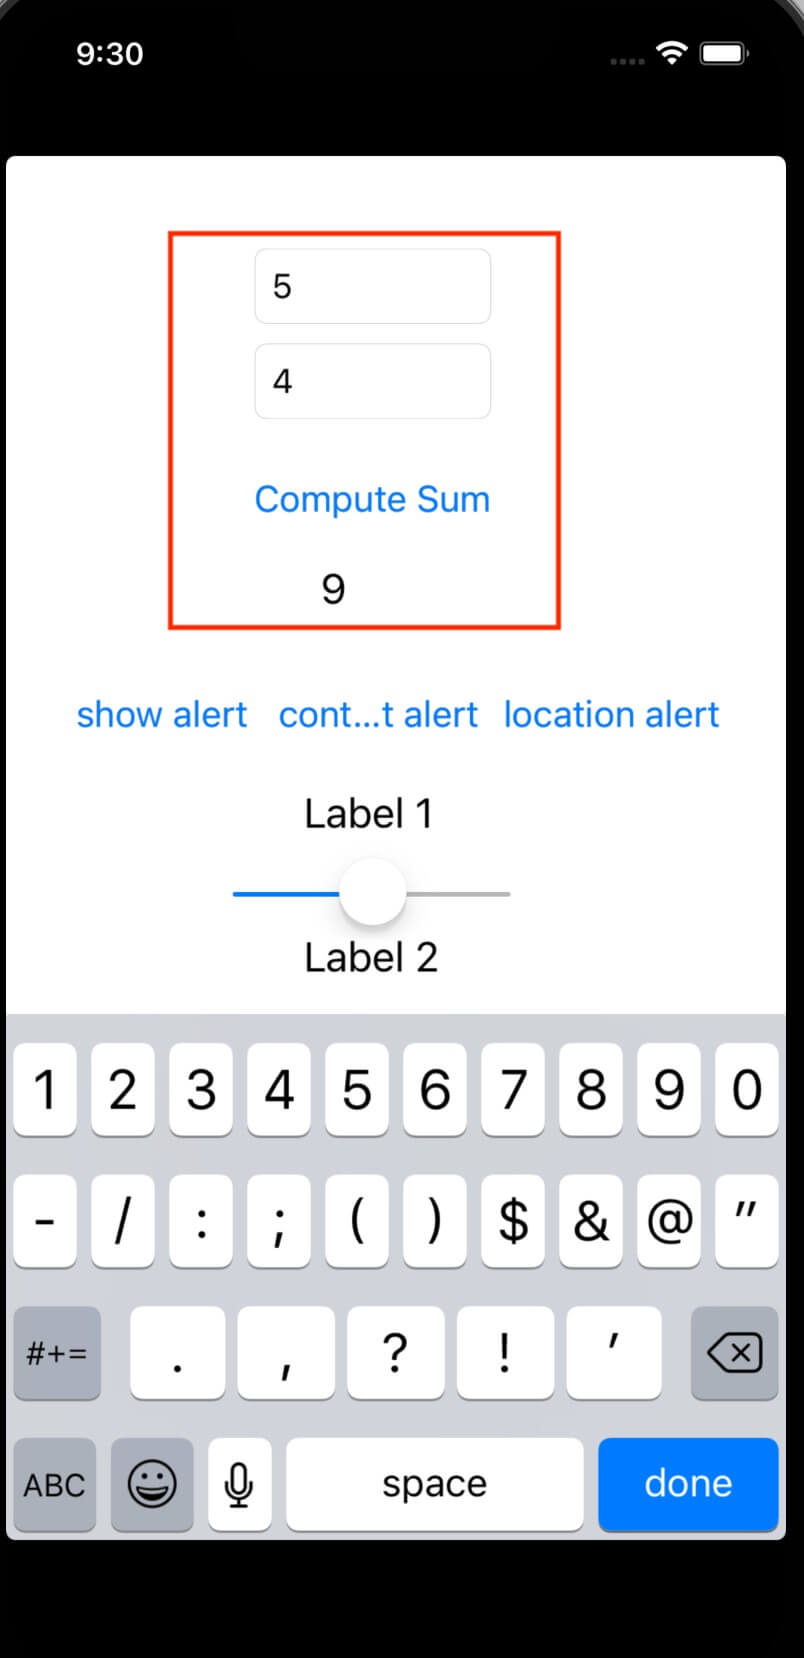
We would automate the below flow:
- Open AUT (Application under test)
- Enter first no in Textbox
- Enter second no in Textbox
- Tap on Compute sum button
- Verify the total is indeed correct
Pretty basic right?
Below is how a sample test would look like (see the code here):
import constants.TestGroups;
import org.testng.Assert;
import org.testng.annotations.Test;
import pages.testapp.home.HomePage;

public class IOSTest extends BaseTest {

   @Test(groups = {TestGroups.IOS})
   public void addNumbers() {
       String actualSum = new HomePage(this.driver)
               .enterTwoNumbersAndCompute("5", "5")
               .getSum();

       Assert.assertEquals(actualSum, "10");
   }
}
Here, we follow the same good patterns that have served us well (like using Fluent, page objects, a base test, and driver manager) in our tests just as we did in our Android test.
You can read about these in detail in this earlier blog.
Your First iOS Page Object
The beauty of the page object pattern is that it looks very similar regardless of the platform.
Below is the complete page object for the above test that implements the desired behavior for this test.
package pages.testapp.home;

import core.page.BasePage;
import io.appium.java_client.AppiumDriver;
import org.openqa.selenium.By;
import org.openqa.selenium.WebElement;

public class HomePage extends BasePage {
   private final By firstNumber = By.name("IntegerA");
   private final By secondNumber = By.name("IntegerB");
   private final By computeSumButton = By.name("ComputeSumButton");
   private final By answer = By.name("Answer");

   public HomePage(AppiumDriver driver) {
       super(driver);
   }

   public HomePage enterTwoNumbersAndCompute(String first, String second) {
       typeFirstNumber(first);
       typeSecondNumber(second);
       compute();
       return this;
   }

   public HomePage typeFirstNumber(String number) {
       WebElement firstNoElement = getElement(firstNumber);
       type(firstNoElement, number);
       return this;
   }

   public HomePage typeSecondNumber(String number) {
       WebElement secondNoElement = getElement(secondNumber);
       type(secondNoElement, number);
       return this;
   }

   public HomePage compute() {
       WebElement computeBtn = getElement(computeSumButton);
       click(computeBtn);
       return this;
   }

   public String getSum() {
       waitForElementToBePresent(answer);
       return getText(getElement(answer));
   }
}
Let’s unpack this and understand its components.
We create a HomePage class that inherits from BasePage that has wrappers over Appium API methods.
public class HomePage extends BasePageWe define our selectors of type By, using the Appium inspector to discover that name is the unique selector for these elements, in your projects trying to depend on ID is probably a safer bet.
private final By firstNumber = By.name("IntegerA");
private final By secondNumber = By.name("IntegerB");
private final By computeSumButton = By.name("ComputeSumButton");
private final By answer = By.name("Answer");
Next, we initialize this class with a driver instance that’s passed the test and also its parent class to ensure we have the appropriate driver instance set:
public HomePage(AppiumDriver driver) {
   super(driver);
}
We then create a wrapper function that takes two numbers as strings, types numbers in the two text boxes, and taps on the button.
public HomePage enterTwoNumbersAndCompute(String first, String second) {
   typeFirstNumber(first);
   typeSecondNumber(second);
   compute();
   return this;
}
We implement these methods by reusing methods from BasePage while ensuring the correct page object is returned.
Since there is no redirection happening in these tests and it’s a single screen we just return this (i.e. the current page object in Java syntax). This enables writing tests in the Fluent style that you saw earlier.
public HomePage typeFirstNumber(String number) {
   WebElement firstNoElement = getElement(firstNumber);
   type(firstNoElement, number);
   return this;
}

public HomePage typeSecondNumber(String number) {
   WebElement secondNoElement = getElement(secondNumber);
   type(secondNoElement, number);
   return this;
}

public HomePage compute() {
   WebElement computeBtn = getElement(computeSumButton);
   click(computeBtn);
   return this;
}
Finally, we return the string that has the sum of two numbers in the getSum() method and let the test perform desired assertions:
public String getSum() {
   waitForElementToBePresent(answer);
   return getText(getElement(answer));
}
Running the Test
Before running the test, ensure that the Appium server is running in another terminal and that your appium 2.0 server has the XCUITest driver installed by following the below steps
# Ensure driver is installed
appium driver install xcuitest

# Start the appium server before running your test
appium
Within the project, you could run the test using the below command or use IntelliJ or equivalent editors test runner to run the desired test.
gradle wrapper clean build runTests -Dtag="IOS" -Dtarget="IOS"Conclusion
With this, we come to an end to this short three-part series on getting started with Appium, from a general introduction to Appium to working with Android to this post on iOS. Hopefully, this series makes it a little bit easier for you or your friends to get set up with Appium.
Exploring the remainder of Appium’s API, capabilities and tooling is left as an exercise to you, my brave and curious reader. I’m sure pretty soon you’ll also be sharing similar posts and hopefully, I’ll learn a thing or two from you as well. Remember Appium docs, the community, and Appium Conf are great sources to go deeper into Appium ?.
So, what are you waiting for? Go for it!
Remember, you can see the entire project on Github at appium-fast-boilerplate, clone or fork it, and play around with it. Hopefully, this post helps you a little bit in starting on iOS automation using Appium. If you found it valuable, do leave a star on the repo and in case there is any feedback, don’t hesitate to create an issue.
You could also check out https://automationhacks.io for other posts that I’ve written about Software engineering and Testing and this page for a talk that I gave on the same topic.
As always, please do share this with your friends or colleagues and if you have thoughts or feedback, I’d be more than happy to chat over on Twitter or in the comments. Until next time. Happy testing and coding.