Learn the cross device testing practices you need to implement to get closer to Continuous Delivery for native mobile apps.
Table of Contents
What is Cross Device Testing
Modern cross device testing is the system by which you verify that an application delivers the desired results on a wide variety of devices and formats. Ideally this testing will be done quickly and continuously.
There are many articles explaining how to do CI/CD for web applications, and many companies are already doing it successfully, but there is not much information available out there about how to achieve the same for native mobile apps.
This post will shed light on the cross device testing practices you need to implement to get a step closer to Continuous Delivery for native mobile apps.
Why is Cross Device Testing Important
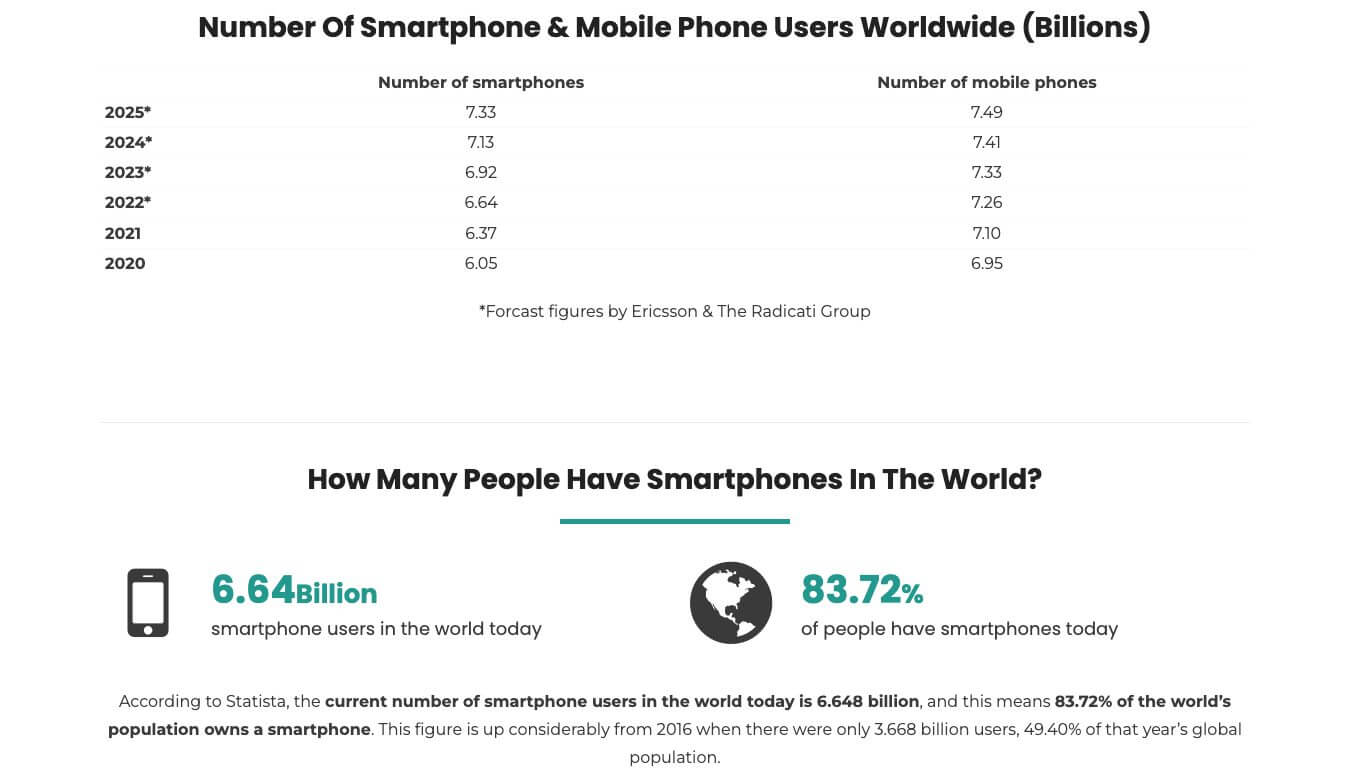
The number of mobile devices used globally is staggering. Based on the data from bankmycell.com, we have 6.64 billion smartphones in use.
Even if we are building and testing an app which impacts a fraction of this number, that is still a very huge number.
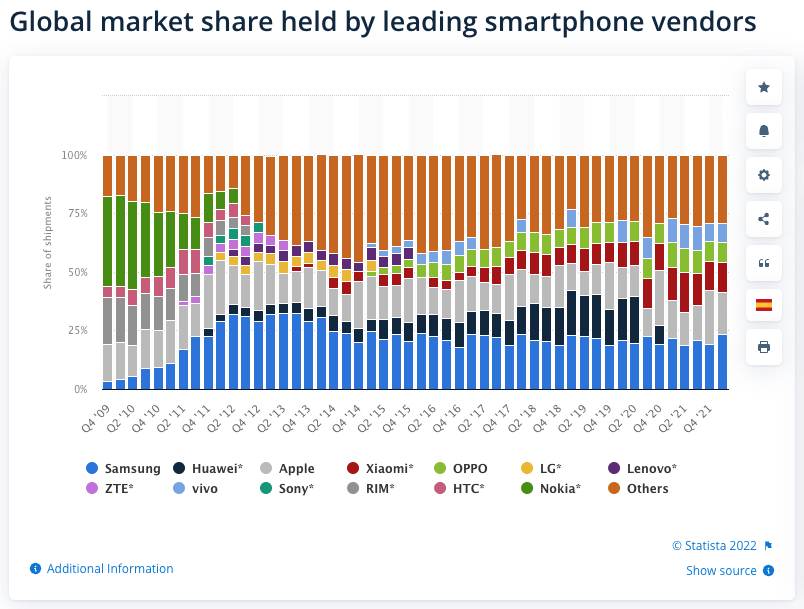
The below chart shows the market share by some leading smartphone vendors over the years.
Challenges of Cross Device Testing
One of the biggest challenges for testing mobile apps is that across all manufacturers combined, there are 1000s of device types in use today. Depending on the popularity of your app, this means there are a huge number of devices your users could be using.
These devices will have variations based on:
- OS types and versions
- potentially customized OS
- hardware resources (memory, processing power, etc.)
- screen sizes
- screen resolutions
- storage with different available capacity for each
- Wifi Vs using mobile data (from different carriers)
- And many more
It is clear that you cannot run our tests on each type of device that may be used by your users.
So how do you get quick feedback and confidence from your testing that (almost) no user will get impacted negatively when you release a new version of your app?
Mobile Test Automation Execution Strategy
Mobile Testing Strategy
Before we think about the strategy for running your automated tests for mobile apps, we need to have a good and holistic mobile testing strategy.
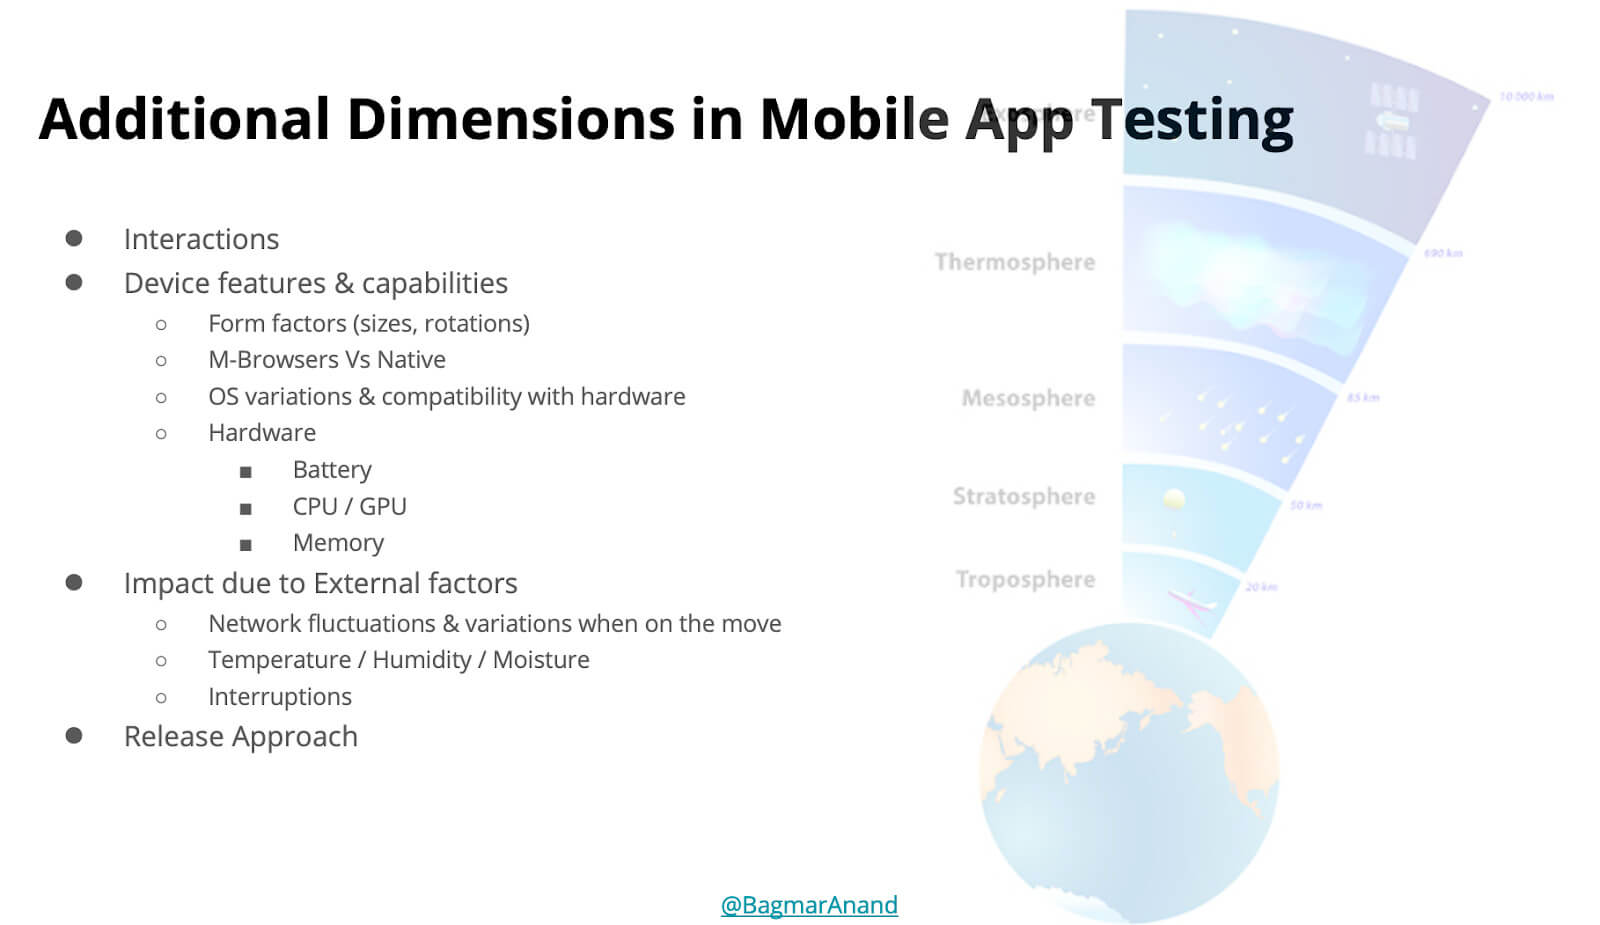
Along with testing the app functionality, mobile testing has additional dimensions, and hence complexities as compared with web-app testing.
You need to understand the impact of the aspects mentioned above and see what may, or may not be applicable to you.
Here are some high-level aspects to consider in your mobile testing strategy:
- Know where and how to run the tests – real devices, emulators / simulators available locally versus in some cloud-based device farm
- Increasing test coverage by writing less code – using Applitools Visual AI to validate functionality and user-experience
- Scaling your test execution – using Applitools Native Mobile Grid
- Testing on different text fonts and display densities
- Testing for accessibility conformance and impact of dark mode on functionality and user experience
- Chaos & Monkey Testing
- Location-based testing
- Testing the impact of Network bandwidth
- Planning and setting up the release strategy for your mobile application including beta-testing, on-field testing, staged-rollouts. This differs for Google PlayStore and Apple
- Building and testing for Observability & Analytics events
Once you have figured out your Mobile Testing Strategy, you now need to think about how and what type of automated tests can give you good, reliable, deterministic and fast feedback about the quality of your apps. This will result in you identifying the different layers of your test automation pyramid.
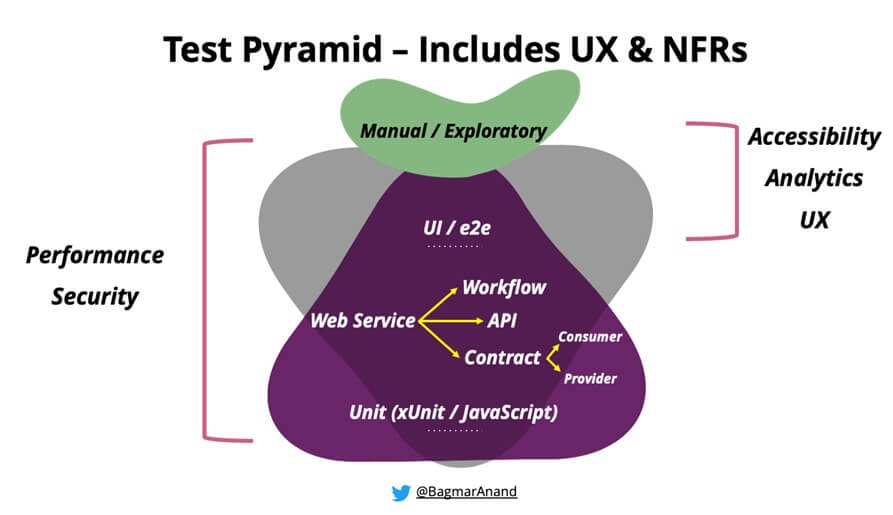
Remember: It is very important to execute all types of automated tests, on every code change and new app that is built. The functional / end-2-end / UI tests for your app should also be run at this time.
Additionally, you need to be able to run the tests on a local developer / qa machine, as well in your Continuous Integration (CI) system. In case of native / hybrid mobile apps, developers and QAs should be able to install the app on the (local) devices they have available with them, and run the tests against that. For CI-based execution, you need to have some form of device farm available locally in your network, or cloud-based to allow execution of the tests.
This continuous testing approach will provide you with quick feedback and allow you to fix issues almost as soon as they creep in the app.
How to Run Functional Tests against Your Mobile Apps
Testing and automating mobile apps have additional complexities. You need to install the app in some device before your automated tests can be run against it.
Let’s explore your options for devices.
Real Devices
Real devices are ideal to run the tests. Your users / customers are going to use your app using a variety of real devices.
In order to allow proper development and testing to be done, each team member needs access to relevant types of devices (which is subject to their user-base).
However, it is not as easy to have a variety of devices available for running the automated tests, for each team member (developer / tester).
The challenges of having the real devices could be related to:
- cost of procuring devices for each team member of a good variety to allow seamless development and testing work.
- maintenance of the devices (OS/software updates, battery issues, other problems the device may have at any point in time, etc.)
- logistical issues like time to order and get devices, tracking of the devices assigned to the team, etc.
- deprecating / disposing the older devices that are not used / required anymore.
Hence we need a different strategy for executing tests on mobile devices. Emulators and Simulators come to the rescue!
What is the Difference between Emulators & Simulators
Before we get into specifics about the execution strategy, it is good to understand the differences between an emulator and simulator.
Android-device emulators and iOS-device simulators make it easy for any team member to easily spin up a device.
An emulator is hardware or software that enables one computer system (called the host) to behave like another computer system (called the guest). An emulator typically enables the host system to run software or use peripheral devices designed for the guest system
An emulator can mimic the operating system, software and the hardware features of the android device.
A Simulator runs on your Mac and behaves like a standard Mac app while simulating iPhone, iPad, Apple Watch, or Apple TV environments. Each combination of a simulated device and software version is considered its own simulation environment, independent of the others, with its own settings and files. These settings and files exist on every device you test within a simulation environment.
An iOS simulator mimics the internal behavior of the device. It cannot mimic the OS / hardware features of the device.
Emulators / Simulators are a great and cost-effective way to overcome the challenges of real devices. These can easily be created as per the requirements and needs by any team member and can be used for testing and also running automated tests. You can also relatively easily set up and use the emulators / simulators in your CI execution environment.
While emulators / simulators may seem like they will solve all the problems, that is not the case. Like with anything, you need to do a proper evaluation and figure out when to use real devices versus emulators / simulators.
Below are some guidelines that I refer to.
When to use Emulators / Simulators
- You are able to validate all application functionality
- There is no performance impact on the application-under-test
Why use Emulators / Simulators
- To reduce cost
- Scale as per needs, resulting in faster feedback
- Can use in CI environment as well
When to use Real Devices for Testing
- If Emulators / Simulators are used, then run “Sanity” / focussed testing on real devices before release
- If Emulators / Simulators cannot validate all application functionality reliably, then invest in Real-Device testing
- If Emulators / Simulators cause performance issues or slowness of interactions with the application-under-test
Cases when Emulators / Simulators May not Help
- If the application-under-test has streaming content, or has high resource requirements
- Applications relying on hardware capabilities
- Applications dependent on customized OS version
Cross-Device Test Automation Strategy
The above approach of using real-devices or emulators / simulators will help your team to shift-left and achieve continuous testing.
There is one challenge that still remains – scaling! How do you ensure your tests run correctly on all supported devices?
A classic, or rather, a traditional way to solve this problem is to repeat the automated test execution on a carefully chosen variety of devices. This would mean, if you have 5 important types of devices, and you have a 100 tests automated, then you are essentially running 500 tests.
This approach has multiple disadvantages:
- The feedback cycle is substantially delayed. If 100 tests took 1 hour to complete on 1 device, 500 tests would take 5 hours (for 5 devices).
- The time to analyze the test results increases by 5x
- The added number of tests could have flaky behavior based on device setup / location, network issues. This could result in re-runs or specific manual re-testing for validation.
- You need 5x more test data
- You are putting 5x more load on your backend systems to cater to executing the same test 5 times
We all know these disadvantages, however, there is no better way to overcome this. Or, is there?
Modern Cross-Device Device Test Automation Strategy
The Applitools Native Mobile Grid for Android and iOS apps can easily help you to overcome the disadvantages of traditional cross-device testing.
It does this by running your test on 1 device, but getting the execution results from all the devices of your choice, automatically. Well, almost automatically. This is how the Applitools Native Mobile Grid works:
- Integrate Applitools SDK in your functional automation.
- In the Applitools Eyes configuration, specify all the devices you want to do your functional testing. Added bonus, you will be able to leverage the Applitools Visual AI capabilities to also get increased functional and visual test coverage.
Below is an example of how to specify Android devices for Applitools Native Mobile Grid:
Configuration config = eyes.getConfiguration(); //Configure the 15 devices we want to validate asynchronously
config.addMobileDevice(new AndroidDeviceInfo(AndroidDeviceName.Galaxy_S9, ScreenOrientation.PORTRAIT));
config.addMobileDevice(new AndroidDeviceInfo(AndroidDeviceName.Galaxy_S9_Plus, ScreenOrientation.PORTRAIT));
config.addMobileDevice(new AndroidDeviceInfo(AndroidDeviceName.Galaxy_S8, ScreenOrientation.PORTRAIT));
config.addMobileDevice(new AndroidDeviceInfo(AndroidDeviceName.Galaxy_S8_Plus, ScreenOrientation.PORTRAIT));
config.addMobileDevice(new AndroidDeviceInfo(AndroidDeviceName.Pixel_4, ScreenOrientation.PORTRAIT));
config.addMobileDevice(new AndroidDeviceInfo(AndroidDeviceName.Galaxy_Note_8, ScreenOrientation.PORTRAIT));
config.addMobileDevice(new AndroidDeviceInfo(AndroidDeviceName.Galaxy_Note_9, ScreenOrientation.PORTRAIT));
config.addMobileDevice(new AndroidDeviceInfo(AndroidDeviceName.Galaxy_Note_10, ScreenOrientation.PORTRAIT));
config.addMobileDevice(new AndroidDeviceInfo(AndroidDeviceName.Galaxy_Note_10_Plus, ScreenOrientation.PORTRAIT));
config.addMobileDevice(new AndroidDeviceInfo(AndroidDeviceName.Galaxy_S10_Plus, ScreenOrientation.PORTRAIT));
config.addMobileDevice(new AndroidDeviceInfo(AndroidDeviceName.Galaxy_S20, ScreenOrientation.PORTRAIT));
config.addMobileDevice(new AndroidDeviceInfo(AndroidDeviceName.Galaxy_S20_PLUS, ScreenOrientation.PORTRAIT));
config.addMobileDevice(new AndroidDeviceInfo(AndroidDeviceName.Galaxy_S21, ScreenOrientation.PORTRAIT));
config.addMobileDevice(new AndroidDeviceInfo(AndroidDeviceName.Galaxy_S21_PLUS, ScreenOrientation.PORTRAIT));
config.addMobileDevice(new AndroidDeviceInfo(AndroidDeviceName.Galaxy_S21_ULTRA, ScreenOrientation.PORTRAIT));
eyes.setConfiguration(config);
Below is an example of how to specify iOS devices for Applitools Native Mobile Grid:
Configuration config = eyes.getConfiguration(); //Configure the 15 devices we want to validate asynchronously
config.addMobileDevice(new IosDeviceInfo(IosDeviceName.iPhone_11));
config.addMobileDevice(new IosDeviceInfo(IosDeviceName.iPhone_11_Pro));
config.addMobileDevice(new IosDeviceInfo(IosDeviceName.iPhone_11_Pro_Max));
config.addMobileDevice(new IosDeviceInfo(IosDeviceName.iPhone_12));
config.addMobileDevice(new IosDeviceInfo(IosDeviceName.iPhone_12_Pro));
config.addMobileDevice(new IosDeviceInfo(IosDeviceName.iPhone_12_Pro_Max));
config.addMobileDevice(new IosDeviceInfo(IosDeviceName.iPhone_12_mini));
config.addMobileDevice(new IosDeviceInfo(IosDeviceName.iPhone_13_Pro));
config.addMobileDevice(new IosDeviceInfo(IosDeviceName.iPhone_13_Pro_Max));
config.addMobileDevice(new IosDeviceInfo(IosDeviceName.iPhone_XS));
config.addMobileDevice(new IosDeviceInfo(IosDeviceName.iPhone_X));
config.addMobileDevice(new IosDeviceInfo(IosDeviceName.iPhone_XR));
config.addMobileDevice(new IosDeviceInfo(IosDeviceName.iPhone_11));
config.addMobileDevice(new IosDeviceInfo(IosDeviceName.iPhone_8));
config.addMobileDevice(new IosDeviceInfo(IosDeviceName.iPhone_7));
eyes.setConfiguration(config);
- Run the test on any 1 device – available locally or in CI. It could be a real device or a simulator / emulator.
Every call to Applitools to do a visual validation will automatically do the functional and visual validation for each device specified in the configuration above.
- See the results from all the devices in the Applitools dashboard
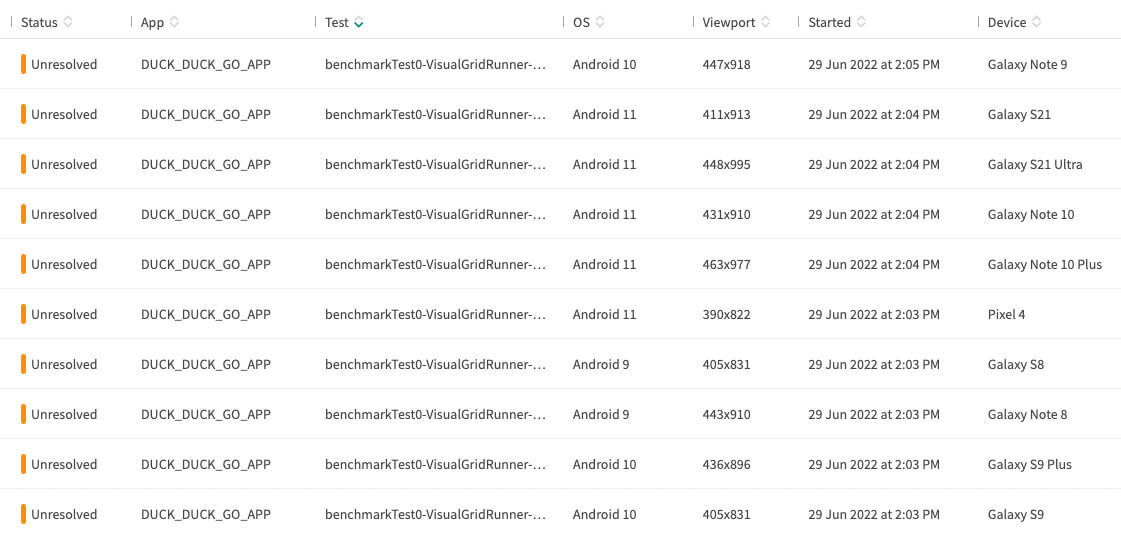
Advantages of using the Applitools Native Mobile Grid
The Applitools Native Mobile Grid has many advantages.
- You do not need to repeat the same test execution on multiple devices. This will save the team members a lot of time for execution, flaky tests and result analysis
- Very fast feedback of test execution across all specified devices (10x faster than traditional cross device testing approach)
- There is no additional test data requirements
- You do not need to procure, build and maintain the devices
- There is less load on your application backend-system
- A secure solution where your application does not need to be shared out of your corporate network
- Using visual assertions instead of functional assertions gives you increased test coverage while writing less code
Read this post on How to Scale Mobile Automation Testing Effectively for more specific details of this amazing solution!
Summary of Modern Cross-Device Testing of Mobile Apps
Using the Applitools Visual AI allows you to extend coverage at the top of your Test Automation Pyramid by including AI-based visual testing along with your UI/UX testing.
Using the Applitools Native Mobile Grid for cross device testing of Android and iOS apps makes your CI loop faster by providing seamless scaling across all supported devices as part of the same test execution cycle.
You can watch my video on Mobile Testing 360deg (https://applitools.com/event/mobile-testing-360deg/) where I share many examples and details related to the above to include as part of your mobile testing strategy.
To start using the Native Mobile Grid, simply sign up at the link below to request access. You can read more about the Applitools Native Mobile Grid in our blog post or on our website.
Happy testing!