In this step-by-step tutorial, learn how to use visual locators to target anything you need to test in your application and how it can help you create tests that are more resilient and robust.
The Challenge of Testing Using Traditional Selectors
As a test engineer, you’re certainly used to writing selectors to target the specific things you are interacting with in your tests. Lots of them. Selectors are critical to test exactly what you’re aiming for, but there are challenges. Not only do you usually have to write quite a lot of them, but in some cases an obvious selector doesn’t even exist and you’ll need to rig up a creative workaround. You can do it, but that kind of workaround is typically fragile and can easily break as the application develops.
Needless to say this is frustrating when it happens. And that it happens more than we’d all like.
There are some cases where traditional selectors work quite well, of course. But in certain complex or atypical situations, there is another option that works better – visual locators.
Why Use Visual AI Locators as an Alternative to Fragile Selectors?
If you’re using an automated visual testing platform that offers visual locators, such as Applitools, you can solve this problem immediately. Visual locators can replace these fragile selectors and give us a more robust way of targeting something we need to test.
Essentially, rather than hard-coding one (or many) atypical selector(s) that will be difficult to track and maintain, Applitools visual locators let you select something just by “looking” to see if it is there on the screen. Applitools is able to do this thanks to an industry-leading Visual AI that has been trained on over a billion images to an accuracy level of 99.9999%.
Let’s walk through how you can use Applitools visual locators to make your testing simpler and avoid hacking together non-standard selectors. You can check out our quick video tutorial below, or read on as we explain it.
Note: This walkthrough assumes some basic familiarity with Applitools. If you’re new to Applitools, feel free to grab a free account and explore the docs, or you can always reach out with any questions or schedule a quick demo.
How to Use Applitools Visual Locators
When writing tests, typically we need some selector in order to target exactly what we want to click or interact with, but an obvious selector doesn’t always exist. For example, take a look at this LinkedIn logo in a typical log-in screen.
To select this, you would have to come up with some kind of creative selector, which doesn’t make a lot of sense, and it can often be fragile and break really easily as the application is being developed.
Instead, we can use visual locators in Applitools to actually select the visual area that we want to interact with.
To do this, you first need to create a new test. Let’s start off by going to the page and creating a check for the page that we actually want to interact with.
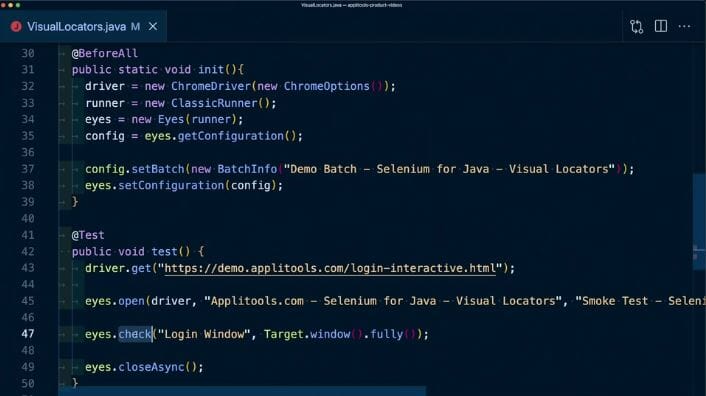
Once we run the test, we can select and open it. We can now look inside of that check for our login page and see the LinkedIn logo.
Inside the Applitools dashboard, we can find the visual locators tool. If we select that tool, we can then draw a visual locator by making a rectangle right around that LinkedIn logo and give it a name. Let’s just call it LinkedIn logo. Next we click add, and we’re done!
We now have a new visual locator created inside of our dashboard. If you have multiple visual locators in the future, there is also a Manage tab, where we can edit the name, or remove any visual locator we have made. Note that visual locators apply to a specific application, but that also means that you can use these locators across different tests in that application.
How to Target Your Visual Locator
Now that we have our visual locator and its associated name, we can target that area when we’re running our test. For example, let’s say we have a Selenium for Java test where we’re currently accessing the login window, but we want make sure if somebody clicks that LinkedIn logo that they’re going to actually be taken to LinkedIn.
To start off, we want to make sure that we have the visual locator and the region packages actually imported into our project.
import com.applitools.eyes.locators.VisualLocator;
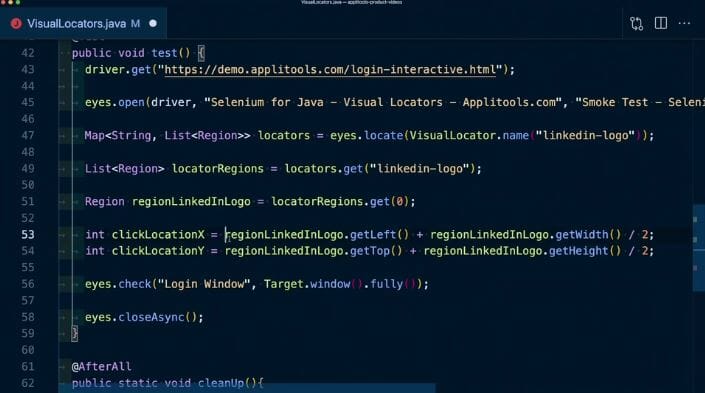
import com.applitools.eyes.Region;Next, we’ll create a new map with a list of regions we can use to tell Eyes that we want to locate our visual locators with the name we chose (linkedIn-logo). Then we want to narrow that down to the actual regions of that locator. So we create locator regions, using those original locators to get the specific LinkedIn logo. Because we want to deal with one region instead of a list of regions, we’re going to use the get command, so that we can grab the zero index of our regions. We can use this region to get both the X and Y axis of where our LinkedIn logo is located inside of the page.
We’ll use that region to find both our X and Y value, and use the getLeft() method and the getTop() method, along with the width and the height to calculate where exactly we want to click. In this instance, we’ll click right in the middle of the LinkedIn logo region, using the X and Y axes to target where I want to click.
Here’s the code for all of that:
Next, we need to import the Selenium Actions interaction.
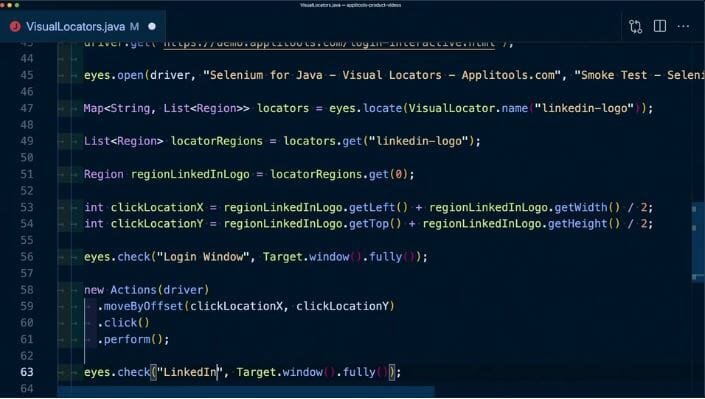
import org.openqa.selenium.interactions.Actions;That will enable us to say that as soon as we perform that first check for the login window, we want to create new action where we move to that click location and actually click. Finally, we want to make sure we’re on the LinkedIn page. So I’m going to use Eyes to add another check, and add this tag as LinkedIn.
Our final code will look like this:
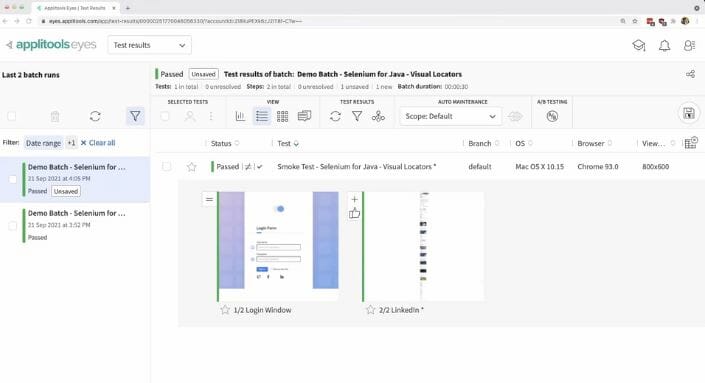
When we look inside of the Applitools dashboard now, we can see our new test. It will show unresolved because we’re adding a new screen to our UI. If we first open up our login window, we’ll see that it looks exactly the same and it’s still visually perfect. If we head over to the next screen, we can now see that it’s clicking over to LinkedIn, just like we wanted to, by using that visual locator.
Once we click thumbs up inside of that checkpoint or inside of the main dashboard UI, we can go ahead and save our tests and then we’ll be ready to run the next test.
Learn More about Visual AI Locators
If you want to learn more about how you can take advantage of AI and visual locators in your tests by using Applitools, head over to the Applitools Docs, where not only do we have a description of exactly what you can expect, but you’ll also find code examples for how you can use it inside of your next test.
Happy testing!
Get Started Today
Want to try Applitools Eyes for yourself? You can get started today at the link below – the account is free forever.