React is, first and foremost, a library for creating reusable components. But until React Storybook came along, reusability of components between applications was very limited. While a library of common components could be created, it was very difficult to use, as there was no useful way of documenting it.
Yes, documenting the common components via a Readme file is possible, even useful. But a component is, in its essence, something visual. A Readme file just doesn’t cut it, neither for a developer and definitely not for a designer that wants to browse a library of shared components and choose the one that fits their purpose.
This limited the usefulness of React’s component reusability.
And then React Storybook came along. React Storybook has changed the way many companies approach React by allowing them to create a library of components that can be visually browsed so as to be able to pick and choose the component they want:
Finally, a real library of shared components can be created and reused across the company. And examples abound, some of them open-source: from Airbnb’s set of date components to Wix’s styled components.
But a library of widely used company-wide components brings its own set of problems: how does one maintain and test the set of components in a reliable way? Components that are internal to one application are easily maintained — they are part of the QA process of that application, whether manual or automated. But how does one change the code of a shared component library in a reliable manner? Any bug introduced into the library will immediately percolate to all the applications in the company. And in these agile days of continuous delivery, this bug will quickly reach production without anybody noticing.
Moreover, everyone in the company assumes that these shared components are religiously tested, but this is not always the matter. And even when they are tested, it is usually their functional aspect that is tested, while testing how they look is largely ignored.
Testing a Shared Library
So how does one go about writing tests for a library of shared components? Let’s look at one of the Shared Components libraries out there — Airbnb’s React Dates. I have forked it for the purpose of this article, so that we can look look at a specific version of that library, frozen in time.
Let’s git clone this fork:
$ git clone https://github.com/applitools/eyes-storybook-example.git
$ cd eyes-storybook-example
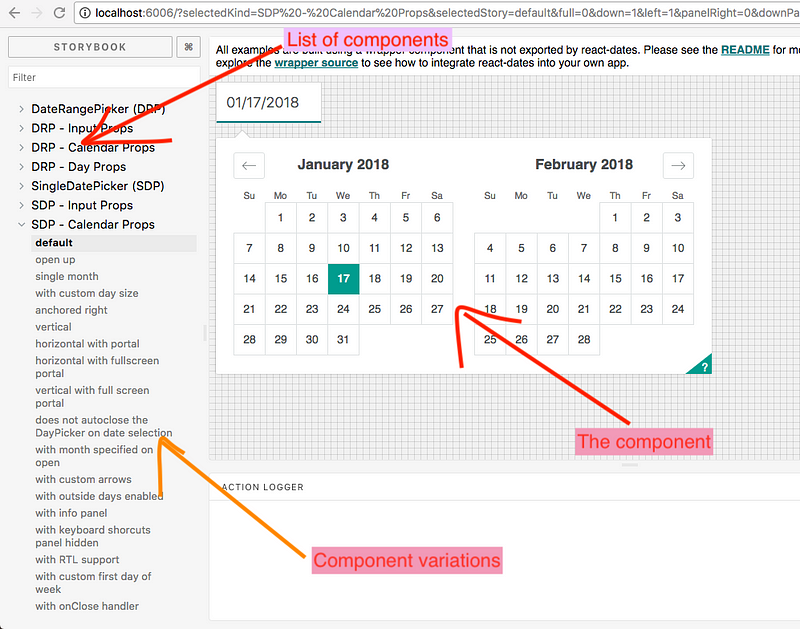
To run the storybook there, just run npm run storybook, and open your browser to http://localhost:6006.
To run the tests, run the following:
$ npm install
$ npm test
This runs the tests, which generate the following output:
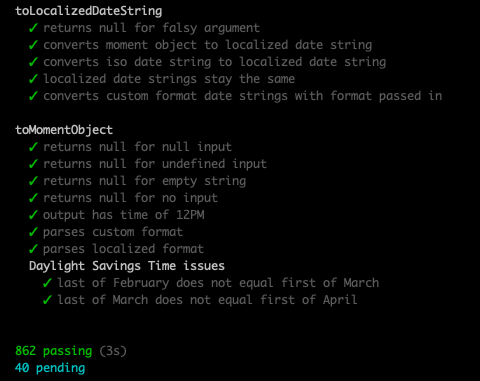
Wow! That’s over 800 tests. I have to say that this component library is very well tested. And how do I know that it is very well tested? It’s not just because there are a lot of tests, but also because I randomly went into some source file, changed something, and ran the tests again.
Let’s try it. Change line 75 in file: src/components/CalendarDay.jsx to:
if (!onDayMouseEnter) onDayMouseEnter(day, e);
(I just added the if to the line). Now let’s run the tests again using npm test:
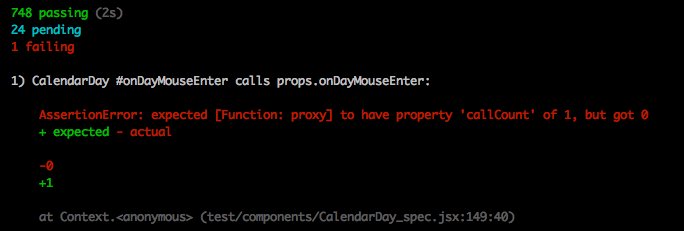
Perfect! The tests failed, as they should. Really great engineering from the Airbnb team.
(If you’re following with your own repository, please undo the change you just made to the file.)
Functional Testing Cannot Catch Visual Problems
Let’s try again. Revert the previous change, so the tests will pass again. Now Edit line 1 in the file src/svg/arrow-right.svg, by changing the first M694 to M94, as follows:

Now let’s run the tests again using npm test:
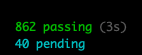
Oops. They’re passing. We’ve changed the source code for the components, and yet the tests pass.
Why did this happen? Because we changed only the visual aspect of the components, without changing any of the functional aspect of it. And Airbnb does only functional testing.
This is not to denigrate the wonderful engineers at Airbnb who have given us this wonderful libraries (and other open-source contributions). This library is tested in a way that should make Airbnb proud. And I am sure that manual testing of the components is done from time to time to ensure that the components are OK.
(If you’re following with your own repository, please undo the change you just made to the file.)
Visual Testing of a Shared Library
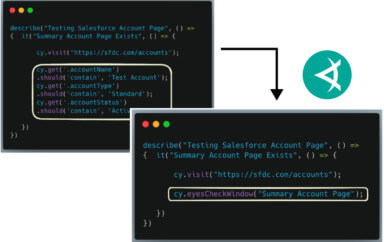
So how does one go about testing the visual aspects of the components in a shared library? Well, if you’re using ReactJS Storybook, you’re in luck (and if you’re building a shared component library, you should be using React Storybook). You are already using React Storybook to visually display the components and all their variants, so testing them automatically is just a simple step (are you listening, Airbnb?).
We’ll be using Applitools Eyes, which has a suite of SDKs that enable Visual UI Testing inside a variety of frameworks. In this case, we’ll use the Applitools Eyes SDK for React Storybook (yes, I know, it’s a mouthfu).
(Full disclosure— I am a developer advocate and architect for Applitools. But I love the product, so I have no problem promoting it!)
To install the SDK in the project, run:
npm install @applitools/eyes-storybook --save-dev
This will install the Eyes SDK for Storybook (locally for this project). If you’re following with your own repository, please undo the changes you made to the files. or otherwise you will get failures. To run the test, just run:
npx eyes-storybook
You will get this error:

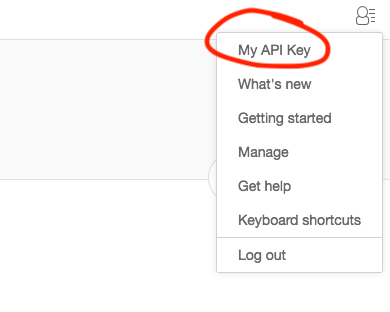
Yup. To use the Eyes SDK, you need an Applitools API Key, which you can get by registering at the Applitools site, here. Once you have that, login and go to the Eyes admin tool, here. You will find the API Key using the following menu:
To make Eyes Storybook use the API key, set the environment key APPLITOOLS_API_KEY to the key you have:
// Mac, Linux:
$ export APPLITOOLS_API_KEY=your-api-key
// Window
C:> set APPLITOOLS_API_KEY=your-api-keyNow run it again:
npx eyes-storybook
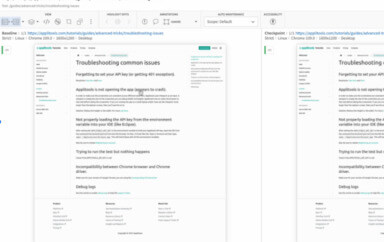
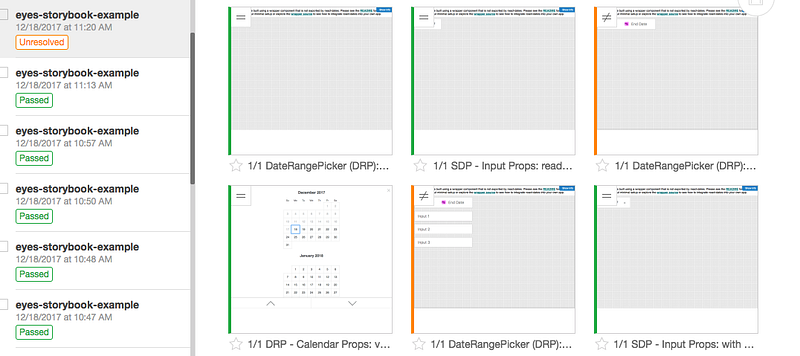
Eyes storybook will run Chrome headless, open your storybook, take a screenshot of all your components and variants, and send them to the Applitools service. When the test ends, as this is the first test, it will establish that these screenshots are the baseline against which all other tests will be checked against. You can check the results with the link it adds to the end of the tests, or just go to http://eyes.applitools.com:

Failing the Test
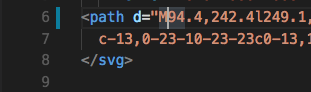
So let’s test if the change we made to the SVG will fail the test. Re-edit line 6 in the file src/svg/arrow-right.svg, by changing the first M694 to M94, thus:
Now let’s run the test again using ./node_modules/.bin/eyes-storybook.
Success! Or rather failure! The test recognized that some of the component screenshots differed from the baseline ones we created earlier. We can see the result of the diffs in the Applitools Eyes management UI:
We can either select these changes as the new baseline (which in this case we don’t want to!) or fix the bug and run the test again, in which case it will be green.
And that is the beauty of Storybook. Because it enables you to create a central repository of components, it feeds three birds with one bird feed (I’m sorry, I can’t kill three birds, even if it is with one stone…):
- Creating and documenting a shared ReactJS components library, with little effort.
- Testing that the functionality of the components works (albeit with lots of effort)
- Visually testing the components with literally zero code.
Conclusion
React Storybook is a game-changer for frontend development— it enables the creation and maintenance of a shared component library for the whole company.
And the best thing about React Storybook is that if you’ve already invested the effort to set it up, you get a suite of tests that check the visual look of your components… for free!
Applitools has visual regression testing tutorials for React Storybook, as well as for Storybook components built with Vue and Angular. As well as tutorials for over 40 other frontend technologies. Check out these examples, and if you have any questions, please contact us or set up a demo.
What Storybooks are you going to start visually testing?
— About the Author —
30 years of experience have not dulled the fascination Gil Tayar has with software development. From the olden days of DOS, to the contemporary world of Software Testing, Gil was, is, and always will be, a software developer. He has in the past co-founded WebCollage, survived the bubble collapse of 2000, and worked on various big cloudy projects at Wix.
His current passion is figuring out how to test software, a passion which he has turned into his main job as Evangelist and Senior Architect at Applitools. He has religiously tested all his software, from the early days as a junior software developer to the current days at Applitools, where he develops tests for software that tests software, which is almost one meta layer too many for him.
In his private life, he is a dad to two lovely kids (and a cat), an avid reader of Science Fiction, (he counts Samuel Delany, Robert Silverberg, and Robert Heinlein as favorites) and a passionate film buff. (Stanley Kubrick, Lars Von Trier, David Cronenberg, anybody?)
Unfortunately for him, he hasn’t really answered the big question of his life – he still doesn’t know whether static languages or dynamic languages are best.