Visual bugs are errors in the presentation of an application. They appear all the time, and frequently surface when applications are viewed in the various viewport sizes of our mobile devices (laptops, phones, tablets, watches).
What’s horrifying about these pesky visual bugs is that they cannot be caught by typical automated tests. This is because most test automation tools consult the DOM (document object model) to report on the state of the application.
Take this tweet for example:
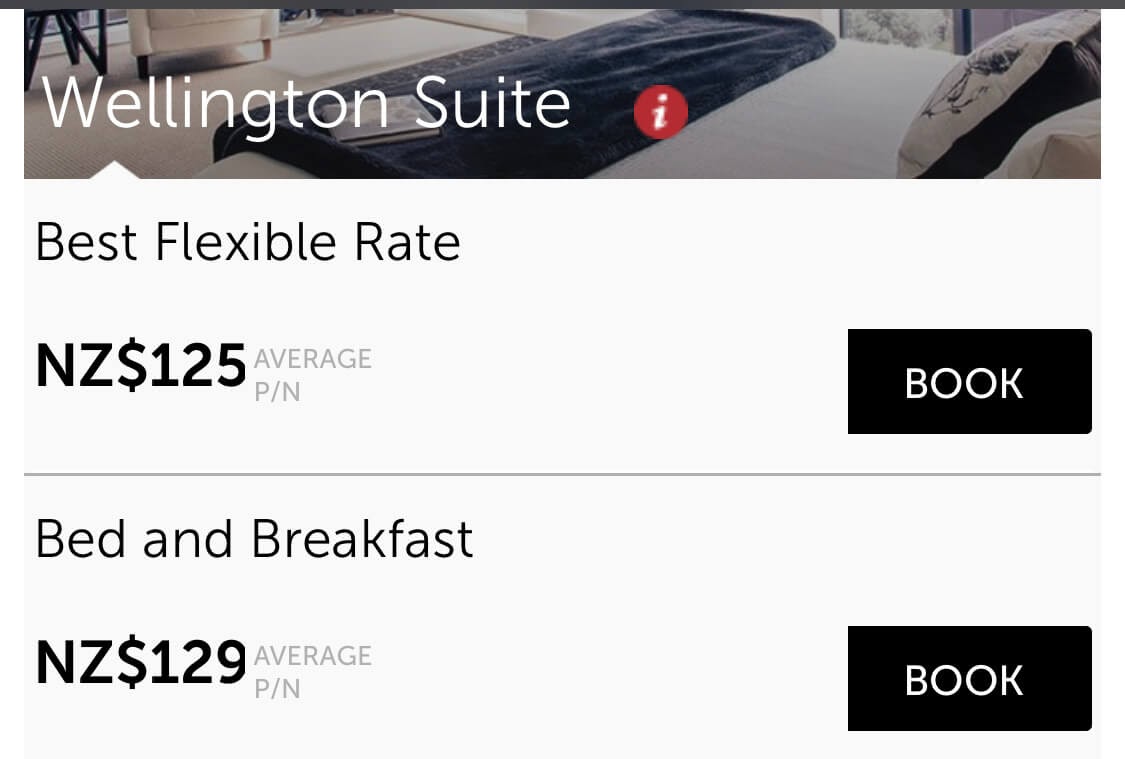
The application is not showing the last digit of the price, yet the full price is there in the DOM. The first price is NZ$1250 but is showing as NZ$125. Big difference!
Sadly, test automation tools will tell you that the price is correct—even though that’s not what the users see. Here’s how visual testing can help you catch these problems.
What is visual testing?
In order to catch visual bugs, we need to add “eyes” to our automated scripts—an ability for our tests to see the application as our users do and verify its appearance.
Visual testing allows us to do just that. These work by taking a screenshot of your application when it’s in its desired state, and then taking a new screenshot every time the test is executed.
The screenshots from the regression run are compared against the approved screenshot. If any meaningful differences are detected, the test fails.
Because Applitools uses artificial intelligence (AI) to view the screenshots just as we would as humans, it is much more effective than basic pixel-based image comparison techniques.
Do I have to start over?
When I tell engineers about the awesomeness of visual testing, they often ask if they will have to throw out all of their existing tests and start over. The answer is no!
Visual testing can be integrated into whatever you already have. Applitools supports all the major programming languages as well as automation frameworks such as Selenium WebDriver, Cypress, Appium, and more.
And while the visual assertions can be added in addition to your existing functional assertions, an awesome benefit is that visual testing encompasses a lot of the functional checks as well.
For example, in the Wellington Suite example from the tweet above, the existing tests probably include assertions for the prices. While you certainly can keep those assertions and add a visual check to make sure the prices appear correctly, the comparison done by visual testing algorithms already ensures that the price is correct and displayed properly. This means less test code needs to be written and maintained.
What if I don’t want to capture the entire screen?
While capturing a screenshot of the entire screen will help you catch bugs you didn’t think to assert against, it’s not always the right approach to visual testing. Sometimes, the screen that you’re testing against contains areas that are still under development and therefore frequently changing, or there just may be data on the screen that is irrelevant for your tests.
Ignore regions
Applitools will allow you to ignore certain regions of your screen. This is perfect for areas that are irrelevant to test, for example status bars, date lines, ads, etc. In this screenshot, I’ve specified to always ignore the status bar for my mobile tests.
Scope to regions
If there isn’t a specific area you’d like to ignore, but there is a specific area you want verified, you can do that with visual testing as well. By annotating the screenshot or programmatically specifying the locator of the region, you can scope your visual check to that area only.
Be mindful of gaps
Verifying an entire screen ensures that nothing is missed, because it inherently includes the verification of things you maybe wouldn’t have covered with traditional assertions. When narrowing the scope of your visual testing, you must be mindful of gaps you may be missing.
My advice is to broaden your scope as much as possible (maybe an entire section versus just a specific element within the section) and couple the visual assertions with traditional functional ones when needed.
What about dynamic data that changes every time the test is executed?
You may not think visual testing can handle applications where the data is different every time the test is run, but it actually can. By using AI, visual testing can determine the patterns that make up the layout of the screen and then use a different comparison algorithm to ensure that the layout is intact during regression runs, regardless of the actual data.
This technique is perfect for applications such as news sites, social media apps, and any other application where the data is not static.
Does visual testing work only on web applications?
Visual testing is not limited to just web applications. Visual testing can also be used for mobile apps, design systems such as Storybook, PDF files, and standalone images.
You can also accomplish cross-platform testing using visual grids. These grids enable faster, smarter visual testing across a plurality of devices and viewport sizes—prime locations for visual bugs!
Visual grids differ from other testing grids in that they do not have to execute your entire scenario on every configuration. Instead, a visual grid runs the scenario on one configuration, captures the state of your application, and then blasts that exact state across all of your supported configurations—thus saving time and effort in writing and executing cross-platform tests.
How to get started with visual testing
Applitools has a free-forever account option which is perfect for smaller projects. To learn how to do all of the cool things I’ve mentioned and much more, head on over to Test Automation University for my free course on visual testing!
[Note: A version of this blog was published previously at TechBeacon.]
For More Information
- Angie Jones: Taking the world’s automation engineers to the next level
- What is Visual Testing? A comprehensive explanation
- Complex Functional Testing – Simplified
- Functional Test Myopia
- Request an Applitools demo
- Sign up for a free Applitools account