I’m learning Appium with visual testing in Jonathan Lipps course, Automated Visual Testing with Appium, on Test Automation University. I’m familiar with testing but new to Appium, so I figure this is a great way to get started.
Jonathan knows what he’s talking about when it comes to Appium. He serves as a lead developer and maintainer of the Appium project. His company, CloudGrey, consults on native mobile app development and testing. And, his company publishes the AppiumPro blog. I assume it’s best to learn from the master.
Learning Appium with Visual Testing – Prerequisites
Okay, Jonathan already burst my bubble in Chapter 1. He expects me to know Appium. I’m learning Appium, so I’ll do my best to be a quick study. The course uses examples in Java, but the code can be any supported language. Python, Ruby, JavaScript, etc. all work. Jonathan also wants to make sure that I understand automated testing concepts. I do.
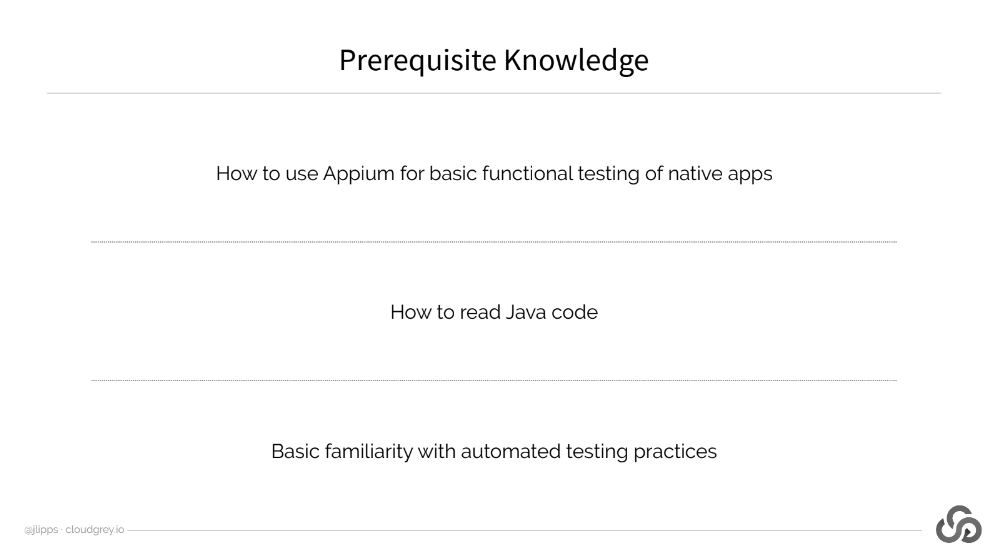
Next, I need to have node.js installed and NPM. I need an Appium CLI installation. And, I need to have software that allows me to get Appium Android dependencies installed. Android Studio is one solution. Actually, Jonathan recommends getting all this installed before taking his course, so I figure I’ll go get a little bit more training and get the software installed. Done.
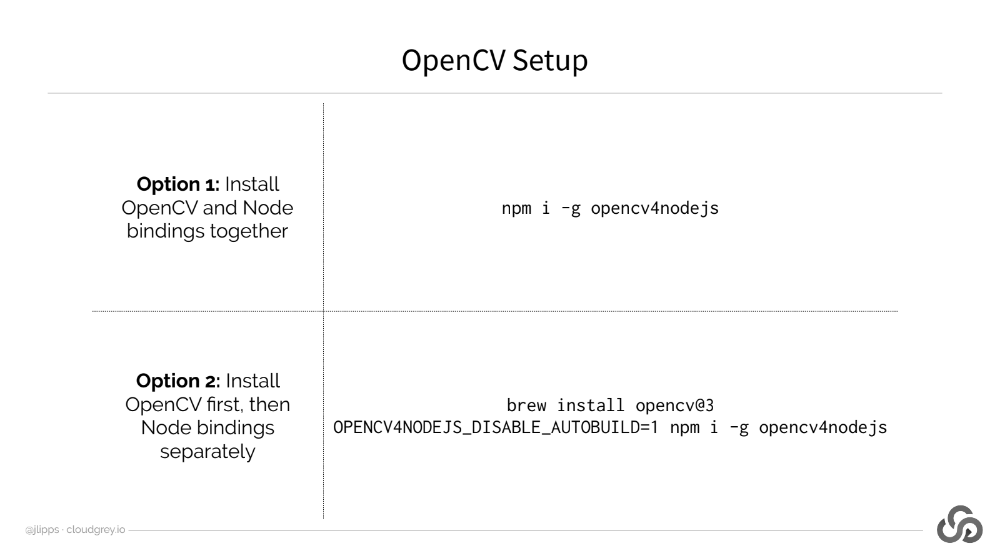
Then comes the tricky bit – installing OpenCV libraries. OpenCV installs a library of computer vision (ergo “CV”) routines to work with Appium. As Jonathan notes, there’s an easy way and a hard way to install OpenCV. The easy way uses a direct NPM command to build the libraries. He has a Mac and ran into issues with the easy way. I have a Mac and ran into the same issues. So, Jonathan provides a second way to install the OpenCV software using Homebrew.
The steps I list here are the few steps here you may run through to get Appium up and running on your local machine. As Jonathan points out, this is all documented.
On to testing.
Learning Appium Testing With A Demo App
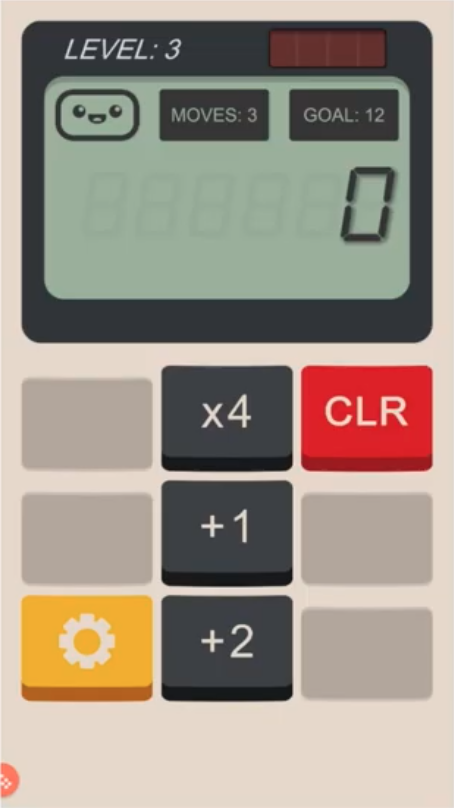
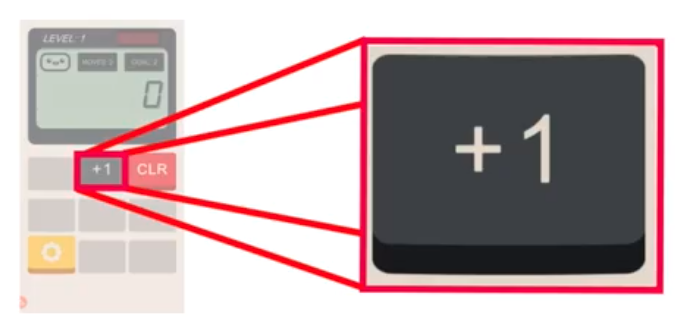
I’m used to testing apps with web element locators. In the case of Jonathan’s demo app, it’s a game. It uses a calculator paradigm with the goal of having the user achieve a certain number by pressing on buttons that perform certain operations. Like this example:
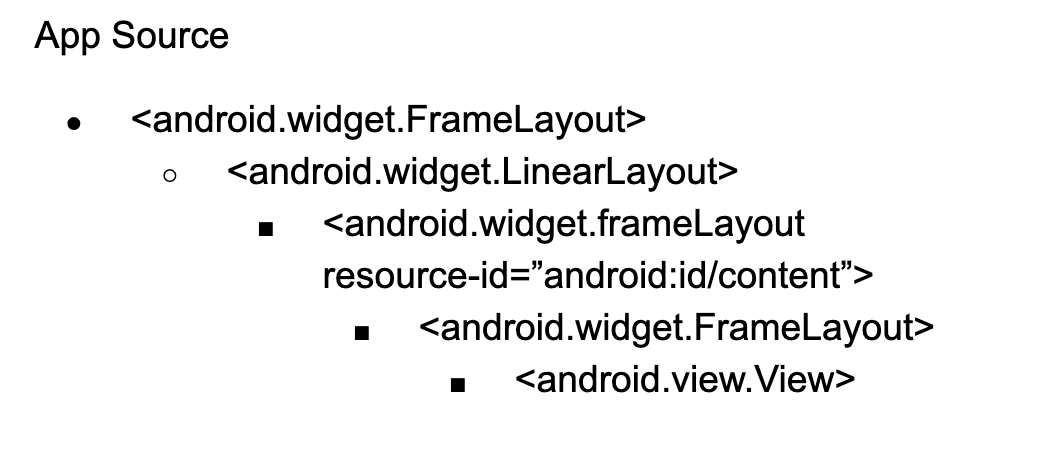
When Jonathan tried to find traditional locators, there was only one leaf node – and it wasn’t a control button. How often does this happen? Often. Your development team can choose one of many frameworks for mobile application development that omits traditional element locators.
The app source looks like this:
You can try to hard code your tests by region geography on the screen, but what happens when you go from a small format phone to a larger phone – to an Android tablet? Yuck!
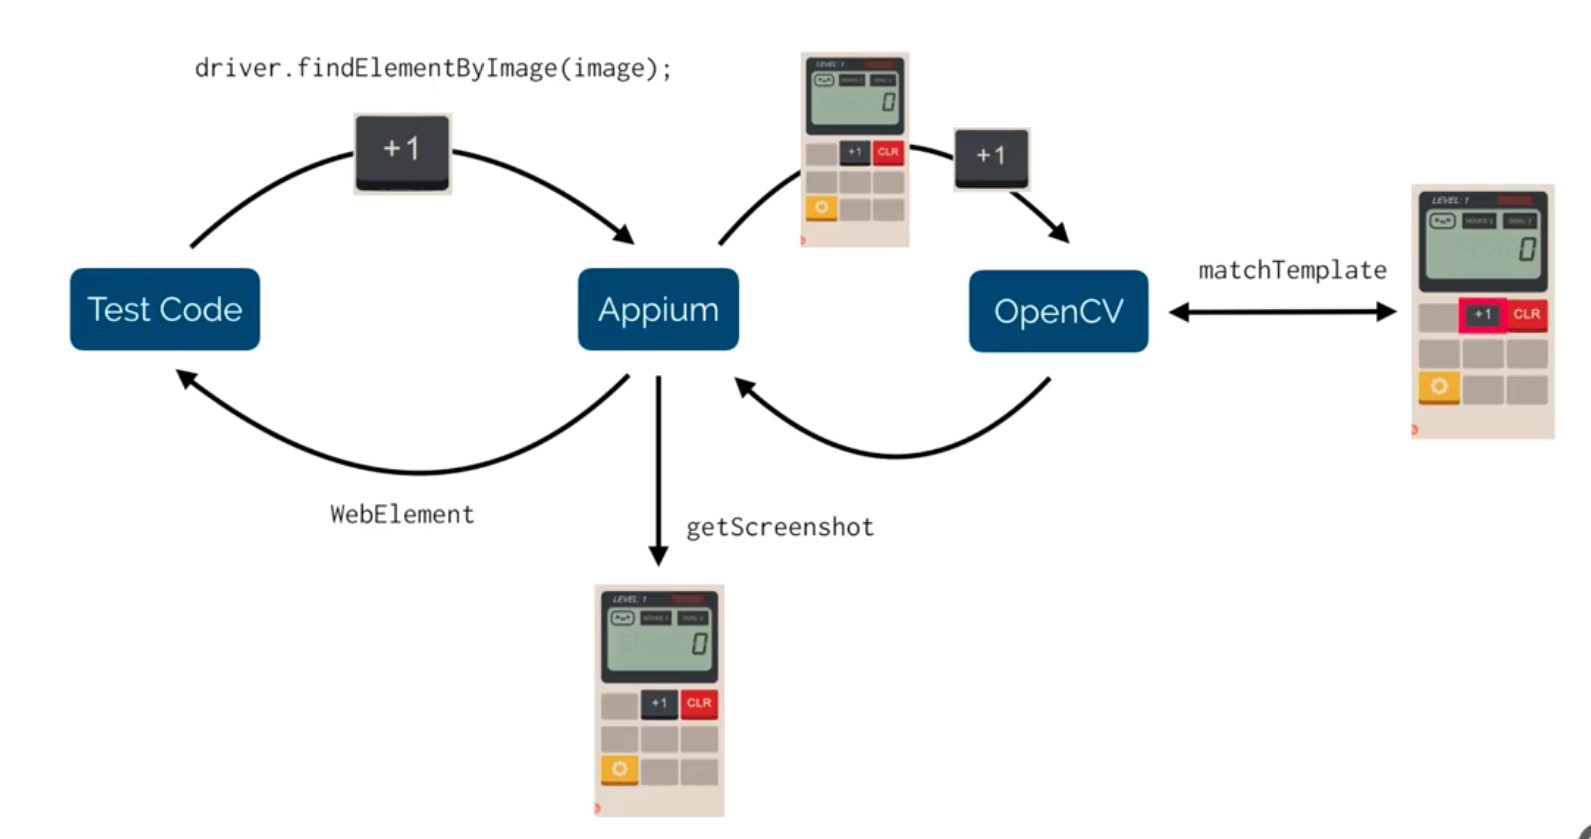
Fortunately, by using OpenCV with Appium you can define the images of buttons that you can save. Take a screen capture, crop the button of interest, and save it in a file accessible to Appium. Later you can pass that image to Appium to find a match and take an action – click. That’s really useful. To reiterate – with OpenCV, Appium can use stored images to find buttons and manipulate the app. That was new to me and really interesting.
The specific command you use is:
driver.findElementByImage(templateImage);
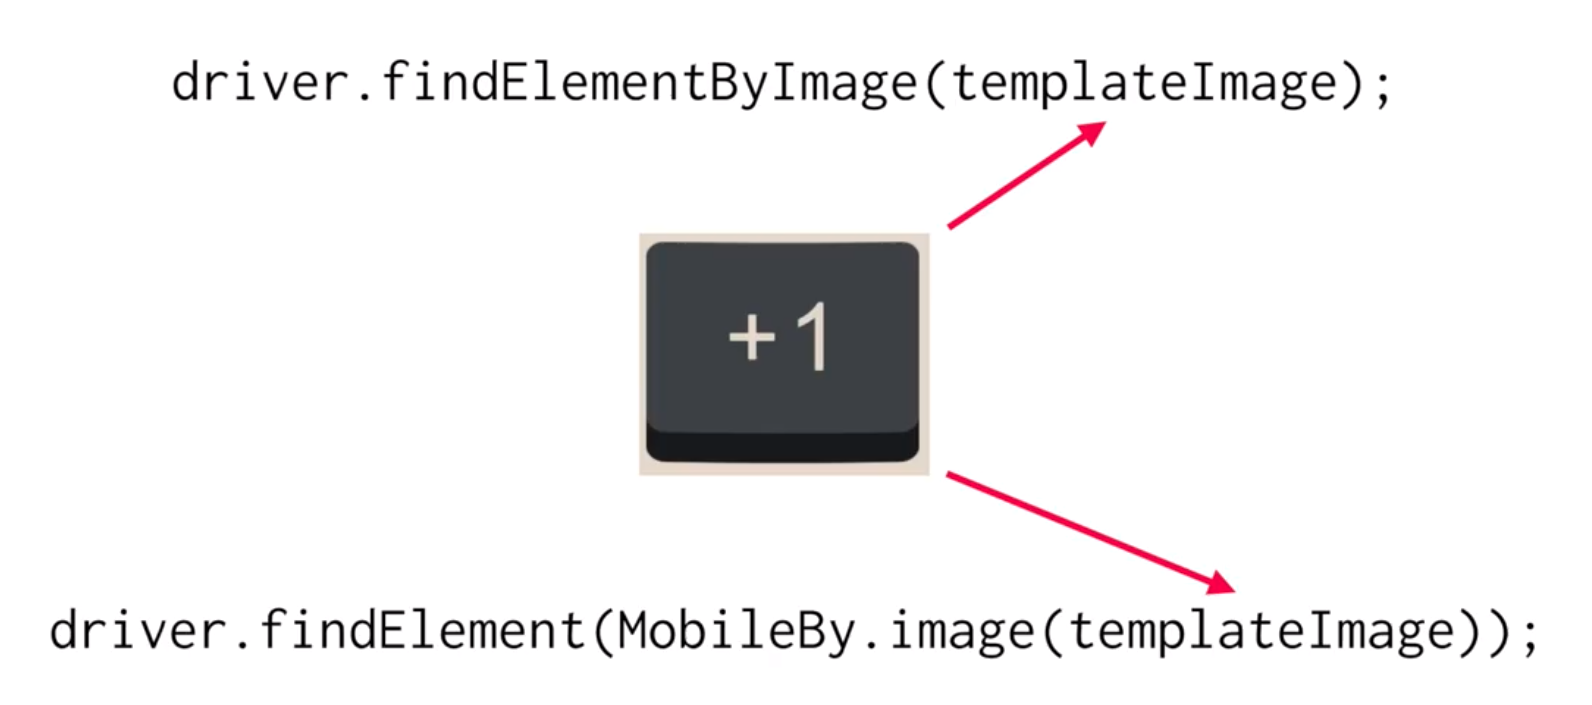
This command returns an ImageElement that can be used for action. The workflow between Appium, OpenCV, your test code, and a stored image looks like this:
Setting Up Your Test Device as an MJPEG Server
Part of learning Appium is learning Appium tricks. From Jonathan’s experience, Appium’s integration with the Android native screen capture and processing can be pretty slow. It can take several seconds to capture one screen. Fortunately, you can install an MJPEG server on your test device. Appium can process the MJPEG server image much more quickly.
Jonathan uses one such piece of software to connect his Android emulator to his Appium test infrastructure. Called Screen Stream, the software serves the image of the Android device so that a person or piece of software can subscribe to a URL and see what’s on the screen. Jonathan notes that the device or emulator under test must have an IP address accessible to Appium.
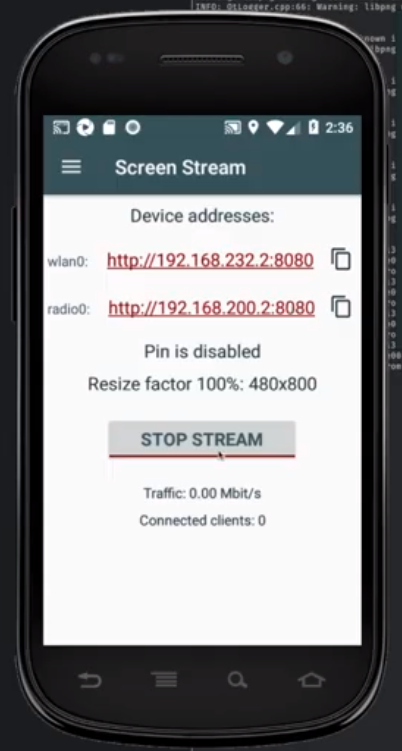
Once you have a stream set up, you need to give Appium access to that stream. Jonathan shows that you set the value of mjpegScreenshotUrl to your appropriate stream URL.
Example Test Code
As Jonathan mentions, his test code is written in Java, and if it’s not a language you know, his code syntax is easy to read. So, don’t let lack of Java stand in the way of learning Appium. Jonathan spends a little time showing you the code he has created for running his app tests.
His course presents the test code in easy-to-read chunks. If you’re not a Java person, you might not get all the syntax, but you’ll get why things are organized the way they are. (Note – if you’re interested in learning Java, take Angie Jones’s course about the Java language on Test Automation University).
Jonathan walks you through his test demo of an Android game that uses a calculator as the input device. And, unfortunately, there are no code hooks to drive the UI. So, Jonathan uses the image matching to drive the app. Each active button can be captured and used to drive the behavior.
You can find the source code in addition to Jonathan’s test excerpts. This will help you see the tests in more detail.
Visual Testing with OpenCV
Jonathan spends an entire chapter focused on OpenCV for visual testing. Jonathan distinguishes functional test – where the goal of testing is to find unexpected behavior in the input-output behavior of the application – versus visual test – where the goal is finding a visual behavior that may cause a user to find the app either inoperative or unappealing.
If an app allows the user to enter two numbers and add them, a functional bug results when:
- Either number cannot be entered in the expected numeric fields
- The numeric entry fields can receive numbers but the button click has no effect
- Data entry and the button click works but the presented response does not match the expected sum.
As a tester, you can also imagine other cases for a functional test: handling negative numbers, non-standard numeric formats, and non-numeric inputs.
For the same app, an exclusively visual bug exists when:
- Number fields cannot be distinguished on a page
- The button cannot be distinguished on a page
Note – Appium may be able to execute a functional test even if there are visual bugs, which explains why you need a solution to examine for visual bugs.
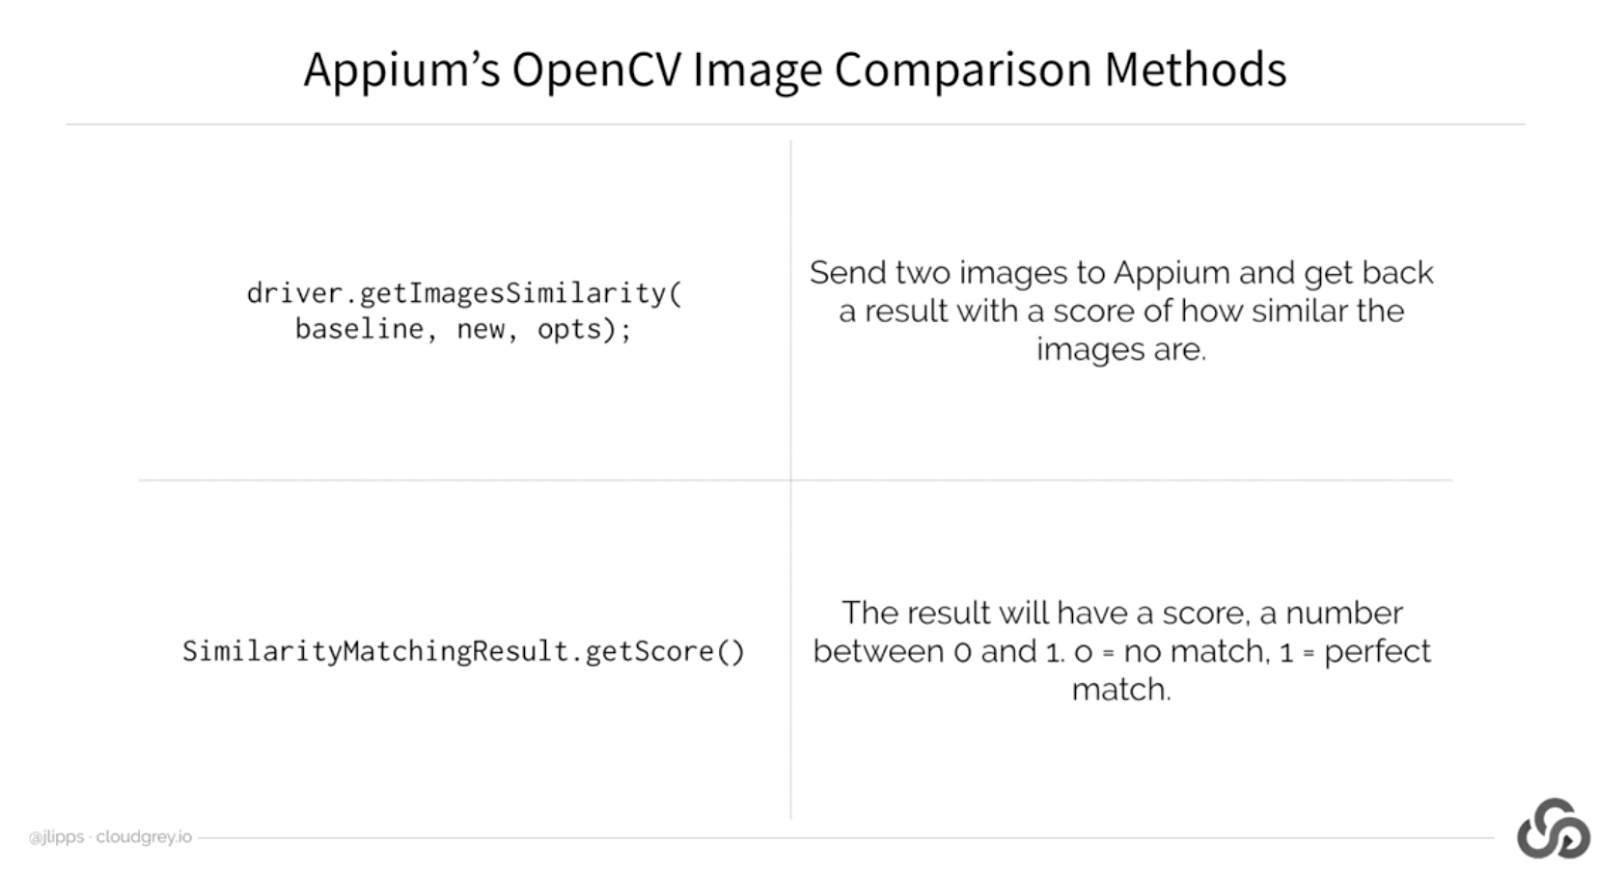
To catch visual bugs, OpenCV lets you capture a screen from the mobile device and store it in a location on your local machine or in a network repository. Once you have captured a screenshot, that becomes your baseline for that screen. On subsequent runs, you call OpenCV to compare your screenshot to the saved baseline. OpenCV uses a pixel comparison engine, and the comparison response on the comparator comes back with a value between 0 and 1. The number is roughly analogous to the percentage of pixels unchanged.

Testing with Appium and OpenCV
To automate his tests, Jonathan sets up his Java to call OpenCV to capture a screen and compare the image to the baseline. For automation purposes, Jonathan sets 0.99 as his acceptance threshold. Anything that shows 0.99 or above generally has small differences – clock, cell signal level, etc. Anything lower likely shows a noticeable difference.
You can play with the acceptance criteria to see what works for you.
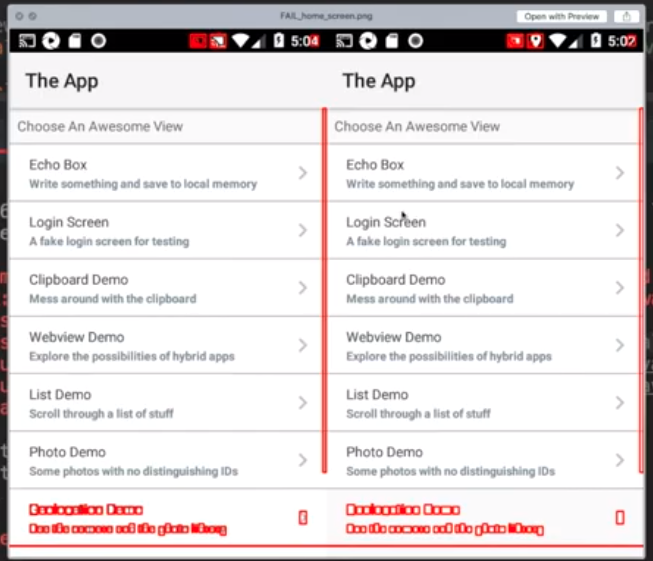
One great thing you can do is see the differences in OpenCV. OpenCV will capture a screen of both the checkpoint and the baseline and highlight the differences. You can use this comparison to determine what you want to do, either:
- Declare the difference a bug and pass the information back to developers or
- Declare the difference as intentional and point future tests to the most recent capture, which becomes the new baseline.
Real-World Visual Tests with OpenCV
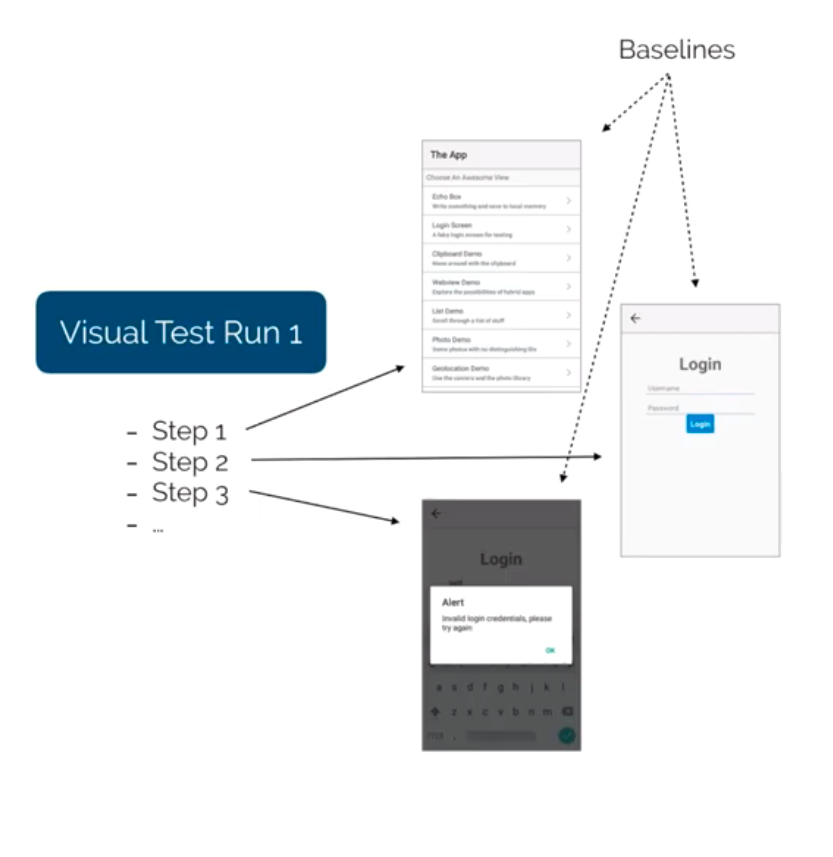
Next, Jonathan demonstrates the visual capture with OpenCV. He goes through a demo app and captures two screen images. He saves the images as baselines. Next, he runs the app with screen modifications and captures the new images and runs his pixel comparison. Each screen that has a difference where the comparison falls below 0.99 fails his test.
Jonathan shows the process you go through using OpenCV. Running through the test the first time, there is no screen capture, so you capture your initial baseline image. The second time you run through the test, you capture screens and your tests either pass or fail. The tests end on the first fail, and you must inspect the compare image to see where the failure occurred.
In the course, Jonathan ran through his sample application. He ran a test, which included two screen captures. His code captured the screenshot as a baseline if no prior baseline existed. Each screen capture served as its own unique test. After running his test with the baseline application, he then pointed to a modified application and reran his tests using the visual comparison as the validation step. Each screenshot in the second app behaved slightly differently from the initial capture. Then we went through the results.
Reviewing the Appium OpenCV Test Results
The first test run showed one failure, because the Appium run reported the first failure as a failed test. In Jonathan’s first screen, the visual difference occurred because he added a new item to the screen. Because he expected the new behavior, he could set the most recent screen capture as the new baseline for subsequent testing.
Then, he had to rerun his test. Again, the test run stopped with an image mismatch failure. While the first image passed with the new baseline, the second image now failed. Again, comparing the images showed the highlighted difference, which turned out to be a visually unacceptable change in the location of an action button. In this case, the check image needed to be sent to developers, as this image contained a bug. This test would continue to fail until the bug got resolved.
As Jonathan shows, image comparison exposes usability changes that you may or may not desire. More importantly, you learn some of the challenges of OpenCV integration with Appium used in production testing.
First, you must manage images yourself. If you have a handful of screenshots, that could be doable. But, if you capture many screenshots, that seems problematic. Second, an image is either all-good or else partially buggy. An image with both an acceptable and unacceptable change cannot be partially accepted. So, you need to manage the partial workflow on your own. Finally, the whole notion of a percentage pixel change as acceptance criteria to account for pixels you know will change seems a little imprecise.
With this, Jonathan moves on to the next chapter – visual testing with Appium and Applitools.
Appium with Applitools for Visual Testing
Jonathan starts the next chapter helping you learn the drawbacks of using Appium with OpenCV for visual testing:
- OpenCV can be challenging to install
- With OpenCV, you need to manage your own baselines
- Self-Managing images – you also manage compare images
- Image compare errors – you will have reported failures that are not failures
- No support for full-screen comparisons with scrolling screens – something we hadn’t yet covered, but you must manually scroll and capture screens and sync them up. Yuck.
- You must maintain the image comparison code, which will require work from release to release.
So, funny enough, Jonathan focuses on these limitations of using Appium with OpenCV, and then he proceeds to show how using Applitools overcomes each of these.
Adding Applitools code – easy. You don’t need to manage a whole image compare library. Applitools does it for you. All you need to do is call into the Applitools Eyes SDK. After that, you need to link to your valid Applitools API Key (best to use a call to a system variable, rather than use the actual key, so that you don’t worry about publishing your key with your code) and start integrating the Applitools code into your Appium tests. Jonathan also goes through the test close steps, including the calls to Applitools to abort an open session in case, for some reason, your test logic skipped a close.
After that, it’s easy to add the Applitools Eyes calls into your test code. Instead of having to use OpenCV calls that include test compares you run and validate on your own manually, all the calls to Applitools Eyes SDK pull screenshots into Applitools. Later after your tests run, you check out the results.
Looking at Applitools Results
Here you learn the differences between running Appium with OpenCV and running Appium with Applitools.
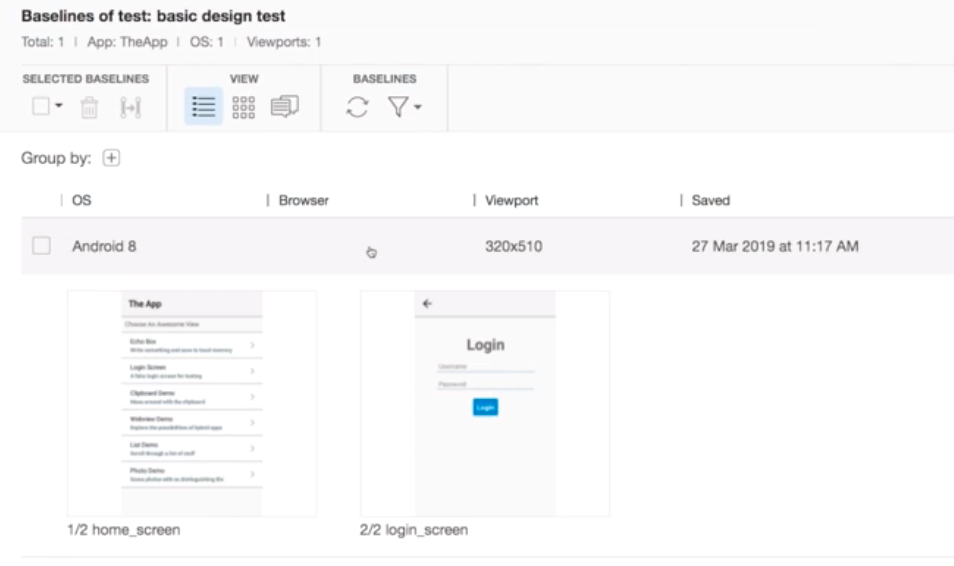
First, your tests run through to completion. Your initial tests, like your initial tests with Appium and OpenCV, run through to completion and capture a baseline image. Unlike with OpenCV, Applitools gives you a useful UI that shows you all the captured images for that run. You don’t have to manage them on your own. When you run your comparison test, the Applitools tests run through to completion while capturing all differences. So, you don’t end up executing multiple test runs to ensure that each visual difference gets captured.
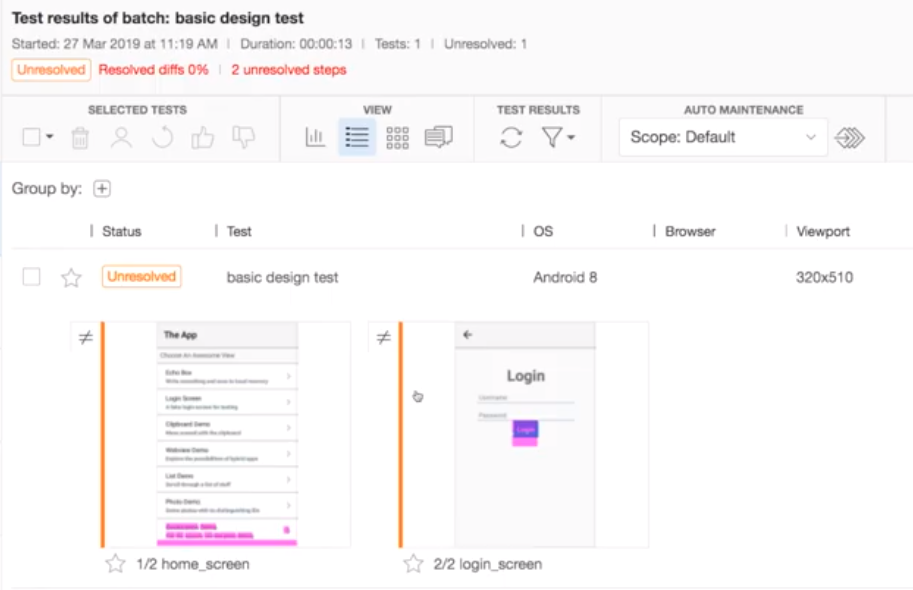
In the Applitools UI, you see all the tests that have been run and ones with differences identified as “Unresolved” but not yet classified as failures. That’s because a difference could be expected or unexpected. You either give a difference a thumbs-up – meaning that the difference was expected (and turning the checkpoint into the new baseline) or a thumbs down – meaning it was a failure.
One useful thing to note is that you can have Applitools ignore the status bar of the phone entirely and focus just on the app. So, unlike the OpenCV screen captures, which capture the full screen and requires you to do some postprocessing, the Applitools capture can select just the app in question.
Jonathan shows how the Applitools UI lets you automate the visual capture and streamline your testing. You can review capture history over time for different tests, and see what you have added or changed. It can give you a history of how your app looks over time.
Advanced Features – Learning Appium with Applitools
Now, Jonathan helps you learn some of the advanced features of Appium with Applitools. First, Applitools lets you capture the full application window – not just a screenshot. You invoke the method:
eyes.setForceFullPageScreenshot(true);
before your call to eyes.open() to start your test, and Applitools will automatically grab a full-page screenshot. Jonathan shows the difference between the prior and current tests by showing that the prior tests only looked at the first screen of the app, but Applitools could see a range of additions to the app.
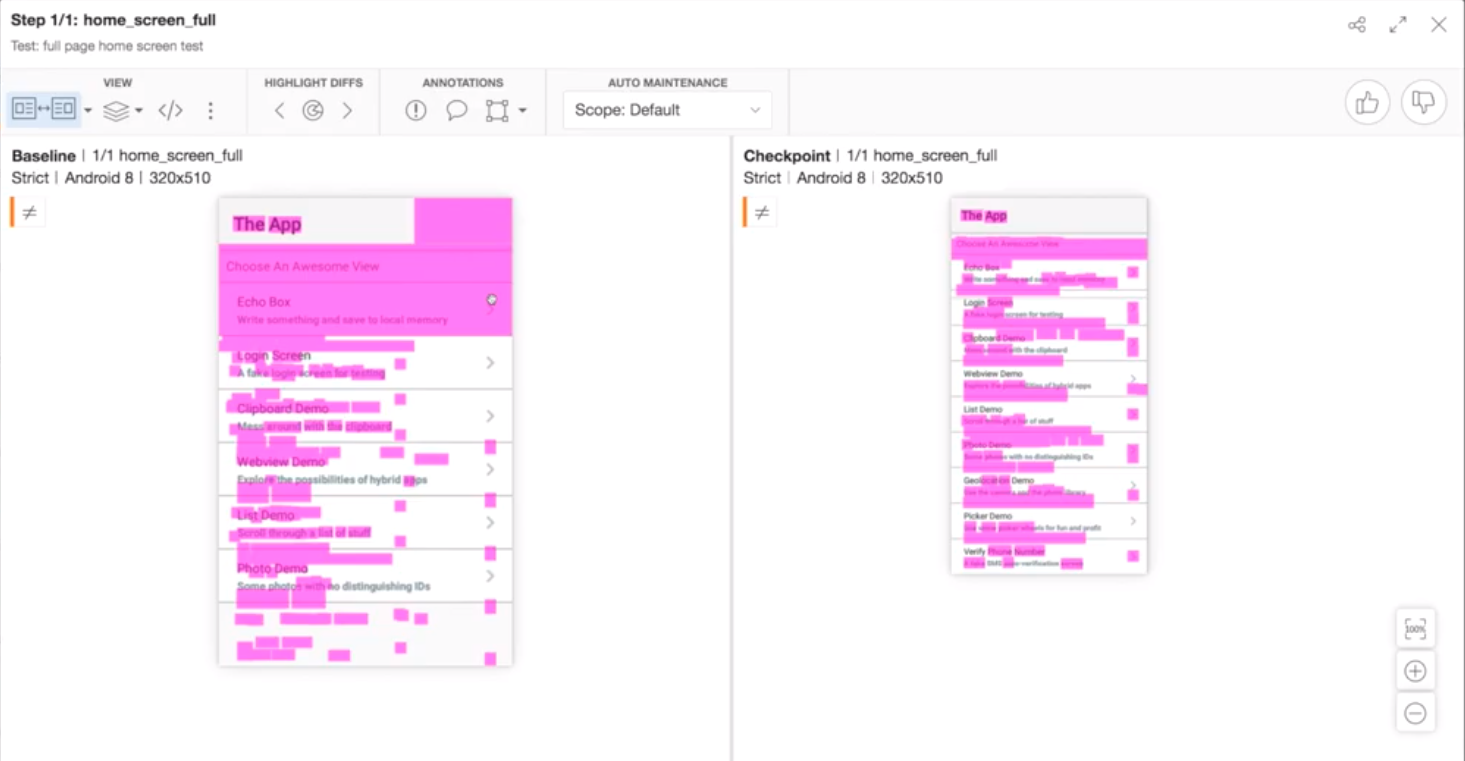
Here, two different runs of the same home screen are captured. The one on the right, the checkpoint, is actually a longer screen and has more content than the baseline on the left. A full capture sometimes finds new content that gets added between test runs, as shown here. But, often, the benefit of full-screen capture for a run is the ability to auto-scroll and stitch together a single image for comparison purposes.
Next, Jonathan shows how you can use Applitools to treat different regions on a page for visual testing. Sometimes your captured screen includes content that will vary from test to test. Jonathan shows a mobile test of an echo screen, where a user types a test phrase and clicks an on-screen “OK” button. The mobile device then displays the typed text in a different region of the screen.
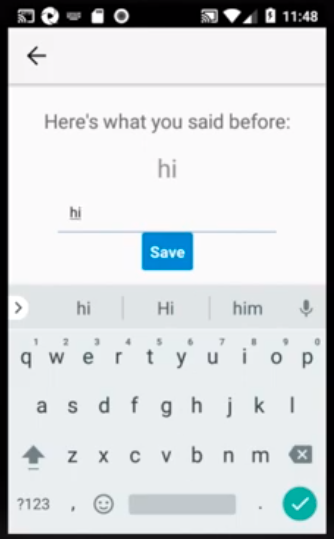
When you use a variable to define your test input phrase and your expected output phrase, your Appium functional test will run and, as long as the two phrases match the variable, the test will pass. However, you will have a visual difference if you change the phrase while capturing the image with Applitools. So, Jonathan shows you how to treat a region as “ignored”. You can select a region, identify it as ignorable, and then Applitools ignores the regions.
Jonathan’s exception demo shows some of the power in Applitools, but the use case might be better for a region that changes independent of the test being run. For instance, if the test screen includes a digital clock region that shows the device time, then that clock will always show a different time. When you run your tests, you might want to ignore the clock region as its region will always change and will always give you an error. You likely want to run and capture multiple versions of the input-output test to handle things like text wrapping and scrolling.
Conclusions
Wow. Appium provides powerful tools for testing mobile apps in both Android and iOS. While Jonathan’s course focused on Android, and runs his tests on an Android emulator, I can easily imagine doing similar tests using iOS.
By focusing on apps that lack traditional locators, Jonathan shows how mobile device testing can depend on visual capabilities for both applying tests as well as measuring results. And, he shows both the benefits of using a package like OpenCV to add visual capabilities for both applying tests and measuring results, and he also shows some of the limitations of OpenCV in production visual validation. Those included the challenges of managing images manually as well as having the first visual failure with OpenCV causing a test run to fail and not collecting all the visual differences for a test run.
Finally, Jonathan does a great job showing how Applitools overcomes a lot of those OpenCV limitations and actually provides a valuable tool for production test automation.
As always, I print my certificate of completion. Jonathan teaches clearly and concisely. I recommend this course to anyone who wants to use Appium to measure the visual behavior of a mobile application.
For More Information
- Check out the Appium Documentation
- Watch Jonathan’s webinar about the shifting landscape of mobile automation.
- Visit Test Automation University
- Take Angie Jones’s Java course on TAU
- Learn the basics of Visual Testing on TAU
- Request an Applitools demo
- Sign up for a free Applitools account
- Check out our tutorials