The Problem
There is a stark misconception in the industry when it comes to visual testing. Namely that it is hard to automate. Even noted automaters in the field share this misconception, which can be seen by this quote.
“Visual testing, something that is very difficult to automate.” – Richard Bradshaw (@FriendlyTester) [source]
As a result, people tend to turn a blind eye to it and miss out on a tremendous amount of value from something that is getting easier to implement every day.
A Visual Regression Testing Primer
Visual Testing (a.k.a. visual checking or visual regression testing or visual UI testing) is the act of verifying that an application’s graphical user interface (GUI) appears correctly to its users. The goal of the activity is to find visual bugs (e.g., font, layout, and rendering issues) so they can be fixed before the end-user sees them. Additionally, visual testing can be used to verify content on a page. This is ideal for sites that have graphical functionality (e.g., charts, dashboards, etc.) since verification with traditional automated functional testing tools can be very challenging.
Given the number of variables (e.g., web browsers, operating systems, screen resolutions, responsive design, internationalization, etc.) the nature of visual testing can be complex. But with existing open source and commercial solutions, this complexity is manageable, making it easier to automate than it once was. And the payoff is well worth the effort.
For example, a single automated visual test will look at a page and assert that every element on it has rendered correctly. Effectively checking hundreds of things and telling you if any of them are out of place. This will occur every time the test is run, and it can be scaled to each browser, operating system, and screen resolution you care about.
Put another way, one automated visual test is worth hundreds of assertions. And if done in the service of an iterative development workflow, then you’re one giant leap closer to Continuous Delivery.
A Solution
By using an existing solution, you can get up and running with automated visual testing quickly. Here’s a list of what’s available (sorted alphabetically by programming language):
| Name | Platform | Programming Language |
|---|---|---|
| Applitools Eyes | Selenium & Other | All |
| Fighting Layout Bugs | Selenium | Java |
| Selenium Visual Diff | Selenium | Java |
| CSS Critic | Other | JavaScript |
| Gemini | Selenium | JavaScript |
| Grunt PhotoBox | PhantomJS | JavaScript |
| PhantomCSS | PhantomJS & Resemble.js | JavaScript |
| Snap and Compare | PhantomJS | JavaScript |
| Specter | XULRunner | JavaScript |
| WebdriverCSS | Selenium | JavaScript |
| FBSnapshotTestCase | Other | Objective-C |
| VisualCeption | Selenium | PHP |
| dpdxt | PhantomJS | Python |
| Huxley | Selenium | Python |
| Needle | Selenium | Python |
| Wraith | PhantomJS | Ruby |
| Wraith-Selenium | Selenium | Ruby |
NOTE: You may be wondering why Sikuli isn’t on this list. That’s because Sikuli isn’t well suited for automated visual testing. It’s better suited for automated functional testing — specifically for hard to automate user interfaces.
Each of these tools follows some variation of the following workflow:
- Drive the application under test (AUT) and take a screenshot
- Compare the screenshot with an initial “baseline” image
- Report the differences
- Update the baseline as needed
Let’s dig in with an example.
An Example
We’ll use WebdriverCSS, which works with Selenium WebDriver. Specifically, the NodeJS bindings and the Selenium Standalone Server (which you can download the latest version of here).
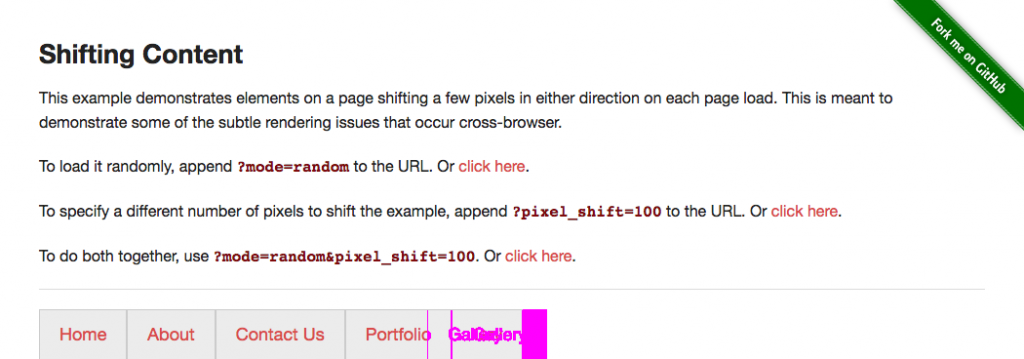
Our application under test is a page on the-internet which has a menu bar with a button that will render in a slightly different location (e.g., 25 pixels in either direction) every time the page loads.
After starting the Selenium Standalone Server (e.g., java -jar selenium-server-standalone-2.44.0.jar from the command-line) we’ll need create a new file. In it we’ll need to require the necessary libraries (e.g., assert for our assertions, webdriverio to drive the browser, and webdrivercss to handle the visual testing) and configure Selenium to connect to the standalone server (which is handled with desiredCapabilities).
# filename: shifting_content.js

var assert = require('assert');
var driver = require('webdriverio').remote({
  desiredCapabilities: {
    browserName: 'chrome'
  }
});
require('webdrivercss').init(driver, { updateBaseline: true });
This will provide us with a driver object that we can use to interact with the browser.
This object is a normal webdriverio instance with one enhancement — the addition of the .webdrivercss command. This command provides the ability to specify which parts of our application we want to perform visual testing on.
For this example, let’s keep things simple and focus on just the page body.
driver
  .init()
  .url('http://the-internet.herokuapp.com/shifting_content?mode=random')
  .webdrivercss('body', {
    name: 'body',
    elem: 'body'
  }, function(err,res) {
      assert.ifError(err);
      assert.ok(res.body[0].isWithinMisMatchTolerance);
    })
  .end();
After specifying our focus element we want to check to see that no visual changes occurred since the last time we ran this test. This is handled with an assert, the focus element (e.g., res.body[0]), and the isWithinMisMatchTolerance command.
The mismatch tolerance is configurable (on a scale of 0 to 100) but is defaulted to 0.5. There are other configuration options with sensible defaults as well (e.g., the folder where screenshots are stored) but you can ignore them for now.
Each time this script is run WebdriverCSS will take a screenshot. The initial shot will be used as a baseline for future comparisons. Then on each subsequent run WebDriverCSS will check to see if the new screenshot is within the mismatch tolerance from the baseline image. If it’s not, then the script will fail.
If the script fails enough times, then the baseline image can be automatically updated. But only if we tell WebdriverCSS to do it (which we already did in our initialization of it).
require('webdrivercss').init(driver, { updateBaseline: true });
Expected Behavior
If we save this file and run it (e.g., node shifting_content.js from the command-line) here is what will happen:
- Open the browser
- Navigate to the page
- Take a screenshot of the page
- Compare the screenshot against the baseline
- Assert that the targeted area of the page is within the match tolerance
- Fail and render a diff image on local disk
In Conclusion…
Hopefully this write-up has gotten you started off on the right foot with automated visual testing. There’s still more to consider when it comes to scaling your automated visual testing. But don’t fret, we’ll cover that in the following write-ups.
Until then, feel free to check out UIRegression. It’s another great online resource for learning about visual testing.
Read Dave’s next post in this series: How to Handle False Positives in Visual Testing
To read more about Applitools’ visual UI testing and Application Visual Management (AVM) solutions, check out the resources section on the Applitools website. To get started with Applitools, request a demo or sign up for a free Applitools account.


