Applitools just released an exciting new product: the Applitools Execution Cloud!
The Applitools Execution Cloud is extraordinary. Like several other testing platforms (such as Selenium Grid), it runs web browser sessions in the cloud – rather than on your machine – to save you the hassle of scaling and maintaining your own resources. However, unlike other platforms, Execution Cloud will automatically wait for elements to be ready for interactions and then fix locators when they need to be updated, which solves two of the biggest struggles when running end-to-end tests. It’s the first test cloud that adds AI power to your tests with self-healing capabilities. It also works with open source tools like Selenium rather than proprietary “low-code-no-code” tools.
Execution Cloud can run any WebDriver-based test today, even ones that don’t use Applitools Eyes. Execution Cloud also works seamlessly with Applitools Ultrafast Grid, so tests can still cover multiple browser types, devices, and viewports. The combination of Execution Cloud with Ultrafast Grid enables functional and visual testing to work together beautifully!
I wanted to be one of the first engineers to give this new platform a try. The initial release supports Selenium WebDriver across all languages (Java, JavaScript, Python, C#, and Ruby), WebdriverIO, and any other WebDriver-based framework. Future releases will support others like Cypress and Playwright. In this article, I’m going to walk through my first experiences with Execution Cloud using Selenium WebDriver in my favorite language – Python. Let’s go!
Starting with plain-old functional tests
Recently, I’ve been working on a little full-stack Python web app named Bulldoggy, the reminders app. Bulldoggy has a login page and a reminders page. It uses HTMX to handle dynamic interactions like adding, editing, and deleting reminder lists and items. (If you want to learn how I built this app, watch my PyTexas 2023 keynote.) Here are quick screenshots of the login and reminders pages:
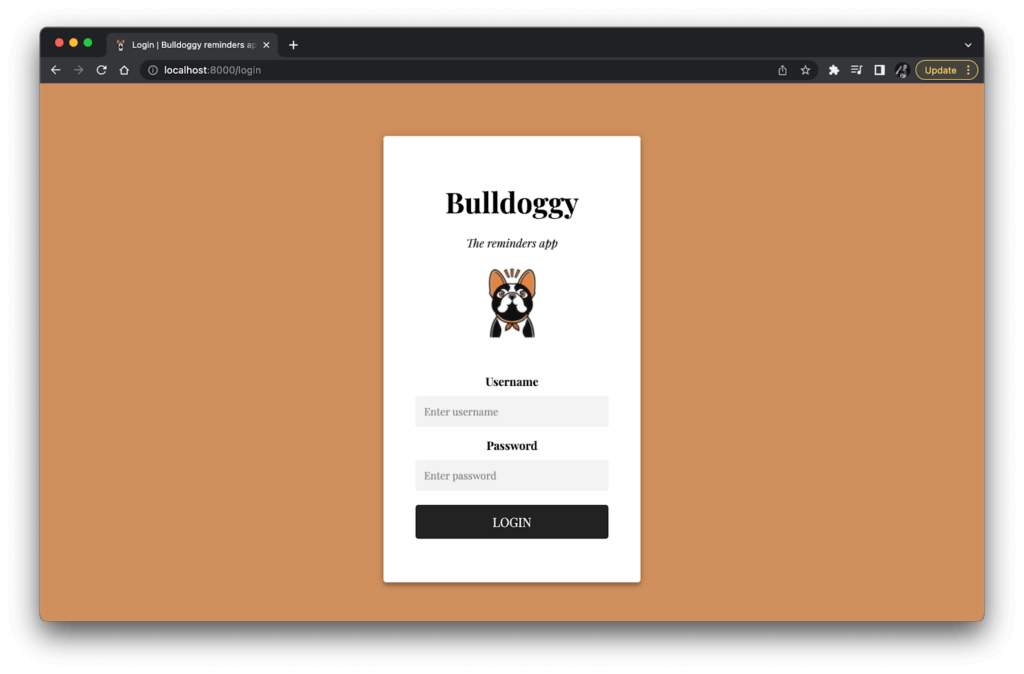
The Bulldoggy login page.
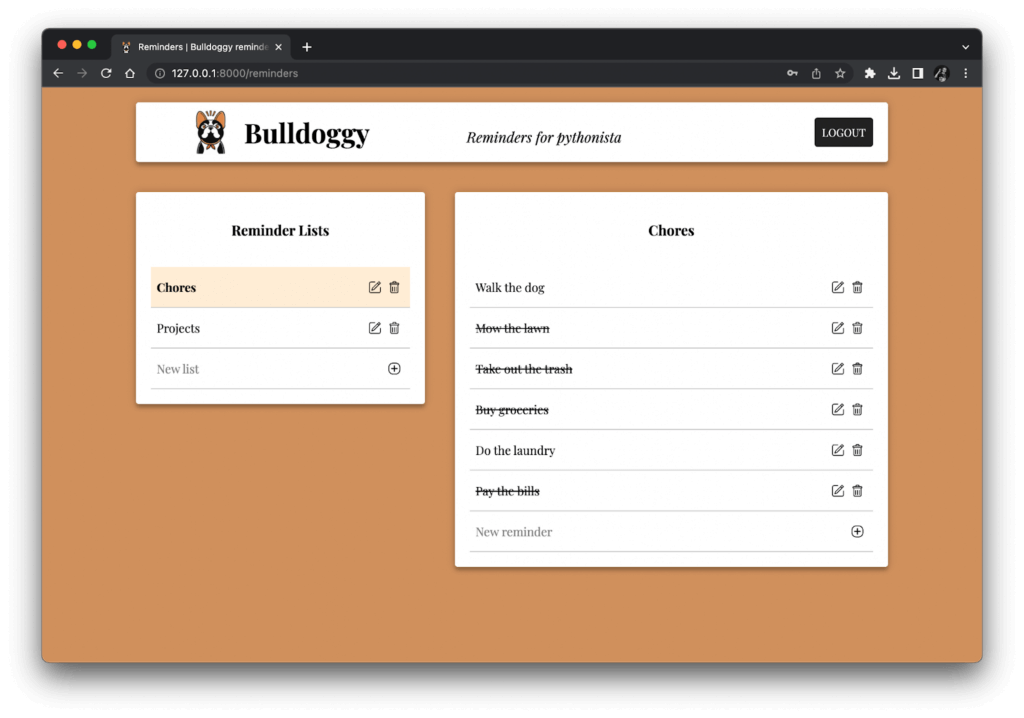
The Bulldoggy reminders page.
Writing a test with Selenium
My testing setup for Bulldoggy is very low-tech: I run the app locally in one terminal, and I launch my tests against it from a second terminal. I wrote a fairly basic login test with Selenium WebDriver and pytest. Here’s the test code:
import pytest

from selenium.webdriver import Chrome, ChromeOptions
from selenium.webdriver.common.by import By


@pytest.fixture(scope='function')
def local_webdriver():
  options = ChromeOptions()
  driver = Chrome(options=options)
  yield driver
  driver.quit()


def test_login_locally(local_webdriver: Chrome):

  # Load the login page
  local_webdriver.get("http://127.0.0.1:8000/login")

  # Perform login
  local_webdriver.find_element(By.NAME, "username").send_keys('pythonista')
  local_webdriver.find_element(By.NAME, "password").send_keys("I<3testing")
  local_webdriver.find_element(By.XPATH, "//button[.='Login']").click()

  # Check the reminders page
  assert local_webdriver.find_element(By.ID, 'bulldoggy-logo')
  assert local_webdriver.find_element(By.ID, 'bulldoggy-title').text == 'Bulldoggy'
  assert local_webdriver.find_element(By.XPATH, "//button[.='Logout']")
  assert local_webdriver.title == 'Reminders | Bulldoggy reminders app'
If you’re familiar with Selenium WebDriver, then you’ll probably recognize the calls in this code, even if you haven’t used Python before. The local_webdriver function is a pytest fixture – it handles setup and cleanup for a local ChromeDriver instance. The test_login_locally function is a test case function that calls the fixture and receives the ChromeDriver instance via dependency injection. The test then loads the Bulldoggy web page, performs login, and checks that the reminders page loads correctly.
When I ran this test locally, it worked just fine: the browser window opened, the automation danced across the pages, and the test reported a passing result. That was all expected. It was a happy path, after all.
Hitting broken locators
Oftentimes, when making changes to a web app, we (or our developers) will change the structure of a page’s HTML or CSS without actually changing what the user sees. Unfortunately, this frequently causes test automation to break because locators fall out of sync. For example, the input elements on the Bulldoggy login page had the following HTML markup:
<input type="text" placeholder="Enter username" name="username" required />
<input type="password" placeholder="Enter password" name="password" required />
My test used the following locators to interact with them:
local_webdriver.find_element(By.NAME, "username").send_keys("pythonista")
local_webdriver.find_element(By.NAME, "password").send_keys("I<3testing")
My locators relied on the input elements’ name attributes. If I changed those names, then the locators would break and the test would crash. For example, I could shorten them like this:
<input type="text" placeholder="Enter username" name="user" required />
<input type="password" placeholder="Enter password" name="pswd" required />
What seems like an innocuous change on the front-end can be devastating for automated tests. It’s impossible to know if an HTML change will break tests without deeply investigating the test code or cautiously running the whole test suite to shake out discrepancies.
Sure enough, when I ran my test against this updated login page, it failed spectacularly with the following error message:
selenium.common.exceptions.NoSuchElementException: Message: no such element: Unable to locate element: {"method":"css selector","selector":"[name="username"]"}
It was no surprise. The CSS selectors no longer found the desired elements.
A developer change like the one I showed here with the Bulldoggy app is only one source of fragility for locators. Many Software-as-a-Service (SaaS) applications like Salesforce and even some front-end development frameworks generate element IDs dynamically, which makes it hard to build stable locators. A/B testing can also introduce page structure variations that break locators. Web apps in development are always changing for one reason or another, making locators perpetually susceptible to failure.
Automatically healing broken locators
One of the most appealing features of Execution Cloud is that it can automatically heal broken locators. Instead of running your WebDriver session on your local machine, you run it remotely on Execution Cloud. In that sense, it’s like Selenium Grid or other popular cross-browser testing platforms. However, unlike those other platforms, it learns the interactions your tests take, and it can dynamically substitute broken locators for working ones whenever they happen. That makes your tests robust against flakiness for any reason: changes in page structure, poorly-written selectors, or dynamically-generated IDs.
Furthermore, Execution Cloud can run “non-Eyes” tests. A non-Eyes test is a traditional, plain-old functional test with no visual assertions or “visual testing.” Our basic login test is a non-Eyes test because it does not capture any checkpoints with Visual AI – it relies entirely on Selenium-based interactions and verifications.
I wanted to put these self-healing capabilities to the test with our non-Eyes test.
Setting up the project
To start, I needed my Applitools account handy (which you can register for free), and I needed to set my API key as the APPLITOOLS_API_KEY environment variable. I also installed the latest version of the Applitools Eyes SDK for Selenium in Python (eyes-selenium).
In the test module, I imported the Applitools Eyes SDK:
from applitools.selenium import *I wrote a fixture to create a batch of tests:
@pytest.fixture(scope='session')
def batch_info():
  return BatchInfo("Bulldoggy: The Reminders App")
I also wrote another fixture to create a remote WebDriver instance that would run in Execution Cloud:
@pytest.fixture(scope='function')
def non_eyes_driver(
  batch_info: BatchInfo,
  request: pytest.FixtureRequest):

  options = ChromeOptions()
  options.set_capability('applitools:tunnel', 'true')

  driver = Remote(
    command_executor=Eyes.get_execution_cloud_url(),
    options=options)

  driver.execute_script(
    "applitools:startTest",
    {
      "testName": request.node.name,
      "appName": "Bulldoggy: The Reminders App",
      "batch": {"id": batch_info.id}
    }
  )

  yield driver

  status = 'Failed' if request.node.test_result.failed else 'Passed'
  driver.execute_script("applitools:endTest", {"status": status})
  driver.quit()
Execution Cloud setup requires a few extra things. Let’s walk through them together:
- Since I’m running the Bulldoggy app on my local machine, I need to set up a tunnel between the remote session and my machine. There are two ways to do this. One way is to set up
ChromeOptionswithoptions.set_capability('applitools:tunnel', 'true'), which I put in the code above. If you don’t want to hardcode the Applitools tunnel setting, the second way is to set theAPPLITOOLS_TUNNELenvironment variable toTrue. That way, you could toggle between local web apps and publicly-accessible ones. Tunnel configuration is documented at the bottom of the Execution Cloud setup and installation page. - The WebDriver session will be a remote one in Execution Cloud. Instead of creating a local ChromeDriver instance, the test creates a remote instance using the Execution Cloud URL by calling
driver = Remote(command_executor=Eyes.get_execution_cloud_url(), options=options). - Since this is a non-Eyes test, we need to explicitly indicate when a test starts and stops. The
driver.execute_scriptcall sends a"applitools:startTest"event with inputs for the test name, app name, and batch ID. - At the end of the test, we need to likewise explicitly indicate the ending with the test status. That’s the second
driver.execute_scriptcall. Then, we can quit the browser.
In order to get the test result from pytest using request.node.test_result, I had to add the following hook to my conftest.py file:
import pytest

@pytest.hookimpl(tryfirst=True, hookwrapper=True)
def pytest_runtest_makereport(item, call):
  outcome = yield
  setattr(item, 'test_result', outcome.get_result())
This is a pretty standard pattern for pytest.
Updating the test case
The only change I had to make to the test case function was the fixture it called. The body of the function remained the same:
def test_login_with_execution_cloud(non_eyes_driver: Remote):

  # Load the login page
  non_eyes_driver.get("http://127.0.0.1:8000/login")

  # Perform login
  non_eyes_driver.find_element(By.NAME, "username").send_keys('pythonista')
  non_eyes_driver.find_element(By.NAME, "password").send_keys("I<3testing")
  non_eyes_driver.find_element(By.XPATH, "//button[.='Login']").click()

  # Check the reminders page
  assert non_eyes_driver.find_element(By.ID, 'bulldoggy-logo')
  assert non_eyes_driver.find_element(By.ID, 'bulldoggy-title').text == 'Bulldoggy'
  assert non_eyes_driver.find_element(By.XPATH, "//button[.='Logout']")
  assert non_eyes_driver.title == 'Reminders | Bulldoggy reminders app'
Running the test in Execution Cloud
I reverted the login page’s markup to its original state, and then I ran the test using the standard command for running pytest: python -m pytest tests. (I also had to set my APPLITOOLS_API_KEY environment variable, as previously mentioned.) Tests ran like normal, except that the browser session did not run on my local machine; it ran in the Execution Cloud.
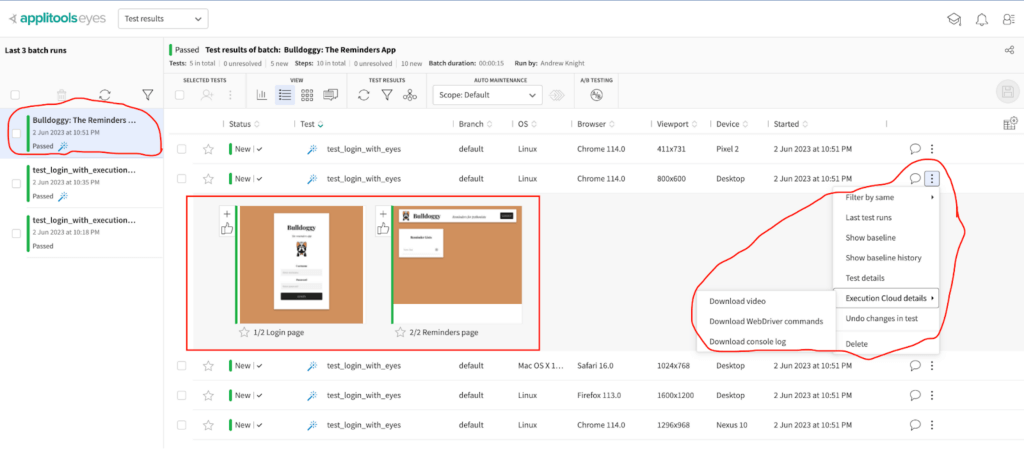
To view the results, I opened the Eyes Test Manager. Applitools captured a few extra goodies as part of the run. When I scrolled all the way to the right and clicked the three-dots icon for one of the tests, there was a new option called “Execution Cloud details”. Under that option, there were three more options:
- Download video
- Download WebDriver commands
- Download console log
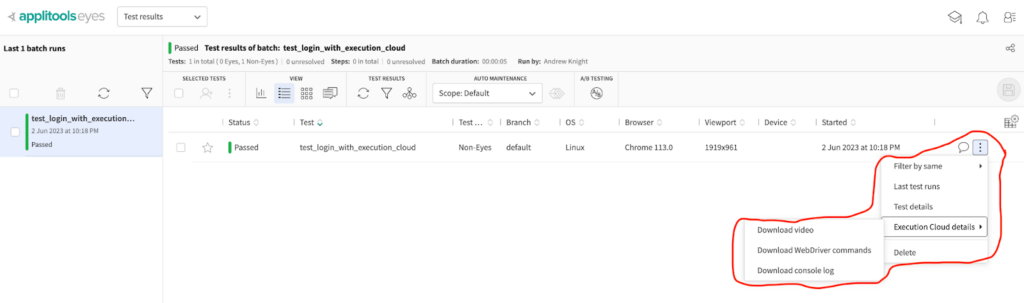
Execution Cloud details for a non-Eyes test.
The option that stuck out to me the most was the video. Video recordings are invaluable for functional test analysis because they show how a test runs in real time. Screenshots along the way are great, but they aren’t always helpful when an interaction goes wrong or just takes too long to complete. When running a test locally, you can watch the automation dance in front of your eyes, but you can’t do that when running remotely or in Continuous Integration (CI).
Here’s the video recording for one of the tests:
The WebDriver log and the console log can be rather verbose, but they can be helpful traces to investigate when something fails in a test. For example, here’s a snippet from the WebDriver log showing one of the commands:
{
  "id": 1,
  "request": {
    "path": "execute/sync",
    "params": {
      "wdSessionId": "9c65e0c2-6742-4bc1-a2af-4672166faf21",
      "*": "execute/sync"
    },
    "method": "POST",
    "body": {
      "script": "return (function(arg){\nvar s=function(){\"use strict\";var t=function(t){var n=(void 0===t?[]:t)[0],e=\"\",r=n.ownerDocument;if(!r)return e;for(var o=n;o!==r;){var a=Array.prototype.filter.call(o.parentNode.childNodes,(function(t){return t.tagName===o.tagName})).indexOf(o);e=\"/\"+o.tagName+\"[\"+(a+1)+\"]\"+e,o=o.parentNode}return e};return function(){var n,e,r;try{n=window.top.document===window.document||\"root-context\"===window.document[\"applitools-marker\"]}catch(t){n=!1}try{e=!window.parent.document===window.document}catch(t){e=!0}if(!e)try{r=t([window.frameElement])}catch(t){r=null}return[document.documentElement,r,n,e]}}();\nreturn s(arg)\n}).apply(null, arguments)",
      "args": [
        null
      ]
    }
  },
  "time": "2023-05-01T03:52:03.917Z",
  "offsetFromCreateSession": 287,
  "duration": 47,
  "response": {
    "statusCode": 200,
    "body": "{\"value\":[{\"element-6066-11e4-a52e-4f735466cecf\":\"ad7cff25-c2d8-4558-9034-b1727ed289d6\"},null,true,false]}"
  }
}
It’s pretty cool to see the Eyes Test Manager providing all these helpful testing artifacts.
Running the test with self-healing locators
After the first test run with Execution Cloud, I changed the names for those input fields:
<input type="text" placeholder="Enter username" name="user" required />
<input type="password" placeholder="Enter password" name="pswd" required />
The login page effectively looked the same, but its markup had changed. I also had to update these form values in the get_login_form_creds function in the app.utils.auth module.
I reran the test (python -m pytest tests), and sure enough, it passed! The Eyes Test Manager showed a little wand icon next to its name:

The wand icon in the Eyes Test Manager showing locators that were automatically healed.
The wand icon indicates that locators in the test were broken but Execution Cloud was able to heal them. I clicked the wand icon and saw this:
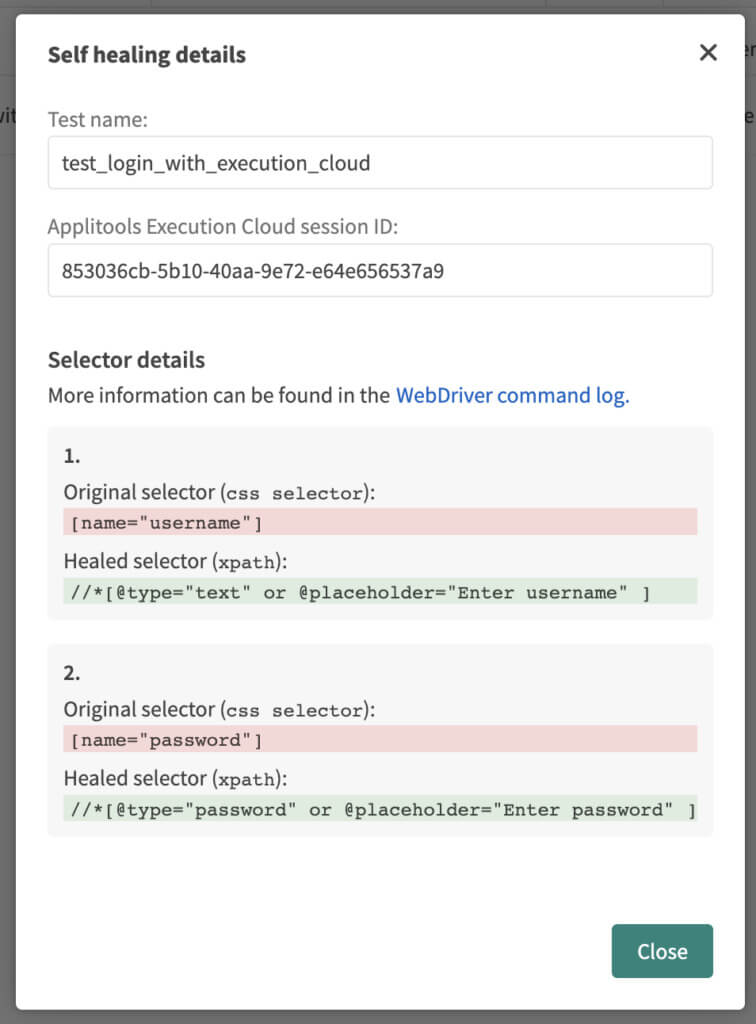
Automatically healed locators.
Execution Cloud changed the locators from using CSS selectors for the name attributes to using XPaths for the placeholder text. That’s awesome! With Applitools, the test overcame page changes so it could run to completion. Applitools also provided the “healed” locators it used so I could update my test code as appropriate.
Running tests with Execution Cloud and Ultrafast Grid together
Visual assertions backed by Visual AI can greatly improve the coverage of traditional functional tests, like our basic login scenario for the Bulldoggy app. If we scrutinize the steps we automated, we can see that (a) we didn’t check anything on the login page itself, and (b) we only checked the basic appearance of three elements on the reminders page plus the title. That’s honestly very shallow coverage. The test doesn’t check important facets like layout, placement, or color. We could add assertions to check more elements, but that would add more brittle locators for us to maintain as well as take more time to develop. Visual assertions could cover everything on the page implicitly with a one-line call.
We can use the Applitools Eyes SDK for Selenium in Python to add visual assertions to our Bulldoggy test. That would transform it from a “non-Eyes” test to an “Eyes” test, meaning it would use Applitools Eyes to capture visual snapshots and find differences with Visual AI in addition to making standard functional interactions. Furthermore, we can perform cross-browser testing with Eyes tests using Applitools Ultrafast Grid, which will re-render the snapshots it captures during testing on any browser configurations we declare.
Thankfully Execution Cloud and Ultrafast Grid can run Eyes tests together seamlessly. I updated my login test to make it happen.
Setting up Applitools Eyes
Setting up Applitools Eyes for our test will be no different than the setup for any other visual test you may have written with Applitools. I already created a fixture for the batch info, so I needed to add fixtures for the Ultrafast Grid runner and the browsers to test on the Ultrafast Grid:
@pytest.fixture(scope='session')
def runner():
  run = VisualGridRunner(RunnerOptions().test_concurrency(5))
  yield run
  print(run.get_all_test_results())


@pytest.fixture(scope='session')
def configuration(batch_info: BatchInfo):
  config = Configuration()
  config.set_batch(batch_info)

  config.add_browser(800, 600, BrowserType.CHROME)
  config.add_browser(1600, 1200, BrowserType.FIREFOX)
  config.add_browser(1024, 768, BrowserType.SAFARI)
  config.add_device_emulation(DeviceName.Pixel_2, ScreenOrientation.PORTRAIT)
  config.add_device_emulation(DeviceName.Nexus_10, ScreenOrientation.LANDSCAPE)

  return config
In this configuration, I targeted three desktop browsers and two mobile browsers.
I also wrote a simpler fixture for creating the remote WebDriver session:
@pytest.fixture(scope='function')
def remote_webdriver():
  options = ChromeOptions()
  options.set_capability('applitools:tunnel', 'true')

  driver = Remote(
    command_executor=Eyes.get_execution_cloud_url(),
    options=options)

  yield driver
  driver.quit()
This fixture still uses the Execution Cloud URL and the tunnel setting, but since our login test will become an Eyes test, we won’t need to call execute_script to declare when a test begins or ends. The Eyes session will do that for us.
Speaking of which, I had to write a fixture to create that Eyes session:
@pytest.fixture(scope='function')
def eyes(
  runner: VisualGridRunner,
  configuration: Configuration,
  remote_webdriver: Remote,
  request: pytest.FixtureRequest):

  eyes = Eyes(runner)
  eyes.set_configuration(configuration)

  eyes.open(
    driver=remote_webdriver,
    app_name='Bulldoggy: The Reminders App',
    test_name=request.node.name,
    viewport_size=RectangleSize(1024, 768))

  yield eyes
  eyes.close_async()
Again, all of this is boilerplate code for running tests with the Ultrafast Grid. I copied most of it from the Applitools tutorial for Selenium in Python. SDKs for other tools and languages need nearly identical setup. Note that the fixtures for the runner and configuration have session scope, meaning they run one time before all tests, whereas the fixture for the Eyes object has function scope, meaning it runs one time per test. All tests can share the same runner and config, while each test needs a unique Eyes session.
Rewriting the test with visual assertions
I had to change two main things in the login test:
- I had to call the new
remote_webdriverandeyesfixtures. - I had to add visual assertions with Applitools Eyes.
The code looked like this:
def test_login_with_eyes(remote_webdriver: Remote, eyes: Eyes):

  # Load the login page
  remote_webdriver.get("http://127.0.0.1:8000/login")

  # Check the login page
  eyes.check(Target.window().fully().with_name("Login page"))

  # Perform login
  remote_webdriver.find_element(By.NAME, "username").send_keys('pythonista')
  remote_webdriver.find_element(By.NAME, "password").send_keys("I<3testing")
  remote_webdriver.find_element(By.XPATH, "//button[.='Login']").click()

  # Check the reminders page
  eyes.check(Target.window().fully().with_name("Reminders page"))
  assert non_eyes_driver.title == 'Reminders | Bulldoggy reminders app'
I actually added two visual assertions – one for the login page, and one for the reminders page. In fact, I removed all of the traditional assertions that verified elements since the visual checkpoints are simpler and add more coverage. The only traditional assertion I kept was for the page title, since that’s a data-oriented verification. Eyes tests can handle both functional and visual testing!
Fewer locators means less risk of breakage, and Execution Cloud’s self-healing capabilities should take care of any lingering locator problems. Furthermore, if I wanted to add any more tests, then I already have all the fixtures ready, so test case code should be fairly concise.
Running the Eyes test
I ran the test one more time with the same command. This time, Applitools treated it as an Eyes test, and the Eyes Test Manager showed the visual snapshots along with all the Execution Cloud artifacts:
Test results for an Eyes tests run with both Execution Cloud and Ultrafast Grid.
Execution Cloud worked together great with Ultrafast Grid!
Taking the next steps
Applitools Execution Cloud is a very cool new platform for running web UI tests. As an engineer, what I like about it most is that it provides AI-powered self-healing capabilities to locators without requiring me to change my test cases. I can make the same, standard Selenium WebDriver calls as I’ve always coded. I don’t need to rewrite my interactions, and I don’t need to use a low-code/no-code platform to get self-healing locators. Even though Execution Cloud supports only Selenium WebDriver for now, there are plans to add support for other open source test frameworks (like Cypress) in the future.
If you want to give Execution Cloud a try, all you need to do is register a free Applitools account and request access! Then, take one of our Selenium WebDriver tutorials – they’ve all been updated with Execution Cloud support.