Cypress, among other things, validates the structure of your DOM. It verifies that a button is visible or that it has the correct text. But what about the look and styling of our app? How can we test that our application looks good visually? We can use Cypress to verify that it has the correct CSS properties but then our code would look very long and complex. It will be a guarantee that engineers will avoid maintaining this test ?
Visual Testing
This is why we need visual testing as part of our test strategy. With visual testing, we are validating what the user sees on different browsers/viewports/mobile devices. However, it’s very time consuming when you do it manually.
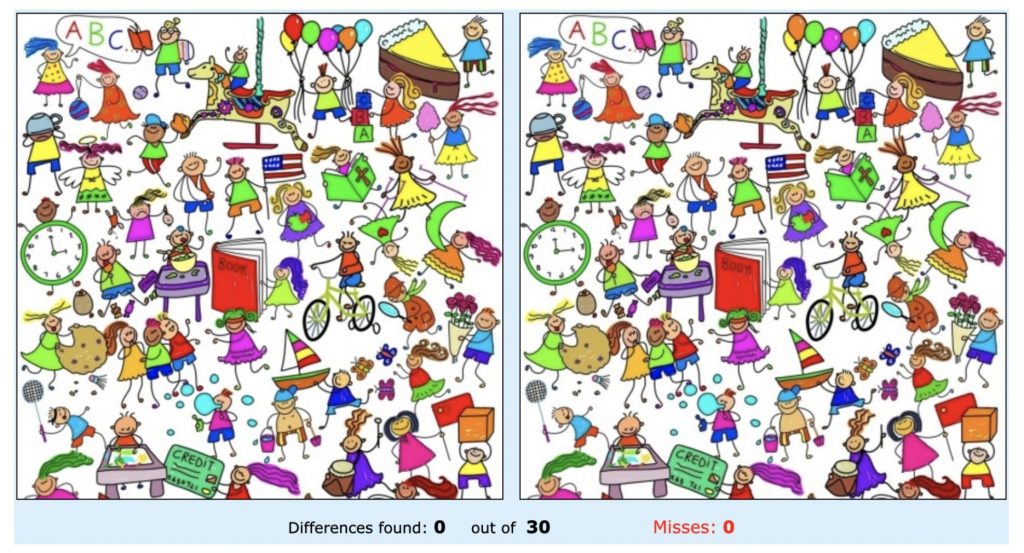
Imagine if someone told you that you have to test the below image manually.
There are 30 differences. You can probably find them after quite some time. But then this provides a really slow feedback loop. The obvious solution would be of course to automate this!
Now, automated visual testing is not new. There are so many tools out there which can help you with visual testing. These tools use pixel-by-pixel comparison to compare the two images. The idea is you have a baseline image which is your source of truth. Every time there is a code change and our automated tests are run, a test image will be taken. The visual testing tool will then compare this test image with the baseline image and then check the differences. At the end, it will report to us whether our test passed or failed.
Problem with pixel-by-pixel visual testing
The problem with pixel-by-pixel visual testing though is it’s very sensitive even with small changes. Even if you have a 1px difference, your test will fail even though on the human eye, the two images look exactly similar.
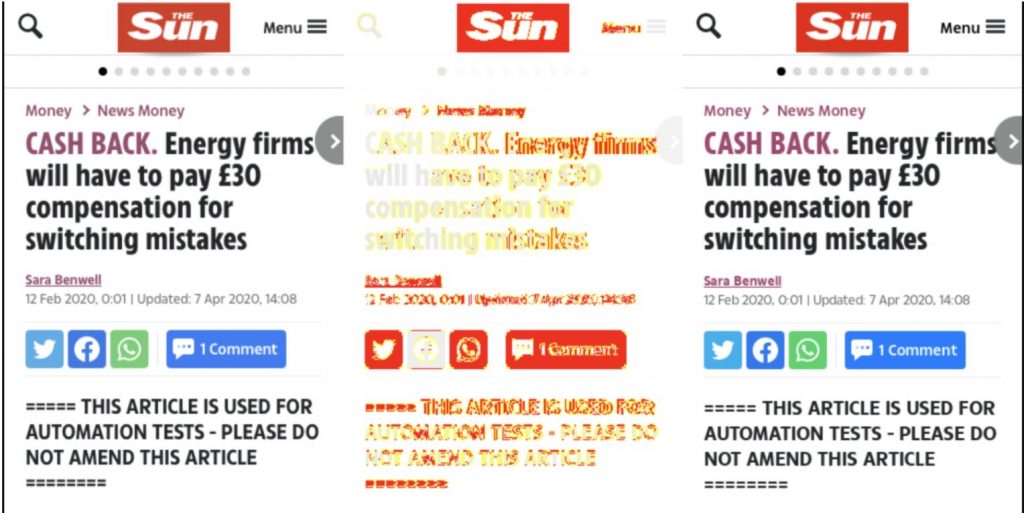
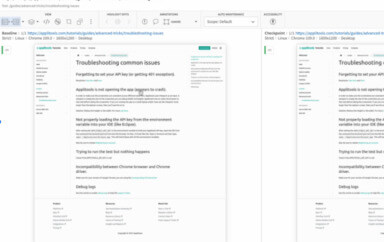
You also get the issue that if you try to run these tests on your build pipelines, you might see a lot of pixel differences especially if the base image is generated locally such as the image above. Looking at this test image, if you ignore the mismatch image in the middle and compare the two images on left and the right, some of the changes that were reported look ok. But because these images were taken on different machine setups , the tool has reported a lot of pixel differences. You can use Docker to solve this and generate the base image using the same configuration as the test image, but from personal experience, I still get flakiness with using pixel-by-pixel comparison tools.

Also, what if you have dynamic data? In the test image above, we have a change of data here but the overall layout is similar. You can probably set the mismatch threshold to be slightly higher so your tests will fail only if they reach the threshold that you defined. The problem with this though is that you might miss actual visual bugs.
Cross Browser Visual Validation
Most of the existing open source tools for visual testing only runs on 1 or 2 browsers. For example, one of the tools that we were using before, called BackstopJS, which is a popular visual testing framework, only runs visual tests on Chrome headlessly. AyeSpy, which is a tool that was actually created by one of the teams here at News UK, is another visual testing tool, which hooks into your Selenium Grid to run your visual tests on different browsers. But still, it’s a bit limited. If you are using the Selenium Docker images, they only have images for Chrome and Firefox. What if you want to run your visual tests on Safari or Internet Explorer? You can definitely verify this yourself, but again as mentioned, it’s time consuming.
How can we solve these different visual testing issues?
Applitools
This is where Applitools comes in. Unlike existing visual tools, Applitools uses AI comparison algorithms so images are compared just like a human would. It was founded in 2013 and pretty much integrates with almost all testing frameworks out there. You name it – Selenium, Cypress, Appium, WebdriverIO, Espresso, XCUITest, even Storybook! With Applitools, you can validate visual differences on a wide range of browsers and viewports. By using different comparison algorithms (exact, strict, layout and content), you have different options to compare images and can cater different scenarios such as dynamic data or animations.
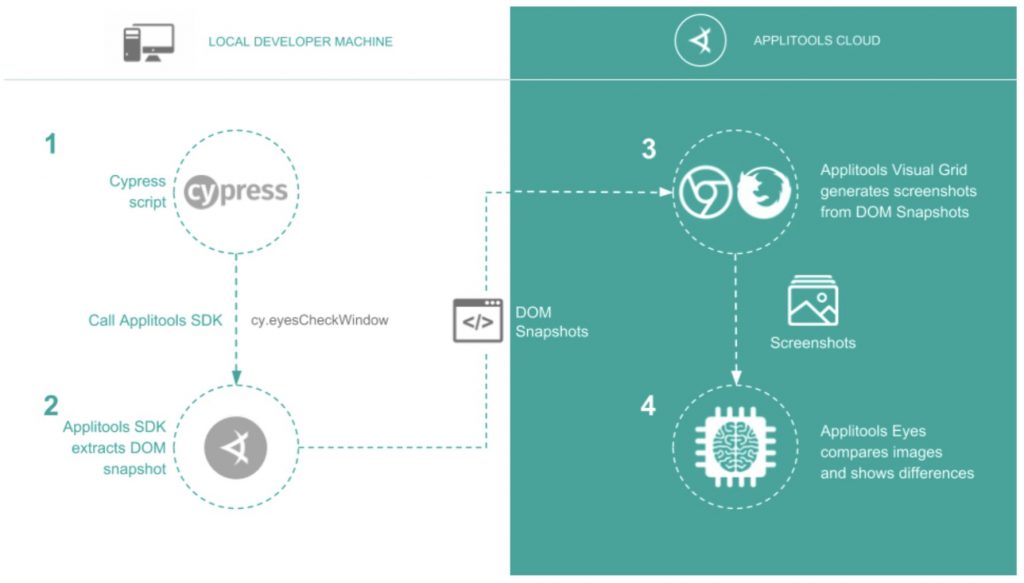
Rather than taking a screenshot, Applitools will extract a snapshot of your DOM. This is one of the reasons why visual tests are fast to run in Applitools. Once the DOM snapshots have been uploaded to the Applitools Cloud, the Applitools Ultrafast Grid, which offers users a way to render screens in multiple browsers and viewports simultaneously to generate the screenshots and do the AI powered image comparison.
Getting Started
To get you started, you need to install the following package to your project. This is specific to Cypress so you would need to install the correct package depending on your test framework of choice.
npm i --D @applitools/eyes-cypress
Once this has been installed, you need to configure the plugin and the easiest way to do this is to run the following command on your terminal
npx eyes-setup
This will automatically add the necessary imports needed to get Applitools working in your Cypress project.
Writing our first test with just Cypress
Let’s start doing some coding and add some validations on a sample react image app that I created a while back. It is a simple image gallery which uses unsplash API for the backend. An example github repo which contains the different code examples can be found here.
Our Cypress test can look like the following code snippet. Keep in mind, this only asserts the application to some extent. I can add more code to verify that it has the correct CSS attributes but I don’t want to make the code too lengthy.

Writing our first test with Cypress and Applitools
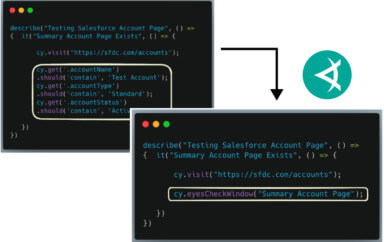
Now, let’s look at how we can write the test using Cypress and Applitools.
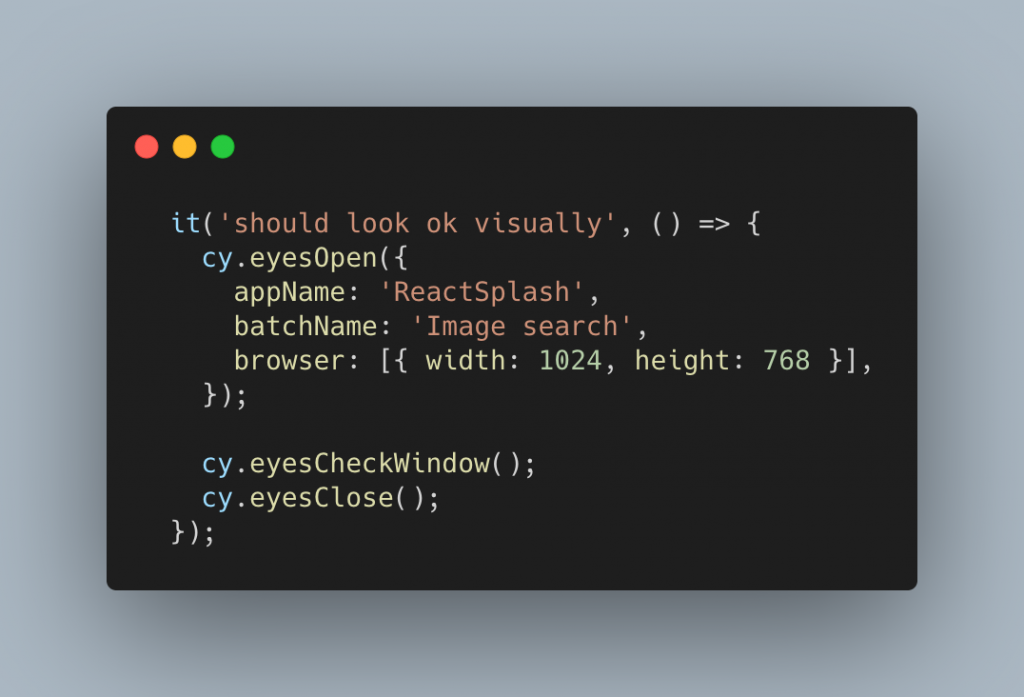
Applitools provides the following commands to Cypress as a minimum setup. `cy.eyesOpen` initiates the Cypress eyes SDK and we pass some arguments such as our app name, batch name and the browser size (defaults to Chrome). The command `cy.eyesCheckWindow` will take a DOM snapshot so every call to this command means a DOM snapshot will be generated. You can call this every time you do an action such as visiting your page under test or clicking buttons, and dropdown menus. Finally, once you are finished, you just call `cy.eyesClose`. To know more about the Cypress eyes SDK, please visit their documentation here to find more information.
In order to run this in Applitools, you need to export an API key which is detailed on this article. Once you have the API key, on your terminal you need to run:
export APPLITOOLS_API_KEY=<your_key>
npx cypress open
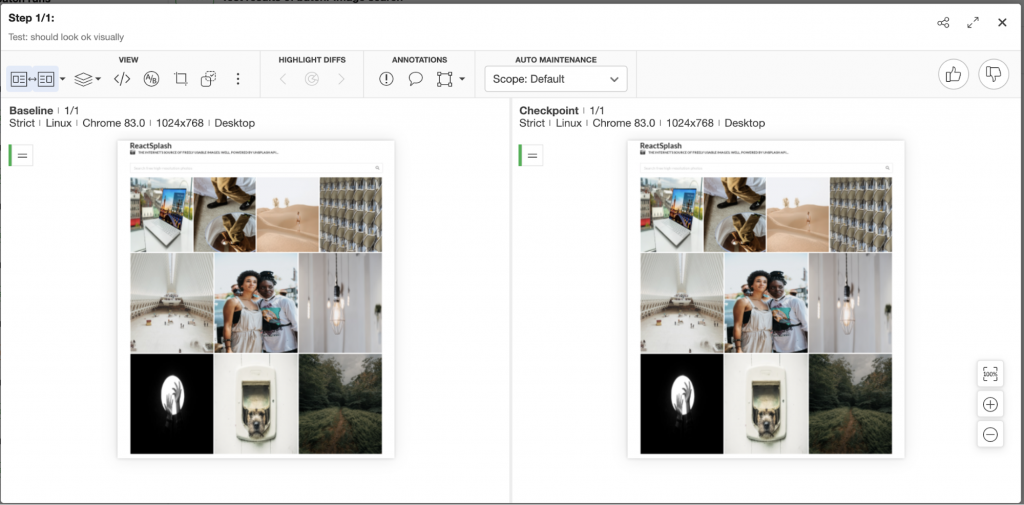
Once the test is finished, if you go to the Applitools dashboard, you should see your test being run. The first time you run it, there will be no baseline image then when you reran the test and everything looks good, you should see the following.
Handling Dynamic Data
Since we are using the unsplash API, we don’t have control as to what data gets returned. When we refresh the app, we might get different results. As an example, the request that I am making to unsplash will get the popular photos on a given day. If I reran my test again tomorrow, then the images will be different like the one shown below.
The good thing is we can apply a layout region so the actual data will be ignored or we can also set the match level as Layout in our test which we can preview on the dashboard. If the layout of our image gallery has changed, Applitools will report it as an issue.
Making code changes to our application
Now, let’s create some changes in our application (code references found here) and introduce the following:
- Update the background colour of the search bar (bug)
- Add a new footer component (new feature)
- Remove camera icon on the subtitle (bug)
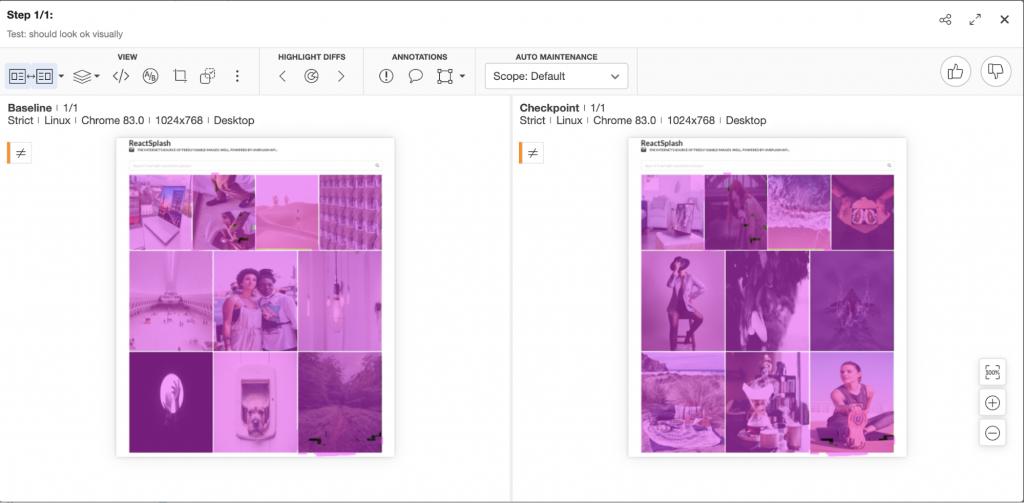
If we run the test where we only use Cypress, how many of these changes do you think your test will catch? Will it catch that there is a new footer component? How about updating the background colour of the search bar? How about the missing header icon? Probably not because we didn’t write any assertions for it. Now, let’s rerun the test written in Cypress and Applitools.
Looking at the image above, it caught all the changes and we didn’t had to update our test since all the maintenance is done on the Applitools side. Any issues can be raised directly on the dashboard and you can also configure it to integrate to your JIRA projects.
Cross Browser Visual Validation
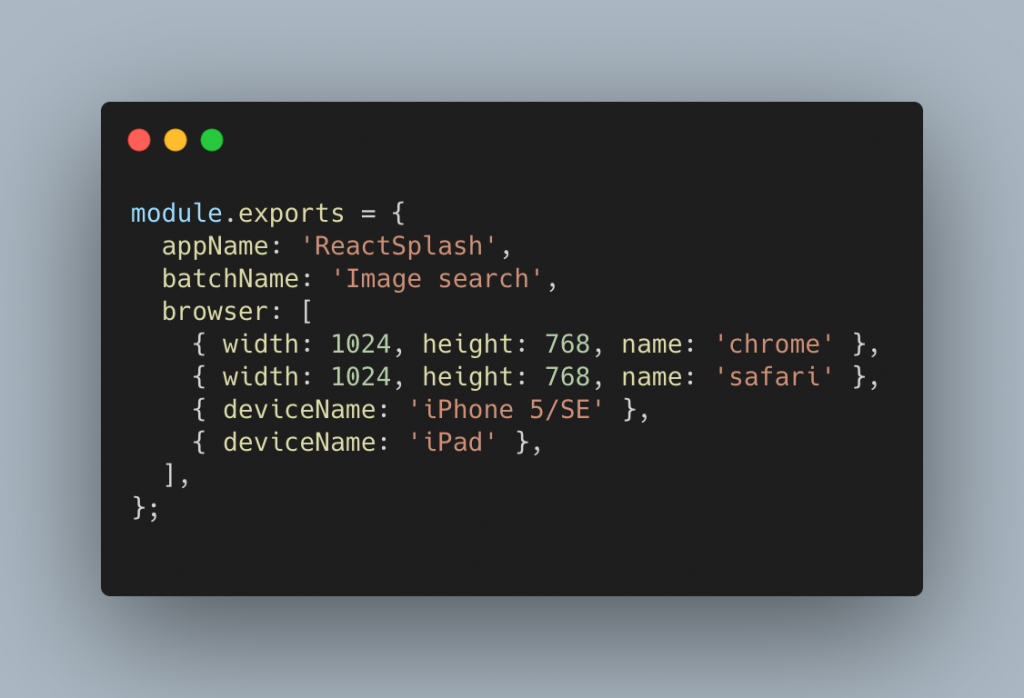
To run the same test on different browsers, you just need to specify the browser options on your Applitools configuration. I’ve refactored the code a bit and created a file called `applitools.config.js` and moved some of the setup we added initially in our `cy.eyesOpen` in this class.
Just simply reran your test and check the results in the Applitools dashboard.
Final Thoughts
This is just an introductory post on how you can use Applitools so if you want to know more about its other features, check out the following resources:
- Applitools Master Class Webinar
- Applying Match Levels
- Applying Match Regions
- Test Automation University – different courses on using Applitools with other frameworks
While open source pixel by pixel comparison tools can help you get started with visual testing, using Applitools can modernize the way you do testing. As always, do a thorough analysis of a tool to see if it will meet your testing needs ?