Running tests shouldn’t be an afterthought, but it can seem challenging to dive in with the huge variety of frameworks and simply not knowing what to test. Instead, we can use Netlify Build Plugins to instantly add automated visual testing to every deployment in just a few clicks with the Applitools Visual Diff Plugin.
What is a Netlify Build Plugin?
Netlify is a hosting and deployment platform that automates taking a web app and publishing it to the web. This also includes the ability to deploy serverless functions, allowing developers to closely develop APIs and backend logic right next to their apps.
As part of that process, Netlify gives developers the ability to install Build Plugins, which helps extend the default deployment allowing additional tools and services to tap.
This makes for a perfect opportunity for things like code analysis or custom build caching for those who don’t want to maintain it themselves, but it’s also an opportunity for adding testing, where we can start using Applitools to run visual tests without having to have any other type of infrastructure or frameworks configured.
How does Applitools work with Netlify Build Plugins?
With Build Plugins, Netlify provides a few different hook locations, meaning, throughout the build and deploy process, there are different steps at which point a Build Plugin can run code.
One of those steps is called Post Build, where as soon as Netlify finishes building the application, we can determine all of the pages that were built and run a visual test with Applitools Eyes.

This provides instant, broad coverage for web apps, making sure that each time we deploy the site, we’re not creating any new regressions or visual bugs.
How to get started with the Applitools Build Plugin?
If you’re already up and running with Netlify, the only thing you need to get started is a free Applitools account. Otherwise, this plugin only works for Netlify-deployed applications.
With your account, you’ll want to be able to locate your Applitools API key. You can find your API key inside of your Applitools dashboard under the account dropdown and by selecting My API Key.

Once you’re ready to go, there are two ways to install the Visual Diff plugin: using the Netlify dashboard or using the Netlify configuration file in your project.
Note: to use advanced settings such as custom browser configurations and ignore regions, you’ll need to use Option 2, using the Netlify configuration file in your project.
Option 1: Adding the Applitools Visual Diff Plugin with the Netlify UI
Setting up your API key
To start, locate to your site inside of Netlify and navigate to the Site Settings section.
Once inside, select Build & deploy in the sidebar and scroll down to Environment.
Here, we want to click Edit variables, where we’re going to add a new variable.
For the name, add APPLITOOLS_API_KEY.
For the value, add your unique Applitools API key.

Adding the Applitools Visual Diff Build Plugin
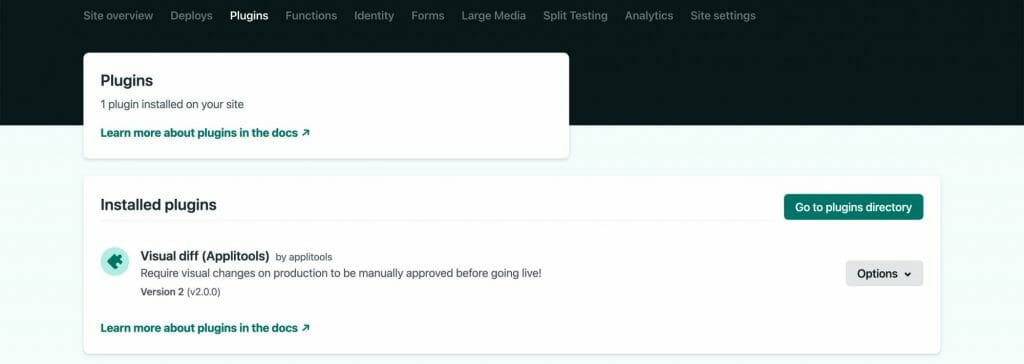
Next, navigate to the Plugins section of the Netlify dashboard, where it will then give you an option to go to the Netlify plugins directory.
Here, you can either search for “Applitools” or scroll down to the bottom where the name of the plugin will be “Visual diff (Applitools)”.
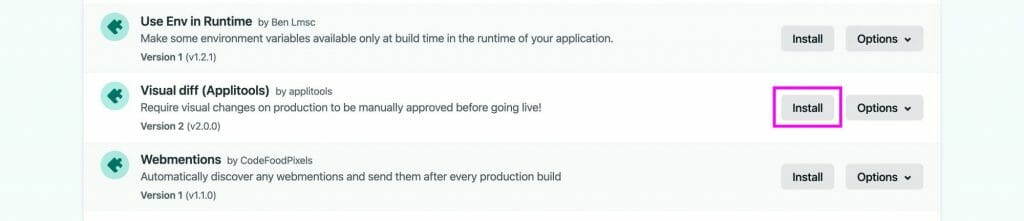
Click the Install button, where it will then ask you to select which site you want to add it to. Find and select your site then confirm installation.
Running a visual test through Netlify
Applitools has the ability to run visual tests by hooking into the Netlify build and deploy process, which means, we need to trigger a new deploy.
Inside of the Netlify dashboard and navigate to the Deploys section.
On the right, above the list of recent deployments, where you’ll see a button that says Trigger deploy. Click Trigger deploy, then select Deploy site from the dropdown.

This will now kick off a new deployment with Netlify. You can even view the logs if you select the new deployment.
Viewing Applitools Visual Testing results
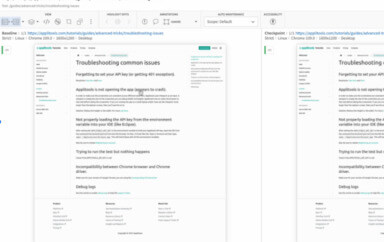
Once the Netlify deployment as finished, Applitools will have run through your site visually testing each page.
You can now head over to the Applitools dashboard, where you’ll now see a new test with your project’s name!
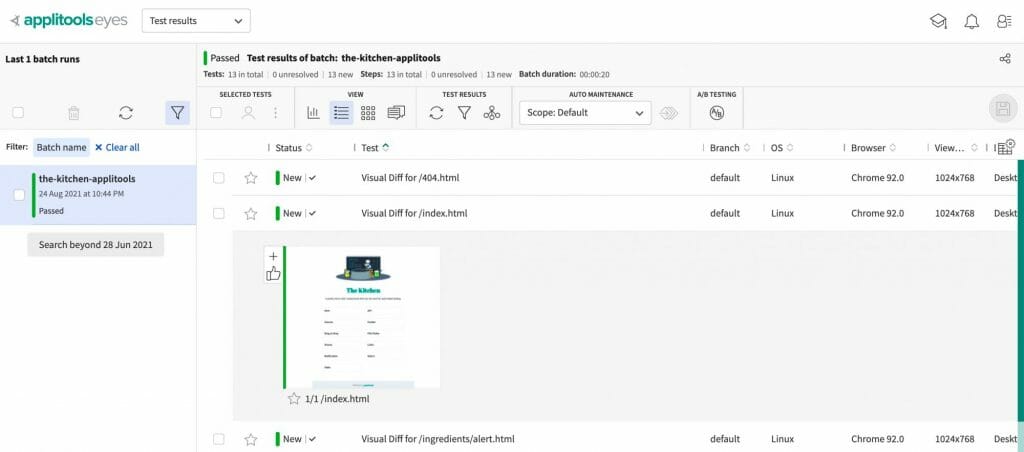
Every time you run your test after, Applitools will compare the active state of your project to this baseline and make sure everything is working as expected!
Option 2: Using a netlify.toml to add the Applitools Visual Diff Plugin to a project
Setting up your API key
Even though we’re going to be setting up the plugin with our Netlify configuration file, we’ll still need to add our API key via the UI.
To start, locate to your site inside of Netlify and navigate to the Site Settings section.
Once inside, select Build & deploy in the sidebar and scroll down to Environment.
Here, we want to click Edit variables, where we’re going to add a new variable.
For the name, add APPLITOOLS_API_KEY.
For the value, add your unique Applitools API key.
Adding the Applitools Visual Diff Build Plugin
If you don’t already have one, create a netlify.toml file inside of the root of your Netlify project.
Next, add the following:
[[plugins]]
  package = "netlify-plugin-visual-diff"
This will tell Netlify that you want to use the Visual Diff plugin when deploying your site.
Running a visual test through Netlify
With your new configuration, commit the new file changes and push them out to your Git repository that’s connected to Netlify.
Unless disabled, this will automatically kick off a new Netlify deploy for your site which will run the visual tests during the build process!
Note: if you have automatic deployments disabled, try going to the Deploys section and triggering a new build.
Viewing Applitools Visual Testing results
Once the Netlify deployment as finished, Applitools will have run through your site visually testing each page.
You can now head over to the Applitools dashboard, where you’ll now see a new test with your project’s name!
Every time you run your test after, Applitools will compare the active state of your project to this baseline and make sure everything is working as expected!
Optional: Advanced Configuration
If using the netlify.toml to manage the plugin, you additionally have the option of passing in configurations via Netlify build plugin inputs.
Head over to the [Applitools Visual Diff plugin GitHub](Viewing Applitools Visual Testing results Once the Netlify deployment as finished, Applitools will have run through your site visually testing each page. You can now head over to the Applitools dashboard, where you’ll now see a new test with your project’s name! Every time you run your test after, Applitools will compare the active state of your project to this baseline and make sure everything is working as expected! ) to learn more!
Learn more about Applitools
Getting started with Netlify and the Applitools Build Plugin is just one of the many ways you can provide broad visual testing coverage on your project.
Check out the Applitools tutorials to find your favorite framework or get in touch to schedule a demo with one of our engineers!