Nowadays companies are investing a lot of money into QA efforts to increase the quality of the software products being released. However, the traditional QA method is not only time-consuming and ineffective but also often disappointing in its results. This triggers inefficiency, additional expenses, and ultimately, higher risk for delivering the end product with visual or functional issues. The pressure to release frequently and stay ahead of the competition can lead to insufficient testing resulting in bugs and other issues that negatively affect the user experience.
Today’s users require software that has functional capabilities, better graphics and is easier to use. To meet these expectations, a lot of testing needs to be done for the application’s visuals and user interface. This is because as the software development life cycle progresses the testing teams are put under pressure as development teams release products faster.
In this blog, we will explore the challenges of testing modern applications and how these challenges can be addressed by utilizing the AI-powered testing tool, Applitools Autonomous.
You will see detailed examples of how Applitools Autnonmous addresses different types of testing like functional, visual, and API testing.
Challenges In Testing Modern Applications
Below are some of the challenges we often face while testing modern applications.
Too Many Scenarios
Modern applications are highly complex, with hundreds of end-to-end scenarios that need to be tested across a vast array of screens, devices, and browsers.
Too Many Screens & Devices
In modern applications, users access digital content on a wide variety of devices, browsers, and screen sizes, each with its own unique characteristics. Manually verifying that an application looks and functions correctly across all these environments is nearly impossible without automated assistance. Traditional testing methods cannot scale to meet this demand, often resulting in inconsistent user experiences and missed visual bugs.
Constant UI Changes
In dynamic development environments, user interfaces (UIs) are constantly evolving. Even minor changes to the UI can require updates to test scripts. This constant maintenance burden can slow down the development process and lead to outdated or ineffective tests.
Different Skill Sets
Teams often consist of members with varying technical skills, leading to the use of different tools and approaches to testing. This creates silos within the organization, where engineers and non-technical testers might not collaborate effectively. So far we have seen the challenges in testing modern applications.
Types of Testing Using Applitools Autonomous
Applitools Autonomous, powered by Applitools’ proven Visual AI, offers a game-changing solution that allows teams to automate and streamline testing across various dimensions. In this blog, we’ll explore the types of testing you can perform using Applitools Autonomous and how it simplifies the testing process.
Full Website Testing
One of the key features of Applitools Autonomous is its ability to conduct a Full Website Test with minimal effort. Simply by entering your website’s URL, Autonomous crawls the sitemap and automatically creates a test suite covering every web application page.
Benefits of Full Website Testing:
- Comprehensive Test Coverage: Automatically creates tests that span the entire site.
- Visual AI Validation: Screenshots are taken and compared in real time to identify visual discrepancies.
- Technical Issues Detection: Automatically detects issues like HTTP errors, timeouts, and structural changes (added/removed pages).
- Cross-Environment Consistency: Ensures your website renders consistently across all environments.
With just a URL input, Applitools Autonomous handles the heavy lifting of testing, giving teams complete coverage across all environments.
URL List Testing
If you don’t need to test your entire website, or if you want to focus on specific pages, Applitools offers URL List Testing. This allows you to upload a list of important URLs that you want to validate across different browsers and devices.
Benefits of URL List Testing:
- Custom Test Plans: Create targeted test plans for critical or specific parts of your website.
- Visual and Functional Validation: Detect visual differences, server errors, and loading failures.
- Quick Setup: Simply upload a CSV, XLS, or sitemap file to initiate the testing process.
This method gives you granular control over which parts of your web application are tested, ensuring the most important areas receive detailed attention.
Custom Flow Testing
For complex workflows, Applitools Autonomous offers Custom Flow Testing, which allows you to simulate end-user actions across your site. For example, you can test user journeys like logging in, adding items to a cart, and checking out — with every action captured step by step.
Benefits of Custom Flow Testing:
- Workflow Validation: Ensure that user flows, from login to checkout, function correctly.
- Real-Time Interaction: Record steps in an interactive browser, which are automatically converted into plain English for easy review.
- Dynamic Content Testing: Easily handle personalized content and dynamic data using Visual AI, ensuring accuracy even with fluctuating data.
Custom Flow Testing is ideal for complex, multi-step processes, such as eCommerce workflows or user registration flows.
Cross-Browser and Device Testing
Cross-browser testing can be a significant bottleneck in the development process, but Applitools Autonomous eliminates this pain point. It replicates browsers in seconds, cutting down the time required for Cross-Browser and Device Testing by up to 90%.
Benefits of Cross-Browser Testing:
- Fast Replication: Save time by reducing cross-browser testing time by up to 90%.
- Consistent Testing: Validate how your site performs across multiple browsers and devices with minimal effort.
By reducing the time spent on browser replication, teams can focus on identifying and resolving any browser-specific issues faster.
API Testing
Applitools Autonomous doesn’t just stop at visual testing—it also enables API Testing. You can initiate HTTP requests directly in your tests, manage application states, and store responses for use in later test steps.
Benefits of API Testing:
- Seamless Integration: Initiate API calls and validate responses as part of your testing workflow.
- State Management: Manage application states before or after the UI flow without complex logic.
API Testing combined with visual validation ensures that your web app’s functionality works correctly and efficiently across the board.
Example of Testing Using Applitools Autonomous
In the below section, you will see the different types of testing you can perform using Applitools Autonomous.
Full Website Testing
In full website testing, users provide the URL they want to scan and specify the test environments where they want to execute the scan. Additionally, users can set optional settings such as a maximum number of URLs and select a custom flow to run before the test. Once these steps are completed, the website is ready to be scanned.
For example, let’s look at the site https://dan.sandbox.applitools.com/e-commerce.
Steps to Create a Full Website Test
- Navigate to Test Management
- In the navigation bar, go to Test management > Tests.
- Click Create a new test and then select Create a full website test.
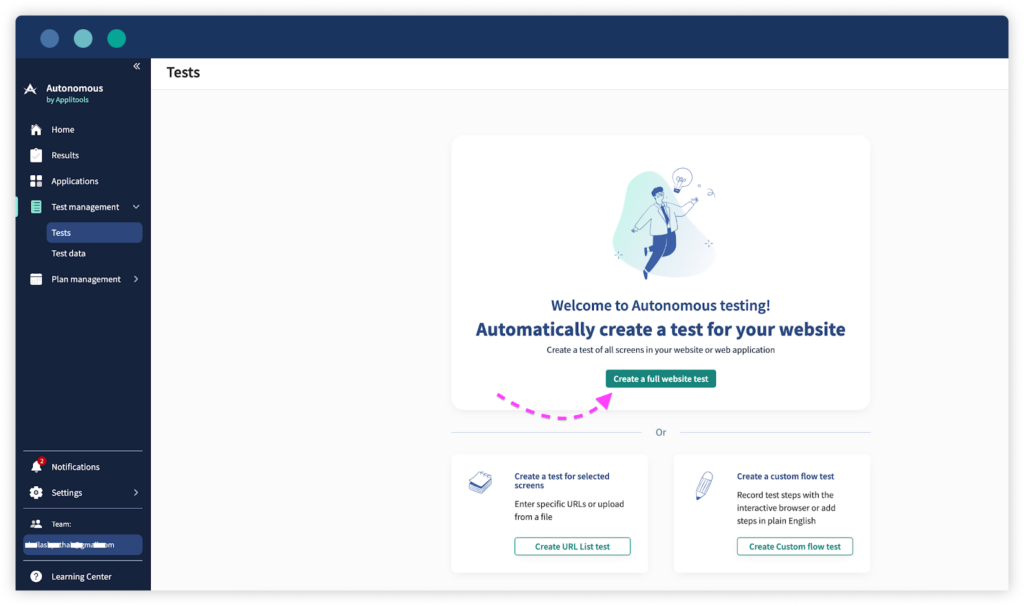
- Enter the URL: In the URL field, input the website homepage in the format https://www.example.com/.
Alternatively, you can enter the full path to the sitemap or a sub-directory, such as https://dan.sandbox.applitools.com/e-commerce/type/books.
If a sub-directory is specified, Autonomous will use the sitemap in the root directory to identify URLs within the sub-directory. If the sub-directory has its own sitemap, provide the full path to that sitemap.
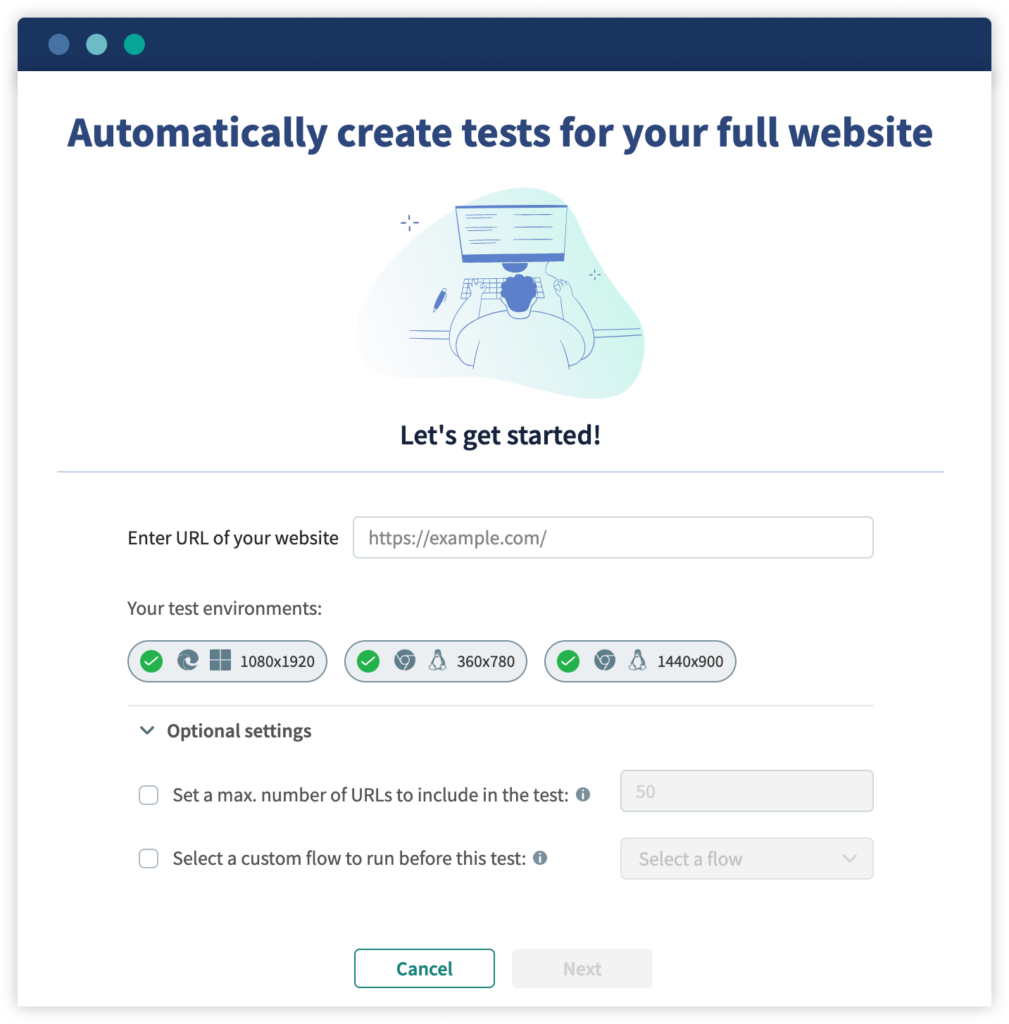
- Default Test Environments: The test will use the below environments by default, each defining a browser, operating system, and screen size. You can click on an environment to remove it from the test. After creating the test, you can add or modify environments in the test plan.
- Chromium, Linux, 1440 x 900
- Chromium, Linux, 360 x 780
- Microsoft Edge, Windows, 1080 x 1920
- Optional Settings:
- Set the Limit: To limit the number of URLs in the initial test run, click on Optional settings and select Set a max number of URLs to include in the test, then enter the desired number of URLs.
This helps the first test run quickly and get preliminary results. This setting only applies to the first run; future runs will include all URLs in the sitemap, with new URLs marked as “New” in the results.
Note: If you have a trial account, note that there is a limit to the number of tests you can include in a full website test. - Custom Flow and Authentication: To enter basic authentication or run a custom flow before each URL opens, click on Optional settings and choose Select a custom flow to run before this test.
You can select Basic authentication and enter a username and password. This adds an authentication-encoded string in each URL, ensuring the username and password are included.
- Set the Limit: To limit the number of URLs in the initial test run, click on Optional settings and select Set a max number of URLs to include in the test, then enter the desired number of URLs.
- Click the Next Button: Once the above steps are completed, your website is ready to be scanned.
Once you click the Next button, Autonomous can then develop baseline data at every screen on the website. These are the initial test images which are in most cases used to identify changes in subsequent test iterations. The maximum count of baselines to be generated is obtained by multiplying the count of URLs in the test by the count of environments.
You can see baseline data is created for every screen in the screenshot below.
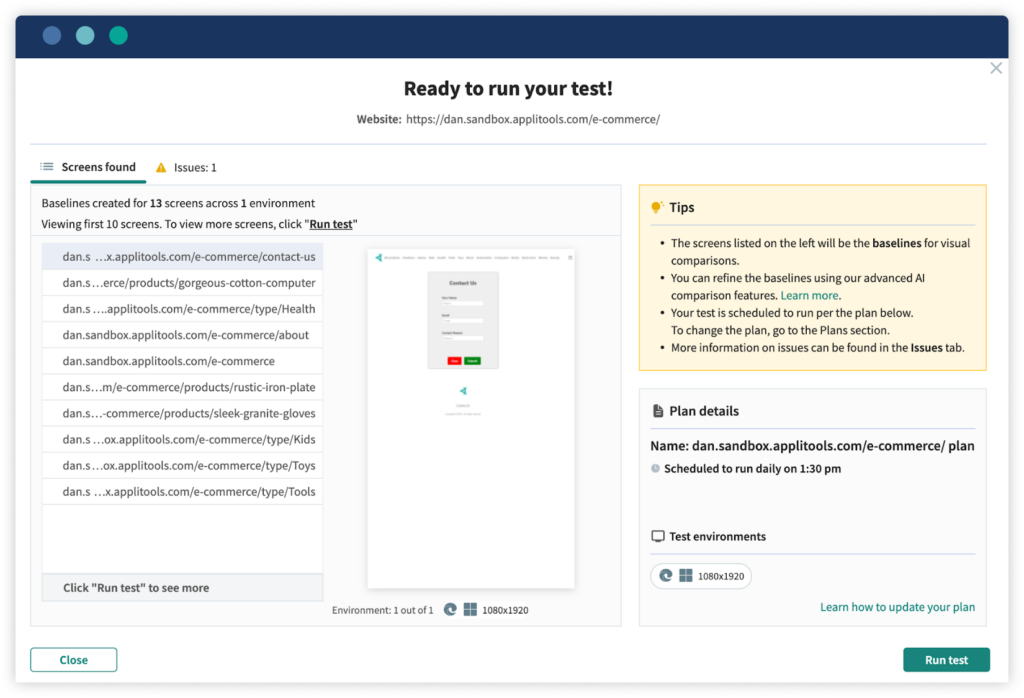
- Execute the Test: Once the baselines have been created, click Run Test. Autonomous will run the test to create a checkpoint for each screen and then compare the checkpoint to the baseline determining any issues and if the screen has changed.
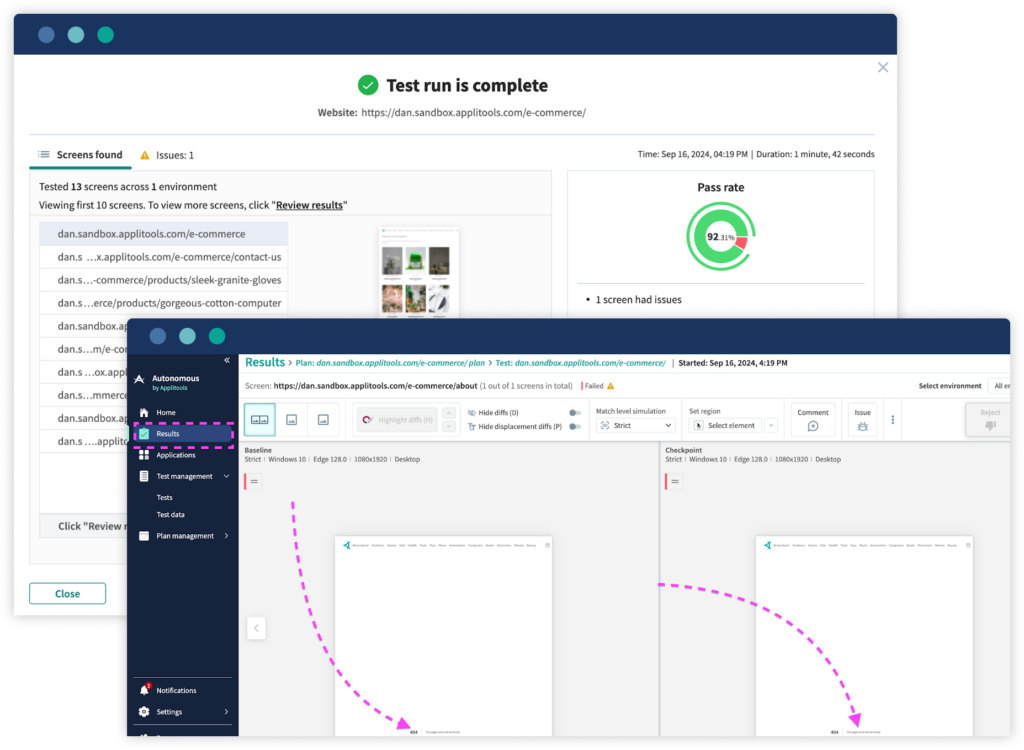
- Execution report: Once the execution is complete, click Review Results to view all test results on the Results page.
Clicking on the Results tab on the left side lets you see the details of the Pass and Fail test cases. In the screenshot, we can see one test case failed. When we tried to find out the reason it was discovered that this test case was failing because of the 404 error screenshot attached below.
This lets us automatically find technical issues, pages that were added or removed from the website, visual disparities, and unexpected alterations on any of the pages.
URL List Test
A URL list test allows users to create a list of URLs with combinations that will be used for testing. This is especially useful when you have no sitemap, want to crawl specific URLs in your domain, or need to crawl URLs of other domains too.
While setting up your URL list test you should create a file with the URL to be tested and check if all of them are properly loaded. The list should be in CSV, XLS, TXT, or a sitemap .xml file format. The sitemap .xml should only contain the URLs you are going to test—not all URLs on your site.
Steps to Create a URL List Test in Applitools Autonomous
- Navigate to Test Management: In the navigation bar go to Test Management > Tests.
- Create a New Test: Click on Create a new test and select the URL list from the dropdown.

- Enter Test Details:
- Test Name: Enter a name for the test. This will appear in the list of tests.
- Description: (Optional) Add a description of the test.
- Application: Select the application the test should be associated with. Every test must be linked to an application. If you have an existing full website test or another test linked to the same application, associate this test accordingly. For more details, refer to the “Applications” section in the platform documentation.
- Plan: Choose the associated plans. Plans define the schedule, environment, and test parameters. A test can belong to multiple plans, and the list of available plans will depend on the application associated with the test. For more details, refer to the “Plans” section.
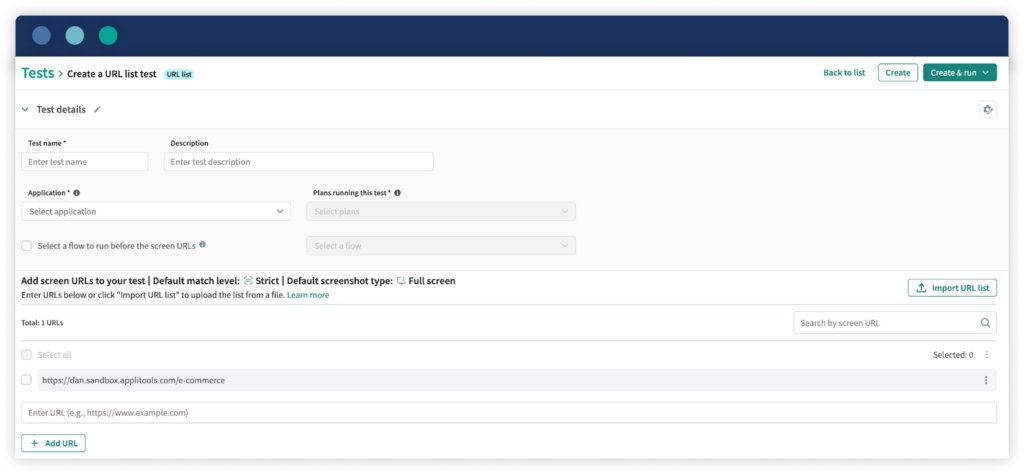
- Run a Flow Before Each Step (Optional): If you need to perform an action (such as entering authentication credentials or closing a popup) before each step, click Select a flow to run before the screen URLs. For more details, see the “Flow to Run Before Steps” section of the documentation.
- Import URLs: Click Import URL list to upload a comma-separated text file, CSV, or XML file with the list of URLs you want to test.
Alternatively, enter a single URL and click Add URL to manually add URLs one by one. - Set Match Level: The default match level for all URLs is set to Strict. If you want to change the match level for a particular URL, click the area to the right of the URL and select the desired match level from the dropdown.
- Advanced Settings: To configure additional advanced settings for the test or individual URLs, refer to the Advanced Test Settings section for further customization options.
- Finalize and Run: Once the configuration is complete, choose one of the following actions:
- Create (or Update): Saves the test to the associated plans without running it.
- Create & run > Create & run test: Saves and runs the test as a single instance without executing any other tests in the plan. You will be asked to choose a plan to determine the test environments. You can view the results on the Results page, and the test will be listed as “Run without a plan.”
- Create & run > Create test & run plan: Saves the test and executes all associated plans, including all tests within those plans. Results can be viewed on the Results or Plans pages.
Custom Flow Testing
The Autonomous Applitools Custom Flow Test is an intelligent and streamlined way to automate end-to-end testing of specific workflows on a website. This feature enables testers to design a sequence of actions or user scenarios, for instance, login, adding items to a shopping cart, and navigating to a checkout page while at the same time, every action is recorded for evaluation purposes.
Key Components of Autonomous Custom Flow Test
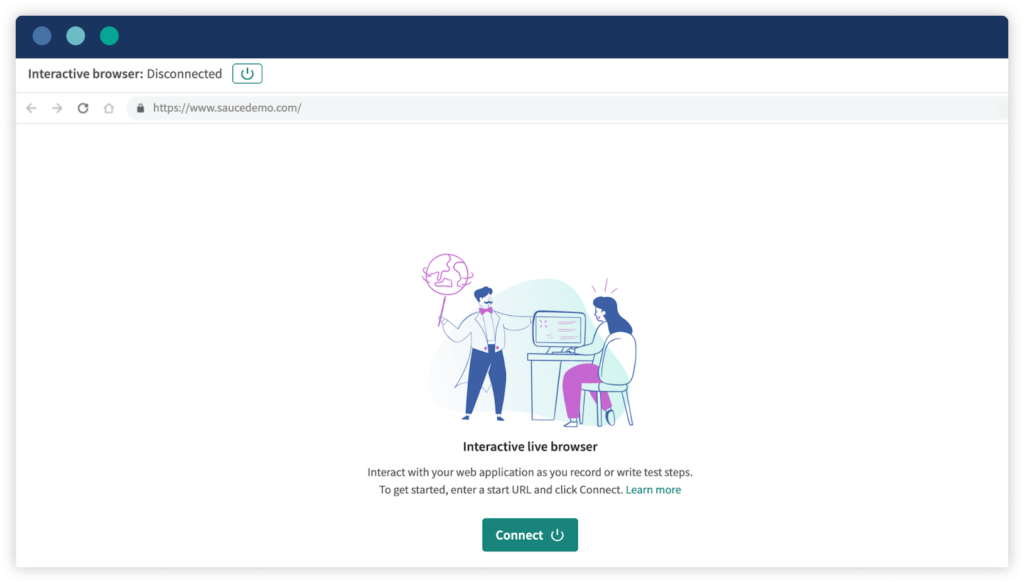
- Interactive Browser: Autonomous provides an interactive Chrome-based browser that allows users to manually interact with the application. Testers can perform actions like clicking buttons, filling in forms, scrolling, or navigating between pages.
The interactive browser records every action in real time and automatically translates them into test steps, simplifying the test creation process.
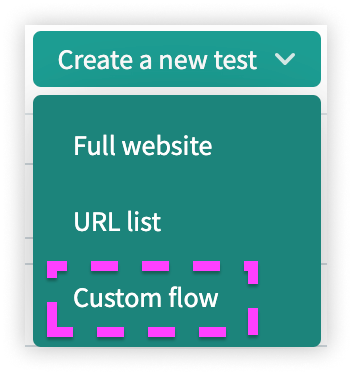
- User Action Steps: Go to Test Management > Tests in the navigation bar. Click on Create a new test and select Custom Flow from the dropdown.
The below screen will then open when you click on Custom flow: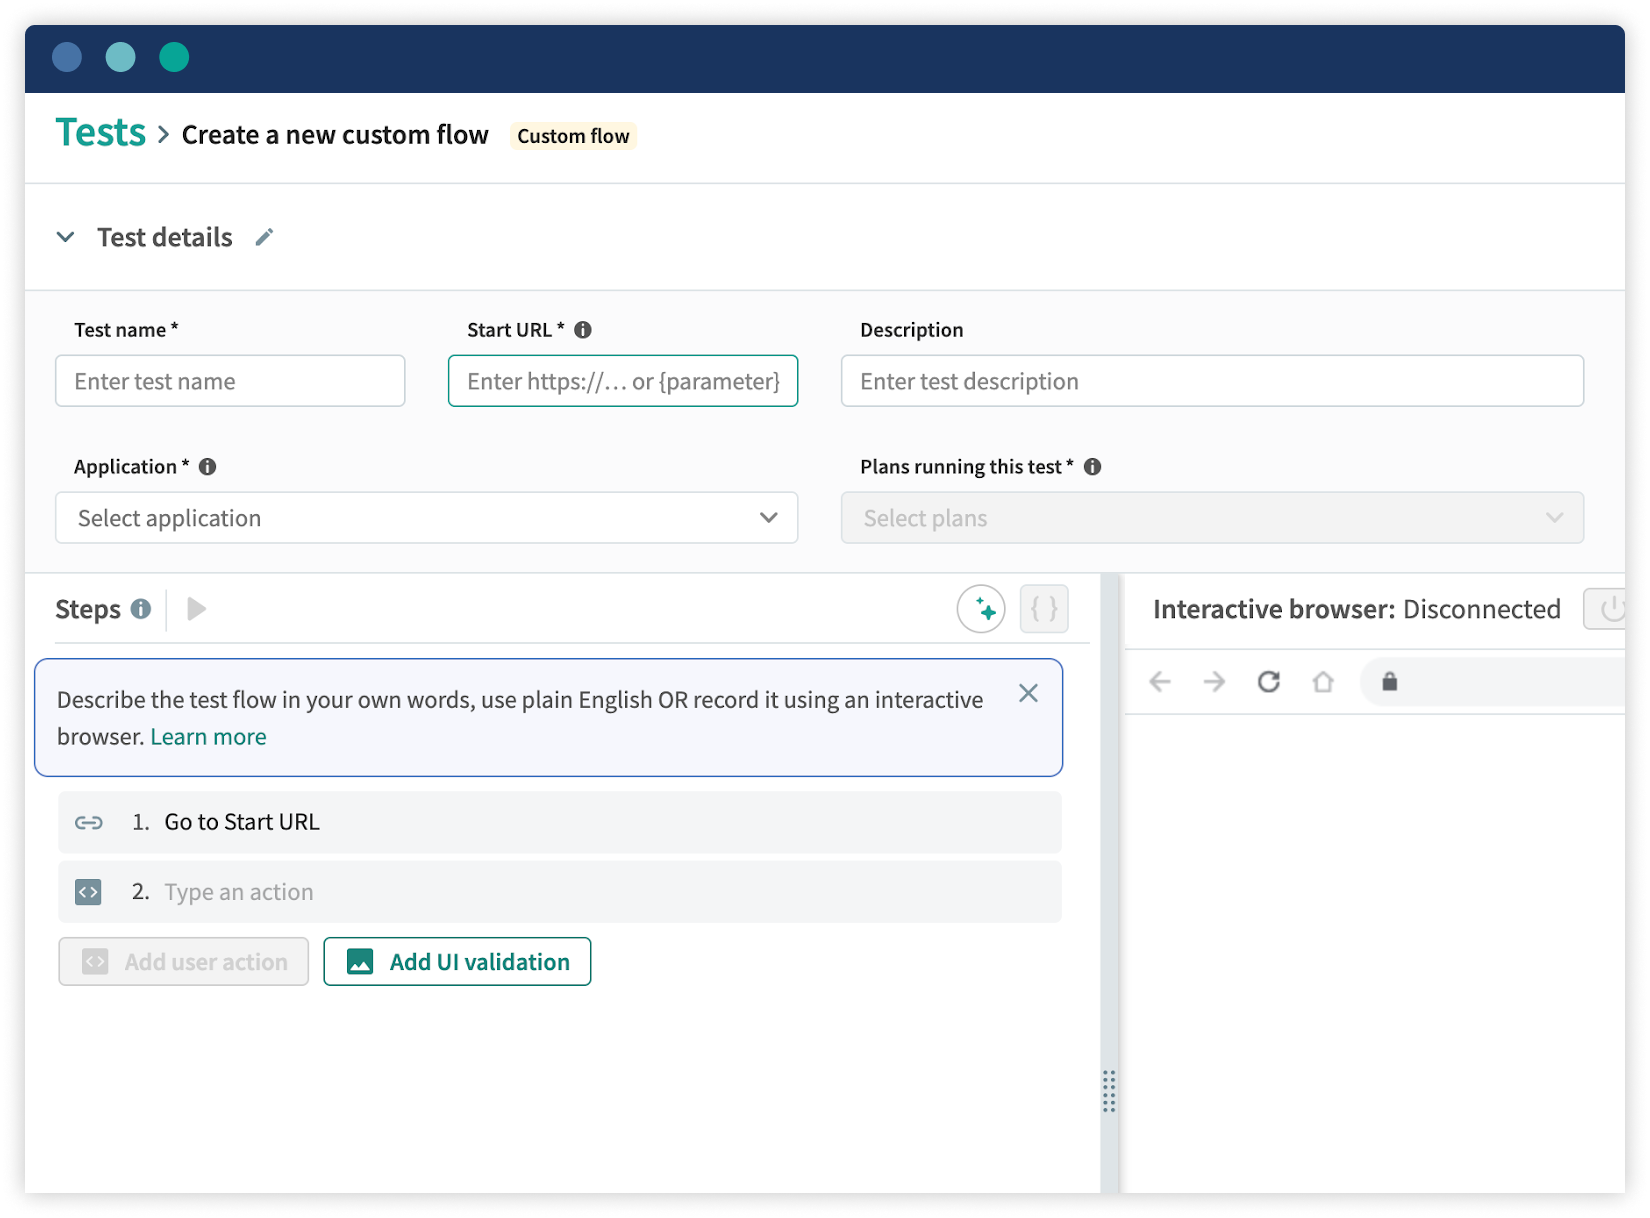
In the screenshot below, you can see the recorded steps resulting from using the interactive browser: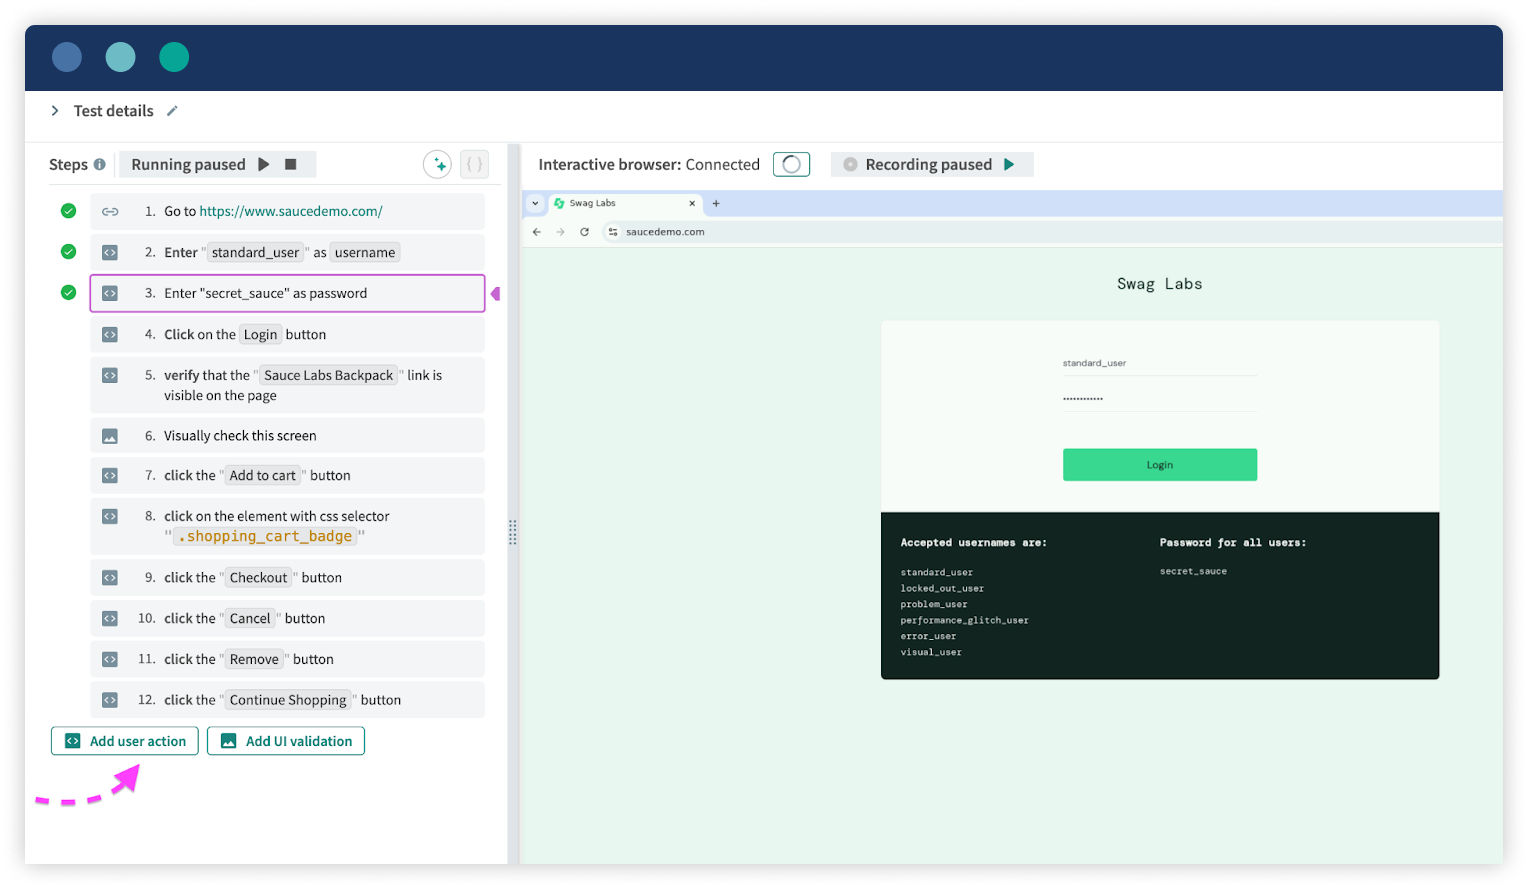
Actions performed in the browser, such as clicking or typing, are captured as plain English commands. These steps can be easily added, modified, or deleted.
For instance, a step might read: “Enter “standard_user” as username”, Enter “secret_sauce” as password, and “Click on the Login button.” Autonomous also offers auto-suggestions to ensure that the commands are valid, reducing the risk of errors and speeding up the creation of test scripts. - UI Validation Steps: Visual validation is a core feature of the Autonomous test. At key points in the workflow, Autonomous takes screenshots to validate the user interface. These visual checkpoints help ensure that there are no unexpected visual changes (known as visual diffs) between test runs.
Screenshots act as baselines and provide insights into the accuracy of the UI across different devices and resolutions.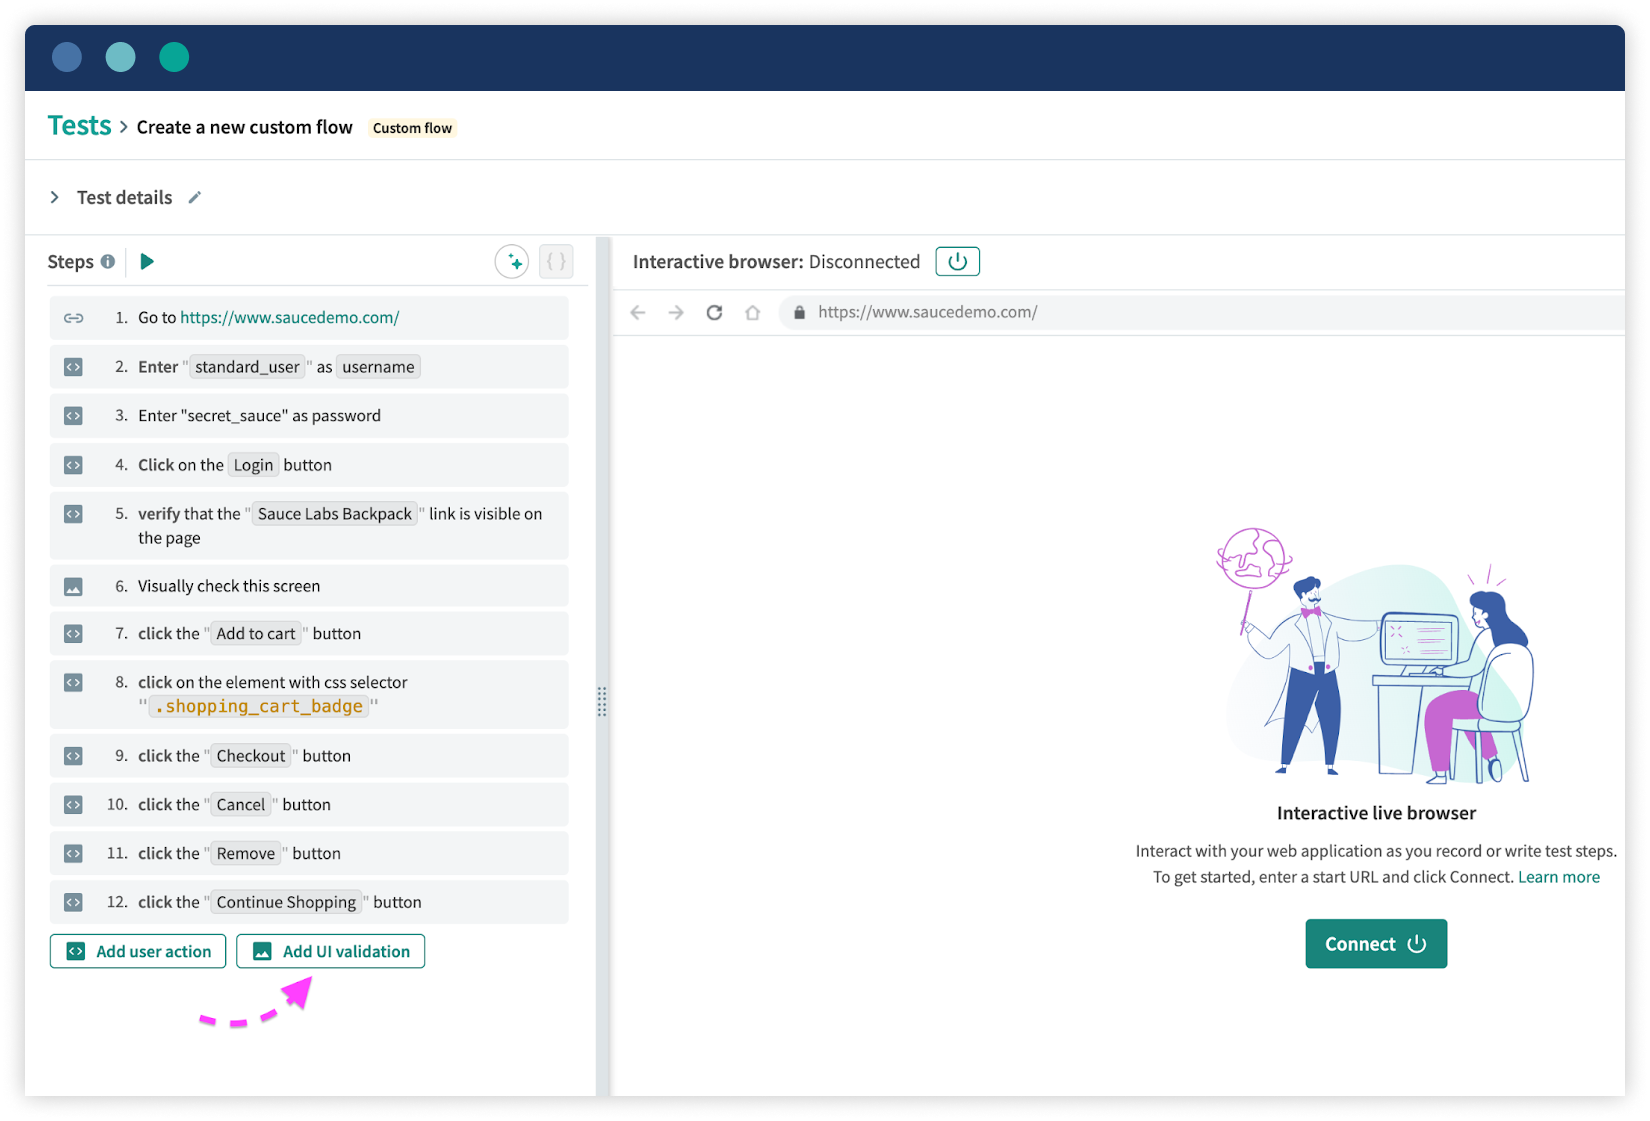
In the below screenshot, you can see that after logging into the application we are visually verifying the page.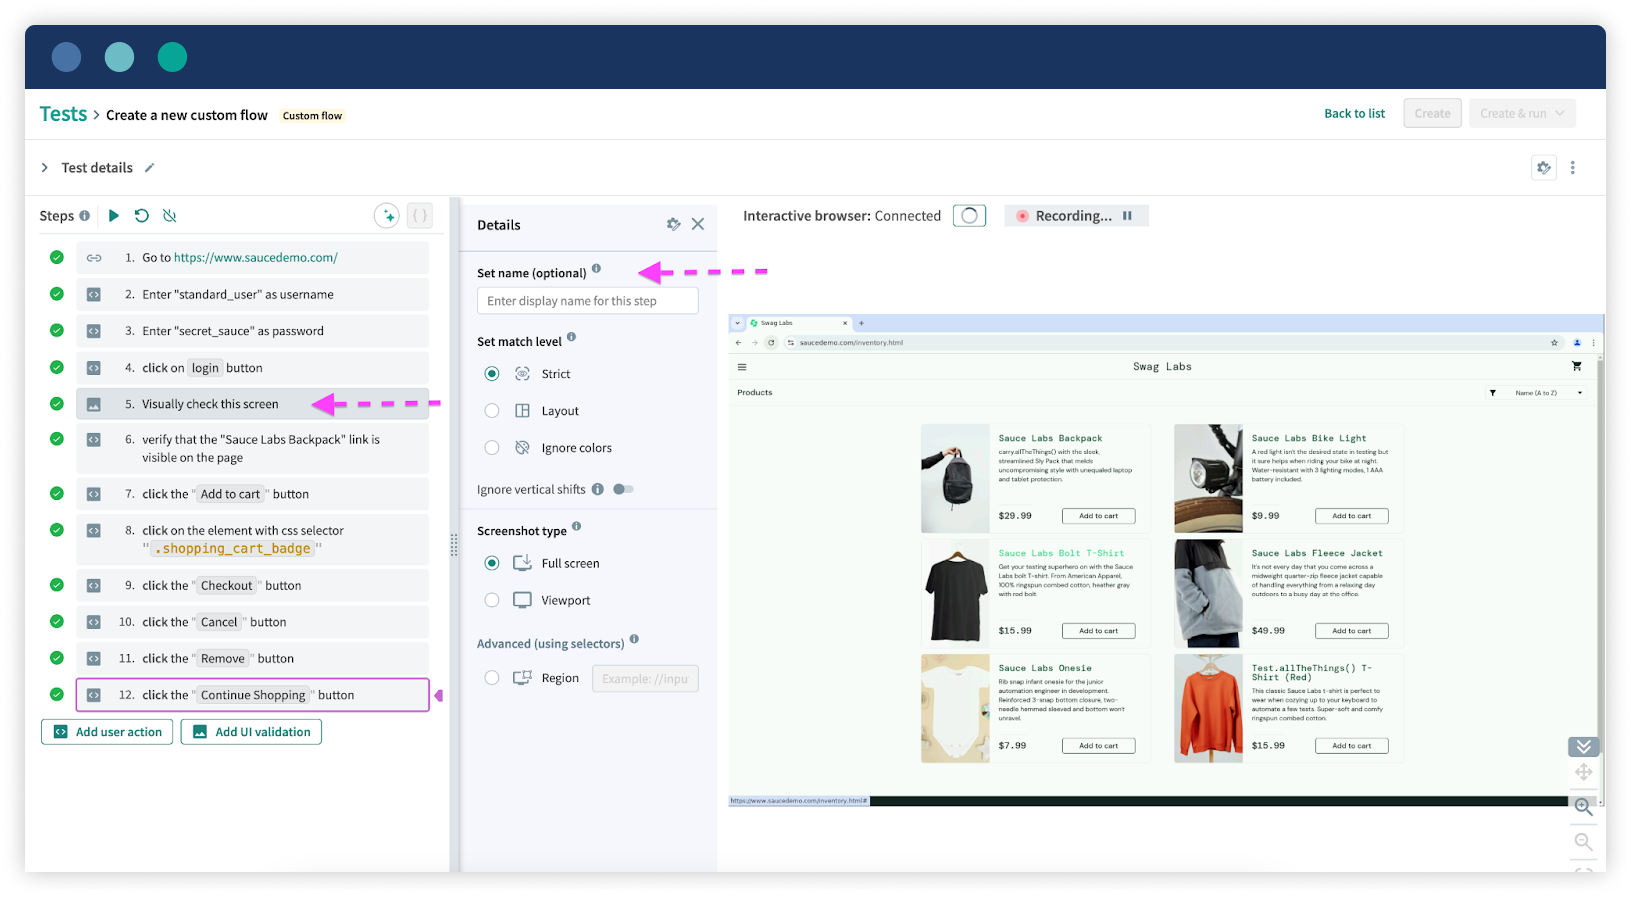
Use Cases of Custom Flow Testing
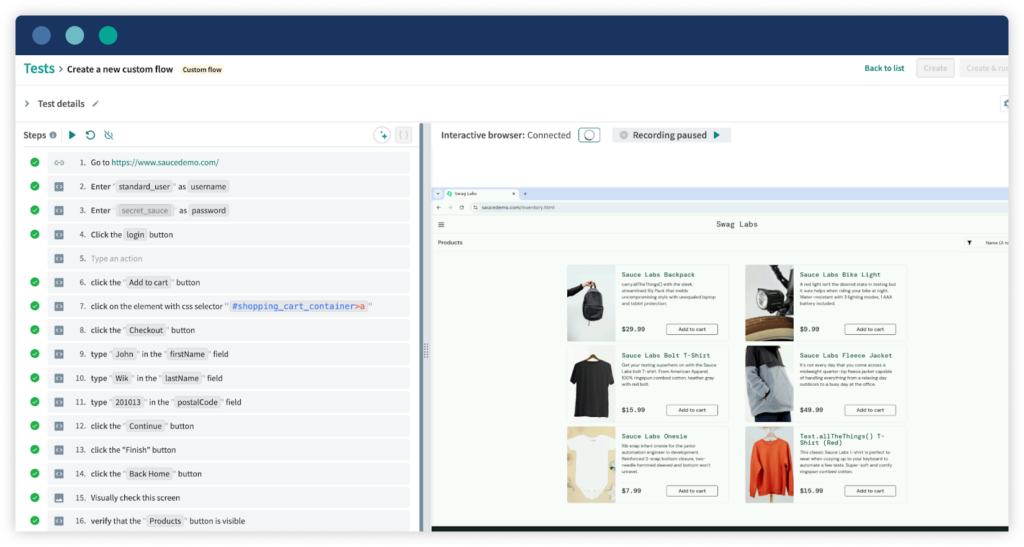
Let’s take the example of https://www.saucedemo.com/ where a user may perform the actions below.
- Login into the application with Username and Password
- Click on Add to cart against the product “Sauce Labs Backpack”
- After adding the item to the cart place the order
- Finally, verify the confirmation message
For the given use case, we have two options to write the test script:
- Manually add user actions: This involves explicitly defining each user action in the script or code.
- Record the steps: This option allows the user’s interactions to be captured automatically by recording the steps as they are performed.
Both approaches can be utilized based on the specific requirement or convenience. In the screenshot below you can see the above use case is recorded.
Debug or Modify a Test
In the screenshot below you can see we can perform various actions by clicking on any existing action. The user has clicked on an action (likely Step 7, clicking a button with a CSS selector) that reveals a dropdown menu providing options such as: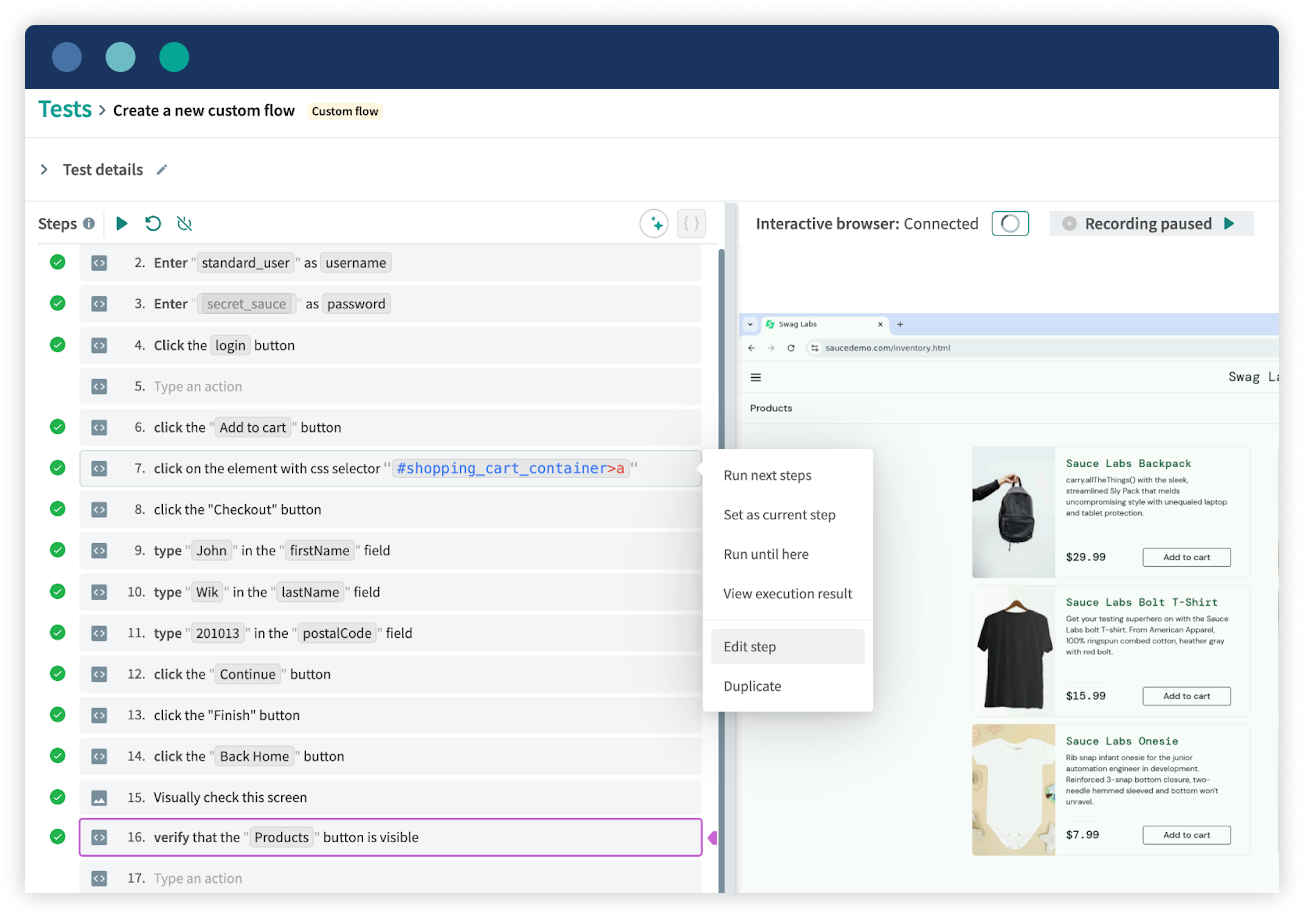
- Run next steps: Executes the remaining steps in the test from the selected point onward.
- Set as current step: Marks the selected step as the starting point for future test execution.
- Run until here: Runs the test from the beginning up to the selected step, stopping just before it.
- View execution result: Displays the outcome of the selected step, including logs or screenshots, if applicable.
- Edit step: Allows modification of the selected step, such as changing input values or actions.
- Duplicate: Creates a copy of the selected step, useful for repeating actions with minor adjustments.
Previewing Test Steps in the Interactive Browser
This approach saves time during the test construction process because it enables previewing of the test steps as one proceeds with the development of the test script in an interactive browser.
When in an interactive browser running a test there is an option where you get to see the screen as it was before each step was performed and after.
How to Preview a Test Step
Place the mouse pointer over an icon before one or several particular test steps, and you will be provided with a thumbnail of the screen. For a more detailed view of the screen, navigate to the icon on the toolbar to open the full-size picture preview.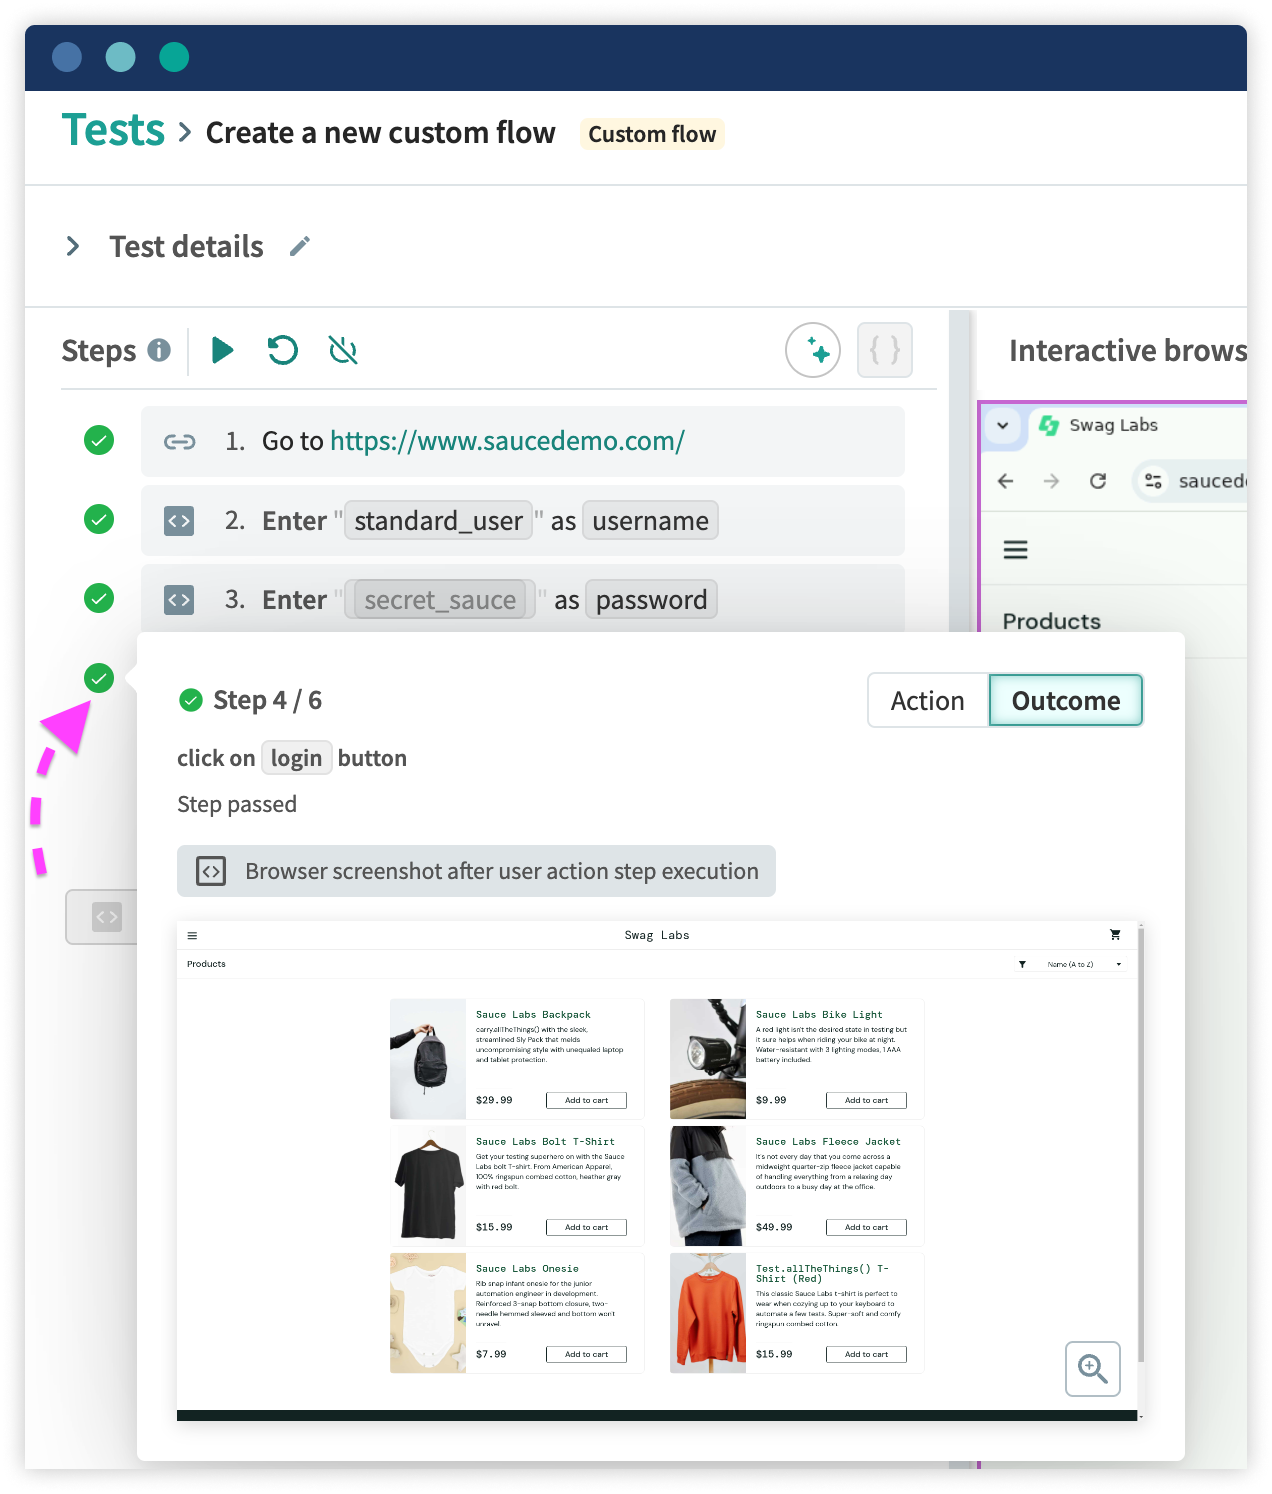
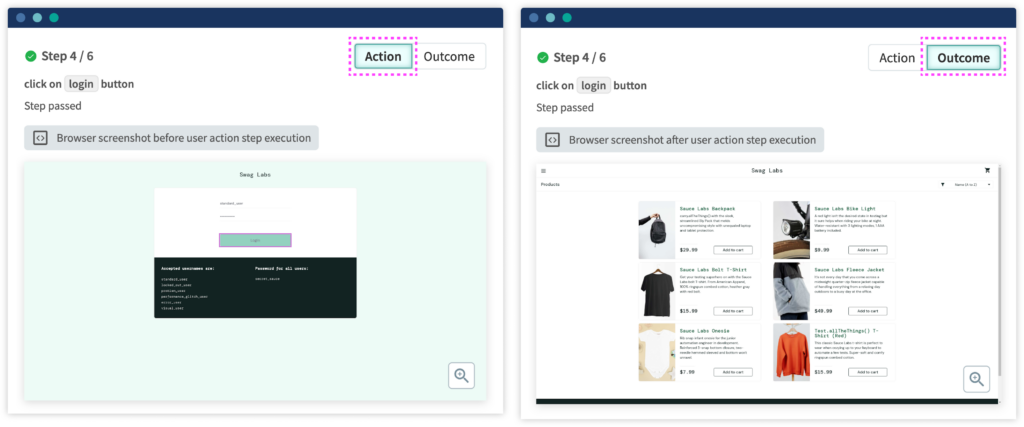
On the top of the preview window, you can find information such as the step number, command run, and its status—pass or fail.
Use the icons behind the worksample Click on Action to see the screen before the step and Outcome to see the screen after the step. When viewing the action window the element clicked on during the step is highlighted in pink.
Running the Test from the Start
To start the test from the first step you can just press the “Run” button or “Rerun test from start” which is above the list of the steps.
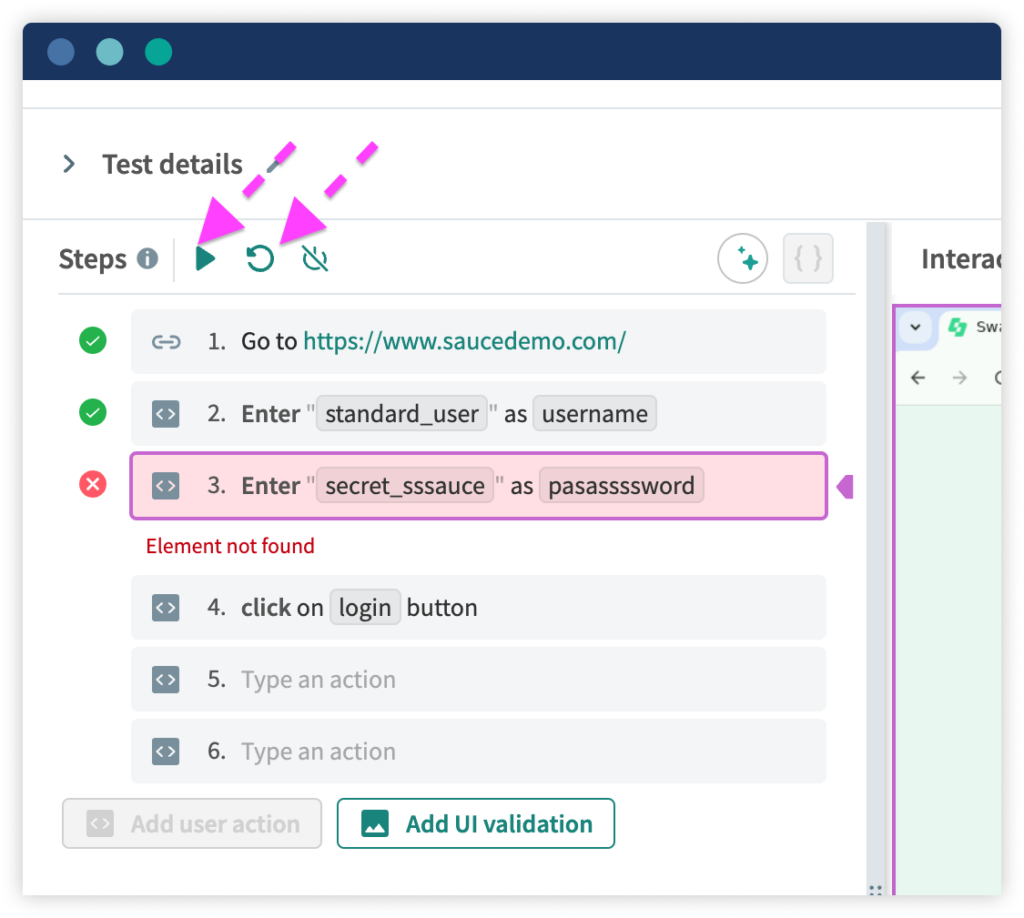
Once started, Autonomous will go through each step one by one while taking a screenshot of the application at every step. If the browser is not already connected, then the Run will also create the connection before the test is carried out. This way it can be ensured all the steps are performed correctly and also shows the status of a particular step.
- ✅ icon indicates that the step was successful
- ❌ icon shows that Autonomous couldn’t process the step, and the test will stop at that point without continuing further
During the test, you can pause or stop it at any time by clicking the Pause or Stop buttons.
API Test
Applitools Autonomous is not limited to functional and visual testing. It can also be used for API automation. Supporting all CRUD operations, it allows you to execute standard HTTP actions like GET, POST, PUT, and DELETE in your tests. This adds versatility to its API testing capabilities.
Autonomous also enables you to validate test operations that cannot be confirmed via the UI, such as verifying form submissions through backend records. Additionally, it ensures backend APIs expose the correct endpoints, function as expected, and return proper responses, headers, and cookies.
GET Requests
For GET requests let’s take an example of https://gorest.co.in/
Navigate to Test Management: In the navigation bar, go to Test Management > Tests. Click on Create a new test and select the Custom Flow from the dropdown.
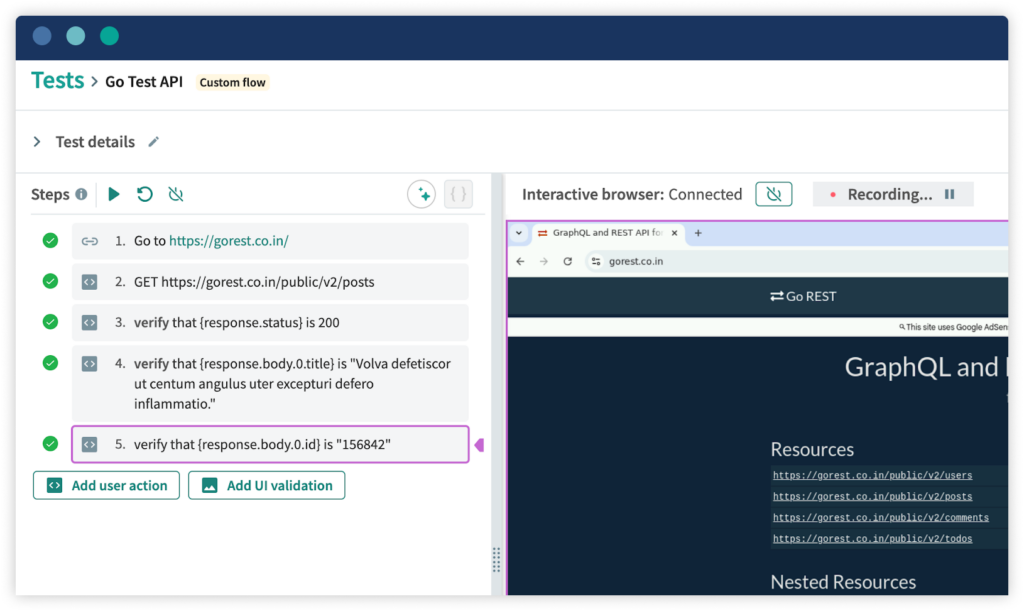
Use Case 1: API Response With Positive Validation
Objective: Hit the API endpoint and verify the following:
- response.status (HTTP status code)
- response.body[0].title (Title of the first object in the response body)
- response.body[0].id (ID of the first object in the response body)
In the screenshot below you can see all the above validations have passed.
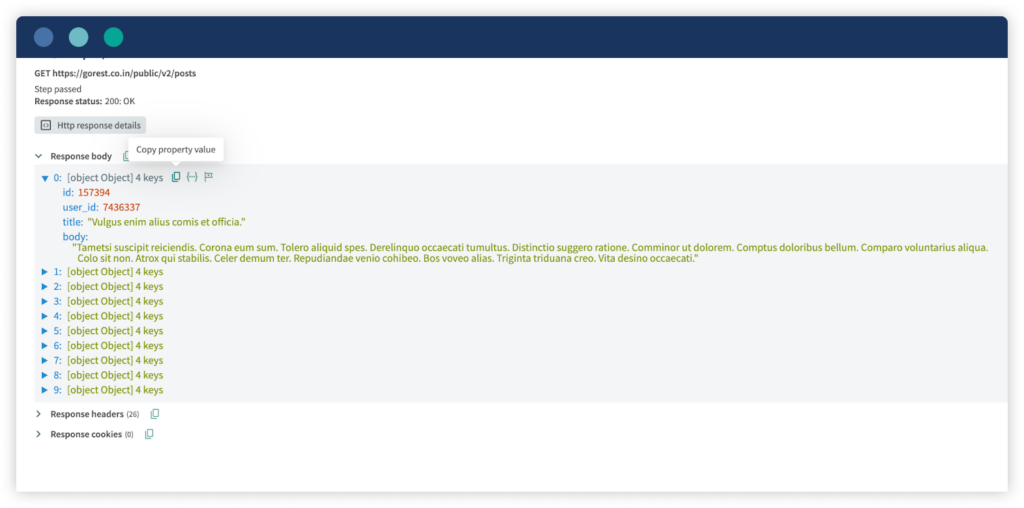
You can then hover over a response value to view options to copy the following information to the clipboard:
- Copy Property Value: Copies the actual value from the response, e.g.,{“id“:157394,”user_id“:7436337,”title“:”Vulgus enim alius comis et officia.”,”body“:”Tametsi suscipit reiciendis. “}
- Copy Property Accessor: Copies the accessor to retrieve the value programmatically, e.g., {response.body.0}
- Copy Property Checkpoints: Copies a formatted checkpoint to use in a test, e.g., verify that {response.body.0.id} is 157394 and verify that {response.body.0.user_id} is 7436337
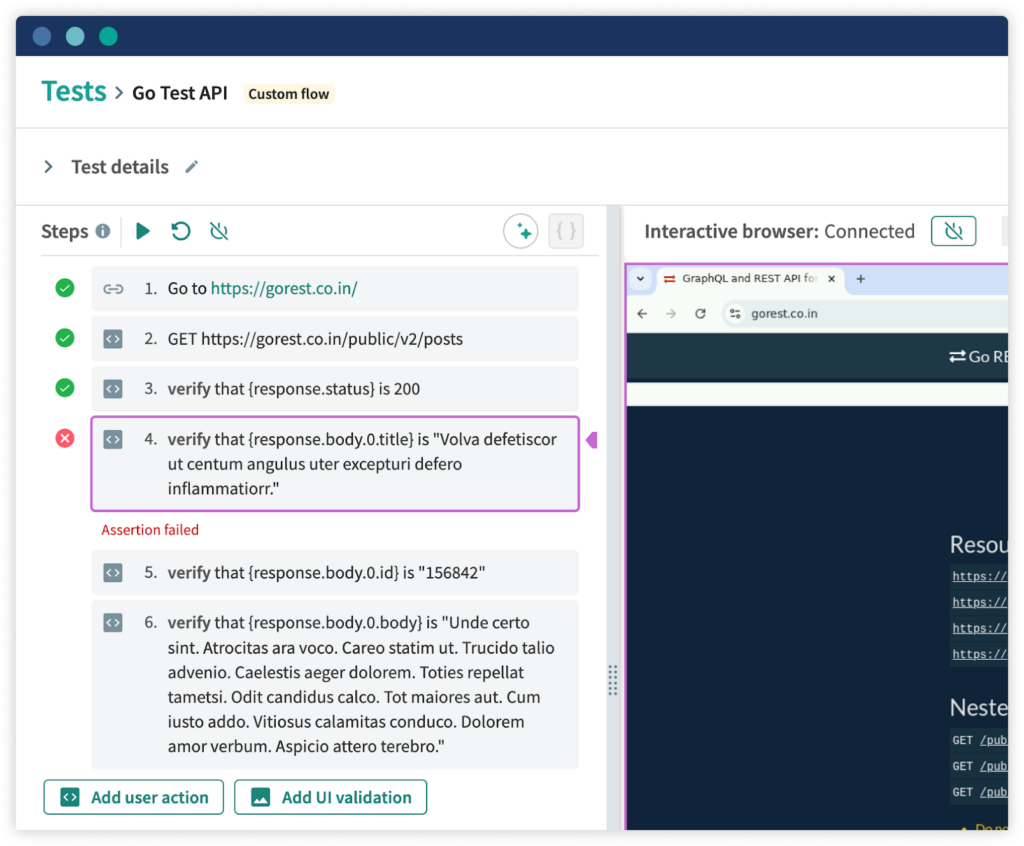
Use Case 2: API Response With Negative Validation
Objective: Hit the API endpoint and verify the following:
- response.status (HTTP status code)
- response.body[0].title (Title of the first object in the response body)
- response.body[0].id (ID of the first object in the response body)
In the screenshot below you can see title validation is failing when we are verifying the title of the first object.
POST Requests
For POST requests let’s take an example of the site https://reqres.in/api/users
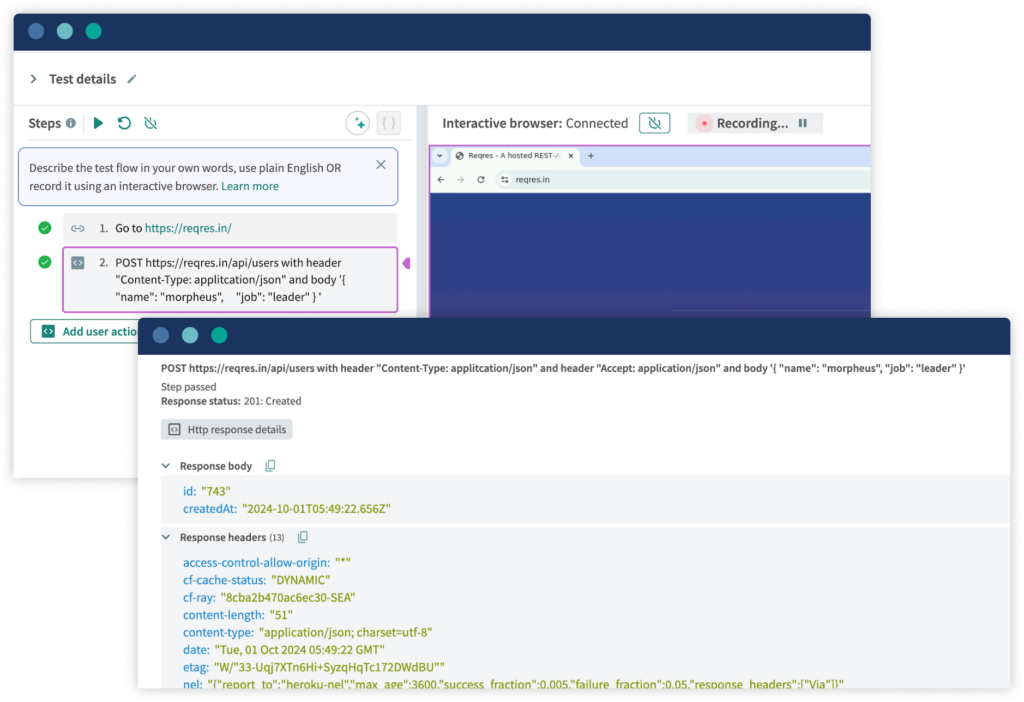
Use Case 1: API Response With Creating User
Objective: Hit the API endpoint https://reqres.in/api/users
- Pass the body in the request
{
“name”: “morpheus”,
“job”: “leader”
}
POST https://reqres.in/api/users with header “Content-Type: applitcation/json” and header “Accept: application/json” and body ‘{ “name”: “morpheus”, “job”: “leader” }’
- Verify the status 201
In the screenshot below you can see test case is passed and a new record is created with the status “201”.
Use Case 2: API Response With Registering User – successful
Objective: Hit the API endpoint https://reqres.inhttps//reqres.in/api/register
- Pass the body in the request
{
“email”: “eve.holt@reqres.in”,
“password”: “pistol”
}
POST to https://reqres.in/api/register with header “Content-Type: application/json” and body ‘{ “email”: “eve.holt@reqres.in”, “password”: “pistol” }’
- Verify the status 200
- Verify ‘token’ is generated

Summary
In the rapidly evolving software industry, companies are pouring resources into quality assurance to ensure smooth product launches. However, traditional QA methods are often too slow, costly, and ineffective, which can lead to bugs, poor user experiences, and product defects.
However, AI-powered tools like Applitools Autonomous offer a powerful solution to these challenges. By automating functional, visual, and API testing, Applitools enhances testing efficiency and effectiveness, ensuring higher-quality releases while reducing the risks of user dissatisfaction.
About the Author
Kailash Pathak (Applitools Ambassador | Cypress Ambassador)
Senior QA Lead Manager with over 15 years of experience in QA engineering and automation. Kailash holds certifications including PMI-ACP®, ITIL®, PRINCE2 Practitioner®, ISTQB, and AWS (CFL).
As an active speaker and workshop conductor, Kailash shares his expertise through blogs on platforms like Medium, Dzone, LambdaTest, Talent500, The Test Tribe, and his personal site https://qaautomationlabs.com/


