All organizations that build software realize that testing is an integral part of the software development process. Like many important tasks and processes, it is not fun. When we are assigned testing tasks, we regard them as an unwanted burden.
What many of us fail to recognize is that testing is more than just checking our source code runs. Testing is really about collecting data that helps our organization plan, organize, and track decisions. Testing data is a strategic asset that will impact a company’s future growth and financial well-being. Nothing hurts a software company more than releasing buggy and unreliable products that no wants to buy. In the short term, no one will buy your wares, and in the longer term, your reputation may never recover.
There are two things you need to do to get the most out of your testing. First, you need to use a testing system that saves you time and effort, tests the things that matter to real users, and puts the fun back into testing. You can do this with visual user interface (UI) testing. Visual UI testing lets you create tests that detect the visual problems that matter most to real users. Second, you need a system that records all test data and makes it available to the relevant people when they need it. For this, you need an Application Visual Management (AVM) system. An AVM system collects, manages, and analyzes all the data you collect from your visual tests and makes it available to anybody who needs it. The goods news is that you can achieve both of these goals with Applitools Eyes.
Applitools Eyes is a unique test management solution that manages the visual testing process. In this post, we will give you a quick tour of the Applitools Eyes Test Manager. Then, we will show you how to use the Test Manager to display test results, edit tests, and update baseline images.
Applitools Eyes Test Manager: Quick Tour
The Test Manager is divided into two main regions: the sidebar and the center panel.
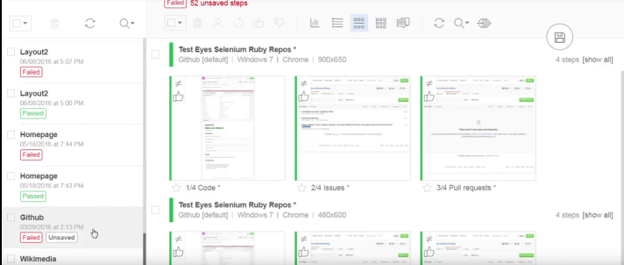
Sidebar
The Sidebar is located on the left side of the Test Manager. It displays all recorded test runs, with the newest runs listed at the top. Each run includes a batch of tests. By default, each test run is displayed as an individual batch. However, you can use the Eyes SDK to group multiple tests together into a single test run.
Center Panel
The Center Panel shows you the details of the currently selected batch. It provides a number of different views for displaying and managing your test results. Note that in all views, you can use the filter to find steps, tests, and batches of interest.
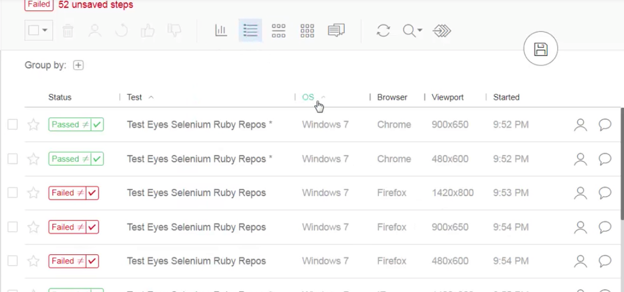
Test Details View
This view lets you inspect and sort tests by operating system, browser, viewport size, and start time. You can group tests together and create your own hierarchies using the available properties. Clicking on a test will reveal thumbnails of the screenshots that have been sent for validation.
Batch Steps View
This view shows validated screenshots in a single group and ignores the test run/batch from which they originated. In addition, this view can create a single representative screenshot that groups a number of steps with the same and/or similar differences.
Batch Summary View
This view lets managers and team members to assess the status of the batch quickly. It also allows you to visualize key metrics, such as the pass/fail ratios per test, and the test status distribution grouped by browser, operating system, and viewport size.
Managing Test Runs
When you run a test for the first time, the Test Manager marks it with a green label. The label indicates that this is a new test run, that the test was passed, and that its screenshots were used to create a baseline. The plus sign in the upper left corner of the thumbnail indicates that this is a new step that did not previously exist in the baseline. The thumbs up symbol indicates that Applitools has accepted the screenshot and included it as a baseline image. In addition, any test or screenshot that matches the baseline will be marked as passed, and its steps will appear with a green stripe and an equals sign.
A test with differences is marked as unresolved, which indicates that this test contains steps with differences that have not yet been reviewed and resolved. Steps with differences are marked with a not equal sign and the differences are highlighted in pink. Clicking the Radar button highlights the differences. These differences are resolved by accepting or rejecting them. You accept differences that represent valid changes to the application under test, and you reject differences that represent defects, issues, or test failures. You accept step differences by clicking the Accept button and reject them by clicking the Reject button. By default, if you reject any differences, the entire test is failed. Conversely, if you accept all differences, each step will be passed, as will the entire test. You can override the default test result by clicking the test label and choosing another status.
Viewing and Updating Baselines
When you want to review a test run, click on the appropriate thumbnail image. The image will be displayed in the Test Editor. The Test Editor provides additional baseline editing tools. For each test, a timeline is displayed at the bottom of the screen. This shows the individual test steps and indicates the result of each checkpoint. Using the toolbar’s Match Level menu, you can change the level of matching (Exact, Strict, Content, or Layout) between the current image and the baseline image.
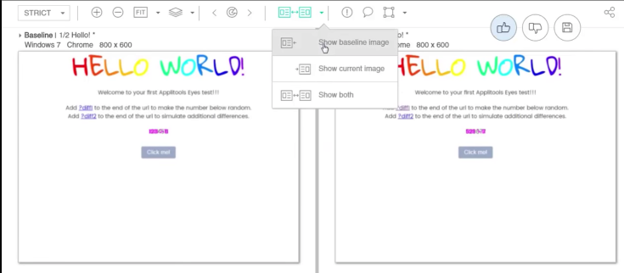
The Test Editor allows you to switch between different views. In the side-by-side view, it displays the baseline image and the current image. In full-page view, you can toggle between the baseline and current image. In both views, you can highlight differences between the current image and the baseline image by clicking the Radar button. For each image, you can zoom in on differences by clicking the Next or Previous buttons. The Test Editor allows you to accept or reject differences within the current step. You can also accept or reject the differences between all steps that have the same difference.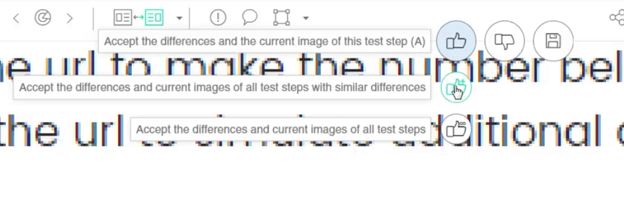
You can indicate whether a difference caused by a dynamic area of your application should be ignored or not by placing an ignore region on top of it. The Auto Adjust Regions feature lets you propagate the ignore region to steps containing the same dynamic area. Any future images captured by Applitools Eyes that include the ignore region will be marked as passed. However, these changes will not be applied to future test runs once the changes have been saved to the baseline, and existing test results will remain unchanged. Steps and tests that contain changes that have not yet been saved to the baseline will have an asterisk next to their name. To save or change the baseline, click the Save button. As expected, the next time you run your test, it will be marked as passed because its screenshots will match the updated baseline.
Effective Testing and Test Management
In this post, we showed how the Applitools Eyes Test Manager can help you manage your visual test runs. Not only does it provide a comprehensive and easy UI, but it also offers many unique and powerful tools that allow you to view individual tests and test runs. Using the Test Manager, you can update your visual testing baselines and propagate those changes across all your tests.
Furthermore, the Test Manager lets you work however you want to. If you want to review each individual test and baseline change, you are able to do so. But you can also take advantage of powerful features that review changes automatically. After you make changes, Applitools Eyes handles the process of updating the relevant images in the test baseline. This is one of the many advanced Application Visual Management (AVM) tools Applitools Eyes provides that can help you manage and update your baselines, handle tedious and repetitive tasks, and allow you to focus on more productive, higher value tasks. Visual testing is one of the most effective testing methods, and the new Applitools Eyes Test manager will help you unleash its full potential.
To learn more about Applitools’ visual UI testing and AVM solutions, check out the resources section on the Applitools website. To get started with Applitools, request a demo, or sign up for a free Applitools account.


