The Admin Account View
The Admin Account view displays the general account settings and usage limits, and lists the account admins and their details. The details in the General and Limits sections appear for informative purposes, and can only be changed by Applitools account managers. Managing the team usage limits and the users that appear in the Admins section is the responsibility of the company's account administrator.
Page Layout
You can access the Account view by clicking the Account tile on the Admin panel.
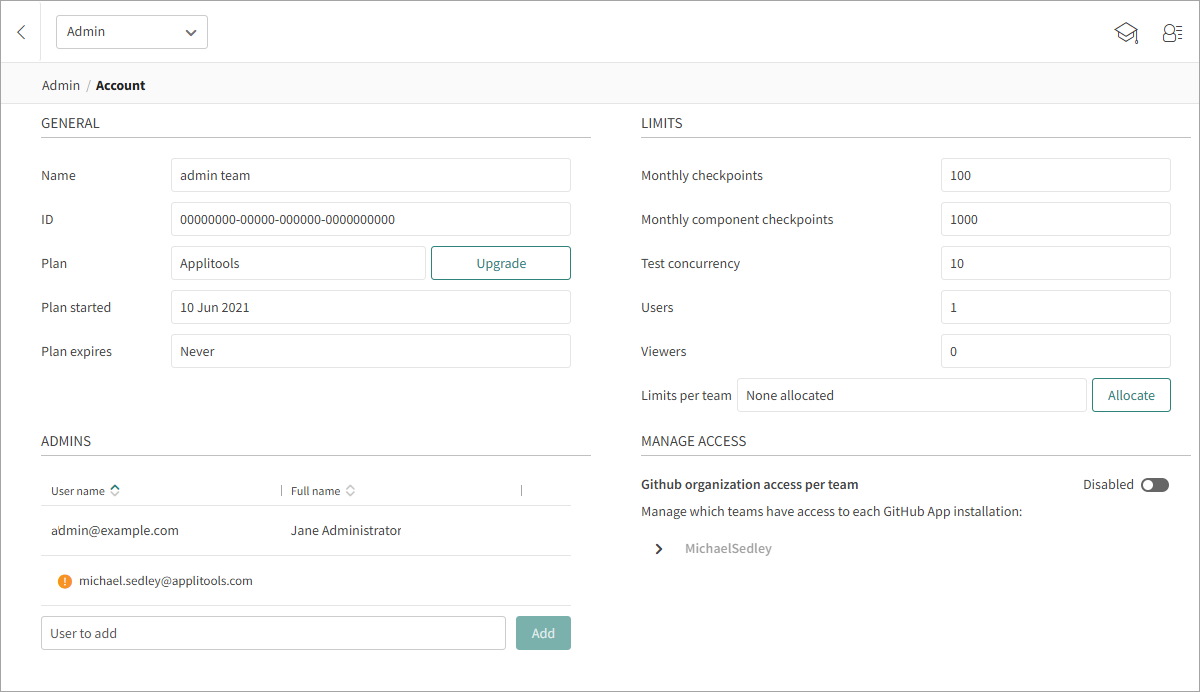
The Account view groups the details of the account in three panels: General, Limits and Admins. Each of these panels is described in the sections that follow.
General Account Details
The information in this section is informative and cannot be changed by the user.
Name
The name associated with the account. This is typically the name of the organization or company, or a department within a company.
ID
An internal identifier of the account. You may be asked for the ID when receiving support from Applitools.
Plan
The type of account. Specific information on the types of plan and their feature sets is available on the Applitools website's pricing page. For more
information see Applitools Pricing.
Upgrade button
Click this button to request a change in plan. See Upgrading an account below.
Plan started
The date that the plan started.
Plan expires
The date that the plan ends. You must renew your plan on or before this date to continue using the Applitools service.
Upgrading an Account
An account admin can request to upgrade an account in order to acquire additional product features and usage.
To upgrade an Applitools Eyes account:
- Go to the Account view.
- Click Upgrade in the General panel.
- Click the tile for the plan that you are interested in and then click Request upgrade.
Account Usage Limits
Your Eyes license agreement specifies various usage limits that govern how much Eyes testing you can do.
Some of these limits differentiate between page verifications and component verifications:
- Page verification: Verifications performed by SDKs that aim to test complete application pages. For example, Selenium, Espresso, XCUI, Cypress and Playwright SDKs.
- Component verification: Verifications performed by SDKs that aim to test UI components in component galleries such as Storybook.
The distinction is significant, since the resource usage of these two approaches can be very different. Images captured for pages can be very large, and are more complex to process. Component checkpoints are only generated by some SDKs, and, by definition, are small (with a captured image size less than 1024x768), but many more images are typically captured and verified.
Limit Metrics
The Limits panel displays the values of the various limits defined by your license. The values you see depend on the details of the account license:
Monthly checkpoints, Monthly component checkpoints
The maximum number of checkpoint executions allowed each month by the license, broken down by pages and components. This is the limit for a license based on executed checkpoints, and is comparable to the number of test steps you see in your test result in the Test Manager.
Number of pages, Number of components
The maximal number of pages and components that can be tested each month. This is the limit for a license based on the number of pages/components verified, and it is comparable to the number of calls there are to the check() methods in your test code, regardless of how many times they are tested during that month.
Test concurrency
The maximum number of tests with page checkpoints that can run simultaneously.
Users
The maximum number of users that can be added to the account. A user is a team member that has full rights to accept and reject steps, to annotate steps, and to update baselines.
Viewers
The maximum number of viewers that may be added to the account. A viewer is a team member that can only view the test results but and is not allowed to make any changes. For more details see Setting users access rights.
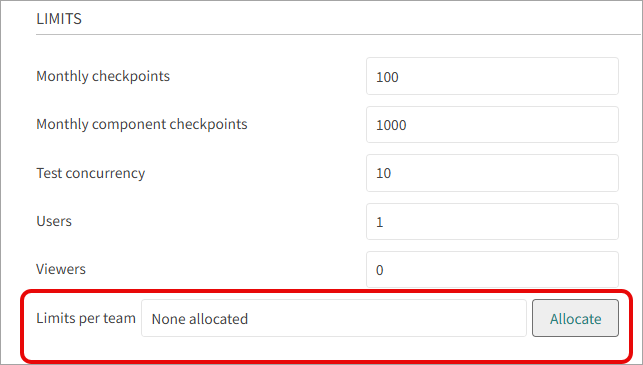
Assigning Team Usage Limits
The limits described above apply to the entire account, regardless of which team runs the tests. This is the default way to apply limits. Eyes allows the account admin to distribute one or more account limits among teams.
For example, if the account is limited to 1000 checkpoints and includes a QA team and two development teams, the account admin can allocate 600 checkpoints to the QA team and 200 checkpoints to each development team.
Setting the Team Limits
At the bottom of the Account Limits section, the Limits per team table displays the current allocation.
To distribute one or more limits between teams:
-
Click the Allocate button.
-
In the dialog box, review the available limits. By default, the toggle to the left of each limit type is off, meaning the limit applies at the account level. The value of the account limit appears to the right of the limit name.
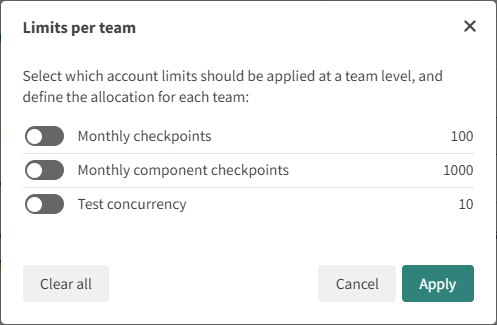
-
To distribute a limit among teams, turn on its toggle, and enter a value for each team. As you enter values, the account limit display updates to show how many units have been allocated. The total assigned to all teams must equal the account limit.
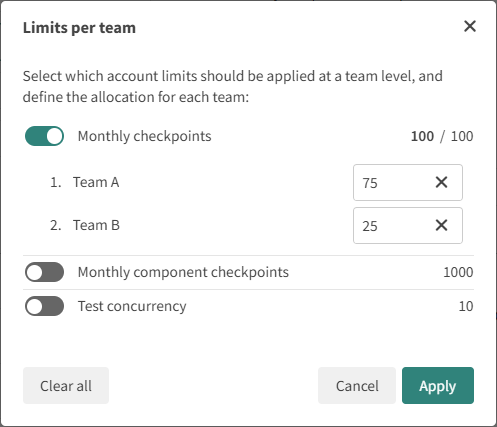
-
Repeat these steps for each limit you want to distribute, then click Apply.
Admins List
The Admins panel lists the account administrators. Account administrators can create and remove teams, designate account and team admins, add or remove users, manage team memberships, and access the test results of all teams that belong to the account. The panel lists the User name and Full name of each user that can function as an account administrator.
Making a User an Account Admin
To add a user as an account admin:
- Navigate to the Admin Account page.
- Click in the User to add text box and select the user you want to add. You can start typing the name and the list will be filtered to include only nmes that include the text you type.
- Click the Add button.
- Repeat steps 1-3 to add more users.