Native Mobile Library
Introduction
The Applitools Native Mobile Library (NML) uses advanced algorithms to generate full-page screenshots of native mobile applications for validation by Eyes SDKs.
NML is embedded within the application code and captures screenshots directly from inside the application. It automatically handles scrolling when needed, ensuring an accurate screenshot without stitching issues. Additionally, system elements like the system clock or battery indicator are excluded from the image.
To use NML, you must link it with the application code. This can be done statically if you have direct access to the source code or dynamically if the application is already compiled.

Benefits of Native Mobile Library
When taking images of an application on a mobile device, NML has the following benefits:
-
Runs inside the app – Since NML is integrated into the application itself, it can capture what’s on the screen without interference from system UI elements like the clock or battery indicator.
-
Handles scrolling automatically – When a screen is longer than the viewport, NML scrolls and captures the full content seamlessly, avoiding common issues with stitching multiple images together.
-
Efficient and accurate – Because NML operates from within the app, it avoids distortions or inconsistencies that might arise from taking screenshots externally (e.g., from a test automation framework).
NML supports UIKit & SwiftUI for iOS and AndroidX & Jetpack Compose for Android compiled applications.
Setting up NML
To work with NML, you need to do the following:
-
Instrument your application – There is a separate process for iOS and Android devices. There are two ways to instrument the application:
- Static – Inside the application before it is compiled
- Dynamic – After the application has been compiled.
-
Set Eyes SDK in the Test Code Environment – For details see the Quickstart section of the relevant SDK.
-
Configure the SDK to use NML in your test code – This is done with the
setMobileCapabilitiesmethod inside your test code. See Configure the SDK to use NML in your Test Code
Instrument your application on iOS
If you are testing with an SDK that supports iOS (Appium or XCUI) you can instrument the application using one of the following methods:
-
Static - If you have access to the code before the application is compiled, you can statically instrument the application before it is compiled. There are two ways to instrument the application statically:
- Using Swift Package Manager (SwiftPM)
- Using a manual process
-
Dynamic - If you do not have access to the application before it is compiled.
Static - Using Swift Package Manager
-
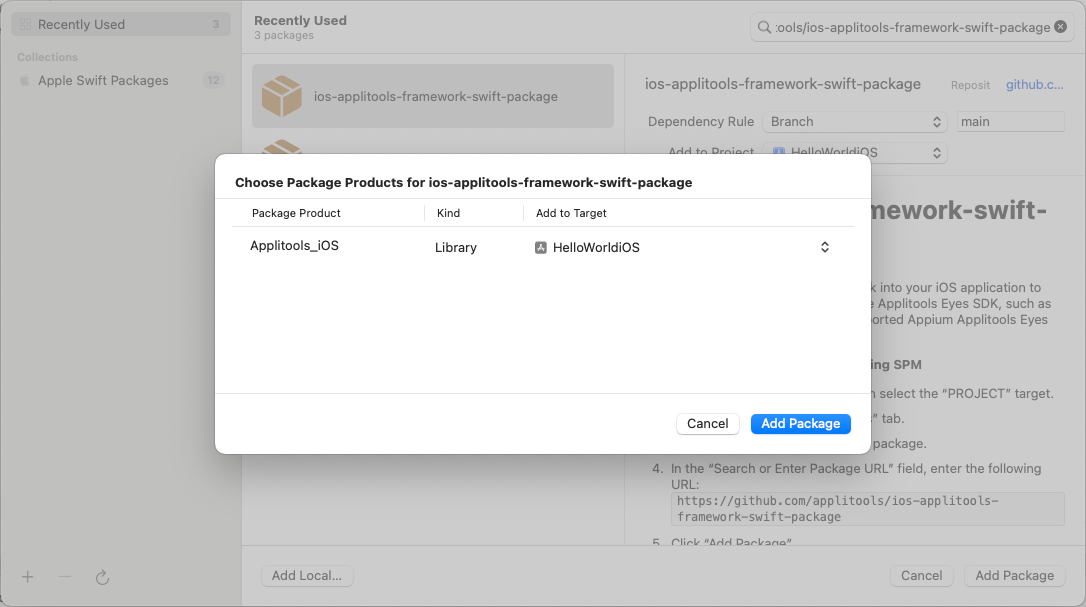
In Xcode, select File > Add Packages...
-
Enter the following URL:
https://github.com/applitools/ios-applitools-framework-swift-package.git -
Click Add Package, then click Add Package in the Choose Package dialog box.
-
Build and run the app.
-
Verify in the console that
Applitools_iOS <version> loadedappears at launch. -
The Applitools iOS framework is always used in conjunction with the Applitools Eyes SDK for visual and UI testing. As of Xcode 16, Swift Package Manager does not support conditionally adding package dependencies for specific configurations. To exclude this framework from production builds (e.g., App Store release builds):
infoThis is important to make sure the package is only used for testing purposes and not in the production build.
-
In Xcode, select your application target then click the Build Settings tab.
-
Under Build Options > Excluded Source File Names, select your production configuration (e.g. "Release"), then click the +.
-
Type Applitools* then press ENTER.
-
Build and run your iOS application for a Release configuration.
-
Verify that
Applitools_iOS <version> loadeddoes not appear in the Console log.
-
Static - Manually Adding the Framework
-
Download the Applitools Native Mobile Library
-
In the Xcode Project Navigator, add the file
Applitools_iOS.xcframework. -
In the Xcode target settings, under Frameworks, Libraries, and Embedded Content, click + and select Applitools_iOS.xcframework. Make sure that the configuration does not target an App Store release.
-
Set the framework to Embed & Sign.
-
Build and run the app.
-
Verify in the console that
Applitools_iOS <version> loadedappears at launch.
Dynamic
Use this option if you need to add the library to an already compiled app. Each time you run this option, the latest version of the library is installed.
-
Download the required
applitoolsifyinstrumentation: -
If running on macOS or Linux, add execution permissions to
applitoolsify:chmod +x <downloaded_file_name>On macOS, if you have permission issues, run the following:
xattr -d com.apple.quarantine <applitooslfiy_path> -
Run one of the following commands, depending on your operating system:
./applitoolsify-ios-Linux-x86_64 <app/ipa file path>./applitoolsify-ios-macos-arm64 <app/ipa file path>./applitoolsify-ios-macos-x86_64 <app/ipa file path>./applitoolsify-ios-win-x86_64.exe <app/ipa file path>
Optional Flag:
--local- If specified, use the local bundled NML library. Default is to fetch the latest NML library from the internet (requires internet connection)
-
If you are running on a local real device, re-sign the app. To do this, you will need a signing certificate and provisioning profile. Re-signing is not required if your target is a simulator or a real device in the cloud.
-
Download iOS App Signer
-
Install and open iOS App Signer.
-
Click Browse and navigate to the app you are testing.
-
Enter the signing certificate and provisioning profile, then click Start.
-
Instrument your application on Android
If you are testing with an SDK that supports Android (Appium or Espresso) and have access to the code before the application is compiled, you can statically instrument the application before it is compiled. If you do not have access the application before it is compiled, you can dynamically instrument the application.
Static
Use this option if you have access to the code before it is compiled.
-
In the
build.gradlefile (app level), add the following dependency:implementation 'com.applitools:applitools-android:+'infoIf your app was built using Jetpack Compose and ProGuard. Please add the following ProGuard rules below.
-keep class androidx.compose.** { *; }
-keep interface androidx.compose.** { *; }
-keep enum androidx.compose.** { *; } -
Ensure that Internet Permissions are included in the
AndroidManifest.xml. -
For all launcher activities, add the following import:
import com.applitools.android.ApplitoolsMobile; -
Inside the
onCreate()function, add the initialization:ApplitoolsMobile.init(this);
Dynamic
Use this option if you need to add the library to an already compiled app. Each time you run this option, the latest version of the library is installed.
-
Download the
applitoolsifyinstrumentation tool: -
If running on macOS or Linux, add execution permissions to
applitoolsify:chmod +x <downloaded_file_name>On macOS, if you have permission issues, run the following:
xattr -d com.apple.quarantine <applitooslfiy_path> -
Run one of the following commands, depending on your operating system:
./applitoolsify-android-Linux-x86_64 <apk file path>./applitoolsify-android-macos-arm64 <apk file path>./applitoolsify-android-macos-x86_64 <apk file path>./applitoolsify-android-win-x86_64.exe <apk file path>
Optional Flag:
--local- If specified, use the local bundled NML library. Default is to fetch the latest NML library from the internet (requires internet connection)
-
Install the instrumented app.
infoIf a previous version of your app has been installed, you need to uninstall it before installing the instrumented app to prevent an
INSTALL_FAILED_UPDATE_INCOMPATIBLEerror.
Configure the SDK to use NML in your Test Code
Once NML has been instrumented in the application code, you need to import the SDK into the test code. The Applitools library must be loaded when the app starts; it cannot be loaded into an already running app.
Before launching the app, you must configure the Applitools Native Mobile Library in your test suite before creating a driver.
If you use the public cloud, ignore the serverUrl parameter.
Running a Test with NML
Once you have instrumented NML in your application code, and imported the SDK into the Test code, you can run a test with NML using eyes.check
Taking a System Screenshot
If you need to take a system screenshot which includes elements outside the application window, for example a system permissions alert, you can take the screenshot outside the regular NML functionality using the useSystemScreenshot method.
If the test flow occurs outside the application context, for example the Applitools Native Mobile Library cannot capture a full-page screenshot. To address this, use the useSystemScreenshot method to have the SDK take the screenshot instead:
Adding Multi-Devices
The multi-device testing feature lets you capture multiple checkpoints across different devices originating from a single checkpoint. This makes visually testing your application much easier and faster by expanding your test coverage more efficiently.
The multi-device target feature is a premium feature that needs to be enabled on your account. Please contact your sales or customer success representative to learn more.
This feature is available for iOS applications built with UIKit & AndroidX. SwiftUI and Jetpack Compose capabilities are coming soon!
The multi-devices you configure in your test code must have a compatible OS version of the device or simulator/emulator executing your tests. See the supported multi-device target list below and OS version compatibility.
Supported Multi-device Targets
| iPhone Model | Min Version | Max Version |
|---|---|---|
iPhone 6s | iOS 15 | iOS 15 |
iPhone 6s Plus | iOS 15 | iOS 15 |
iPhone 7 | iOS 15 | iOS 15 |
iPhone 7 Plus | iOS 15 | iOS 15 |
iPhone SE (1st Gen) | iOS 15 | iOS 15 |
iPhone 8 | iOS 15 | iOS 16 |
iPhone 8 Plus | iOS 15 | iOS 16 |
iPhone X | iOS 15 | iOS 16 |
iPhone SE (2nd Gen) | iOS 15 | iOS 18 |
iPhone SE (3rd Gen) | iOS 15 | iOS 18 |
iPhone XS | iOS 15 | iOS 18 |
iPhone XR | iOS 15 | iOS 18 |
iPhone XS Max | iOS 15 | iOS 18 |
iPhone 11 | iOS 15 | iOS 18 |
iPhone 11 Pro | iOS 15 | iOS 18 |
iPhone 11 Pro Max | iOS 15 | iOS 18 |
iPhone 12 | iOS 15 | iOS 18 |
iPhone 12 mini | iOS 15 | iOS 18 |
iPhone 12 Pro | iOS 15 | iOS 18 |
iPhone 12 Pro Max | iOS 15 | iOS 18 |
iPhone 13 | iOS 15 | iOS 18 |
iPhone 13 mini | iOS 15 | iOS 18 |
iPhone 13 Pro | iOS 15 | iOS 18 |
iPhone 13 Pro Max | iOS 15 | iOS 18 |
iPhone 14 | iOS 16 | iOS 18 |
iPhone 14 Plus | iOS 16 | iOS 18 |
iPhone 14 Pro | iOS 16 | iOS 18 |
iPhone 14 Pro Max | iOS 16 | iOS 18 |
iPhone 15 | iOS 17 | iOS 18 |
iPhone 15 Plus | iOS 17 | iOS 18 |
iPhone 15 Pro | iOS 17 | iOS 18 |
iPhone 15 Pro Max | iOS 17 | iOS 18 |
iPhone 16 | iOS 18 | iOS 18 |
iPhone 16 Plus | iOS 18 | iOS 18 |
iPhone 16 Pro | iOS 18 | iOS 18 |
iPhone 16 Pro Max | iOS 18 | iOS 18 |
| Android Model | Min Version | Max Version |
|---|---|---|
Galaxy S25 | 14 | 15 |
Galaxy S25 Ultra | 14 | 15 |
Pixel 9 | 14 | 15 |
Android multi-device supports API levels 34 or above.
Use the configuration setting below to configure the devices you want to use for your testing.