Automated Test Maintenance
Eyes' Automated test maintenance provides you with a powerful set of features that significantly reduces your test maintenance overhead when you have many tests, and tests that run across multiple operating systems, browser types, device types, and screen sizes.
By using Eyes' Automated test maintenance, you can check steps across multiple tests and environments in a fraction of the time required to achieve the same result manually. As the size and complexity of the application under test increases, the benefit that you derive from using Eyes' Automated test maintenance increases accordingly.
In practice, the Automated test maintenance features work by identifying and grouping steps that have similar differences in their checkpoint images for you to verify, as well as replicating the maintenance actions that you perform for one step in other relevant steps within a batch. Maintenance actions include:
- Grouping steps by similar differences.
- Accepting and rejecting unresolved mismatches.
- Applying, modifying, and deleting baseline regions in steps.
Key Features
The Automated test maintenance features automate several aspects of your work:
-
Group steps by similar differences.
You can collect all the steps with similar differences into groups. Once grouped, you can view the steps in the Step editor, which gives you the opportunity to assess the steps in the group and exclude steps from the group. When you are satisfied with the collection of steps in the group, you can then accept or reject them all in one operation. -
Accepting and rejecting unresolved mismatches.
When you accept or reject an unresolved step, Eyes searches for other steps with similar underlying images and unresolved steps that have the same set of differences as that step. Eyes Test Manager compares the pink shaded mismatch areas in the selected step to the mismatch areas in all other steps in the scope. The Eyes Test Manager applies the accept/reject maintenance action to all steps with similar underlying checkpoint images in the scope and disregards any steps that contain a different set of mismatch areas. -
Creating and deleting baseline variations.
When you mark a mismatched step as a new Baseline variations, Eyes will detect other steps in the same baseline variation groups and create those as new baseline variations as well. Similarly, when you delete a baseline variation from a step, Eyes will delete the baseline variation in the other steps in the variation group. -
Applying, deleting, and modifying baseline regions in steps.
When you add, delete, or modify a baseline region, such as an Ignore region, Eyes notifies you of the option to apply the change to other steps that have the same underlying image. By accepting the option, Eyes applies the region change to all steps in the scope that have identical underlying checkpoint images.
Automated test maintenance lets you control and review the automated maintenance aspects of your work by:
- Setting the Automated test maintenance scope.
Setting the scope lets you control the extent to which Automated maintenance operates over the steps in a batch. You can set the scope to default, batch, explicitly selected tests or steps in a batch, or the current step only. You can set the scope from the toolbar in the Batch details view or Batch steps view on the Test results page, or in the Step editor and the Test editor.

The Automated test maintenance features are automatically triggered by your maintenance actions.
- Displaying system notifications.
When Eyes finishes running Automated test maintenance actions, it displays a notification about the action and lists the notification in the Notifications list. The list remains up to date for the extent of the current session. At any point in the session, you can reference the notifications in the list and examine the details of the impacted step in the Step editor, giving you the opportunity to modify or undo a change.
Automated Maintenance Scopes
The Eyes Test Manager's Automated test maintenance features automatically replicate the maintenance actions you perform in one step across other steps with similar underlying checkpoint images within a batch. Setting the scope defines the range over which the Test Manager applies the Automated test maintenance actions.
The Automated test maintenance features work over several ranges of steps in a batch. You can set the scope of the Automated test maintenance features to:
- Default - Scans the default scope for each maintenance task.
- Batch - Scans all steps in a Batch.
- Selected Test results or selected Steps - Scans all steps in the selected range.
- Scan the current step only - Applies changes to the current step only.
Your maintenance actions automatically trigger the Automated test maintenance features.
Available Scopes
| Scope | Group by similar diffs | Accept/Reject and Region operations |
|---|---|---|
| Default | All steps in the batch | All steps in tests that have the same:
|
| Batch | All steps in the batch | All steps in the batch |
| Selected tests | All steps in the selected tests | All steps in the selected tests |
| Selected steps | Only selected steps | Only selected steps |
| Current step | Disabled | Only the current step. Note: This refers to all occurrences throughout the current step of an image that is encapsulated by the set region. |
Setting the Scope
You can set the scope by selecting an option from the Auto Maintenance menu in the Test results toolbar:
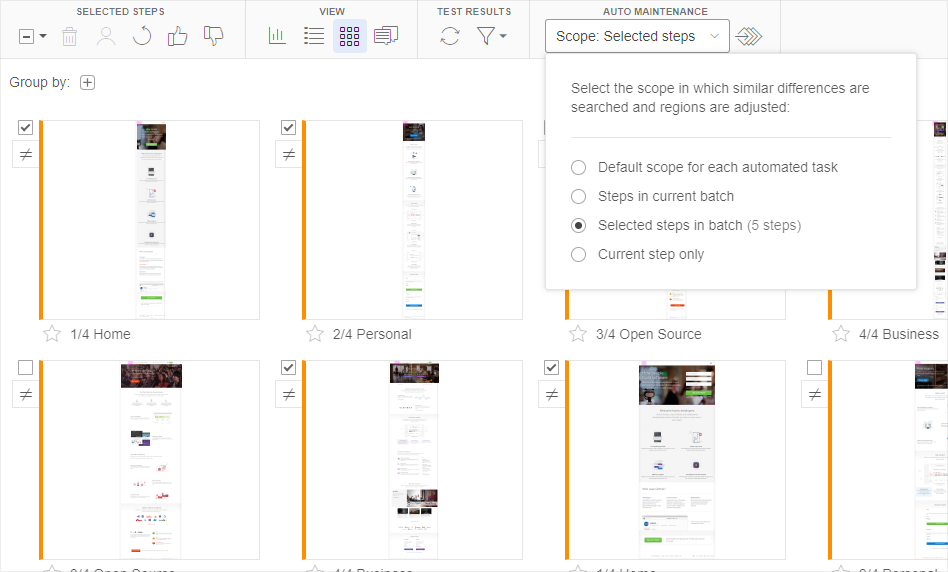
To set the scope:
- Click on the Auto Maintenance drop-down to open the menu.
- Select one of the following options:
- Default
- Batch
- Selected tests/steps in batch
- Current step only
- Click outside the menu to close it.
Triggering Automated Test Maintenance
When you perform maintenance actions on steps within the set scope, you trigger the Automated test maintenance features. For more information on the Automated test maintenance scope, see Setting the automated test maintenance scope. Maintenance actions include:
- Grouping steps by similar differences.
- Accepting and rejecting steps that have unresolved differences.
- Applying, modifying, and deleting baseline regions in steps.
- Creating or deleting baseline variations.
While processing the action, Eyes displays a pop-up to inform you that it is searching for steps with similar differences to which it will apply the maintenance action. When the search is complete, Eyes updates the pop-up with the number of steps that have been processed. Actions that trigger a maintenance action on one or more steps are copied to the Notification list.
After applying the change to all steps with similar differences, you can view the changed steps in the Step editor's Group views. Click the See details link in the notification to display the modified steps in the Step editor.
For more information on notifications see Automated test maintenance notifications and messages.
Grouping Steps
For more information, see Grouping Steps By Similar Differences below.
Accepting or Rejecting An Unresolved Step
When you Accept or Reject an unresolved step, Eyes automatically searches for steps that have similar differences that are unresolved. Eyes automatically applies the respective accept or reject maintenance action to all steps with similar differences in the scope.
The figure below shows several unresolved steps from a test that are being processed in response to another step having been accepted.
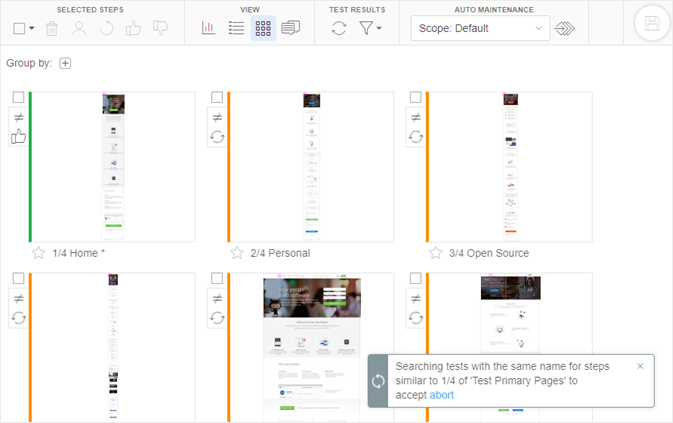
When steps are being processed, The Eyes Test Manager displays a spinning progress indicator adjacent to the Step status indicator. A progress notification is shown in the bottom right of the screen, informing you that Eyes is searching the tests with the same name for other steps with similar differences.
Adding, Modifying or Deleting Regions
In the Test editor and Step editor you can add ignore regions, match level regions and floating regions.
When you add a region of any type to a step, the Eyes Test Manager asks if you would like to apply the region to other steps in the scope. Eyes Test Manager asks a similar question if you adjust or delete a region. Click on Apply to other steps in scope if you want Eyes to search for similar regions in other tests and steps and apply the same region type in those steps.
The figure below shows an Ignore region drawn around a small part of an image in a step.
To apply a region using Automated test maintenance:
- View the step in the Step editor or Test editor.
- Select the Region tool from the toolbar and use the mouse to draw a rectangle around the area of interest in either the baseline or checkpoint image.
- Click Apply to other steps in scope in the Automated test maintenance confirmation message.
To delete a region using Automated test maintenance:
- View the step in the Step editor or Test editor.
- Select the region of interest in the step and click Delete .
- Click Apply to other steps in scope in the Automated test maintenance confirmation message.
Grouping Steps By Similar Differences
Grouping steps by similar differences is a key feature of Eyes' Automated test maintenance that you use to collect steps with similar differences into groups. Eyes applies any maintenance action you perform on a group to each step included in the group. This allows you to accept or reject all the steps in a group in a single operation. The scope that you set for Automated test maintenance defines the range of steps that Eyes' considers for grouping.
By identifying and grouping steps with similar differences from across the scope, Automated test maintenance can assess steps across multiple tests and environments in a fraction of the time required to achieve the same result manually. As the size and complexity of the application under test increases, the benefit that Eyes' Automated test maintenance provides increases accordingly.
Note that Automated test maintenance is also possible when using baseline variations (typically as part of A/B testing).
Identifying Similar Differences
When you select Group steps by similar differences , Eyes analyzes each step in the scope and collects steps with similar differences into groups. Eyes' compares the pink shaded difference areas in one step to the difference areas in all other steps in the scope.
Eyes considers two steps to be similar if they have the same pink shaded difference areas appearing in the same order. This way, Eyes compiles groups of steps where each group includes a number of steps that have the same difference areas.
Group Thumbnails
After Eyes creates the groups, a group thumbnail for each group appears in the Batch details view and the Batch steps view. A group thumbnail appears and behaves like a regular step thumbnail with the following differences:
- A group thumbnail looks like a deck of thumbnails.
- A Step counter indicates the number of steps that Eyes' included in the group.
- Clicking the group thumbnail opens the group in the Step editor.
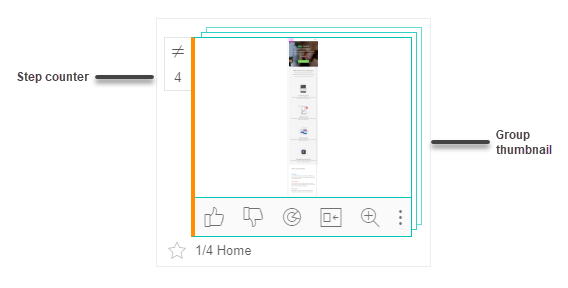
You can view a group and its included steps in one of the Step editor's Group views. Manually inspecting the steps in a group gives you the opportunity to extract steps from the group before performing maintenance actions on the group. When satisfied with the collection of steps in the group, you can then accept or reject them all in a single action.
How To Group Steps By Similar Differences
You can group steps by similar differences from the Batch details view or from the Batch steps view.
To group steps by similar differences:
- Either set the Auto Maintenance scope or verify that the proper scope is already set.
- Click Group by similar differences .
- Eyes' displays a notification to inform you that it is searching for similar steps. The notification remains visible until Eyes' has processed all steps in the scope.
- One or more group thumbnails appear in the Batch details view or Batch steps view. If Eyes does not find any steps with similar differences, then there will not be any group thumbnails to display.
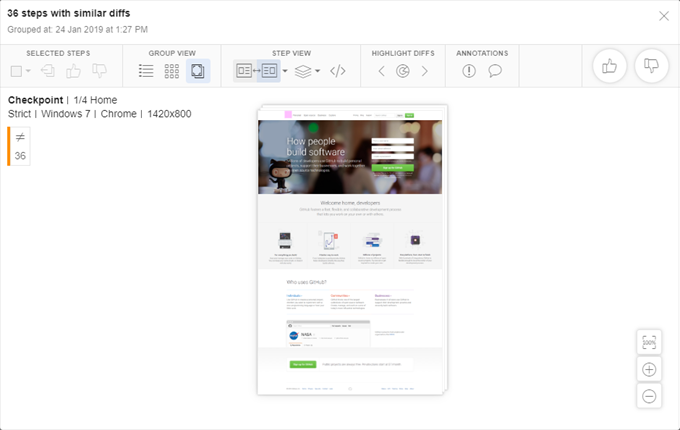
- Clicking a group thumbnail opens the group in the Group representative step view of the Step editor.
Accepting or Rejecting Step Differences
When you view a group of steps in the Step editor, the toolbar only displays tools that you can use in the currently selected view. The left side of the toolbar shows the Selected Steps section that you use to perform maintenance actions, such as accept or reject, on a select number of step differences in the group. The right side of the toolbar displays the Accept Group Diffs section that you use to accept or reject all step differences in the group.

Accepting and rejecting selected step differences in a group
When you Group steps by similar diffs, the resulting group is made up of a number of steps that each contain the same set of similar diffs. When reviewing the group, you can Accept or Reject one or more selected step differences instead of accepting or rejecting the entire group.
In the Step editor's Group details view or Group gallery view, you can select one or more steps and then Accept or Reject the selected steps.
To Accept or Reject selected step differences in a group:
- Enter the group and then click the Group details view or Group gallery view in the Step editor toolbar.
- Click the check box to the left of each step you want to Accept or Reject.
- Click either Accept or Reject in the Selected steps group of the Step editor toolbar.
Accepting and rejecting all step differences in a group
When you Group steps by similar diffs, the resulting group is made up of a number of steps that each contain the same set of similar diffs. When reviewing the group, you can Accept or Reject the group diffs in a single operation.
In any of the Group view modes, the Accept group diffs group is located at the far right end of the Step editor toolbar. Clicking Accept or Reject applies the selected action to each step in the group.
Reviewing Groups and Their Steps
The Automated test maintenance creates a group when:
- You perform a maintenance action, such as accepting or rejecting step differences or adding or editing a region to a step. In response, Eyes scans the steps in the current scope and replicates the maintenance action on any step that has matching similar differences.
- You use Group by similar differences to collect all steps across the scope where the steps' underlying checkpoint images have the same set of similar differences.
The outcome of each approach differs depending on the maintenance action used as the basis for creating the group. The table below details the differences.
| Action | Group definition | Follow-up action |
|---|---|---|
| Accept or Reject a step difference | All step differences in the group are either accepted or rejected depending on the maintenance action that was performed. | Review the steps in the Step editor's Group mode views. Undo the maintenance action in one or more steps if required. |
| Add, delete, or adjust a region | A group of steps in which the same region adjustment is applied to all steps in the group. | Review the steps in the Step editor's Group mode views. Undo the region adjustment in one or more steps if required. |
| Group by similar differences | A group of steps that all contain the same set of similar differences. All step differences are still waiting to be Accepted or Rejected. | Review the steps in the Step editor's Group mode views. Exclude individual steps from the group if required. Accept or Reject the differences for selected steps in the group in a single operation. Accept or Reject the differences for all the group's steps in a single operation. |
In all cases, you can review the groups and their steps in the Step editor. The Step editor toolbar updates dynamically to display or hide the available Group mode views and associated toolbars depending on whether or not you are looking at a step that belongs to a group.
Group View Modes
The Step editor Group mode has three group views that you can use to examine the steps in a group. The group mode views are:
- Group details view
- Group gallery view
- Group representative step view
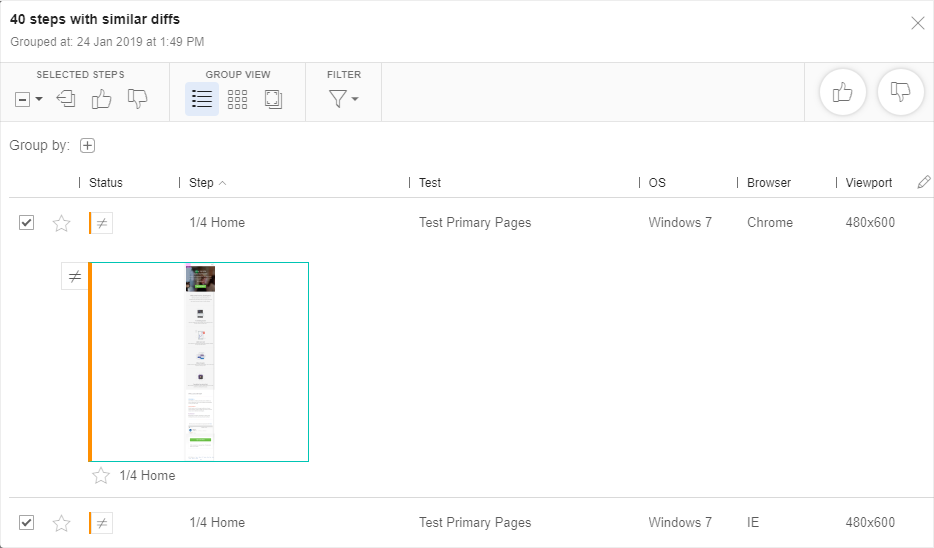
Group Details View
This view lists each of the steps in the group in a tabular format. Each row in the table is dedicated to a separate step. The information in the table details the Test name and environment parameters that were used when running the test to which the step belongs. Clicking the row expands it to show a thumbnail representation of the step.
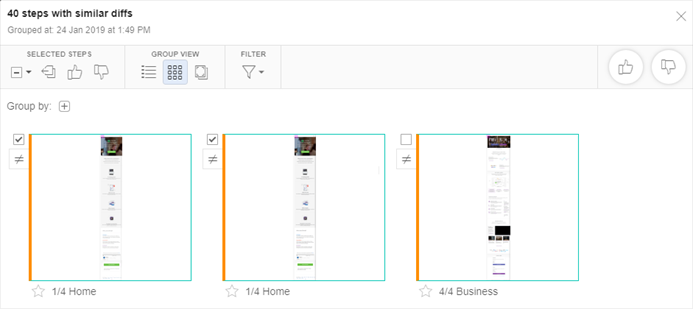
Group Gallery View
This view displays a thumbnail representation of each step in the group.
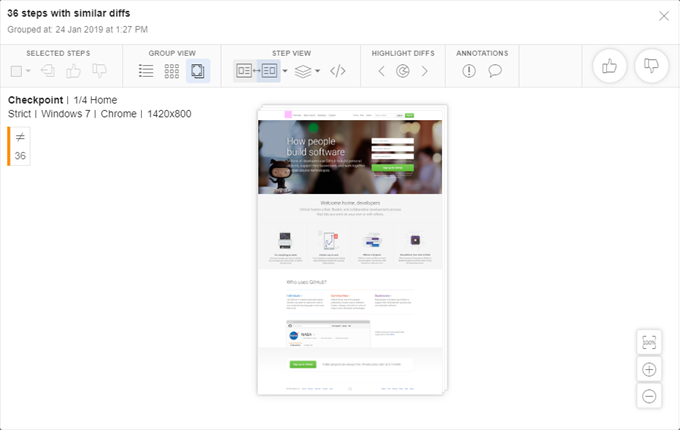
Group representative step view
This view displays the first step in the group and shows the similar diffs on the image. In this view, the toolset in the toolbar is extended to include all tools available to the Step editor except for the Add regions tool.
Excluding Steps From a Group
When you Group steps by similar diffs, the resulting group is made up of a number of steps that each contain the same set of similar diffs. When reviewing the group, you may decide that one or more steps do not belong in the group.
In either the Group details view or Group gallery view you can select one or more steps and then exclude them from the group.
To exclude steps from a group:
- Enter the group and then click the Group details view or Group gallery view in the Step editor toolbar.
- Click the checkbox next to each of the steps you want to exclude.
- Click Exclude selected steps from group .
Notifications and Messages
Eyes displays various notifications and messages in response to Automated test maintenance actions. The notifications provide you with real-time feedback on the status of running tasks. The maintenance actions that prompt such notifications include accepting or rejecting step differences or adding or adjusting regions in some way.
While processing the test maintenance actions, Eyes displays a pop-up message at the bottom right of the screen. The message informs you that Eyes is searching for similar steps on which to apply the maintenance action. While running, the messages display a circle shaped progress indicator which shows you that a task is running. Each message contains an Abort link that you can use to discontinue and exit the task.
When the search finishes, the pop-up message indicates the number of similar steps that were treated. For actions that result in adjusting one or more additional steps, the same notification is added to the Notification list.
Popup Message Types
The various message types include:
- Eyes progress pop up messages for the running task.
- Details pop up messages for a completed task.
The exact content of the message varies depending on the context of the Automated test maintenance action that you run.
The following flow illustrates the type of messages that appear when starting, running and completing a task. The specific flow shows the type of messages that the Test Manager displays when the Auto Maintenance scope is set to Default, and when accepting a mismatch in a single step in the batch.
-
Starting a task
Note that the message contains an Abort link. If needed you can click the link to discontinue and exit the task.
-
Running a task
-
Completed task pop up message
Completed Task Message
In addition to informing you that the task is finished, the Completed task message also:
-
Notifies you of the number of similar steps on which the action was performed.
-
Includes a see details link.
Clicking the link opens the Step editor in the Group view mode. The Group view mode allows you to examine the set of steps that are included in the group on which Eyes performed the Automated test maintenance action.
Indication With A Counter
If the test includes automatically adjusted items, the icon appears in the toolbar, showing the number of adjusted items. Hover over the icon to view a summary of the adjustments. This icon is only displayed when automatic maintenance tasks have been performed.

Notifications List
The Notifications list provides a history of all completed action messages that were issued in the current session. Eyes' shows the messages listed in chronological order with the most recent message appearing at the top of the Notifications list. Each message includes a time stamp that indicates the amount of time which has passed since the Automated test maintenance action started. The time stamp continues to update as long as the browser session is active.
The image shows the open Notification list with a number of messages visible in the list.
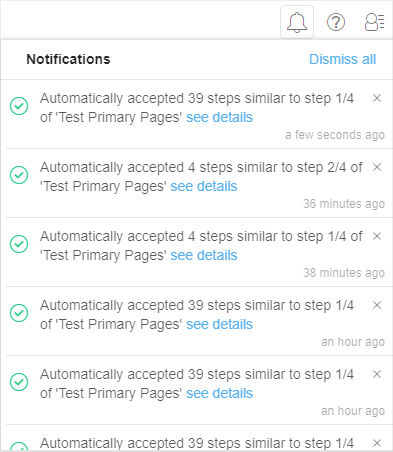
You access the Notifications list by clicking the Notifications list icon located at the right side of the Eyes Test Manager toolbar.
The table shows the different visual states of the Notifications list icon and describes each state.
| State | Description |
|---|---|
| The icon appears as a simple outline when the Notifications list is empty or if all messages have already been viewed. | |
| A blue colored Progress bar appears below the icon when an Automated test maintenance task is being processed. The associated blue colored numeric counter indicates the number of Automated test maintenance tasks that Eyes Test Manager is currently processing. | |
| The associated green colored numeric counter indicates the number of messages in the Notifications list that have not yet been viewed. |