Match Levels & Regions
Applitools allows you to apply any of the available match levels (Strict, Layout, Ignore Colors) to an entire Visual AI checkpoint or as a region within a Visual AI checkpoint.
There are many use cases that can come up that require you to handle portions of your page differently than the rest of the page. These cases include but are not limited to:
- Dynamic data like dates or user IDs
- Components that slightly change their position
- Components that change in length like rows in a table
- Components that change colors
- Components that you're not interested in testing and would like to ignore
In addition to match level regions, Applitools also supports three extra types of regions for specific use cases: Dynamic Text regions, Ignore regions and Floating regions. Ignore regions will prevent Visual AI comparison from occurring in the specified section. Floating regions allow you to specify a "range" where a certain element can be positioned before it's considered a visual bug.
In this guide we'll go over:
- All available Match Levels
- How to apply Match Level regions from the Applitools Test Manager
- How to apply Match Level regions from the SDK
- How to use Dynamic Text Regions
- How to use Ignore and Floating Regions
Match Levels
Traditional pixel-to-pixel comparisons are unreliable since an exact match is needed for a test to pass. Other tools offer thresholds that indicate how many pixels need to be different for the test to fail but this is still unreliable and arbitrary. Traditional pixel-to-pixel comparisons are also very noisy and it can be hard to spot what exactly on the page is a visual bug vs. something that's just shifted slightly.
Applitools provides several match levels that allows you to control how the Applitools Visual AI will compare baseline and checkpoint images.
Strict
This is the default and recommend match level.
This match level verifies that the page content matches the baseline image closely enough that the human eye would not see any difference. With this level, Eyes detects changes in text, font, color, graphics, and position of elements. It aims to detect differences that are visible to the human eye while ignoring differences in pixel values that are platform dependent due to the rendering software and hardware.
The Strict match level is most effective when used for regression tests on a particular browser/OS with mostly static content.
Layout
This match level is useful for validating that the page layout is consistent.
With this match level, Eyes identifies the various page elements in the checkpoint and baseline images, such as text, images, buttons, and columns and verifies that the relative positions of these elements are consistent. This match level can detect elements that have appeared, disappeared, or moved. With this match level, the Eyes matching engine ignores differences in the actual content text and graphics, color, and other style changes.
This match level is most effective when used to validate pages with dynamic content, language localization, and cross-environment testing where a single baseline is used for multiple execution environments (different operating systems, browsers, devices, viewport sizes, and orientations).
Ignore colors
This match level is similar to the strict match level but ignores changes in colors. It is effective when your content is static but the color varies, for example if there are buttons or screen elements that can appear in a variety of colors.
Dynamic text
Dynamic text recognizes defined text patterns such as a date, email address, or URL. For example, if text is defined as a date, Eyes confirms that the text is a valid date format, and would not identify a diff if the date changes, only if the date format is not valid.
Exact
This match level causes the Eyes matching engine to do a pixel to pixel comparison of the checkpoint and baseline images. It is sensitive to differences such as rendering anomalies that are not visible to the human eye. It is not recommended for ordinary verification purposes.
Applying Match Level Regions
Each of the Match Levels listed above can be applied globally as well as to a specific section, or region, on the page. This is important since many times, one match level isn't enough to provide 100% coverage for a given page.
For example, perhaps you have a dashboard that contains dynamic content. You don't necessarily want to apply the Layout Match Level to the entire page since content that isn't dynamic could change. We don't want to miss any visual bugs so the best practice in this scenario would be to apply Strict to the entire page and use Layout regions to cover the dynamic content on our dashboard.
Applitools Test Manager
In the Test editor or Step editor, you can define a region using one of the following methods:
- Element-based - (recommended) A dynamic region based on a web element, such as a frame, image, text box, or video. When you click on an object on the screen, Eyes automatically identifies the screen element. This method is recommended because Eyes can recognize the element even if its exact location on the screen changes. This method requires useDOM to be enabled.
- Drawn - A region based on coordinates on the screen. This is useful if you want to define a fixed area that is not linked to a single element or create a region around multiple elements.
You can add padding around a region. For example, if an element includes a border or shadow, you may want to add several pixels on each side to apply the region settings to the border or shadow.
You can automatically convert drawn elements to linked element-based regions. For details, see Updating Drawn Regions to Element-Based Regions.
Defining A Region
-
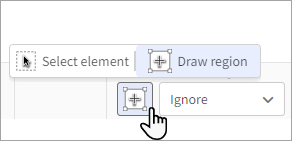
In the Test editor or Step editor, click and select one of the following:
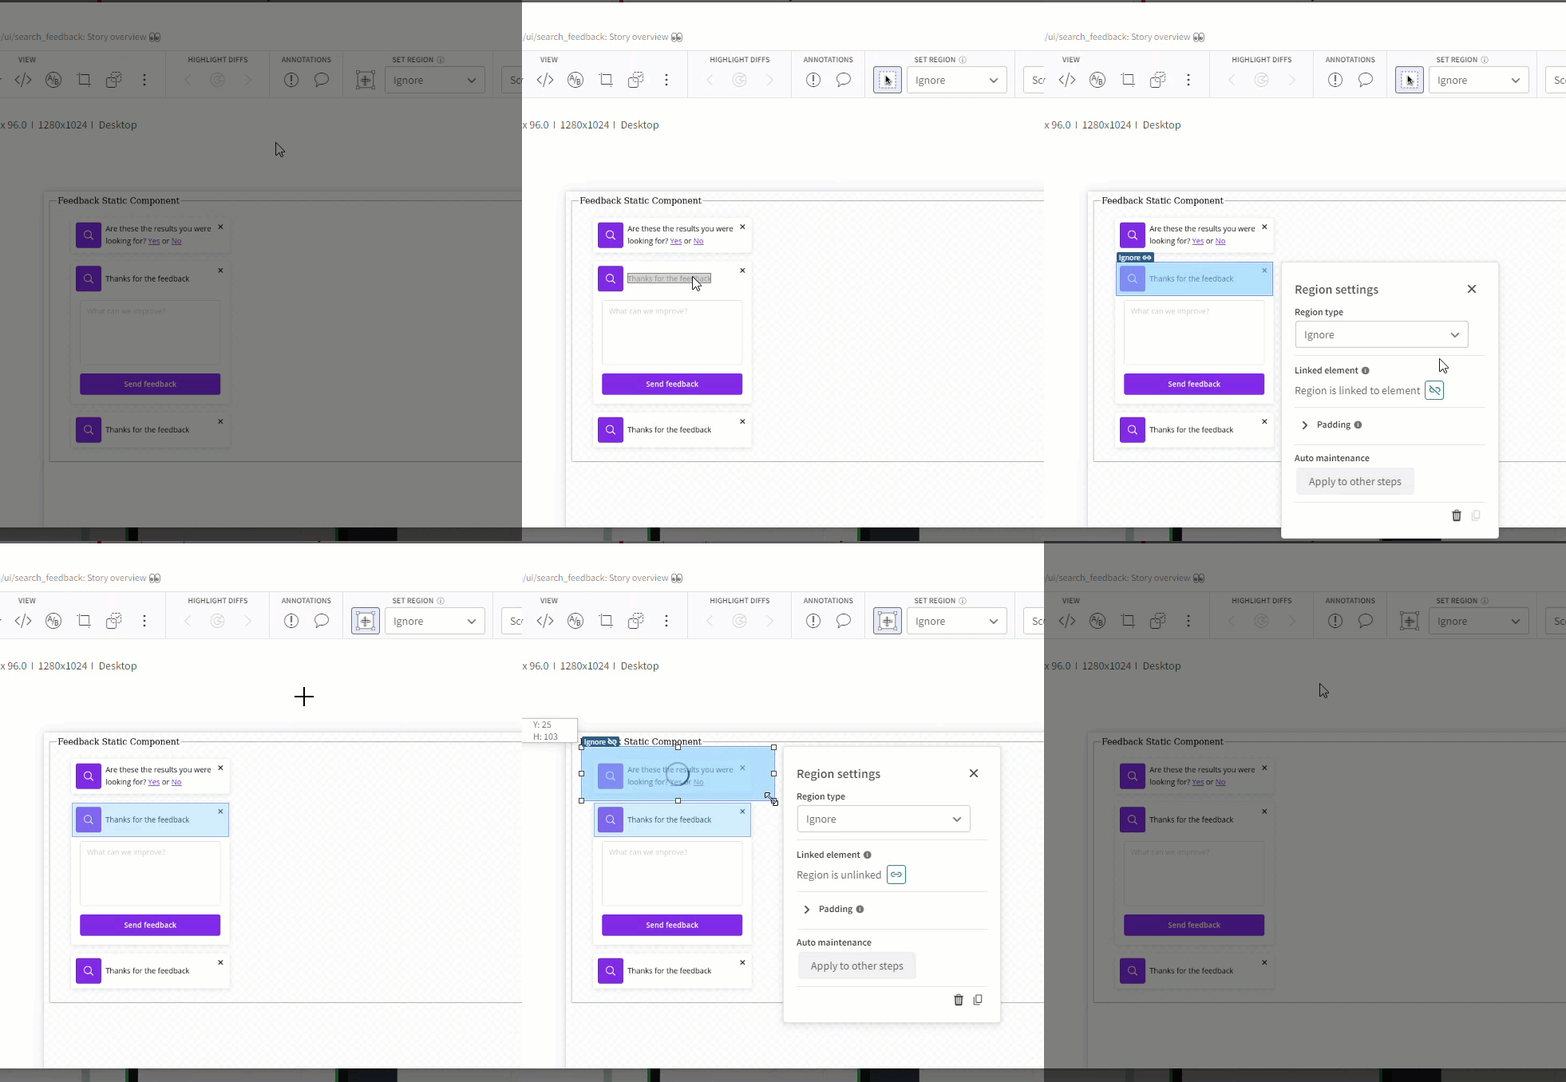
- Select element - Identifies a region based on the HTML element. This is recommended because Eyes can recognize the element even if its location on the screen moves. When selecting an element, the pointer highlights the element as you move it over the image. Click to select the highlighted element.
- Draw Region - Identifies a region based on the location on the screen. Drag and drop a box to create a drawn region.
The Region settings window opens.
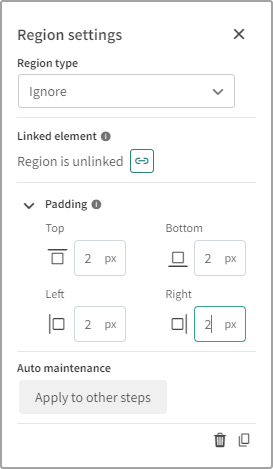
-
Select the match type for the region. If you select the Dynamic match type, you can select patterns dynamic patterns to apply. For details, see Dynamic text match level.
-
To convert the region from an element-based region to a drawn region or vice-versa, click
or
-
If required, add padding to the region. This applies the match level to the space around the region. For example, if an element has a shadow, you may want to add padding to include it.
-
To apply the region to other similar screens, for example a logo or banner that appears on multiple screens, select Apply to other steps. For more information see Adding, modifying, or deleting regions of a step.
Updating Drawn Regions to Element-Based Regions
You can automatically update all drawn regions in a test to dynamic element-based regions. This improves results as the region's definition links to the element, allowing Eyes to recognize it even if the size or position changes. The option to update regions to element-based regions is available in several places in the system:
To update a single region:
- In the Step editor or Test editor, click on a drawn region and in the Region settings window, click
To update all regions on a screen:
-
In the Step editor or Test editor, click > Convert drawn regions to element-based regions.
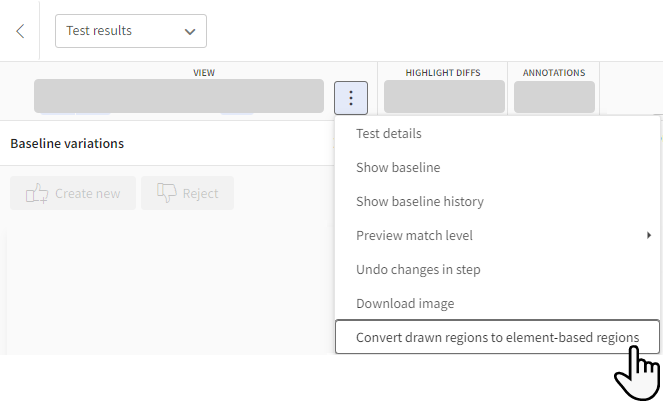
To update all regions in a test:
- In the Test Results page, next to a test, click > Convert drawn regions to element-based regions.
To update all regions in a batch:
-
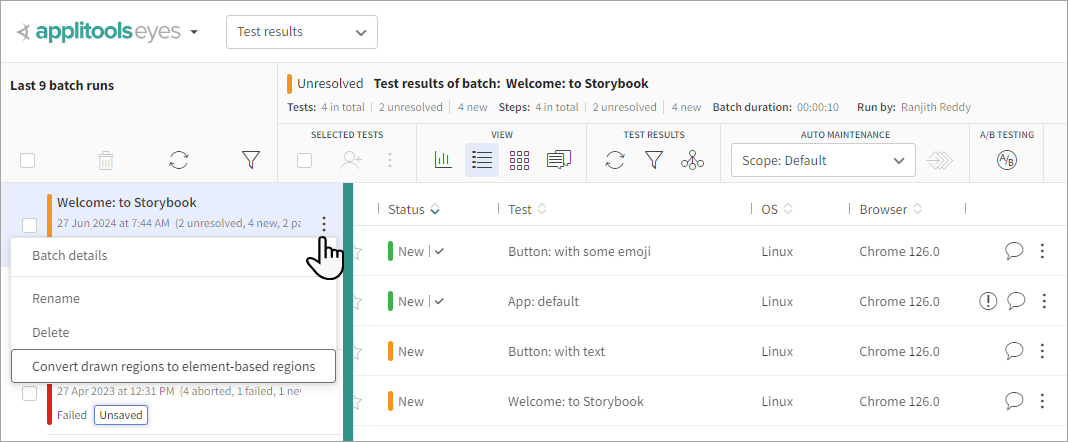
In the Test Results page, in the list of batches on the left, next to a batch , click > Convert drawn regions to element-based regions.
Copying Regions
You can copy a region with the same match level and padding settings.
-
In the Step editor or Test editor, click on a region and in the Region settings window, click.
-
Click to close the Region settings window
-
Click on a different location on the image, and in the Set region dropdown list, select Paste region.

Deleting Regions
In the Step editor or Test editor, click on a region and in the Region settings window, click .
Applitools SDK
Regions can also be defined and applied from an Eyes SDK.
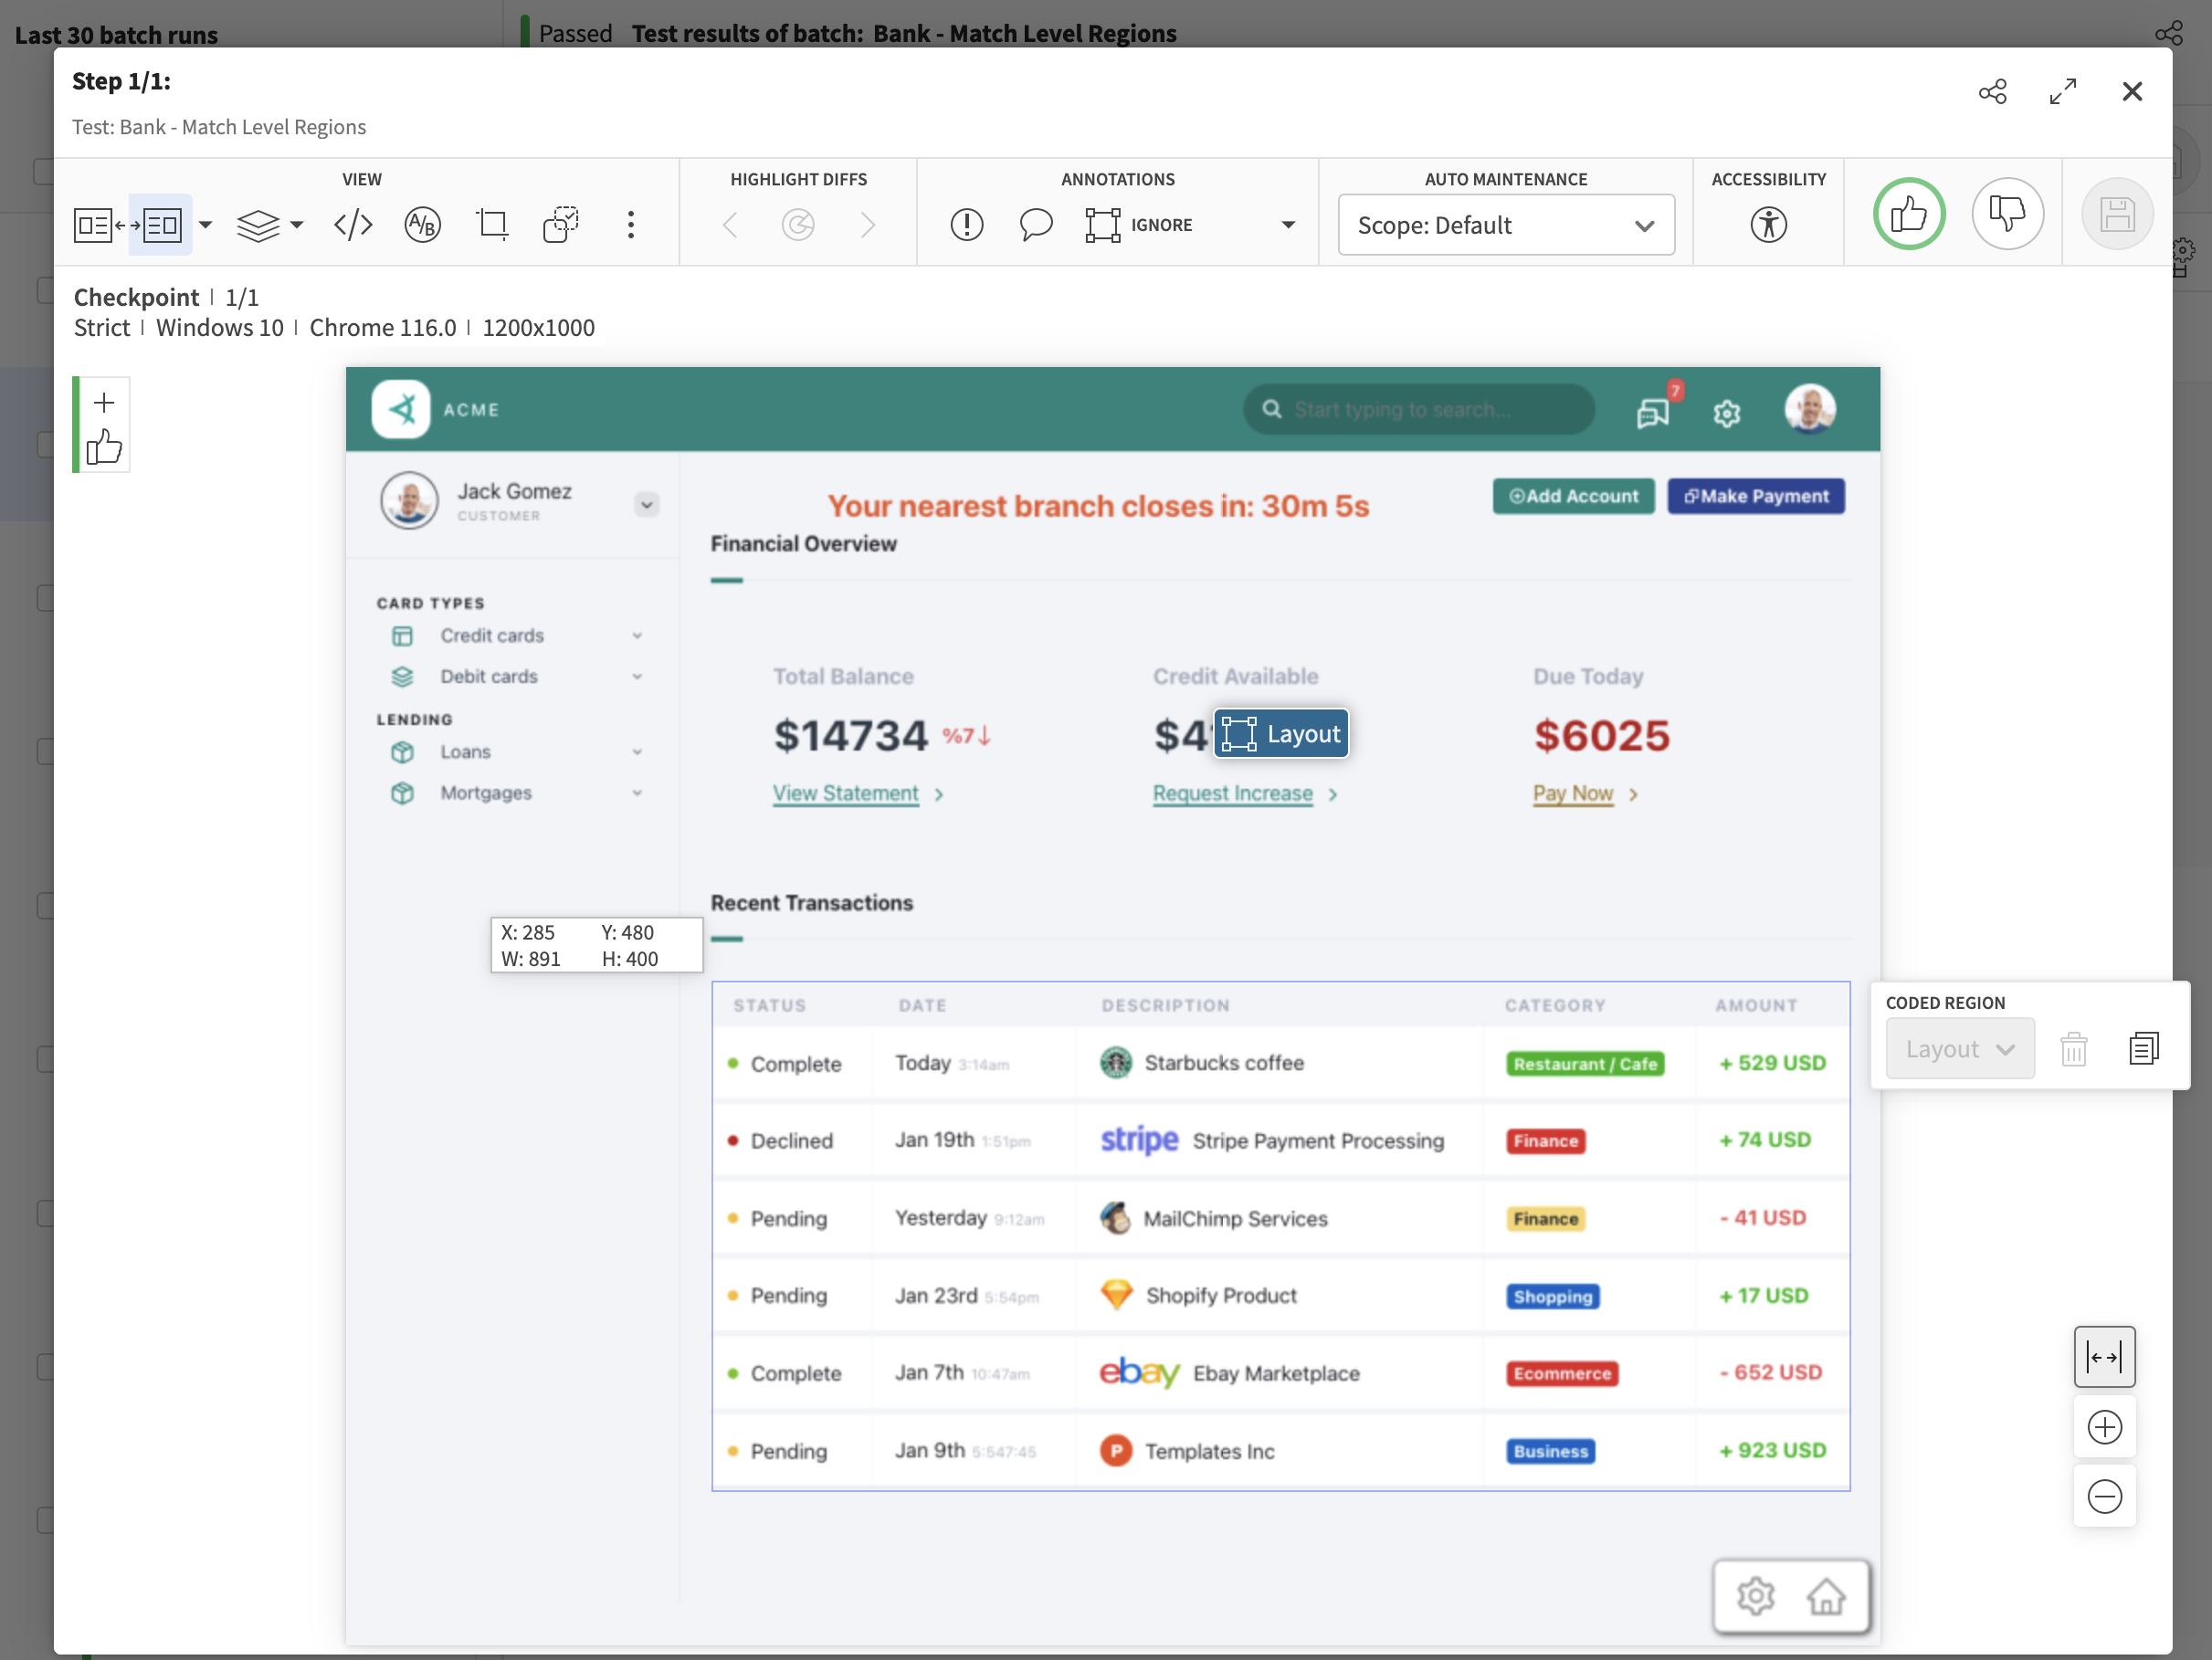
In this case, our entire page is compared using the Strict match level with the exception of the specified regions that are instead compared with the Layout match level.
Dynamic Text Regions
Dynamic text recognizes defined text patterns such as a date, email address, or URL. For example, if text is defined as a date, Eyes confirms that the text is a valid date format, and would not identify a diff if the date changes, only if the date format is not valid.
The following text patterns are available by default:
- Text field (for example text inside input boxes)
- Number (for example ZIP codes, ID numbers, phone numbers)
- Date
- Link
- Currency
You can set dynamic text at the application, test, step, or region level. The system applies the lowest level, i.e., if there is no dynamic text setting for a step, it takes the settings for the test. If there are no settings for a test, it takes the application settings.
Creating a Custom Dynamic Pattern
Dynamic text is based on a .NET regular expression (Regex) search. In addition to the predefined patterns, you can generate your own Regex search. For details and examples of creating a Regex search, see this page.
Following are examples of customized searches:
-
Phone number which may include a country code and dash, for example, "+123-456-7890" or "(123) 456-7890":
^[\+]?[(]?[0-9]{3}[)]?[-\s\.]?[0-9]{3}[-\s\.]?[0-9]{4,6}$ -
Valid Social Security number:
^(?!0{3})(?!6{3})[0-8]\d{2}-(?!0{2})\d{2}-(?!0{4})\d{4}$ -
US ZIP code:
^[0-9]{5}(?:-[0-9]{4})?$
When you apply a custom pattern to an application, test, step or region, there is an option to create or modify a custom dynamic pattern. If you create a pattern, the new custom pattern will be available to all users and can be called from the SDK based on the name assigned to the pattern.
To create a custom dynamic pattern:
-
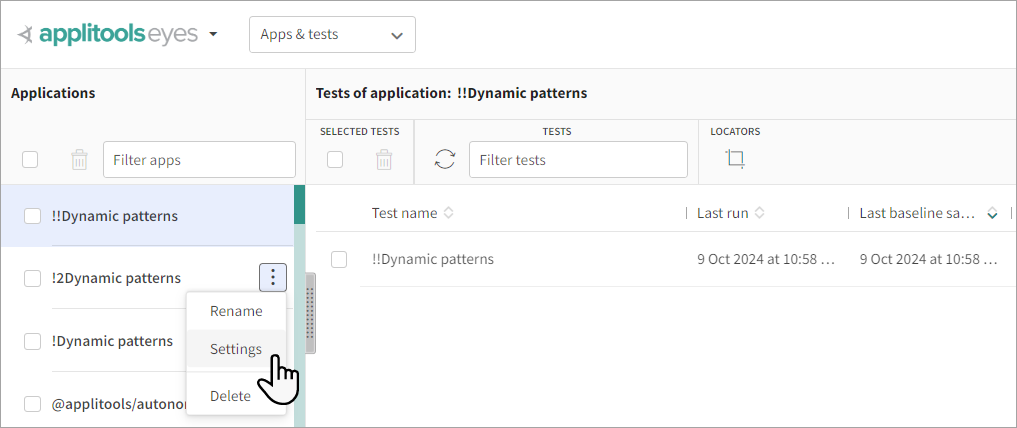
Open the Application, Test, or Step settings window. For example, to open the Application settings window, in the Page Navigator, select Apps & tests, then in the list of applications on the left, hover over an application and click > Settings.
-
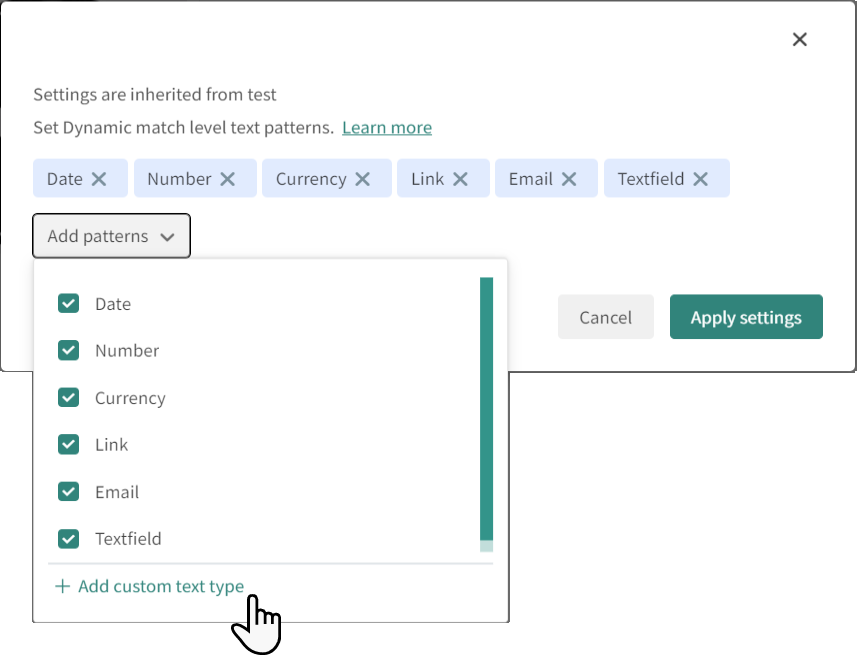
Click Add custom type:
-
Enter a name and a Regex pattern. Once you have created the custom pattern, you can use the name to set the pattern in the code.
For details and examples of creating a Regex search, see this page.
-
Click Add.
-
Once the required patterns have been selected, click Apply settings.
Setting Dynamic Match Level Using Code
You can apply a dynamic match level to a region using an SDK. You can apply a single pattern, an array of patterns, or use the default system patterns. If a customized pattern has been created in the Test Manager, you can call it in the code, however you cannot create a new customized pattern in the code.
The following code sample provides an example of different methods that can be used to apply a match level to a region.
Note that if the match type is set in the code, you cannot modify it in the Test Manager.
Viewing Dynamic Content In the Step Editor
In the Step editor, regions that contain dynamic text are highlighted in yellow.
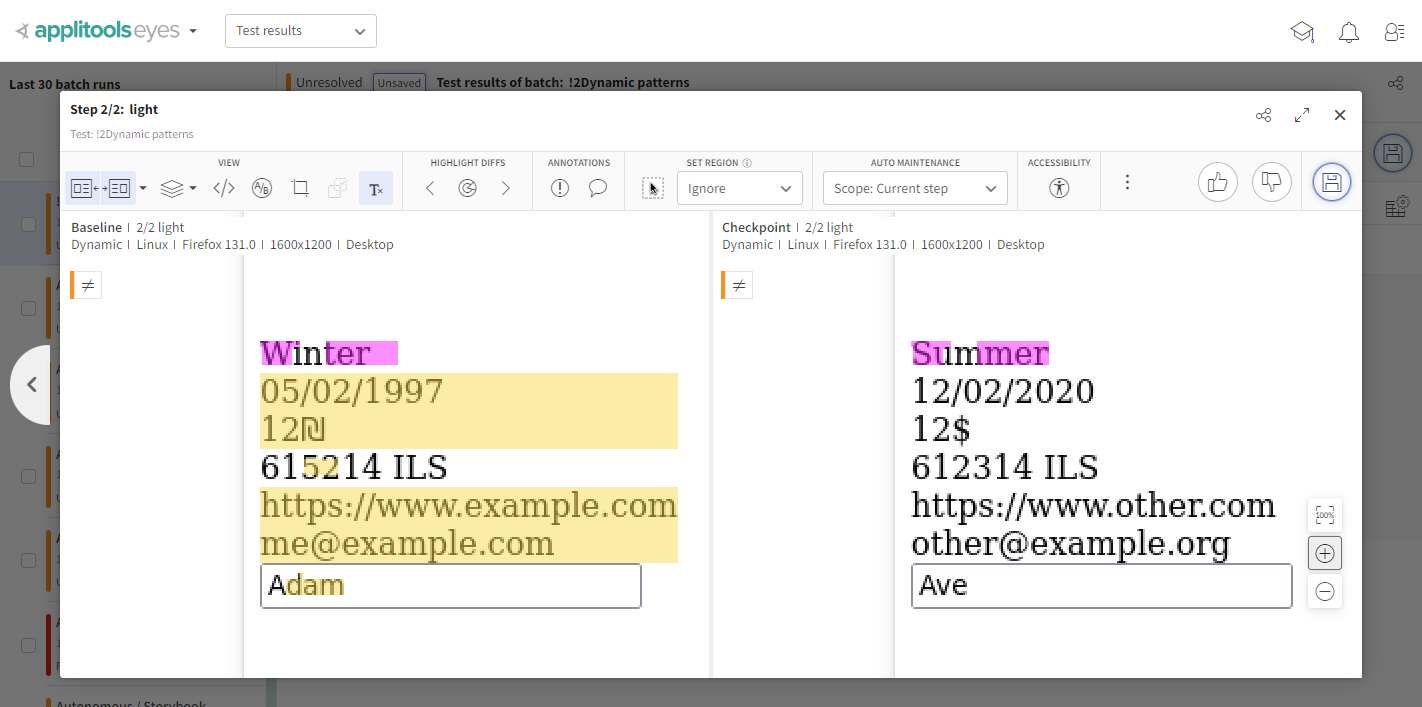
The yellow shading indicates that text in that region matches a dynamic pattern and will not be marked as a diff.
To hide the yellow shading, click .
Ignore Regions
Ignore regions are regions that can be applied through the same mechanisms as match level regions mentioned above, either on the Applitools Test Manager or from an Applitools SDK. Ignore regions should only be used as a last resort and most cases can be handled by Layout regions or Ignore Colors regions.
However, if you come across a section of your page that you're not interested in visually validating, you can apply an ignore region. The process for applying ignore regions from the Applitools Test Manager is the same process as shown in the section above except you now choose "Ignore region" from the list of options.
Below is an example of how to apply ignore regions from the SDKs:
Now, our test will not visually validate the regions we've specified with the selectors used above.
Floating Regions
Floating regions can be used for a very specific set of use cases where an element on the page is considered valid as long as it stays within a certain "range" on the screen. For example, we may have an animated feature that moves side to side or an arrow icon that moves and points to a different date based on the day of the week.
Whatever the case may be, floating regions allow you to define a range where the specified element is allowed to be positioned before the test fails.
In the test result below, we noticed that our icon shifted from the left over to the right:
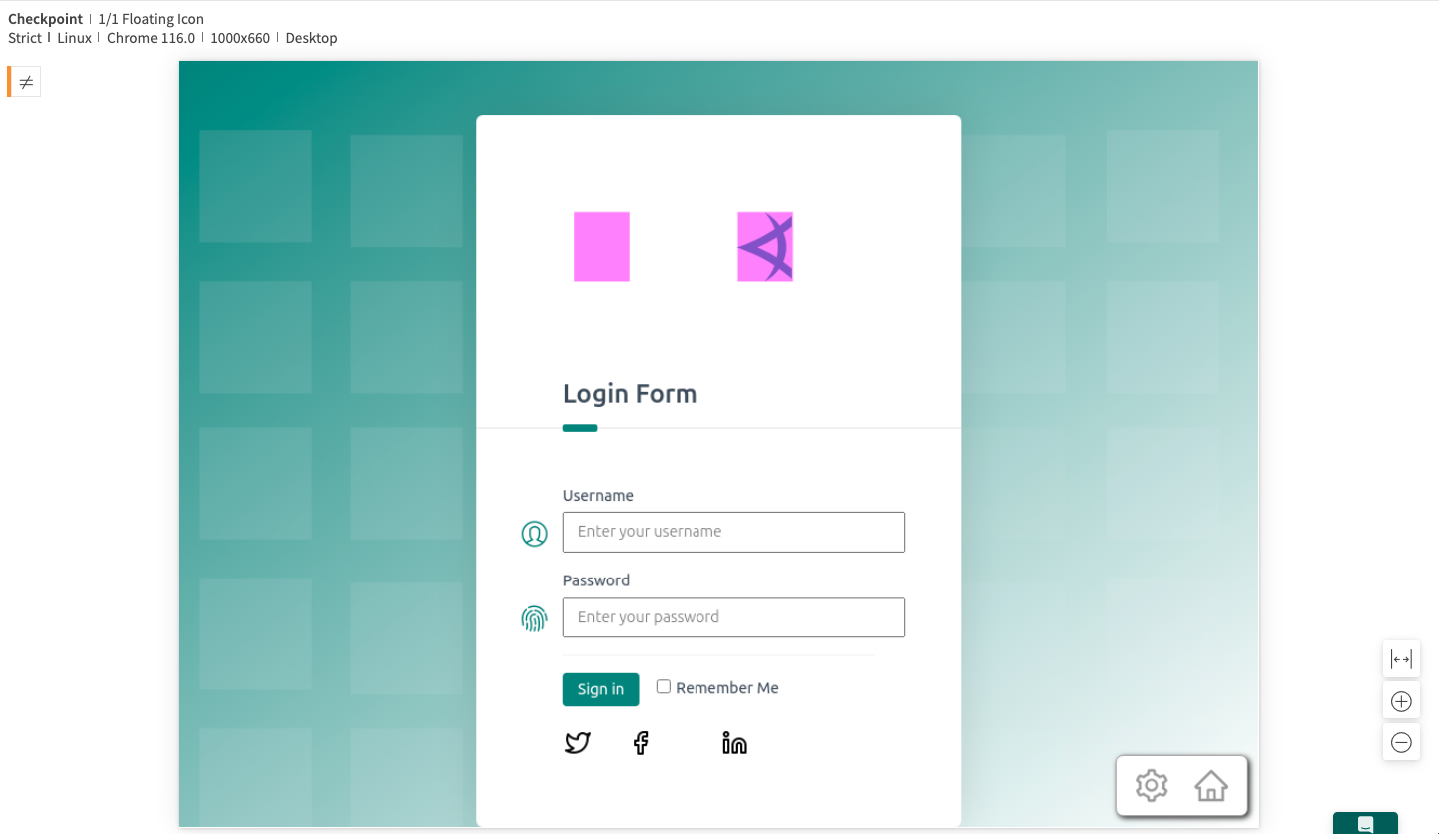
Floating regions are unique from the other regions that we've seen so far since they actually consist of two regions that work in conjunction with each other. The small yellow region is used to specify the actual web element that we're interested in. In this case, it's our app logo that has shifted its position.
The large blue region specifies the "bounds" that our small yellow region is allowed to move within. As long as the yellow region is within the blue region, our tests will pass. If, however, the yellow region leaves the bounds of the blue region, our test will fail.
Floating regions can also be configured from code using an Applitools SDK:
In the code above, the selector represents the small yellow box of the floating region, aka the element that moves, and the other arguments specify the bounds in each direction that the element is allowed to move within. The result looks like this:
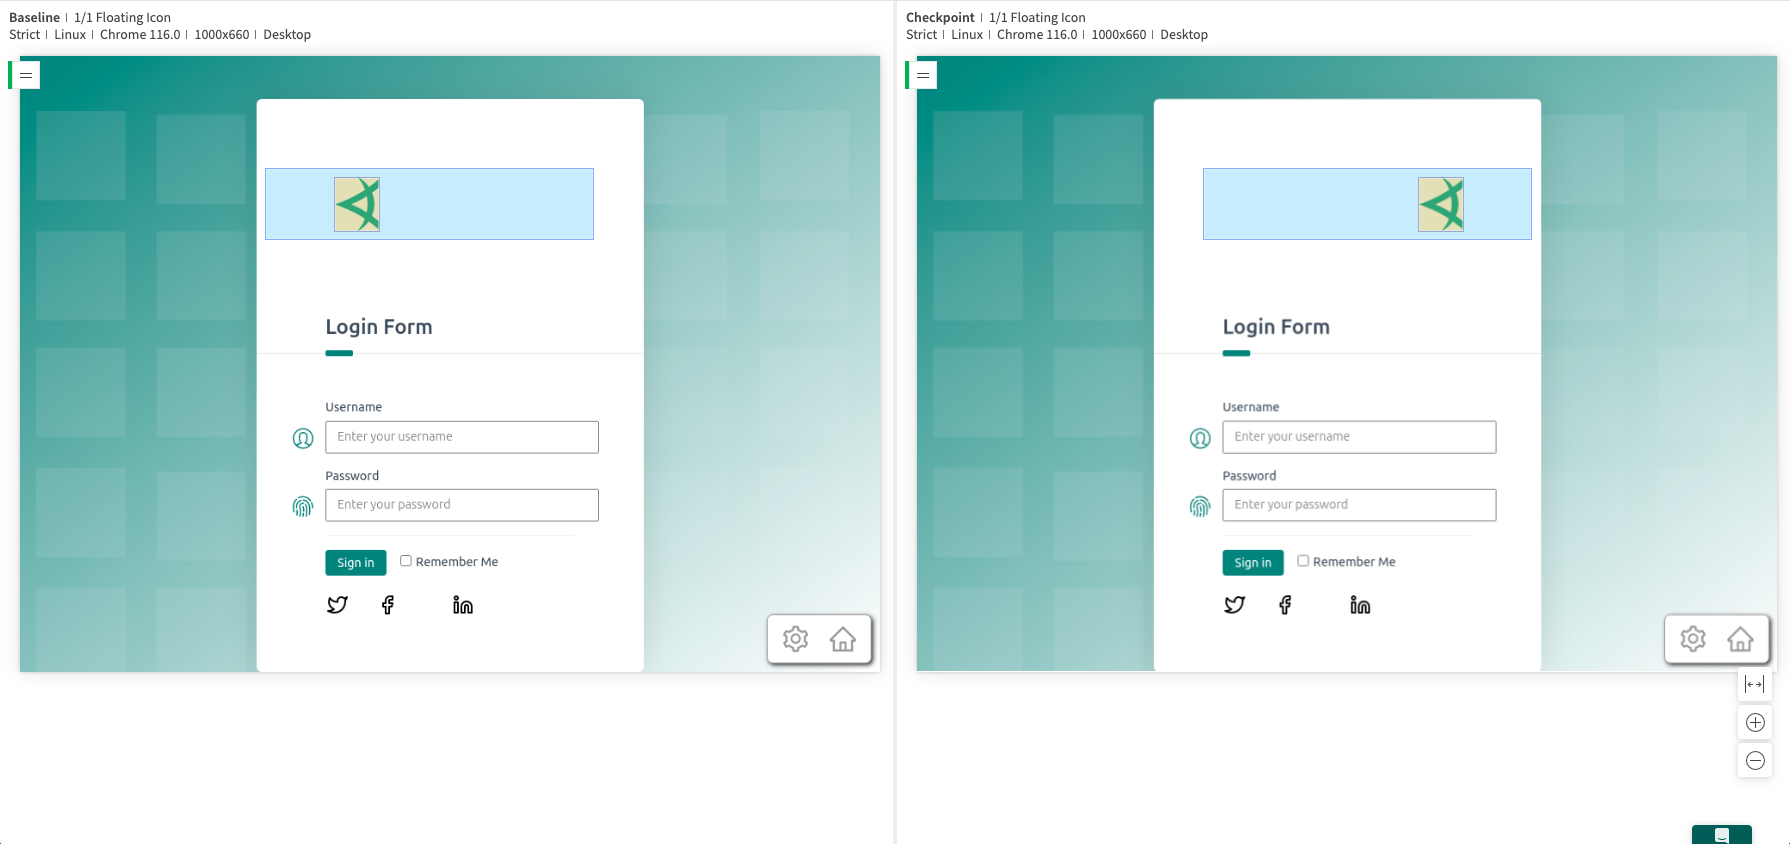
As we can see, even though our icon moved from the left side to the right side, it stayed within the bounds of the blue box and therefore, no differences were flagged and our test passed.