After you run Eyes visual UI tests, you use the test results page to see the outcome of the test runs, and if necessary, to update the test baselines.
Using the controls and tools on this page you can analyze the results of the test run by filtering, sorting and grouping the information in various ways. You can look at, and compare the baseline and checkpoint images. You can accept a checkpoint image so that it will become the new baseline image. Alternatively, you can reject a step, indicating that the step failed, and you can assign the test to a team member for further action.
The main tasks you can achieve on this page are:
-
View the overall results of the batch to see whether all the tests passed and to view tests that have failed.
-
Accept or reject all the differences in a test or group of steps and then update the baseline.
In addition, in the views that display a step thumbnail, you can open the test editor or step editor tools. These allow you to make side-by-side comparisons of the checkpoint and baseline images, and also allow you to take the following actions:
-
Accept or reject differences in individual steps and update the baseline.
-
Annotate tests and steps with issues and remarks.
-
Define match levels, ignore regions, and floating regions.
-
Analyze the impact of a change in match level.
Layout
To open this page, in the Page Navigator, select Test results.
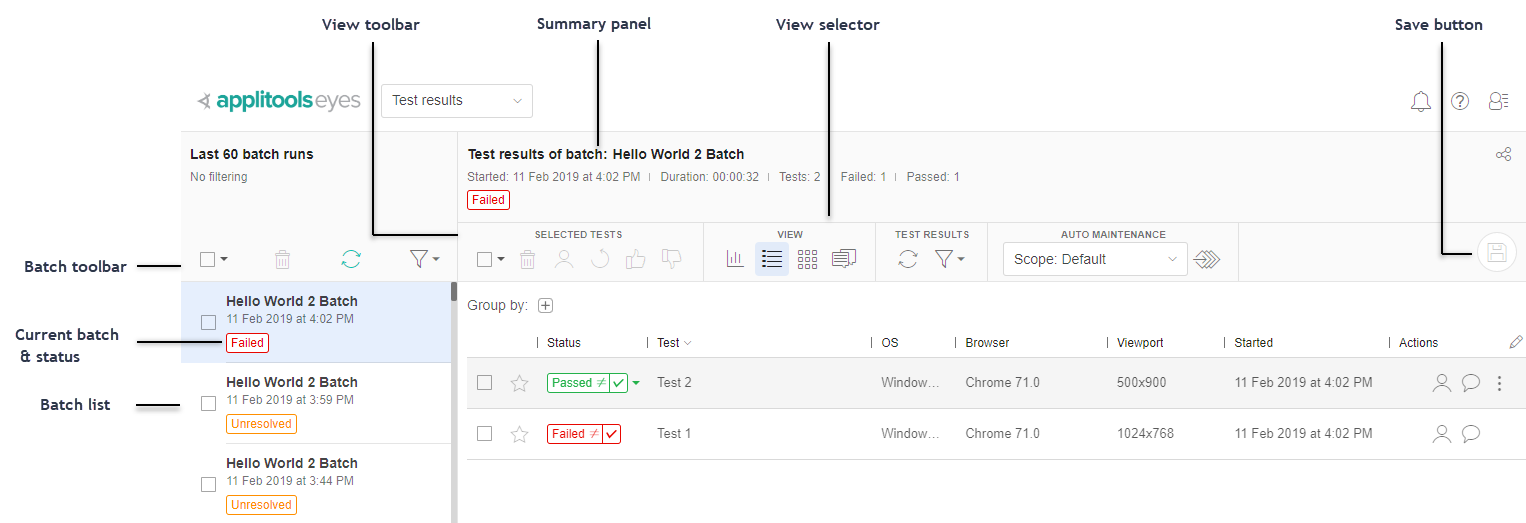
The test results page is divided vertically into two panels. On the left, you can see the batch list - a list of all the batches run by your team. When you click on any entry in the batch list, it becomes the current batch, and the main panel shows information on the test results of that batch. The information you can see depends on the view you select using the view selector. Each view focuses on a different aspect of the test results (batch level, tests, steps, and issues & results). See The test results views below for more details about what you can see and do in each view.
The batch list panel
The batches in the list are presented in chronological ordered, with the most recently run test first. Since the batch list can be very long, it is updated only when you scroll further down the list.
Above the batch list is a toolbar that allows you to:
-
 Select /deselect all visible batches (after any filtering).
 -
 Delete the selected batches (see How to delete batches.
 -
 Update the batch list (see Updating the page).
 -
 Filter the batch list (see How to filter and search batches.
Each entry in the batch list displays the batch name, the date and time the batch started running, and a batch status (Running, Passed, or Failed - see Test and batch status). There is also an indication if you have started resolving the tests but have not yet saved the results, and a checkbox that is used to select the batch for deletion.
When you click a batch in the list, it becomes the current batch and information about that batch will be displayed in the main panel.
Current batch summary panel
At the top of the main panel, there is a panel that provides information about the currently selected batch:

The information displayed includes the name of the current batch, when the first test in the batch started, how long it took to run, and how many tests there are in the batch. Then there is a breakdown of the number of tests in different states: Unresolved, Aborted, Failed, New, Running, Passed, or Issues. Only values that are non-zero are displayed. The state labels also function as quick filters that you can click to show all test results matching that state.
The current batch status (Passed, Failed, etc.) and save state are also displayed here (see Test and batch status for more details).
You can rename the current batch by hovering over its name, clicking on it, and typing in a new name (see How to rename a batch for more details).
Saving changes to the baseline
The save changes to baseline button  will "pulse" when you have made changes and have not yet saved them to the baseline.
Click on the button to save all the tests. If you only want to update the selected baseline rather than the baselines of all the tests (since this will immediately impact tests when they next run), then in thetest details view, select Save selected test to baseline in the sub-menu opened when you hover over this button.
Updating the page
Since tests can be running in the background, the information on this page may not be up to date. Both the batch toolbar and the test toolbar have a ![]() button. If these indicators rotate, then this means that more information is available on the server. Click on the button and the panel associated with that button will be updated.
button. If these indicators rotate, then this means that more information is available on the server. Click on the button and the panel associated with that button will be updated.
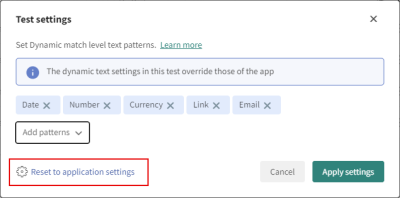
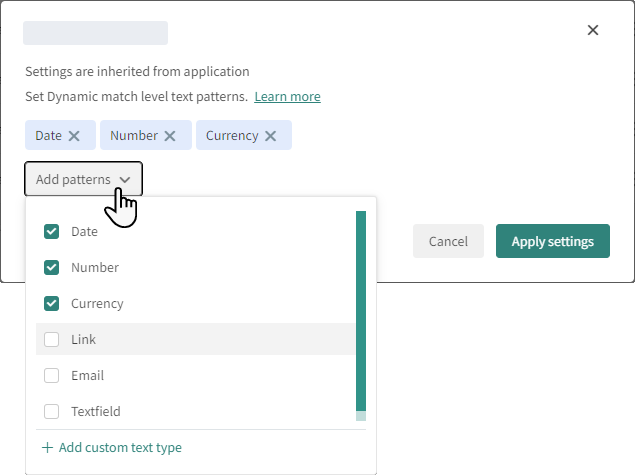
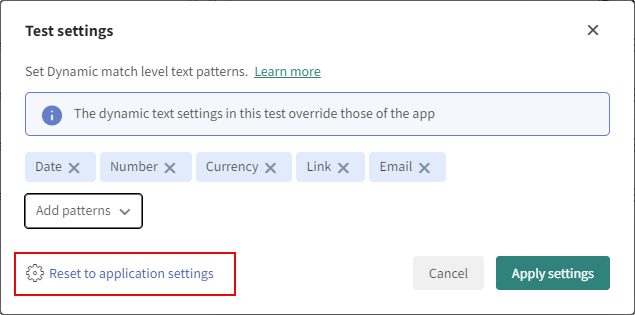
Setting dynamic text patterns
By default, the text uses the Dynamic Match Level set at the application level.
You can modify the dynamic text pattern for a specific test:
-
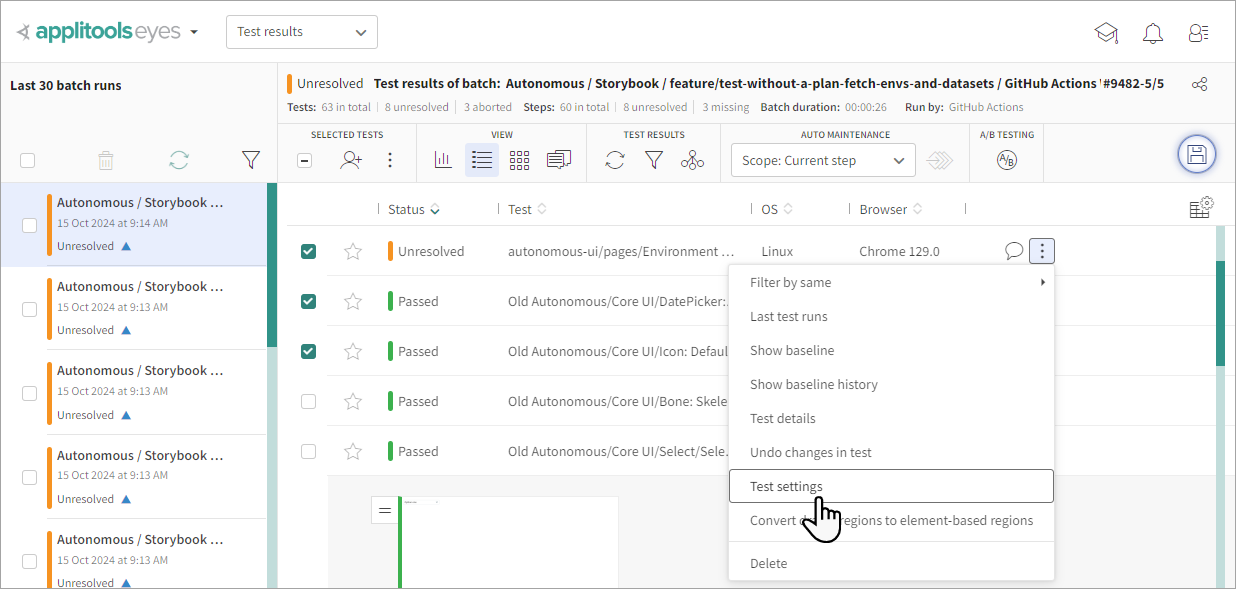
In the Test results page, in the list of tests, next to a test, click
 > Test settings.
-
Click App patterns and select the required patterns.
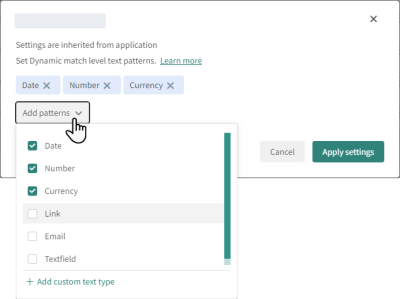
-
If you need to create a new custom pattern, click Add custom text type. For details, see Dynamic Match Level.
-
Click Apply settings.
Note that after modifying test patterns, you can reset to the application settings.
Views on the test results
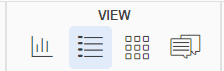
The current batch toolbar contains buttons that allow you to select the current view:
The other buttons in the View selector toolbar always contain the same buttons, but some of the operations are only enabled in particular views, and others behave slightly differently in each view.
The test results views
What you actually see in the main panel depends on the current view selected in the view selector. There are four different views of the test results available:
-
 Batch summary view
 - This view provides you with a high-level view of the results of the test runs and the current progress in processing these results. This view displays graphical summaries of key test attributes and states. For example, you can see the percentage of tests that have mismatches, the percentage of the steps that have been resolved, the browsers and operating systems the tests ran on, and more.
- This view displays a list of all the tests in the batch along with key information such as the test status and execution environment. You can sort, group and filter the tests by various criteria. You can select a subset of the tests and do operations on them such as resolving all the steps, deleting the test or assigning them to a team member. You can expand a test to see thumbnail images of all the steps along with the test result for that step.
 Batch steps view
- In this view, you can see all the steps in the batch, irrespective of which test they were captured in. You can filter and group the steps using various criteria, and take actions such as resolving all the steps in one click.
-
 Issues and remarks view
 - In this view, you can see all the steps in the batch that have remarks or issues, and edit these remarks and issues.
 Batch details view
The step thumbnail
In the test detail and step details views, you can see thumbnail images steps. In the test details view, these are initially hidden, and you can see all the steps of any test by clicking on the test. In the step details view, you can filter and group the steps by various criteria.
The step thumbnail allows you to:
-
See the baseline or checkpoint image.
-
Highlight the differences found in the image.
-
Accept or reject individual steps.
-
Apply a dynamic match level to a step.
-
Invoke a filter to show all the steps with the same Browser, operating system or viewport.
-
Open the test editor or step editor.
Filtering results
You can filter the test results to narrow down what you see to criteria that you define. See Filtering test results for details.
Applying a dynamic match level to a step
To a apply a dynamic match level to a single step, click ![]() > Step settings,, select the required patterns and click Apply settings.
> Step settings,, select the required patterns and click Apply settings.

Grouping Results
You can group the results into hierarchical groups based on various criteria that you define using grouping. See Using the group by tool in the Test results view for details.
The test and step editors
You can open the test and step editors from any of the views that display a step thumbnail. Clicking on the thumbnail will open up the Step editor. You can open the Test editor using the step thumbnail menu. The main difference between the Test editor and the Step editor is that the Test editor allows you to navigate through all the steps in a test, whereas the step editor allows you to step through all the steps in a batch, taking into account any filtering and grouping that you have applied to the Test results page.
The Step and Test editor tools provide you with the following capabilities: