Issues and remarks view
The Test results page provides multiple views that allow you to view the test results in different ways. Use the toolbar View selector to select a particular view.
This article discusses the Issues and remarks view that you open by clicking on the button in the view toolbar. This view displays all the steps in the batch that have been annotated by a user with an issue or a remark. The main difference between an issue and a remark is that with an issue you can optionally control the pass status of the test while a remark does not impact the test or step status.
Overview
The screen-shot below shows the Issues & remarks view, displaying issues and remarks of various types, created by several users.
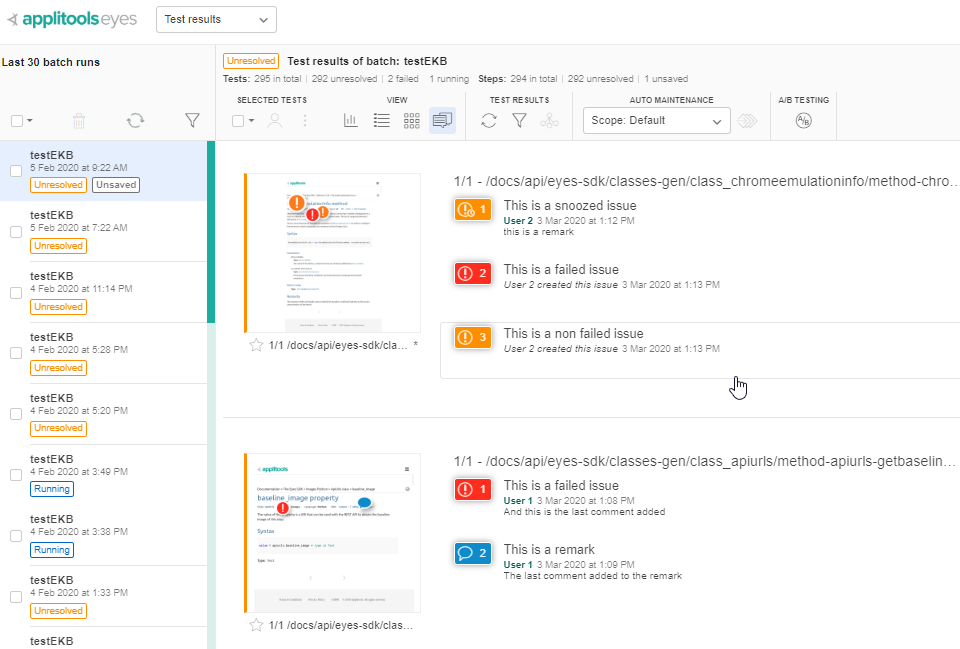
By default the view shows all the issues and remarks in the batch, but you can use the filter to narrow down the regions displayed based on various criteria.
Each step displayed, includes a thumbnail of the step overlaid with the position of the region(s), and a list of issues and remarks made on that step, for each issue or remark you can see its title, the user that created it, the date and time it was created and the most recent comment in the discussion thread added.
Users create remarks or issues using the Test editor or Step editor. In the Issues and remarks view, you can click on either the details area or the thumbnail and the Test Manager will open the remarks dialog or issues dialog in the Test editor, allowing you to add a comment and make changes. The following screenshot shows the issues dialog. The remarks dialog is similar but does not offer the ability to fail the test or snooze the failure.
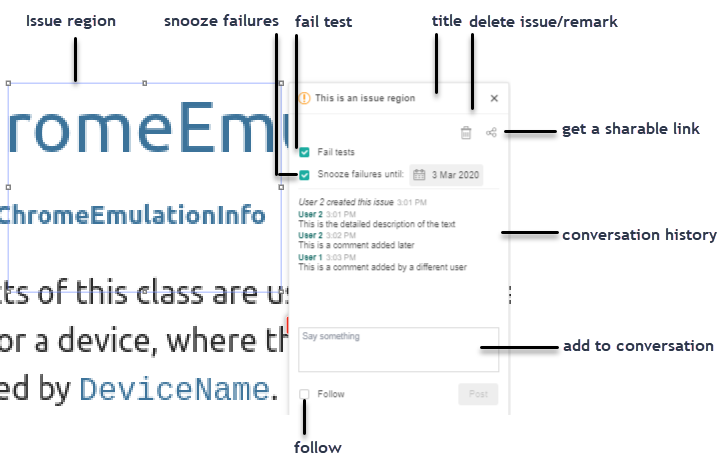
In this dialog you can:
- See the issue/remark title and change it.
- See the conversation history and add a comment to the conversation.
- In the dialog you can also:
- Add additional information in the comment box. If you reference a team member's name in the text then an email is sent to the team member.
- Follow the thread (get a notification when other users add comments).
- Copy a URL that you can save in a file or send in an email. When you paste this URL into a browser it will open the Test editor on this step, with the comment editor open on this comment.
- Delete the issue or remark.
-
In the case of an issue region you can also:
-
Select the check box labeled Fail tests. Once you accept or reject the step, the test status will be forced to a Failed state in both the current and future test executions.
-
If you select Fail tests, you can select the check box labeled Snooze failures and select a date. If you do this, then the test will only be forced into the Failed state after the specified date.
-
If you have configured either the Jira integration or the Rally integration, you can associate a Jira issue or Rally work item with the region.
-
To go back to the issues and remarks view, close the dialog by clicking on the and the click on the back button to the left of the page selector (Test Results).
Issues and remark type icons
The icons to the left of the information indicate whether a region is an issue or a remark.
-
 A remark
 -
 An issue that has not been explicitly failed
 -
 An issue that has been explicitly failed
 -
 An issue that has been explicitly failed but snoozed (it will fail the test after a specified date)
