Managing Eyes account teams
The Admin Teams view displays information about the teams currently associated with the account of the logged in user. Using the features on this view, you can create new teams, remove teams, and access a team's Team information view, allowing you to define the users, access rights, and other properties of the team.
You need to have administration rights to access the Teams view.
This article describes the operations you can perform on the Teams and Team information views.
- Operations on teams:
- Operations on a specific team:
- Accessing account team information
- Adding members to a team
- Handling pending requests to join a team
- Removing members from a team
- Public access to team test results
- Setting user permissions
- Blocking a team from using Eyes
- Integrating Eyes with third party platforms
Operations on teams
Accessing account team information
You can access the Teams view that lists the teams in the account by selecting the page navigator Admin menu and then clicking the Teams tile.
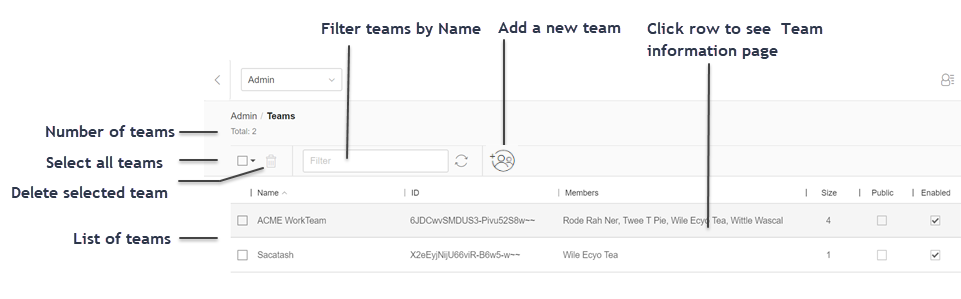
The Teams view displays all the teams currently associated with the account in a table, with a row for each team. The toolbar at the top of the view includes tools to select/deselect all teams, to delete selected teams, to filter teams by name, and to add a new team.
The row for each team displays the following information:
- Selection checkbox
- The selection checkbox allows you to select the team for operations available in the toolbar, such as delete team .
- Name
- The name given to the team when it was created.
- ID
- An internal ID that is assigned to the team when it is created. Customer Services may request the ID when handling a customer request that relates to the team.
- Members
- The Full name of each user in the team.
- Size
- The number of users in the team.
- Public
- When the Public option is selected, registered Applitools users outside the team can also view the team's test results.
- Enabled
- When the Enabled option is deselected, the Test Manager prevents the team members from accessing test results and performing Test Manager operations.
On this view, you can perform the following operations:
- Add a team to the account.
- Remove a team from the account.
- Access a team's information view by clicking on the row of that team.
Adding teams to an account
When you add a new team to an account, it has the following initial conditions:
-
No team members
-
No public access
-
An API key with default parameters of Enabled and with permissions to Execute tests.
To add a new team to an account:
-
On the Admin panel, click on the Teams tile.
-
Click Add a new team

-
Enter a name for the team and click Add.
The team appears in the list of teams, and you can then add members to the team. See Adding members to a team for more information.
Removing a team from an account
To remove teams from an account:
-
On the Admin panel, click on the Teams tile.
-
Click on the selection checkbox to the left of the team you want to remove or use the Select All checkbox in the tool bar to select all of the teams. You can also type a few letters in the filter text box and use the Select All checkbox to select all teams that contain the typed text.
-
Click the
 button to remove the selected teams.
Operations on a specific team
Accessing the team information view
To access the team information for a particular team, navigate to the Teams view and click on the row of the team whose information you want to see. This will open the team's information view.
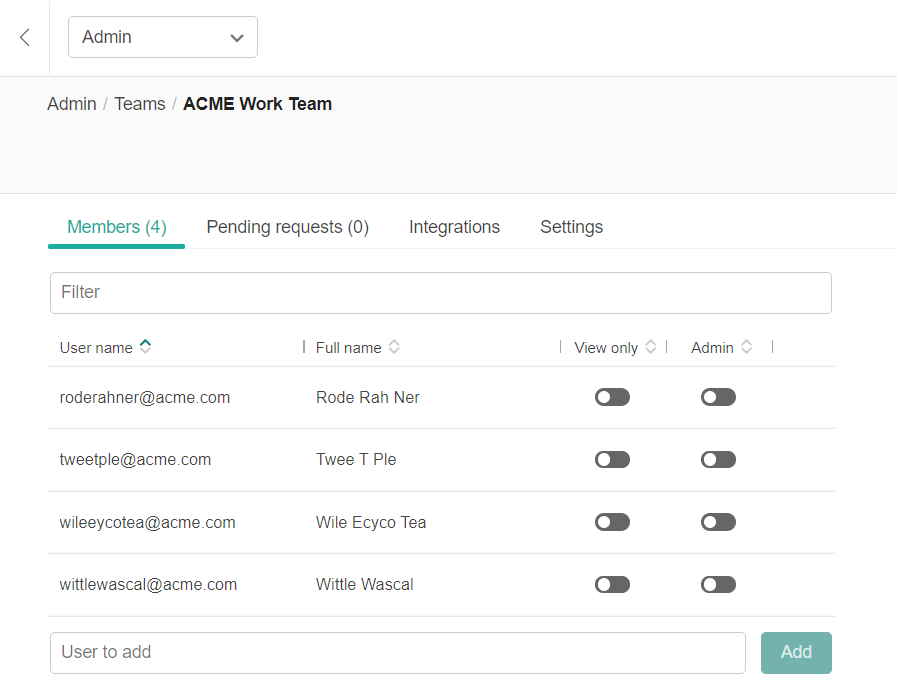
The Team information view has the following tabs:
-
Members: See the current team members, add new members, and remove existing members.
-
Pending requests: Handle requests by users to obtain access to team information.
-
Integrations: Manage integration with third party tools for the team.
-
Settings: Various global team settings, such as disabling team access to Eyes, enabling public access to team test results, and setting A/B testing options.
Adding members to a team
You can add both new users and existing users on other teams to a team. Adding new users to a team automatically registers them as account users.
To add a member to a team:
-
On the Admin panel, click on the Teams tile.
-
In the Members tab, click in the User to add field and a menu will appear with existing users. You can then do any of the following:
-
Select an existing user from the drop-down menu and then click Add.
-
Type the name of an existing user and click Add.
-
Type the email address of a new user.
In this case, the Add New User dialog box appears and is populated with the user's details. Make any necessary adjustments to the user's details and click Add. Doing so also registers the new user to the account.
-
-
Click Save changes
 to apply the changes.
You can also add a user to teams from the user admin Users view in several ways. See Adding a user to a team and Adding multiple users to multiple teams for more information.
Handling pending requests to join a team
Users can be invited to see Test results, for example, by receiving an invitation in email or Slack when a test batch is completed. In the invitation, the user can request access and then a team member with Admin rights can allow or deny access.
To allow or deny access to invited users:
-
On the Admin panel, click on the Teams tile.
-
Ensure that you are on the Pending requests tab where you can see a list of people that have requested access and grant or deny the request.
Removing members from a team
To remove a member from a team:
-
On the Admin panel, click on the Teams tile.
-
In the Members tab, hover over the row that contains the user you want to remove and then click the X that appears at the end of the row.

-
Click Save changes
to apply the changes.
You can also remove a user from the Users view. See Removing a user from a team and Removing users from the account for more information.
Public access to team test results
By default, only team members can access test results. If you need to give team access to any registered Eyes users, including users outside your organization, contact Customer Support to make team access public.
Setting user permissions
When you add users to a team, Eyes provides them with default user permissions. You can modify the user permissions as required. There are two types of user permissions: Edit/View only and Admin. You set the permission level by either selecting or deselecting the permission options on the Members tab of the Team information view.
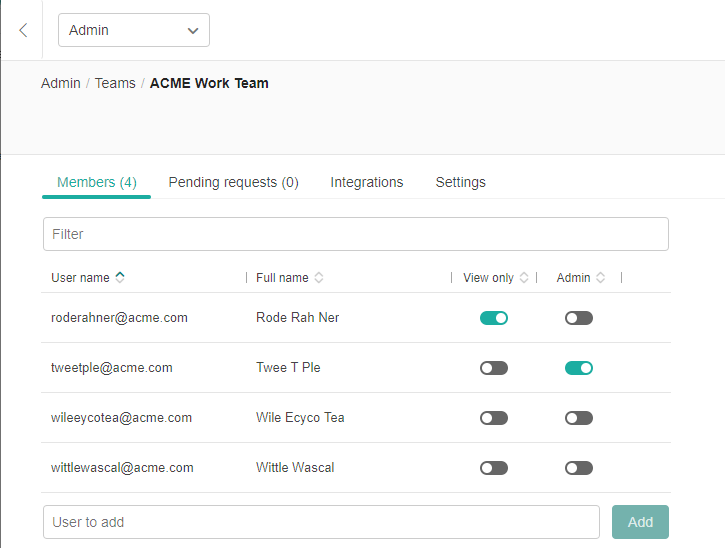
You can set the following types of user permissions:
- Edit/View only
- When the View only toggle is disabled for a user, then the user has full access, meaning they are allowed to run tests and save changes to the baseline. When the View only toggle is enabled the user can only view the results. Eyes prevents them from making changes or saving to the baseline.
- Admin
- When this option is enabled for a user, they have Team admin rights, which means they can add and remove users and enable or disable permissions. Being a team Admin does not grant users Account Admin permissions which allow them to create and remove teams.
To set user permissions:
-
On the Admin panel, click on the Teams tile.
-
On the Members tab, set the View only and Admin options as required.
-
Click Save changes .
Blocking a team from using Eyes
You can block a team from using Eyes by disabling the team on the Team information view.
To block a team from using Eyes:
-
On the Admin panel, click on the Teams tile.
-
On the Settings tab, deselect the Enabled setting.
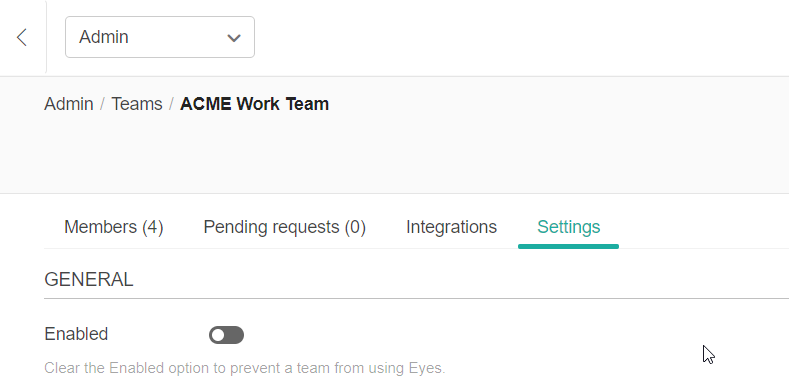
Click Save changes .
Integrating Eyes with third party platforms
To integrate Eyes with third-party platforms, you need to configure the application to communicate with Eyes. Part of the configuration is performed by selecting the integration type from the Integrations tab on the Team information view of a given team. See Integrating Eyes with third party platforms for more information.
For further information, see our video, Managing Teams in Applitools Eyes:
