Integrations
Preflight can be integrated with:
- Eyes Visual AI.
- Project Management tools such as Jira.
- Notification tools such as Slack.
- CI/CD pipeline tools including GitHub, Azure DevOps, Jenkins, Bitbucket, CircleCI, GitLab and Travis CI.
Eyes Visual AI
This integration requires you to have an active Applitools Eyes account. Click here to learn more.
Integrating Preflight with Eyes Visual AI enables you to authorize or fail tests recorded in Preflight, directly in Eyes.
If you have an Ultrafast Grid account, the integration will enable you to use premium features such as testing a wider range of browsers and viewing visual AI results directly within Preflight test results page.
If you upgrade to Ultrafast Grid after performing the integration, you must manually activate these Ultrafast Grid features, as described below.
In addition, by default, Preflight does not send batch completion notifications (Microsoft Teams, Slack or email) when the execution of a batch of tests has completed. To receive notifications, you must manually activate batch notifications, as described below.
To Integrate with Eyes Visual AI
- In the Navigation bar, select your profile icon.
- Click Account Settings > Integrations.
- Click Connect to Eyes Visual AI.
-
Click Connect Now in the pop-up that appears.
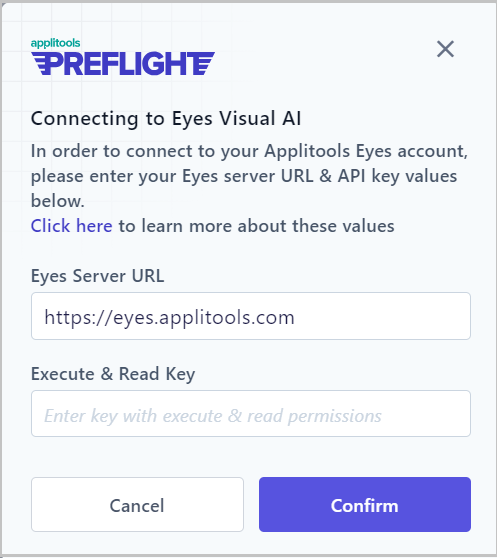
The Connecting to Eyes Visual AI window appears.
-
Enter the Eyes Server URL. By default this is the public cloud, but it may also be a private cloud.
-
Enter the Execute and Read Key.
To obtain this key, an organization admin must create one in the Admin panel in Eyes by selecting API keys and clicking the Add new API icon. The key must have Execute and Read permissions. You can also reuse an existing key if it has been created for the same team. For more information see How to retrieve your API key.
- Click Confirm. Applitools checks to see if the key is valid. If the key does not have the correct permissions an error message appears.
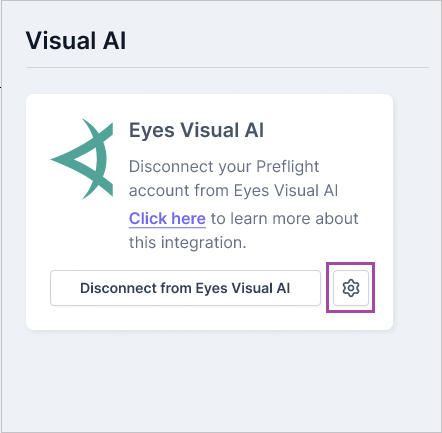
Eyes Visual AI Integration Settings
Use the Settings window to:
-
Activate Ultrafast Grid features if you have upgraded you Eyes account from Classic to Ultrafast Grid after performing the initial integration. For more information see Applitools Eyes documentation.
-
Activate the Eyes Batch completion notifications feature which allows you to request that notifications are sent to one or more people when the execution of a batch of tests has completed. The notifications are sent using Teams, Slack and/or email, so anyone who is interested, and authorized to receive updates on the build status and quality of a batch of test has access to this information even if they don't have access to Eyes. For more information on setting up Batch notifications in Eyes, see Batch completion notifications.
To Activate Ultrafast Grid Features in Preflight and/or Batch Notifications
- In the Navigation bar, select your profile icon.
-
Click Account Settings > Integrations.
-

-
Click Enable Ultrafast Grid to enable the premium features.
-
Click Batch Completion Notifications to enable receiving Slack, email or Microsoft Teams notifications when a batch of tests has completed.
-
Click Confirm.
 .
.Also see:
Slack Integration
Integrating Preflight with Slack enables you to receive detailed error messages when a test fails. These messages include:
- A link to the video of the test
- The platform the test was run on
- The screen size
- The browser
- The status
- A screenshot of the test
- An error message describing the problem
To Integrate with Slack
- In the Navigation bar, select your profile icon.
- Click Account Settings > Integrations.
- Click Connect to Slack.
- A permissions message appears. Click Allow.
GitHub Integration
You can work with tests and workflows created in Preflight directly in GitHub by adding an automatically created script to your config file.
To Integrate with GitHub
-
In the Navigation bar, select your profile icon.
-
Click Account Settings > Integrations.
-
Click Connect to GitHub.
-
Go to the repository you’ve connected to GitHub and create a
build.ymlfile under.github/workflowsif you haven’t got one already. -
Click Next > Create Credentials.
-
Click Generate API Keys.

-
Copy the values of Client_ID and Secret and add them to GitHub.
-
Click Next > Configure Tests.
-
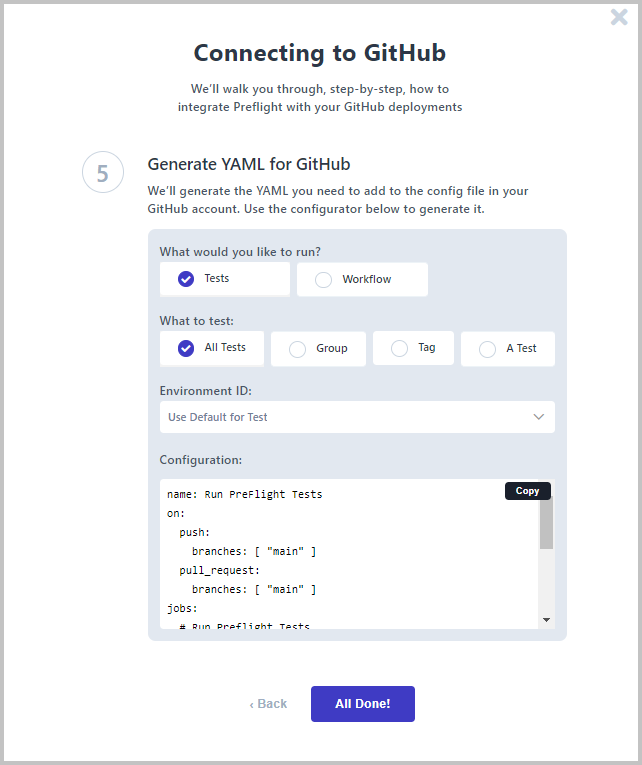
Define whether you want to run Tests or Workflows.
- For Tests define whether to test:
- For Workflows define whether to test:
- All workflows
- A single workflow, and select the workflow from the list.
-
For both tests and workflows define the environment to run the test on. Either select one from the list or select Use Default Settings to use the environment(s) that were used to record the test(s).
A script corresponding to your selections appears in the Configuration field.
-
Click Copy to copy the script and paste it into the
configfile in your GitHub account. -
Click All Done.
Azure DevOps Integration
You can work with tests and workflows created in Preflight directly in Azure DevOps by adding an automatically created script to your config file.
To Integrate with Azure DevOps
-
In the Navigation bar, select your profile icon.
-
Click Account Settings > Integrations.
-
Click Connect to Azure DevOps.
-
Log into Azure DevOps and go to the pipeline you want to add tests to.
-
Click Edit in the top right.
-
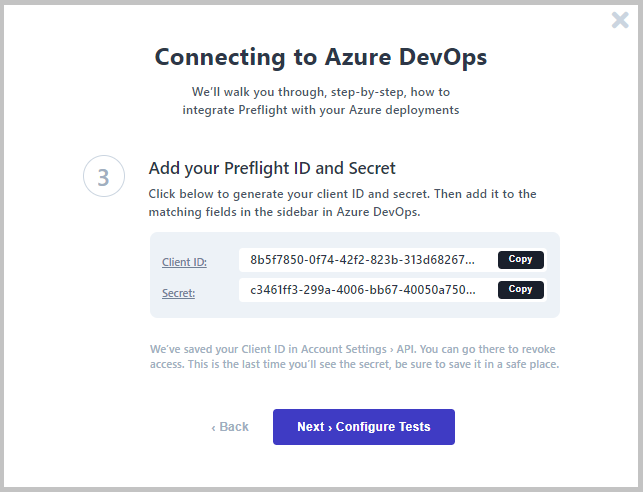
In Preflight, click Next > Create Credentials.
-
Click Generate API Keys.
-
Copy the values of Client_ID and Secret and add them to the corresponding fields in the sidebar in Azure DevOps.
-
Click Next > Configure Tests.

-
Define whether you want to run Tests or Workflows.
-
For Tests define whether to test:
-
For Workflows define whether to test:
- All workflows
- A single workflow, and select the workflow from the list.
-
-
For both tests and workflows define the environment to run the test on. Either select one from the list or select Use Default Settings to use the environment(s) that were used to record the test(s).
A script corresponding to your selections appears in the Configuration field.
-
Click Copy to copy the script and paste it into the
configfile in your Azure DevOps account. -
Click All Done.
Jenkins Integration
You can work with tests and workflows created in Preflight directly in Jenkins by adding an automatically created IDs and texts into Jenkins.
To Integrate with Jenkins
-
In the Navigation bar, select your profile icon.
-
Click Account Settings > Integrations.
-
Click Connect to Jenkins button.
-
Log into your Jenkins account.
-
Click Manage Jenkins in the Jenkins sidebar then click Plugin Manager and search for Preflight under Available plugins.
-
In Preflight click Next > Build Step.
-
In your Jenkins project, under General Settings, click Add Build Step and then click Run Preflight Test.
-
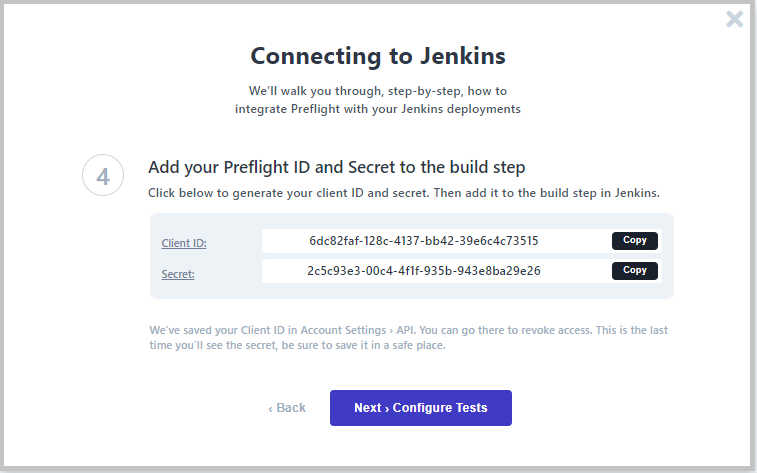
Click Next > Create Credentials.
-
Click Generate API Keys.
-
Copy the values of Client_ID and Secret and add them to the build step.
-
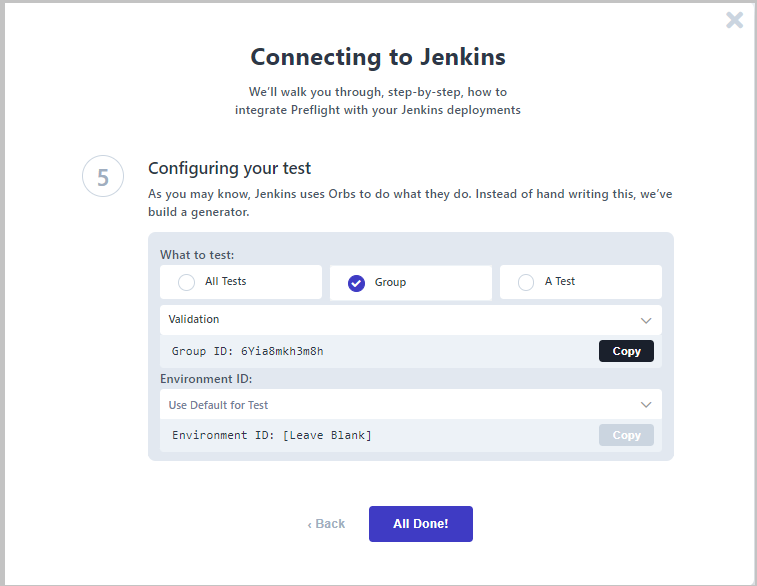
Click Next > Configure Tests.
-
Define whether you want to test:
- All tests - In Jenkins, leave Group ID and Test ID blank.
- A group of tests, and select a group from the list. Click Copy and paste the ID into the Group ID field in Jenkins.
- A single test, and select the test from the list. Click Copy and paste the ID into the Test ID field in Jenkins.
-
Define the environment to run the test on:
- Leave Use Test Settings to use the environment(s) that were used to record the test(s). In Jenkins, leave the Environment ID field empty.
- Select an environment from the list. Click Copy and paste the ID into the Environment ID field in Jenkins.
-
Click All Done.
Bitbucket Integration
You can work with tests and workflows created in Preflight directly in Bitbucket by adding an automatically created YAML script into a .yml file in your repository.
To Integrate with Bitbucket
-
In the Navigation bar, select your profile icon.
-
Click Account Settings > Integrations.
-
Click Connect to Bitbucket.
-
Go to the repository you’ve connected to Bitbucket and create a
bitbucket-pipelines.ymlfile if you haven’t got one already. -
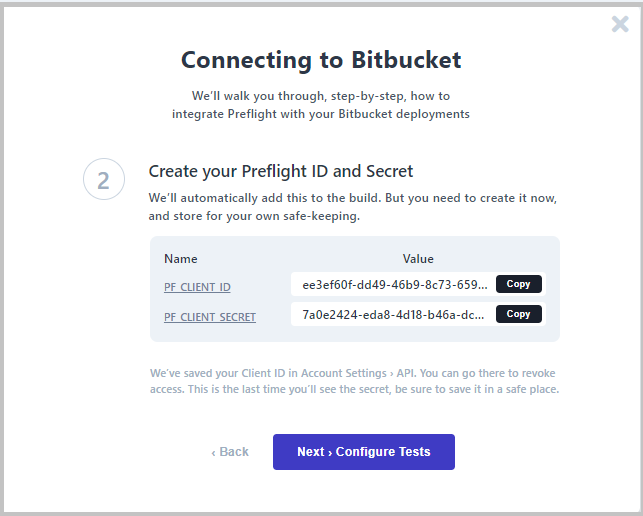
In Preflight, click Next > Create Credentials.
-
Click Generate API Keys.
-
Copy the values of PF_Client_ID and PF_Client_Secret and add them to and add them to Bitbucket.
-
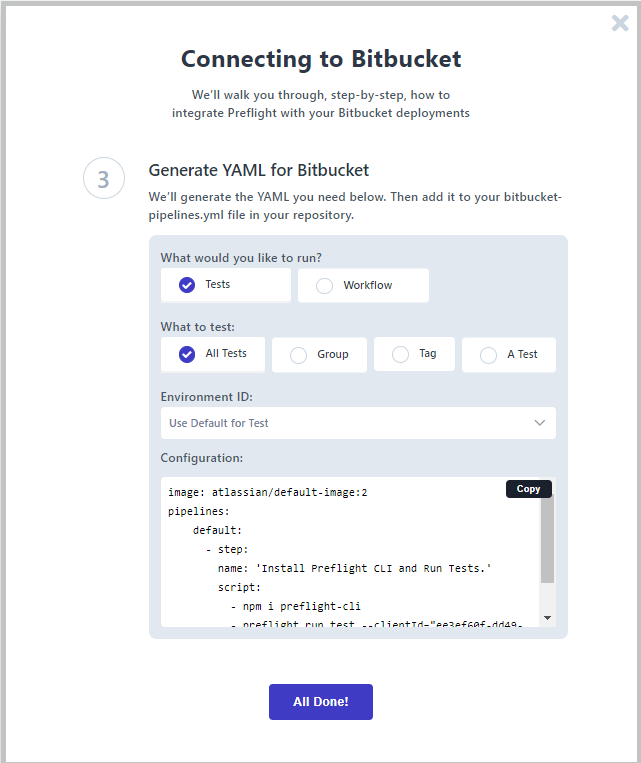
Click Next > Configure Tests.
-
Define whether you want to run Tests or Workflows.
-
For Tests define whether to test:
-
For Workflows define whether to test:
- All workflows
- A single workflow, and select the workflow from the list.
-
-
For both tests and workflows define the environment to run the test on. Either select one from the list or select Use Default Settings to use the environment(s) that were used to record the test(s).
A script corresponding to your selections appears in the Configuration field.
-
Click Copy to copy the script and paste it into the
bitbucket-pipelines.ymlfile in your repository. -
Click All Done.
CircleCI Integration
You can work with tests and workflows created in Preflight directly in by adding an automatically created YAML script to CircleCI.
To Integrate with CircleCI
-
In the Navigation bar, select your profile icon.
-
Click Account Settings > Integrations.
-
Click Connect to CircleCI.
-
Log into your CircleCI account and go to the Settings for the Project you want to add Preflight to.
-
Go to Environment Variables.
-
In Preflight, click Next > Authentication.
-
Click Generate API Keys.
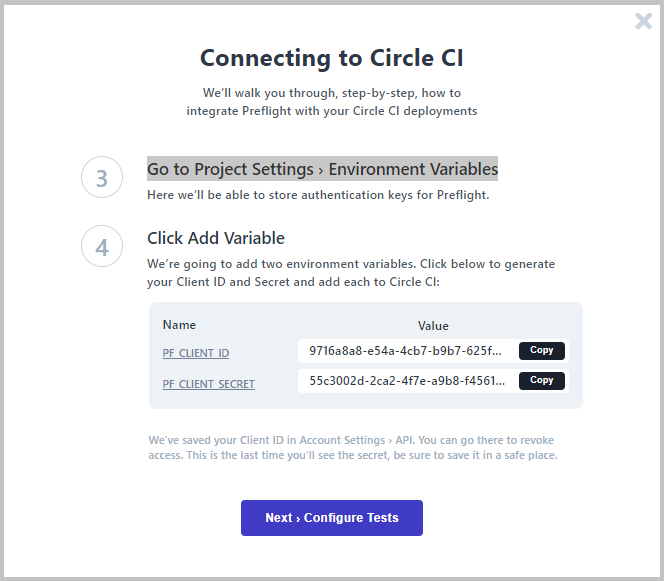
-
Copy the values of PF_Client_ID and PF_Client_Secret and in CircleCI click Add Variable and add them to the environment variables.
-
Click Next > Configure Tests.
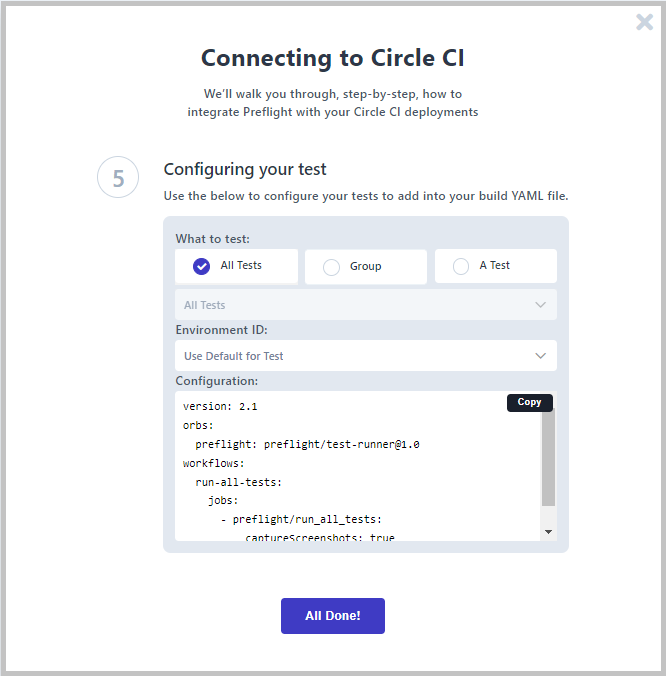
-
Define whether you want to run Tests or Workflows.
-
For Tests define whether to test:
- All tests
- A single test, and select the test from the list.
- A group of tests, and select a group from the list.
-
For Workflows define whether to test:
- All workflows
- A single workflow, and select the workflow from the list.
-
-
For both tests and workflows define the environment to run the test on. Either select one from the list or select Use Default Settings to use the environment(s) that were used to record the test(s).
A script corresponding to your selections appears in the Configuration field.
-
Click Copy to copy the script and paste it into the build's YAML file.
-
Click All Done.
GitLab Integration
You can work with tests and workflows created in Preflight directly in GitLab by adding an automatically created YAML script to your GitLab account.
To Integrate with GitLab
-
In the Navigation bar, select your profile icon.
-
Click Account Settings > Integrations.
-
Click Connect to GitLab.
-
Log into GitLab and go to the project you want to connect to Preflight.
-
Selected your project and on the Details page click Set up CI/CD on the right side of the Options bar.
-
In Preflight click Next > Create Credentials.
-
Click Generate API Keys.

-
Copy the values of Client_ID and Secret and add them to GitLab.
-
Click Next > Configure Tests.
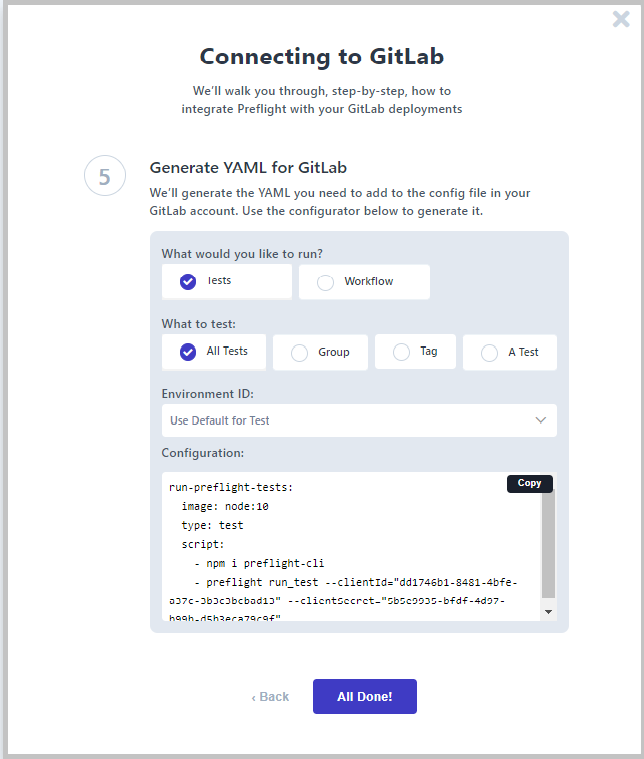
-
Define whether you want to run Tests or Workflows.
-
For Tests define whether to test:
-
For Workflows define whether to test:
- All workflows
- A single workflow, and select the workflow from the list.
-
-
For both tests and workflows define:
- The environment to run the test on. Either select one from the list or select Use Default Settings to use the environment(s) that were used to record the test(s).
A script corresponding to your selections appears in the Configuration field.
-
Click Copy to copy the script and paste it into the
configfile in your GitLab account. -
Click All Done.
Travis Integration
You can work with tests and workflows created in Preflight directly in Travis by adding an automatically created YAML script to your Travis .yml file.
To Integrate with Travis
-
In the Navigation bar, select your profile icon.
-
Click Account Settings > Integrations.
-
Click Connect to Travis CI.
-
Enter the name for the .yml file you want to connect to.
-
Click Next > Create Credentials.
-
Click Generate API Keys.
-
Copy the values of PF_Client_ID and PF_Client_Secret and add them to Travis.
-
Click Next > Configure Tests.

-
Define whether you want to run Tests or Workflows.
-
For Tests define whether to test:
-
For Workflows define whether to test:
- All workflows
- A single workflow, and select the workflow from the list.
-
-
For both tests and workflows define:
- The environment to run the test on. Either select one from the list or select Use Default Settings to use the environment(s) that were used to record the test(s).
- The browser(s) you want to test. You can leave the test defaults, test according to the global defaults that you defined, or select browsers from the list.
- The screen size(s) you want to test. You can leave the test defaults, test according to the global defaults that you defined, or select screen sizes from the list.
A script corresponding to your selections appears in the Configuration field.
-
Click Copy to copy the script and paste it into your YAML file.
-
Click All Done.
Related topics