Step Types
This topic describes the steps that are supported by Preflight, and includes:
Navigate
Navigates to the given URL. You can define cookies to use when navigating.
Click
Moves the mouse on the target element, then clicks.
From the Editor, you can define whether the click should be single, a right click or a double click. You can also choose whether to repeat the click. Preflight click's the area for the number of times you specify.
Type
Types text, usually into an input, text area, etc.
Select
Selects the value you provide from a list. For example:
Checkpoints
Preflight supports the following checkpoint step types:
Check Value/Textual and Grab Checkpoints
Checks the content of an element to see if the initial test condition matches. From the Editor, if you see that the checkpoint is capturing the incorrect value, click Re-Select to grab a new value instead.
You can also use checkpoints to store your variables, by defining it as a Grab Value. Preflight will store the value as {{checkpoint(n)}} where n is the numerical value of your checkpoint. For example, your first grabbed checkpoint value would be {{checkpoint(1)}}, and your second would be {{checkpoint(2)}} and so on.
Visual Checkpoints
Checks whether a visual screen element matches the original test. From the Editor, if you see that the checkpoint is capturing an incorrect element, click Re-Select to grab a new visual element instead.
You can edit the allowed difference between your source and the result, in the Max Allowed Difference [%] field. The default value is 5, which means that if the difference is less than or equal to a 95% match you will receive an error. Your Visual Check Result can be viewed in the Test Results tab.
If your original image was recorded on a screen size different from the size defined in your test settings, Preflight will replace the source of the visual to fit the test settings.
Visual AI Element Checkpoints
This is similar to Visual Checkpoints, but if you have integrated with Eyes Visual AI, in the Editor you will see additional options, as described in Visual AI Page Checkpoints, below.
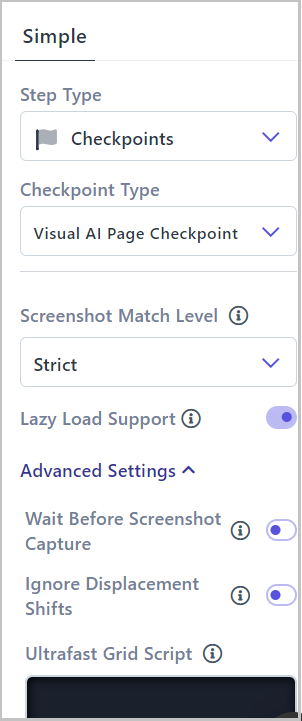
Visual AI Page Checkpoints
This option is only available for customers who have integrated with Eyes Visual AI. It enables you to capture an entire page. For more information about these settings see Defining Eyes Visual AI Settings.
From the Editor, you can change the following settings in the Simple tab:
-
Screenshot Match Level - Defines how Eyes compares the checkpoint image with the baseline image. For more information see Defining Eyes Visual AI Settings.
-
Lazy Load Support - When selected only the first part of the page will be loaded and the remaining parts will only be loaded when scrolling down.
Open the Advanced Settings section to change the following:
-
Screenshot Capture Mode - For Eyes Classic account customers only. Select the method to use to capture the page/iFrame. For more information see Defining Eyes Visual AI Settings.
-
Wait Before Screenshot Capture - Number of seconds to wait before capturing the snapshot. This may be useful if the page requires additional time to load before validation. For more information refer to step 6 in the Eyes documentation.
-
Ignore Displacement Shifts - You can use ignore displacements to hide differences that arise from content whose position on the page has changed, and focus on mismatches caused by actual changes in the content. This feature is useful for example, where content is added or deleted, causing other elements on the page to be displaced and generating additional differences. For more information refer to the Eyes documentation.
-
Ultrafast Grid Script - For Ultrafast Grid accounts only. Specifies JavaScript code to be executed by the browser that renders the page before the page is rendered.
File Upload
Uploads a file to a file upload input.
Send Browser Location
Sends a Geolocation to the website. You can choose any location.
Javascript
Runs the javascript on the current page in the targeted element. Click here for methods and tutorials.
Webcam
Simulates a webcam using a video feed. The video feed needs to be a direct URL of the video.
Email Action
An Open email action will open the latest email sent to the test email address.
Preflight will find the email with the subject that is closest to the subject that you have provided. If you don't provide a subject, this may slow down the test as Preflight may wait until it is confident enough to proceed.
A Close email action will close the email. If you need to store a value from an email, use Checkpoints.
Drag & Drop
This will allow you to drag an element to the target element.
Hover
Hover the target element.
Press Keys
Press keys. It can be any key you want as well as combined keys such as: Ctrl + S
Conditional Operators
Preflight does not have conditional operators but it does provide Workflows in which you can run tests sequentially. Workflows enable you to set up tests in a way that the condition you want is always there instead of creating conditional operators.
The problem with conditions in a test is it makes them unstable. Since you are relying on a dataset that's presented but not built to run in a specific way to test a specific scenario.
For example:
If the input's value is `apple`, do something
                If the input's value is `orange`, do something else
                Else do nothing
In this scenario above, we don't handle the value strawberry and it will break the test.
Instead, we can use Preflight's Workflows to use two tests to re-utilize and test exactly Apple and Orange differently
Workflow - Slice the Apple:
- Create a product named
Apple - Slice the
Apple
As you can see, you make sure the second test always gets Apple. The good thing is we can re-utilize the first test in another workflow.
Workflow - Squeeze the Orange:
- Create a product named
Orange - Squeeze the
Orange
Related topics