Full Website Test
A full website test automatically creates a list of all screens in your website based on the sitemap file and takes a screenshot of each page. These screenshots are used as a baseline in your first test. In future runs of the test, Autonomous compares pages to these baselines to identify pages that have changed, been added or removed, or did not load properly.
A full website test has the following benefits:
-
Automatically creates a test that covers the entire website or web application, providing complete coverage easily.
-
Ensures the complete and consistent display of all screens across various environments.
-
Detects both visual disparities and unexpected alterations on any page throughout the entire website or web application.
-
Automatically detects technical issues in any of the pages, including HTTP errors and page timeouts.
-
Automatically detects pages that were added or removed from the website or web application every time the test runs.
There is an option to create a custom flow test which should run when each screen is loaded. For example, if you need to log into a website or click "Accept Cookies" before opening a screen.
To Create a Full Website Test
-
In the , select Tests.
-
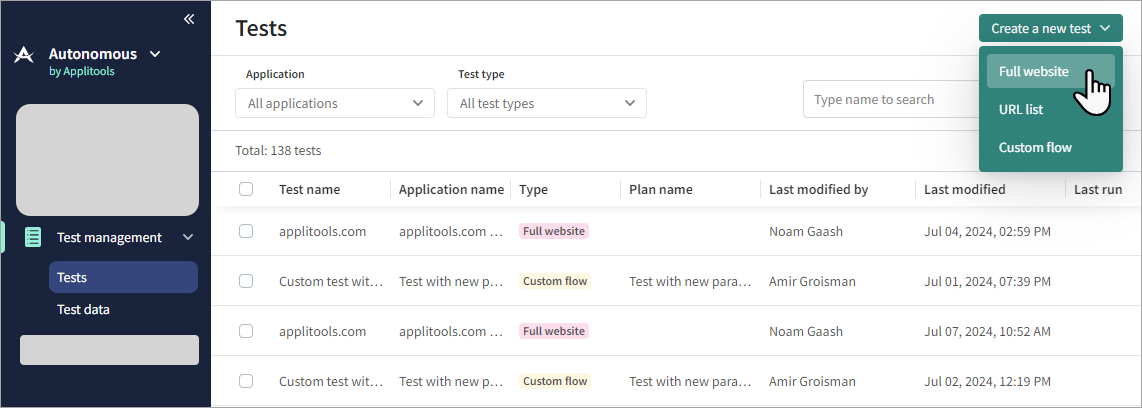
Click Create a new test > Full website.
-
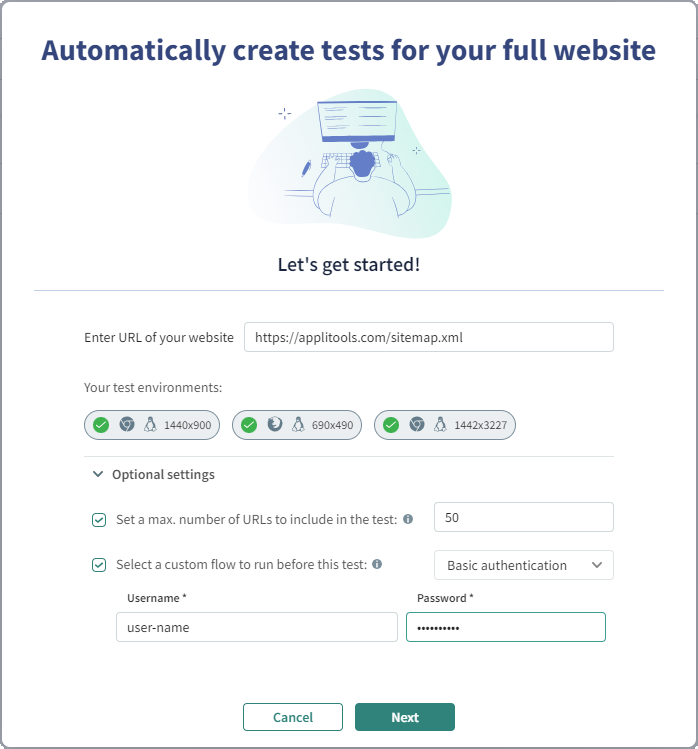
In the URL field, enter the home page of the website. The URL must be in the format https://www.example.com/. You can also enter the full path to the sitemap, or to a sub-directory, for example
https://applitools.com/docs/.If you specify a sub-directory, Autonomous uses the sitemap in the root directory and identifies URLs in the sub-directory. If the sub-directory has a separate sitemap, enter the full path to the sitemap for the sub-directory.
-
By default, the test uses the following browsers and devices:
-
Chromium, Linux, 1440 x 900
-
Safari, Mac, 1200 x 857
-
Microsoft Edge, Windows, 1080 x 1920
If required, click on an item to remove it from the test. After you create the test, you will be able to add or modify the browsers and devices in the test plan.
-
-
To limit the number of URLs included in the first run of the test, click Optional settings, select Set a max. number of URLs to include in the test and enter a number of URLs. This is an easy way to quickly run the first test and get an indication of the results for a limited number of URLs. This option only applies the first time that the test runs; in future runs the test will include all URLs in the sitemap and additional URLs will be marked as New in the results.
-
If you have a trial account, there is a limit to the number of tests you can include in a full website test.
-
To enter basic authentication or run a custom flow before each URL opens, click Optional settings, choose Select a custom flow to run before this test, and select one of the following:
-
Basic authentication and enter a username and password. Basic authentication adds an authentication encode string in each URL, so that the user name and password are included in the request to the browser.
-
An existing custom flow test, (see Custom Flow Test) for example, a test that selects "Accept Cookies" which should run when each URL in the test opens.
-
-
Click Next.
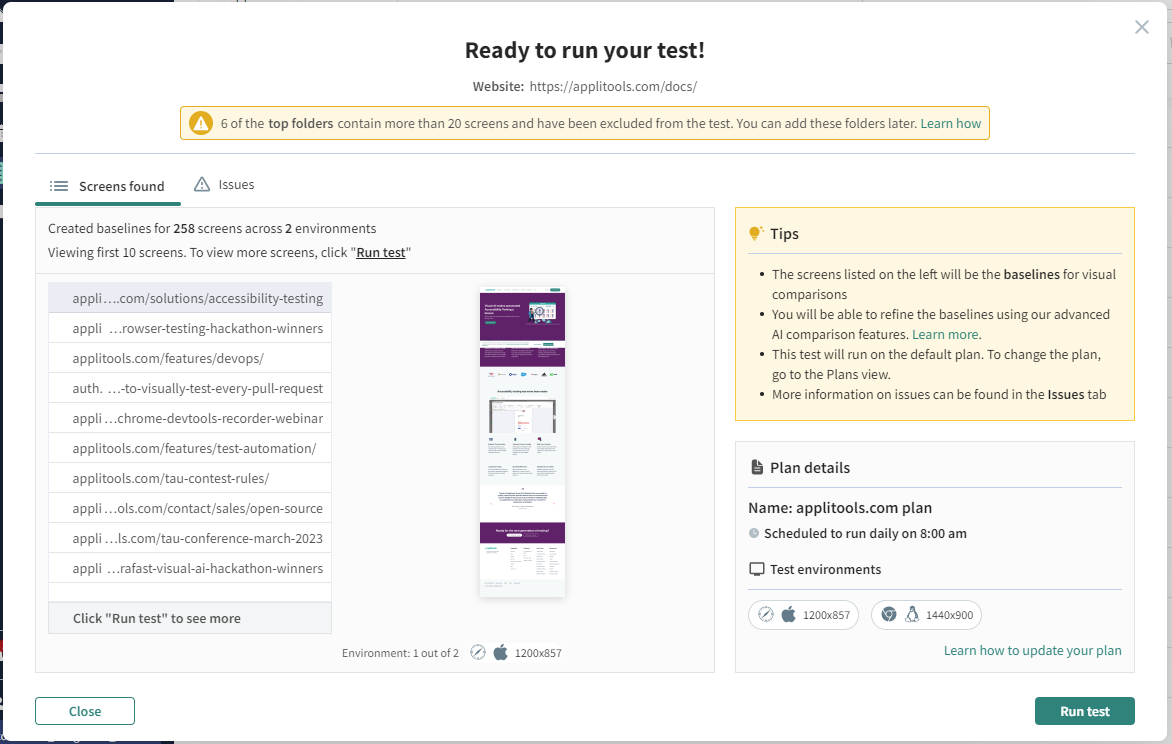
Autonomous creates baselines for each screen in the website. A baseline is an initial image which will be used to compare to future runs of the test to identify differences. The number of baselines is based on the number of URLs in the test, multiplied by the number of browsers & devices.
Once the baselines have been generated, Autonomous displays thumbnails of the first 10 baselines in the default browser and environment.
-
If required, select a plan for the test. The plan determines the schedule, devices, and browsers that will be used for future runs of the test. For details, see Plans
-
Once the baselines have been created, click Run Test.
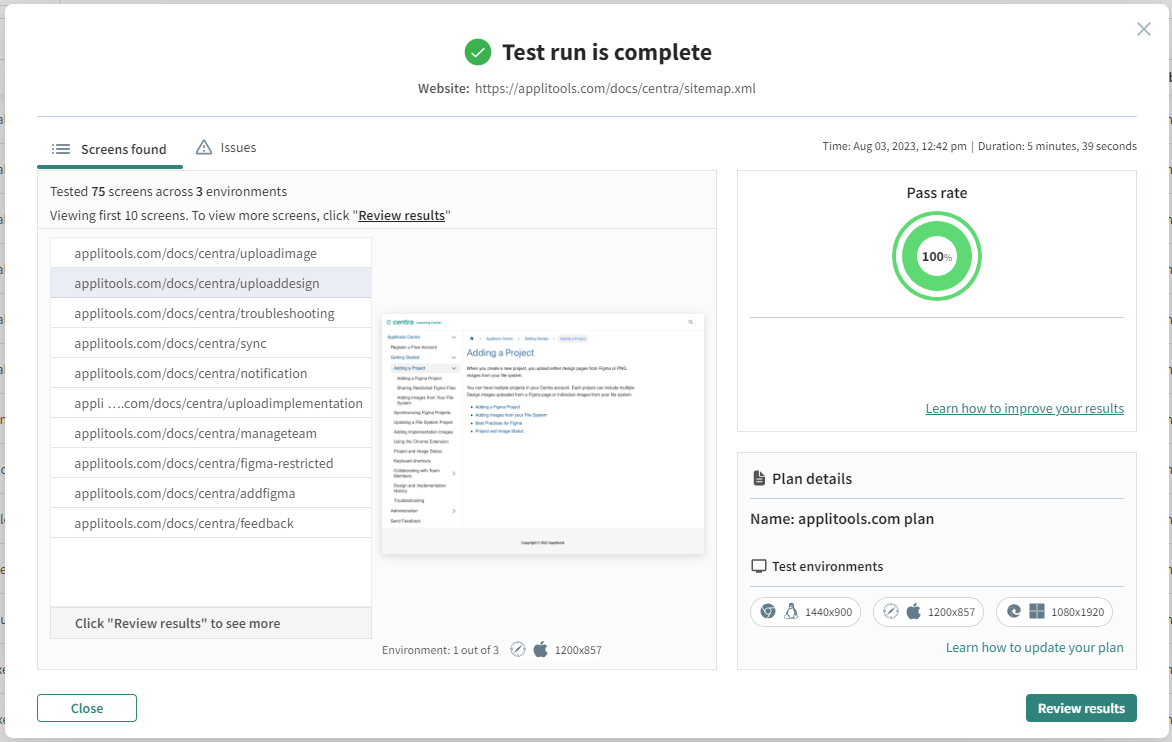
Autonomous runs the test to create a checkpoint for each screen, which is compared to the baseline to identify issues and screens that have changed.
-
The Test is Complete window provides a preview of the first ten screens in the test. Click Review Results to view the complete results in the Results page.
Modifying an Existing Test
To view or modify an existing full website test, in the , select Tests and click on the test that you want to view or modify.
Like many pages in Autonomous, at the top of the Test Details page there are breadcrumbs to show where you are in the system. Click on the word Tests next to the name of the test or Back to list to return to the Tests page.

Modifying Test Details
The top part of the Test Details page has a collapsible section that lists test details. If you modify this information the system prompts you to save your changes; changes are not automatically saved.

You can modify the following Test Details:
-
Test name – The name of the test as it is displayed on the Tests page. By default this is the base URL of the test.
-
Start URL – This field is not relevant for a full website test and cannot be modified.
-
Description – Optional description of the test.
-
Plans – (Optional) The plans associated with the test. The plan determines the test schedule and browsers & devices. A test can belong to multiple plans. For further information, see Plans.
-
To set other advanced settings for the test, click
. For details, see Advanced Test Settings.
Flow to Run Before Steps
You can enter basic authentication or run a custom test before each URL in a test. For example, if you need to close a popup or click "Accept Cookies" before each URL in the test.
To enter or modify basic authentication or run a custom flow, click Select a flow to run before the screen URLs and select one of the following:
-
Basic authentication and enter a username and password. Basic authentication adds an authentication encode string in each URL, so that the user name and password is included in the request to the browser. When using basic authentication, the authorization header includes the endcode in every request.
-
Existing customized test and select a Custom Flow Test, for example a test which selects "Accept Cookies", which should run when each URL in the test opens. The list of available custom flow tests is based on the plans that the test belongs to. If the custom flow does not run successfully, for example a popup does not appear, the test will ignore the custom flow test for that URL.
By default, the start URL of a custom pre-flow test will be ignored. If you do not want to ignore the start URL, in the test's advanced settings, enable Use the custom flow's start URL for details, see Use Custom Flow's Start URL.
Excluding or Adding URLs
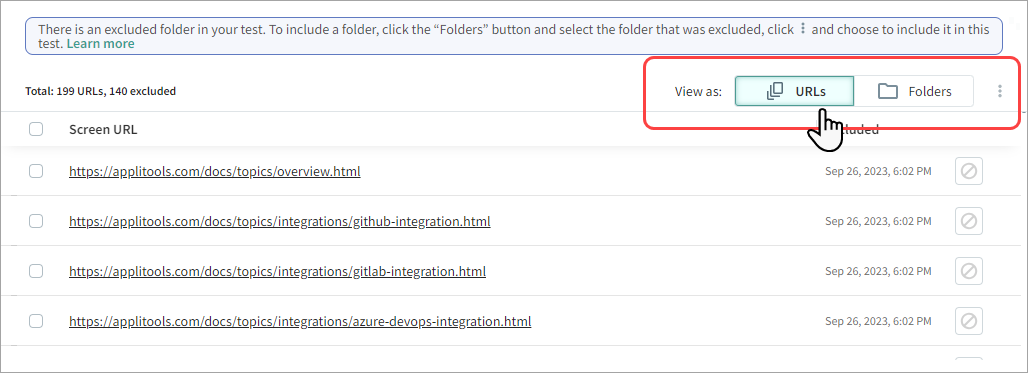
You can select URLs or folders to include or exclude from the test. For example, if your sitemap or a sub-directory contains more than the maximum number of allowed URLs, no screens will be included in the test and you need to manually select which URLs or folders should be included.
When you run the test, if there are new URLs in the sitemap they will be added to the test unless they are located in a folder that has been excluded.
To Exclude URLs or Folders:
-
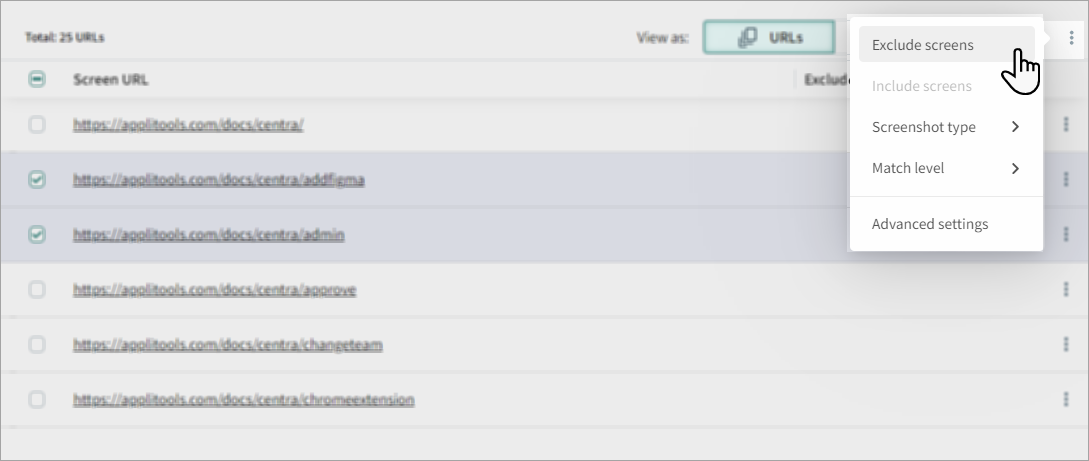
In the Test Details page, select whether to view as URLs or Folders.
-
Select URLs or folders that you want to exclude and click
> Exclude screens.
Setting the Match Level
The match level determines the way that Autonomous compares the checkpoint image with the baseline image. You can change the match level for any screen in the test. For details see Match Level.
Setting the Screenshot Type
The screenshot type determines what will be included in the screenshot (Full screen, viewport, or region). For details, see Screenshot Type.
To set the screenshot type for a single URL, next to the URL click and select a screenshot type.
To select the screenshot type for multiple URLs, in the list of URLs, select the required URLs and click > Screenshot type and select the required type.
Running the Test
You can run a test on an ad-hoc basis without running a plan. When you run a test directly from the Test settings page, you need to select browsers and devices for the run. This is an easy way to view the results of changes you made to a test and create a baseline without waiting for the next scheduled run.
To Run a Single Instance of a Test
-
At the top of the Test Settings page, click Run.

-
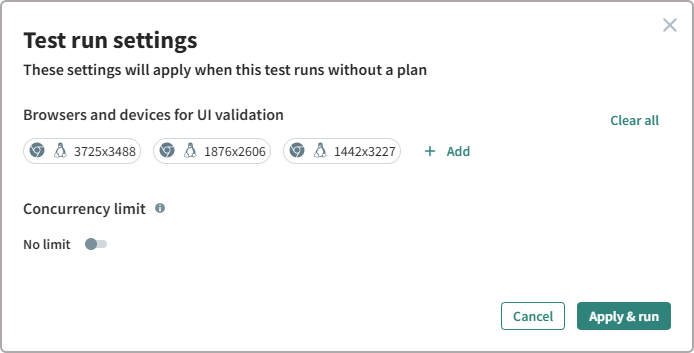
By default, the browsers and devices that were last selected are displayed. Click on an item to remove it, or click Add to add new browsers and devices.
-
If required, set a concurrency limit to control how many screenshots the test generates simultaneously. Without a concurrency limit, the test will take screenshots for multiple URLs at the same time. With a concurrency limit of 1, the test will generate one screenshot before proceeding to the next.
-
Click Apply and run.
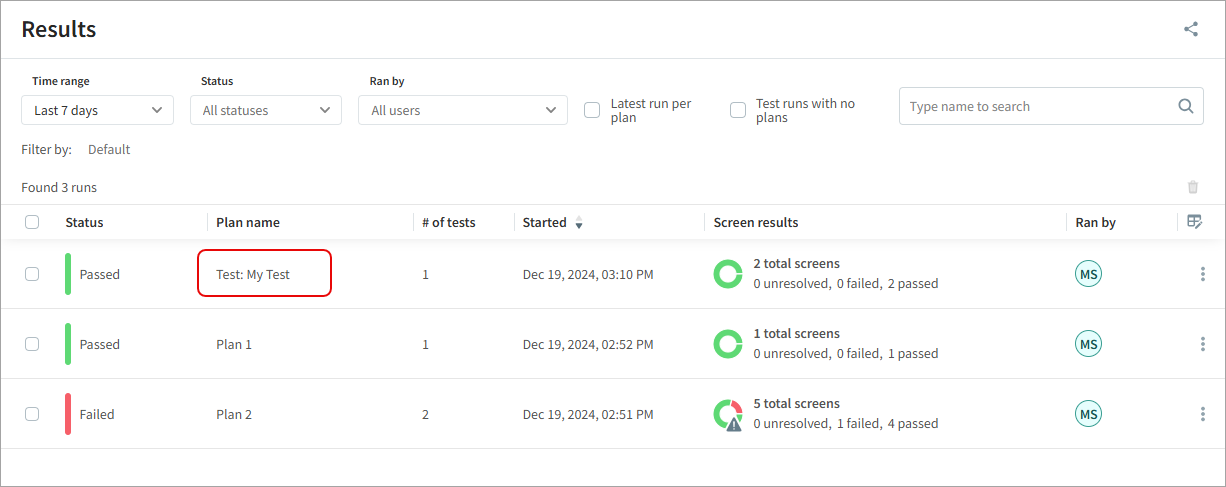
Once the test has run, you can view the status in the Results window. If the test is run without a plan, the Plan name column will list the name of the test in the Plan name column.
Modifying Advanced Settings
To set or modify advanced settings for the test or for specific URLs in the test, see Advanced Test Settings.
Troubleshooting
The following are some common problems you may encounter when creating or running a full website test.
Problem:
Autonomous is unable to find the sitemap, or there is no sitemap file.
Solution:
By default, Autonomous looks for a sitemap file in the root directory, the file must be named sitemap.xml or listed in the robots.txt file. This error appears if Autonomous is unable to find a sitemap file. To resolve this problem try one of the following:
-
Add a sitemap file named sitemap.xml to the root directory.
-
If there is a sitemap file with a different name or in a different location, when creating the full website test, enter the full path to the sitemap file instead of the root directory.
-
If there is no sitemap file and you are unable to create one, create a URL list test instead of a Full Website Test. See URL List Test
Problem:
The test timed out
Solution:
This could be caused by a network issue, try again later.
Problem:
An error message appears that not all screens were included in the test or one or more directory was excluded from the test.
Solution:
There is a limit on the number of screens that can be included in a single test. The maximum number is based in your Autonomous plan. If your sitemap includes too many URLs, try one of the following:
-
Manually select URLs that should be excluded from the test. For details, see Excluding or Adding URLs.
-
Create a separate test for each sub-directory
-
Contact Support to increase the number of URLs allowed in your plan
This error is caused because the server timed out before it was able to process the complete sitemap, this is normally because the sitemap is extremely large.
If the sitemap includes multiple nested sitemaps, you should create a separate full website test for each nested sitemap. When you create the test, instead of entering the URL of your website, enter the full path to a nested sitemap.
Problem:
An "Unknown Error" occurred when creating a test for a sub-directory (for example http://www.mynewssite.com/sport)
Solution:
When creating a test for a sub-directory, Autonomous uses the sitemap in the root folder to identify screens in the sub-directory. If the sub-directory has a separate sitemap, when you create the test, enter the full path to the sitemap for the sub-directory.
