Editing Actions
Using Preflight's Editor you can:
- Edit individual actions (steps) including changing the input text to use and the action type
- Reorder actions
- Copy and paste actions
- Cut and paste actions
- Delete actions
- Add new actions to a test
Click here for information about comparing test results.
Editing Actions
It is possible to break a test by editing its actions, therefore, we recommend that you duplicate your test before editing.
To Edit Actions
-
In the Navigation bar, select Tests.
-
Click the test you want to edit.
-
Click Editor.

The Editor has three playback modes
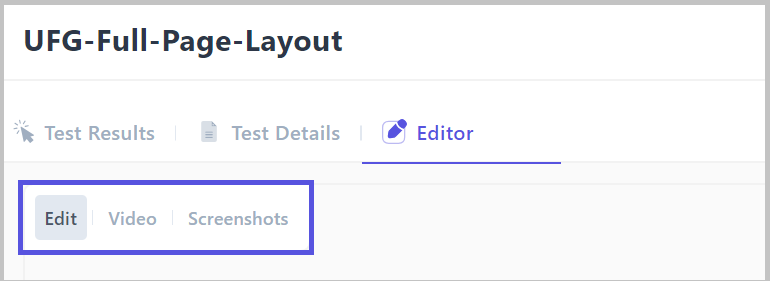
- Edit mode. This is the default mode where you can view a video of the test and use a control panel to control the playback, as described in the next step.
- Video mode. Shows a video of the desktop and the test without the control panel for controlling playback.
- Screenshots mode. Displays each individual screenshot that comprises the test. In this mode you can jump between:
- Full Screenshot - displays the entire page
- Element Only - the element where the action is occurring
- Highlight Element - displays the entire page while highlighting the element where the action is occurring.
In all three modes the actions are displayed in a control panel at the bottom of the page.
- Click Original Recording to view the original recording of the test or watch a recording from a specific date by clicking the date drop-down menu and selecting a date.
-
In Edit mode, click the play icon to view a recording of your test. Use the control panel below the video to:
- Control the playback speed.
- Repeat the playback of a particular action.
- Jump to the beginning of the action.
- Jump to the next action.
- View the type of action using the icons displayed on the progress bar.
-
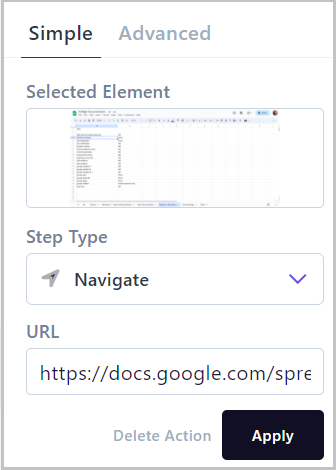
To edit an action's details, while playing back, when the action you want to edit is being displayed, click the >> icon to open the action. The action's details are displayed in the Simple panel on the right. Use can also locate an action in the Actions tab below the control panel. You may need to scroll down to view this. Clicking the >> button above the action jumps to the action in the recording and displays the details in the Simple tab.
-
Use the Step Type field to change the action's type and update the relevant values.
-
Select Optional to continue the test even if this action fails.
-
Click Advanced to edit more advanced settings, including:
-
Selectors - It is recommended to add as many different selectors as possible so that your tests will be less likely to fail. Some examples would be:
XPath: //button[text()=' Log in ']
CSS: button[id='login-2']
-
Checkpoint Name
-
Wait before (seconds) - The number of seconds to wait before proceeding.
-
Whether the Target element is in an iFrame
-
Whether the Target element is in an Shadow DOM
-
Various Data Settings:
- Context Awareness
- Computer Vision
- Selectors (secondary selectors)
-
-
Click Apply.
Reordering Actions
Use the Actions tab below the control panel to change the order the actions are performed.
To Reorder Actions
- Click Reorder in the top right of the control panel.
- Drag each action to the required position.
- Click Exit Reorder to complete the reordering.
Copying Actions
Use the Actions tab below the control panel to copy an action and paste it in a different position in the test.
To Copy Actions
- Click Select.
- Select the action that you want to copy.
- Click Copy.
- Click the + icon at the location where the action should be pasted.
- Click Paste Action.
Cutting Actions
Use the Actions tab below the control panel to cut an action and paste it in a different position in the test.
To Cut Actions
- Click Select.
- Select the action that you want to cut.
- Click Cut.
- Click the + icon at the location where the action should be pasted.
- Click Paste Action.
Deleting Actions
Use the Actions tab below the control panel to delete an action from the test.
To Delete Actions
- Click Select.
- Select the action(s) that you want to delete.
- Click Delete. The action(s) are deleted.
Alternatively, you can delete an action from the Simple panel.
- While viewing the video of the test, when you see the action you want to delete and click >> in the control panel to edit it. The action's details are displayed in the Simple panel on the right.
- Click Delete Action (located next to the Apply button).
Adding Actions
Use the Actions tab below the control panel to add a new action to the test.
To Add Actions
- In the Actions tab, click the + icon at the location where the action should be added.
- Click New Action.
- In the Simple tab, define the step type and update the relevant values.
- Select Optional to continue the test even if this action fails.
- Click Apply.
Related topics