Walkthrough: Running a visual UI test and reviewing test results
This article will give you hands-on experience of using Eyes. It will walk you through an example of writing and running a visual UI test using Selenium and the Eyes SDK. It will also walk you through reviewing test results using the Eyes Test Manager. The main steps of the workflow that this article covers are:
- Setting up the test execution environment
- Running a test for the first time
- Reviewing the results of a second test run
- Creating a batch of two test results
- Adding some differences to a test
- Running the test that was created with differences
- Resolving the differences in test results
- Running a test against the updated baseline
- Using the Test Editor to investigate and resolve differences
The Hello World web page
The test we're going to run executes a visual UI test on an example web page created by
Applitools.
If you go to
https://applitools.com/helloworld2,
you will see the following screen:
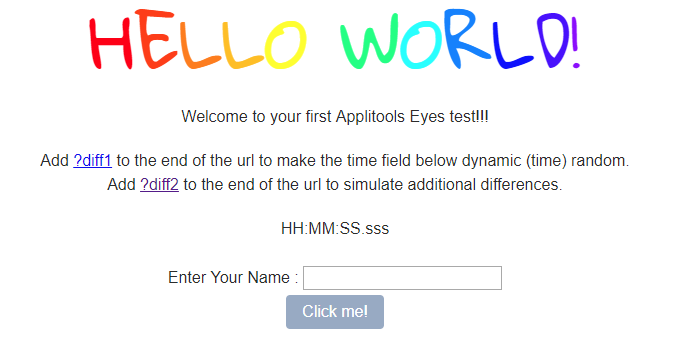
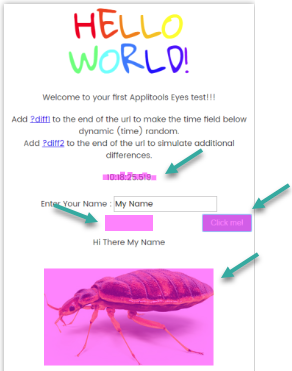
Enter your name in the text field, and click the button that says "Click me".
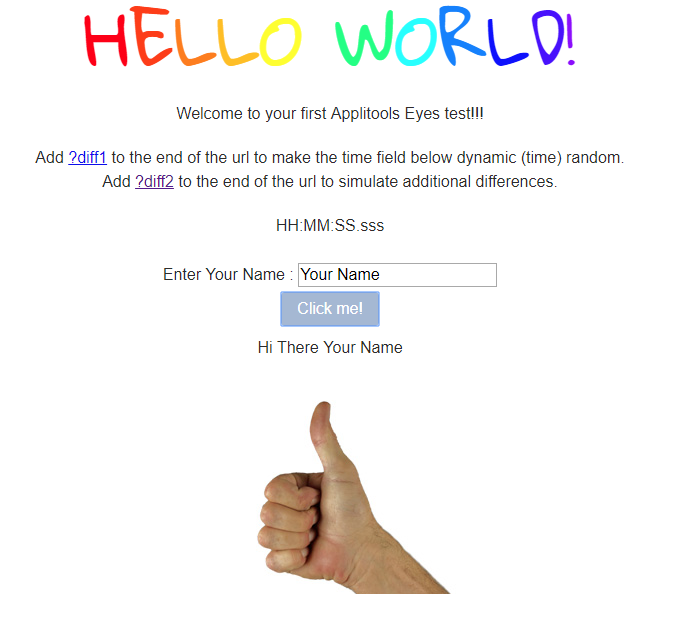
The screen will now look like this:
Let's automate it!
The test code we're going to write will do exactly what you just did, but will also take screenshots after each keyboard or mouse event so that we can visually validate them to ensure that the result is consistent every time we run the test.
Here is an outline of what the test code does:
- Open the web page
- Take an initial screenshot
- Enter some text
- Take a screenshot after the text is entered
- Click the button
- Take a screenshot after the click
Our program will run this test twice, once with a viewport size of 1024 x 768 and a second time with a viewport size of 500 x 900.
This example is an extended version of the example used in the overview article Writing tests with the Eyes SDK . Since the code is very similar, we won't explain the code here.
Setting up the test execution environment
To run these tests you will need:
- An Aplitools Eyes API key
- A Chrome Driver
- The Eyes SDK
- The example code
Getting your API key
In order to execute Eyes tests, you must obtain an API key that identifies your account and provides you with test execution permissions. If you don’t have an Applitools account yet, or if you don’t know how to obtain your API key, follow the instructions in the article How to obtain your API key.
In order for the test to run, you have to pass the value of the API key to the Eyes SDK. There are several way to do this. If you only have one key, then the simplest way is to set an environment variable to the value of the API key and then read the value in the code and use the SDK to set the API key. If you call the environment variable APPLITOOLS_API_KEY then the SDK will use the value of that environment variable unless you define it explicitly in the code.
Getting the Chrome Driver
In order to run the test, you will need a chrome browser and the chrome webdriver. To obtain these, follow the instruction here: https://sites.google.com/a/chromium.org/chromedriver/getting-started. Make sure you install the webdriver in a folder that appears in your PATH environment.
Getting the SDK
You will need the Eyes SDK for the programing language of your choice:
In Java, if you have a test environment that uses Maven, You can add the following dependency in your Maven .pom file to load the Eyes Java Selenium Library.
<dependencies>
   <dependency>
      <groupId>com.applitools</groupId>
      <artifactId>eyes-selenium-java3</artifactId>
      <version>RELEASE</version>
  </dependency>
</dependencies>
Alternately:
- Download the latest version of the Eyes Java Selenium SDK from here and extract it to a folder of your choice.
- Add the extracted files to your path.
npm init
npm install eyes.selenium --save-dev
npm install selenium-webdriver
npm install chromedriver
In Visual Studio, in the NuGet console Browse for Eyes.Selenium and install it
Run the following command in a shell
  composer require applitools/eyes.sdk.php:dev-master

If you don't have any installed packages create a composer.json file with the following content
{
"require": {
"applitools/eyes.sdk.php": "dev-master"
}
}
And then run:
composer install
Run the following command in a shell
	pip install eyes-selenium
Run the following command in a shell
	gem install eyes_selenium
Getting the code
Copy the code below in your preferred language into a file of the appropriate type. Note that this code is structured differently from the way tests are usually constructed since the aim here is a guided walk through the entire workflow. The typical way of structuring the code is described in detail in the article Writing visual tests with the Eyes SDK.
Customizing the code
If you have a on prem Eyes server or dedicated cloud, then set the value of the serverURLstr variable to the URL of your Eyes server:
The code is designed to run on a screen with a width of about 1200 and a height of about 1000. If a viewport size error occurs when you start the test, then your screen may be too small. Either use a larger monitor or change the values of the variables viewport_size_landscape and viewport_size_portrait in the code to reduce the size of the browser that is opened.
Running a test for the first time
Now let's run the test for the first time. After you start running the test in your IDE or console, a browser will open, and you will see it changing its size twice - once for each viewport size. After the test completes, on your run time console you should see output similar to this:
New Baseline Created: 3 steps
results at https://eyes.applitools.com/app/batches/00000251885689413314/00000251885689412658?accountId=mvdQ30vIlkiU8F-usoJS4w~~
New Baseline Created: 3 steps
results at https://eyes.applitools.com/app/batches/00000251885689375737/00000251885689375389?accountId=mvdQ30vIlkiU8F-usoJS4w~~
If you see "All steps passed" or "Test Failed" instead of "New Baseline Created", then this means that a baseline already exists for this test and application name. This may be because you or someone else from your team has run this example previously. To fix this, change the test name to something unique by editing the following line, which appears near the top of the code:
Run the test again and when you see the "New Baseline Created" on the console, copy the first URL from the console and paste it into a browser. The Test Manager will start up with the test already loaded (you might need to log in first). Alternatively, if the Test Manager is not yet open in a browser, type the URL
https://applitools.com/users/login
into your browser, log in, and the Test Manager will start. If the Test Manager is already open before running the test, click the 'update batch' button
 to see the new test results.
In the Batch entries list on the left, you should see two batch entries - one for each test in this test run. Click on the first entry, click the "test details view" icon
 , and you will see a row with the test name:
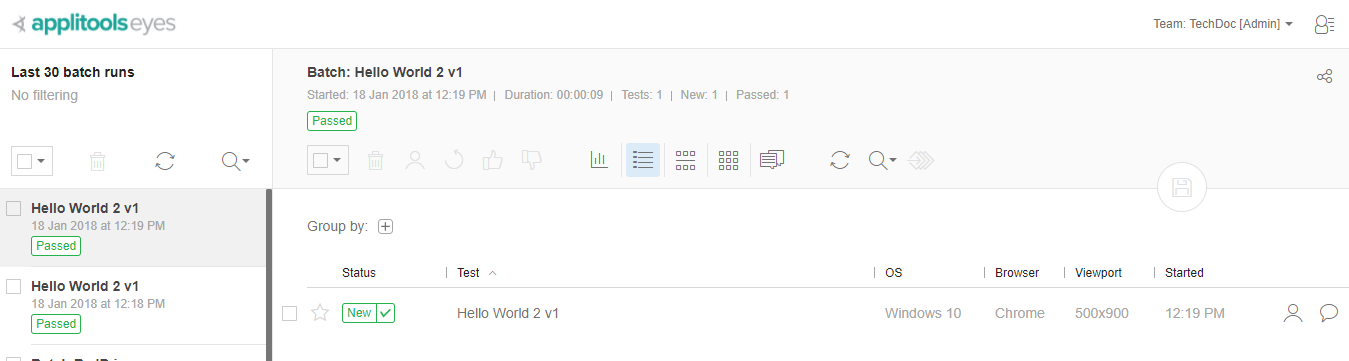
Click on the test name, and the Test Manager will display the steps of the test.
Note that the batch has a status of
 ,
the test has a status of
,
the test has a status of
 , and all three steps have a new step
icon and an "Accepted"
, and all three steps have a new step
icon and an "Accepted"
 icon in the top left corner. This is what we expect. The test and steps are marked as new since there was no existing baseline for this test, so Eyes has automatically accepted all the steps and saved the baseline.
Reviewing the results of a second test run
Now run the test again. This time you should see something like this on the console:
All steps passed:     3 steps
results at https://eyes.applitools.com/app/batches/00000251885688837901/00000251885688837518?accountId=mvdQ30vIlkiU8F-usoJS4w~~
All steps passed:     3 steps
results at https://eyes.applitools.com/app/batches/00000251885688825008/00000251885688824836?accountId=mvdQ30vIlkiU8F-usoJS4w~~
Click the 'update batch' button
in the Test Manager, and the steps of the test should look like the screenshot below.
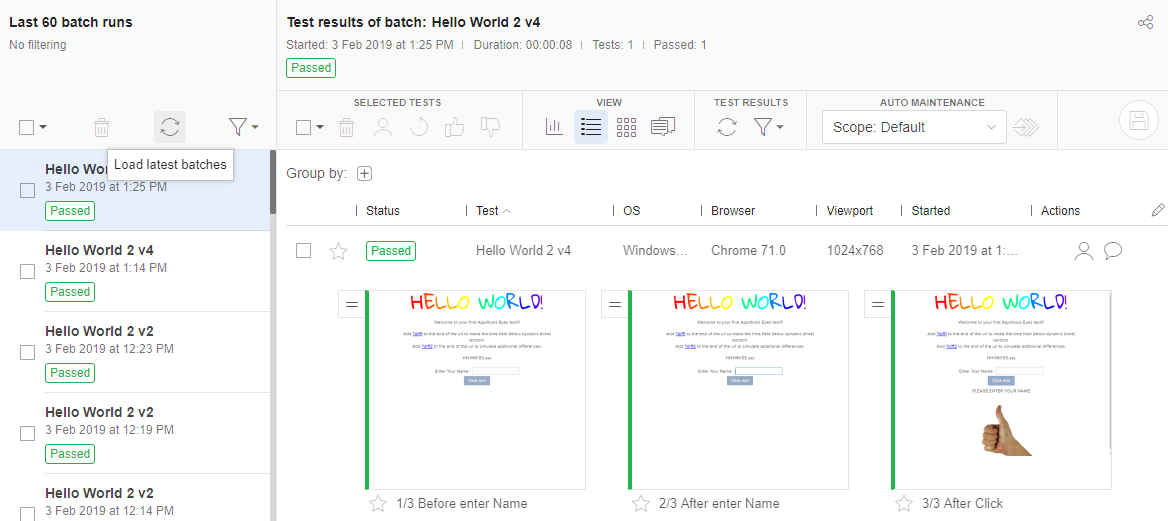
Note that the batch and test status have a value of "Passed" and that all the steps have the matched icon
 in the top left corner of the step image, indicating that the checkpoint image matched the baseline image. This time, however, there is no default "Accepted"
icon.
Apart from in the first run, this icon will only be displayed for a step after you explicitly accept that step.
in the top left corner of the step image, indicating that the checkpoint image matched the baseline image. This time, however, there is no default "Accepted"
icon.
Apart from in the first run, this icon will only be displayed for a step after you explicitly accept that step.
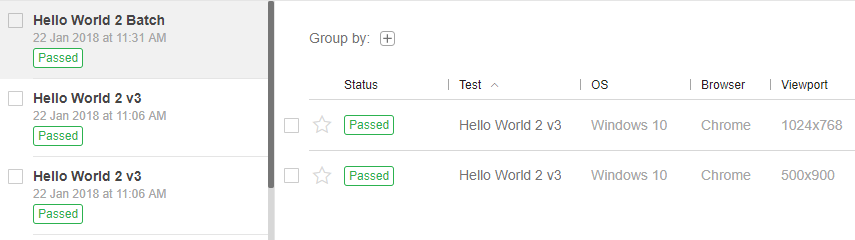
Creating a batch of two test results
Until now, the two test runs appeared in the Test Manager as two separate entities in the batch list. The runs are actually the same test (the same sequence of events) that was run twice with a different viewport size each time, so it makes sense to batch them together. To do this, change your code as instructed below:
Now, if we run the test again and look at the Test Manager, we see a single entry named "Hello World 2 Batch", and there are two test results (two rows) on the main panel. If you look at the "Viewport" column, you can see the viewport that was used in each run.
Adding some differences to a test
Now let's change the test so that there will be some differences for Eyes to discover. We'll do this in a few ways in order to demonstrate the three basic types of mismatches that Eyes can detect.
- We'll change the graphic look of the application by adding "?diff2" to the website URL - this is just a trick in the web application that forces it to produce some changes for this demo.
- We'll remove the first checkpoint from the code.
- We'll add an additional checkpoint after the last checkpoint of the test.
In the code sample, there is a function called
test01Changed()
that implements these differences. Change the value of the flag in your code as described in the comment below, so that the changed version of the function will be executed instead of the original function.
Running a test with differences
Now run the test again. This time, in the console we will see the following lines that Eyes indicate that Eyes has detected four failed steps:
Test Failed: 4 steps, matches=0 missing=1 mismatches=3
results at https://eyes.applitools.com/app/batches/00000251889993686590/00000251889993686356?accountId=mvdQ30vIlkiU8F-usoJS4w~~
Test Failed: 4 steps, matches=0 missing=1 mismatches=3
results at https://eyes.applitools.com/app/batches/00000251889993671516/00000251889993671329?accountId=mvdQ30vIlkiU8F-usoJS4w~~
In the
Eyes Test Manager,
after clicking the 'update batch' button
, we will see the single batch entry with a status of
 . Click on it, and you will see the two test results in the main panel, both with a status of
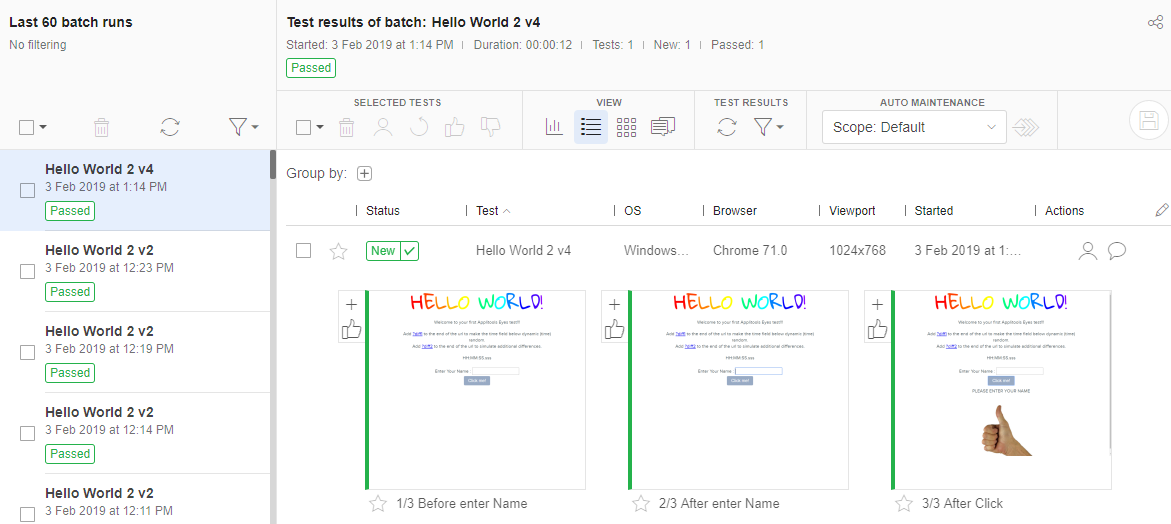
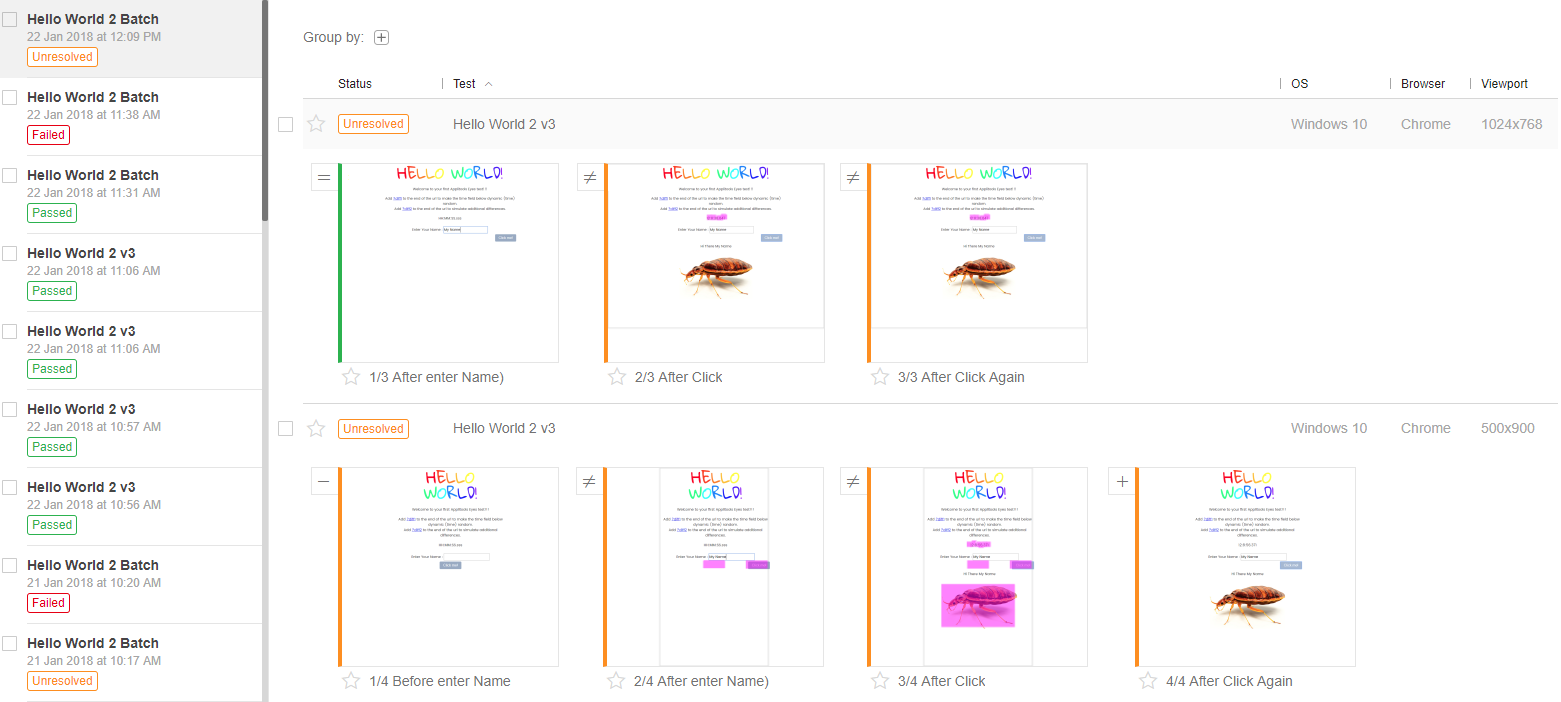
 . Click on the first test so that it expands to show all of its steps. The screenshot below shows what you should see.
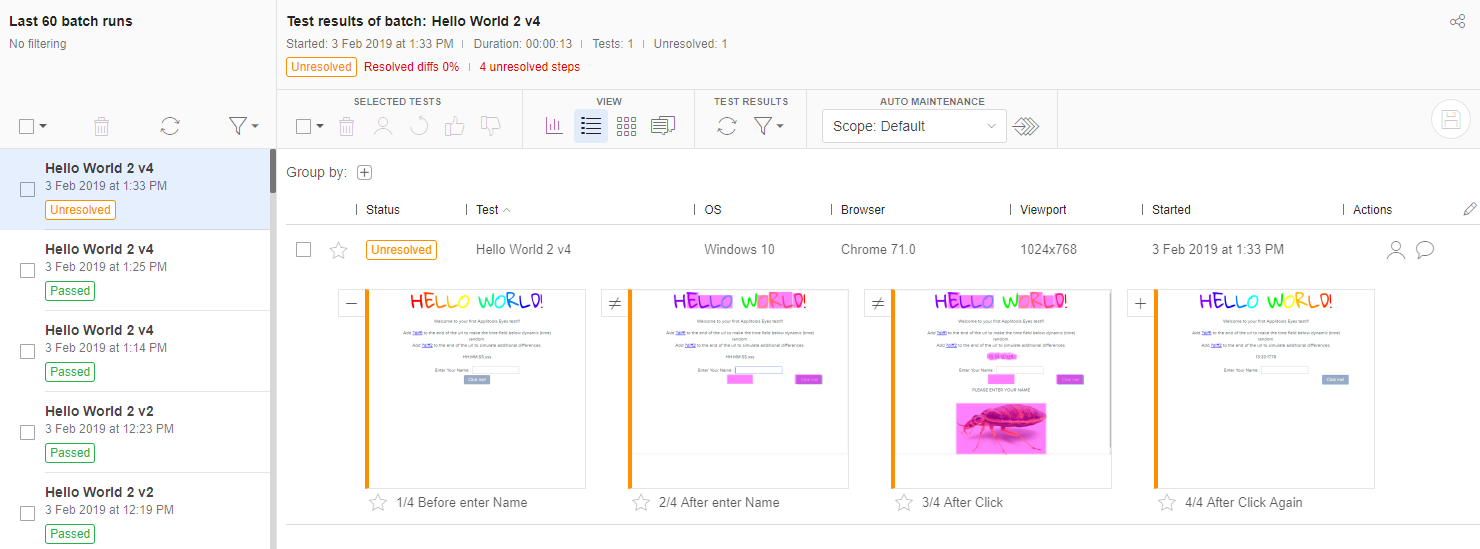
The first step has a "missing step"
 icon in the top-left corner since we skipped the first checkpoint. The second and third steps have a "mismatch"
 icon caused by differences in the output which we forced by adding the "?diff2" to the URL. The fourth step has a "new step"
 icon because of the extra checkpoint that we added at the end of the test.
Resolving the differences in test results
Since Eyes has found differences, the next step is to resolve them. As a minimum, resolving the steps means going through each step that has an "unresolved" (orange) status and either accepting it or rejecting it. Accepting a step means that the step is considered as having passed the check. In the case of a mismatch
or new checkpoint
, accepting a step also means that the baseline should be updated from the checkpoint image. When a checkpoint is marked as missing
, accepting the step means that the baseline image should be removed from the sequence of images. Rejecting a step means that the step has failed the check, and the baseline image will either remain as is. See the article
Reviewing test results and updating the baseline
for a full description of what Eyes does when you accept and reject steps.
For the purposes of our demonstration, let's accept all the steps in the first test (with the viewport of 1024x768) and reject all the steps in the second test (with the viewport of 500x900).
When you place your cursor over the step thumbnail, a toolbar will be displayed as shown below.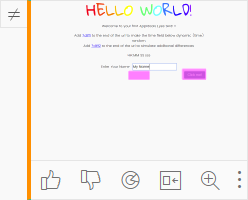
Click the
button to accept the step or the
 button to reject the step.
Some things to note:
- As long as any step in a test has an "unresolved" (orange) status, the test and batch status will be Unresolved.
- Once all the steps of a test have been accepted or rejected, the test will have a status of "Passed" with a check mark if all the steps passed, or "Failed" with a check mark if one or more steps are marked as failed. The batch status is Failed since one of the tests failed.
- Both the test passed status and the test failed status have a "diffs" status to indicate that differences were found in at least one step.
- There are various indicators on the screen which signal that you have made changes to the baseline and that these changes need to be saved. These are labeled in the screenshot below:


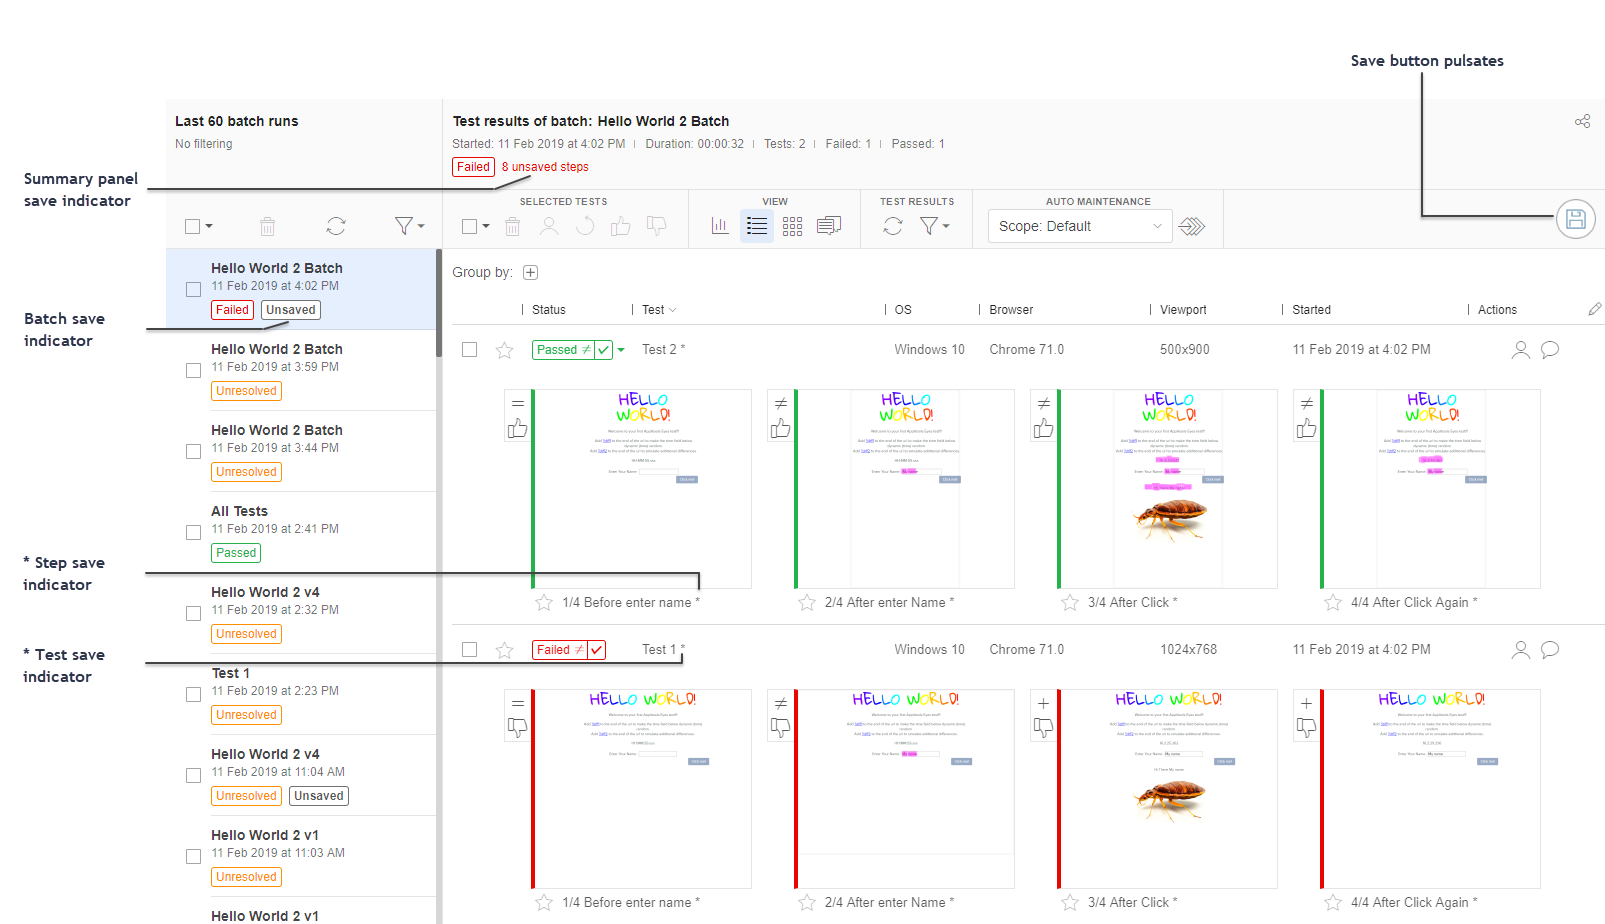
Note the labels that indicate some of the places where the need to save is signaled.
Click the 'Save baseline' button
 and note the changes in the saved status.
Running the test against the updated baseline
If you run the test again, then the second test will fail as it did previously. This is what we expect since we rejected all the steps, so the baseline was not updated and therefore Eyes found the same mismatches.
Examining the results of the first test, we can see that there are now only three steps instead of four. Eyes has not displayed a step that signaled a missing checkpoint since we accepted the missing checkpoint. The last step is no longer marked as "new" since we accepted it. However, the second and third tests are still showing differences.
In the next section, we will look at some additional tools that Eyes provides to investigate and resolve these differences.
Using the Test Editor to investigate and resolve differences
Click on the thumbnail of the second step of the first test (1024 x 768), and the Test Manager will open the "Test Editor". We will only briefly describe a few of the basic functions available in this screen. For a full description see Test Editor overview .
The Test Editor displays a single step of a test at a time and provides possible operations. It also provides a way to move the display to other steps in the test (described further below).
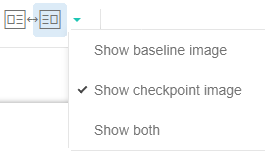
Viewing the checkpoint or baseline image
The Test Editor can display either the checkpoint image of the step, the baseline image, or both images side by side. Use the image toggle control
 to choose between these views by clicking on the triangle on the right of the control and selecting the view you want. You can also press the
T
key to toggle between the checkpoint and baseline images.
to choose between these views by clicking on the triangle on the right of the control and selecting the view you want. You can also press the
T
key to toggle between the checkpoint and baseline images.
Identifying the differences
There are several ways to make the differences in a step stand out:
- If the “diffs” layer is enabled, then the impacted pixels are colored in pink.>
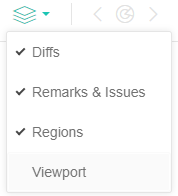
 If the pink areas are not visible, then you can enable them by enabling "Diffs" in the 'select visible layers' control
 .
.
-
If you click the 'Highlight differences' control
 , then the Test Manager will draw animated circles in the area with the diffs of the checkpoint image.
-
You can use the zoom in on next
 or previous
 differences controls to zoom the display to the next or previous mismatch area. You can do the same thing by using the shortcut keys
<
and
>
(without pressing shift, so the actual keys are
,
and
.
but the arrow keys are easier to remember).
differences controls to zoom the display to the next or previous mismatch area. You can do the same thing by using the shortcut keys
<
and
>
(without pressing shift, so the actual keys are
,
and
.
but the arrow keys are easier to remember).
- Some types of differences can easily be noticed if you toggle quickly and repeatedly between the checkpoint and baseline images (very convenient to do with the T key).
Looking at the diffs found in steps two and three of the first test result, you will see that they are caused by a text area that displays the time of day, which is different on every run, so Eyes detects a mismatch.
Eyes provides several ways to handle this situation. We will describe two of these in the next section.
Ignoring dynamic data in application pages
The Test Manager provides a tool you can use to mark a region on the checkpoint and baseline images to indicate how that area should be processed when comparing the two images. When you apply the region, you can immediately see the way that it impacts the differences in the results. When you save the baseline, these regions are saved in the context of the baseline and Eyes will apply the special processing to those regions in future test runs.
We will demonstrate two options that will help us solve the mismatches found because of the dynamic time field in the second and third steps.
In the Test Editor, click the 'Add region' button
 . A crosshair will appear on the screen. Move your cursor to the top-left of the text field with the time, click and drag the cursor to the bottom-right of the text field, and then release the cursor. You should see the following:
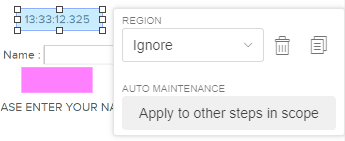
If the text to the right of the rectangle does not say "Ignore", then click on the triangle and select the ignore option. At this point, disregard the Auto Maintenance option - Apply to other steps in scope - and click outside of the drop-down menu to close it. For more information on the Auto Maintenance feature see Automated test maintenance. .
.
You have now told Eyes that this area should be ignored when the images are compared in future test runs. You can see that the pixels that were previously highlighted in pink are no longer highlighted. The request to ignore these areas will apply to all future tests after you click the 'Save' button. Typically, you click Save only when you have finished all of you reviewing. Otherwise, you will impact tests that run in the meantime. Changes you make are persisted when you make them, not when you click save.
Click the reject button
 (we don't want to change the baseline image). This does the usual reject action and also moves the Test Editor to the next (third) step.
In the third step, add another region in the same place as in the second step, but this time, instead of defining an "Ignore" region, define a "Layout" region. This tells Eyes that it should check that the text field is there and in the correct position and layout, but that it should ignore the actual text.
Reject this step as well. Hint: You can use the shortcut R key to do this (and the A key is used to accept the step).
Finally, click the 'Save' button
 to save all the changes to the baseline and to return to the Test Manager.
Run the test again and all the steps in the first test should now have a matched status. The second test will still have the same status it had in the previous runs.
Note that the batch status is Unresolved since we have not yet resolved the second test. If you like, go ahead and resolve it the same way we resolved the first test.
Moving to other steps in the test
We've already described how you will automatically be taken to the next step in the test when you click accept or reject in the Test Editor. You can also move from test to test using the time line displayed at the bottom of the Test Editor screen. On the time line, each step is represented by a small rectangle whose color indicates the status of the step ( unresolved , accepted or rejected ). You can click on any rectangle to view that step. You can also use the time line controls to the left of the time line to jump to the previous step, the next step, the previous unresolved step or the next unresolved step.

The play button simulates the test run by displaying all of the steps one after the other along with the user mouse and keyboard interactions that were made during the test.
Keyboard shortcuts
We've mentioned several keyboard shortcuts that can help you work efficiently in Test Manager. To see all the available shortcuts, click ? in one of the Test Manager screens.
Summary
Congratulations! You now know how to:
- Run tests written with the Eyes SDK.
- Batch multiple tests together.
- Identify the three different types of mismatches.
- Use the Test Editor to investigate and resolve the mismatches in a step and move from one step to another.
- Use “ignore” and “Layout” regions to prevent false diffs due to dynamic data.