Working with GitHub
Once you have configured the GitHub repositories, you can use your CI and GitHub in the usual way. A CI job is normally triggered by a push to your repository, and this, in turn, runs your Eyes tests.
The Eyes/GitHub integration is based on the GitHub all commits. When there is an open all commits, Eyes adds the following functionality to your GitHub workflow:
-
When your CI initiates a build that includes an Eyes test, Eyes detects that the run is associated with a GitHub pull request and searches for a baseline to use as a reference. Eyes checks for a matching baseline in the following order:
- On a branch that corresponds to the repository name and source branch defined by the all commits.
- If there is no such branch, Eyes creates a branch and populates it with the latest baseline for that test from the repository name and target branch defined by the all commits
- If there is no such baseline, Eyes marks the test as New.
-
Eyes sends GitHub status information that is displayed on the GitHub All Commits panel. Lines with an Eyes test status have an Applitools icon
 .
. -
There is an option to have the name of the Applitools team included in the check name, this allows you to divide batches by Applitools team and use the same pipeline whenever a commit is done, even on the same repository (monorepo configuration), to enable this option, contact Applitools support.
-
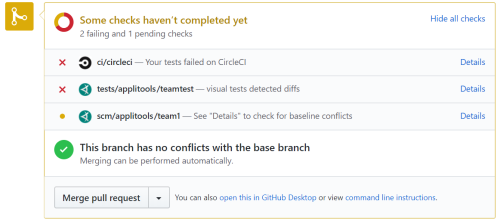
The item labeled tests/applitools indicates the results of the Eyes test that ran as part of this build. In this case, the
 icon indicates that some differences were found and need to be resolved.
A
 icon indicates that all of the Eyes tests passed.
If you click on the Details link, the browser switches to the Test results screen of the Eyes Test Manager, showing the results of the tests in the most recent build related to that all commits.
If you click Accept on all of the steps of all of the tests, the
 icon is replaced with the
  (passed) icon in the GitHub pull panel.
 -
The item labeled scm/applitools represents the merge conflict status. In this example, the
 icon indicates that baseline conflicts have not yet been checked.
A
 icon indicates that there are merge conflicts. After you resolve any conflicts, Eyes sends an updated status to GitHub, and the
  next to the scm/applitools item is replaced with a
  icon.
Click on the Details link to open the Merge branches screen in the Test Manager.
See How to review branch differences and resolve them for more details.
-
You can merge the baseline changes of the source branch with the target in one of the following ways:
- Merge the GitHub all commits as usual. This merges the Git files and, once this has completed successfully, Eyes is notified that it should merge the Eyes test baselines.
- Click on the Merge button on the Merge branches screen in the Test Manager (enabled only after all conflicts have been resolved). This operation is independent of any merge process in Git and occurs immediately, even if the GitHub merge has not been done.
By default, code merge is blocked if there are unsaved changes to the checkpoint as the SCM will not be marked as Passed. To enable or disable this setting, contact Customer Support.
How to review branch differences and resolve them
Merging an Eyes source branch with a target branch results in adding new baselines to the target branch or updating its existing baselines according to baseline changes found in the source branch. Changes can include both updated baseline images and new, changed, or removed annotations (e.g. an added ignore region).
When working on a branch that is a child of another branch (the parent branch) and the child branch doesn't have a baseline, Eyes will use a fallback baseline from the parent branch. For details, see Baseline management on a child branch.
Eyes knows how to compare two baselines and determine whether they can be merged automatically or whether user intervention is required. For example, an ignore region added to a source baseline step that did not change in the target baseline can be automatically added to the target baseline, but if another ignore region was added to the same step in the target baseline, user intervention is required to determine whether to keep only one of the added regions or both of them.
As described above, the item on the GitHub pull request page marked scm/applitools/team-name indicates the merge status of the Eyes baselines in the source branch.
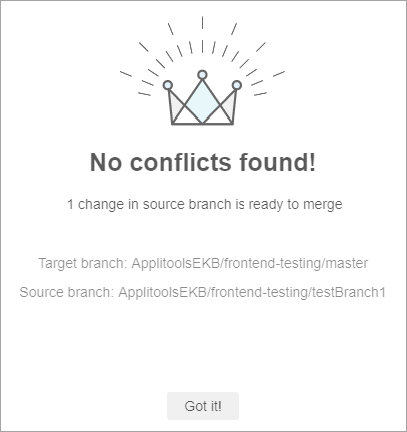
Click on the Details link for this item, to view the Test Manager Merge branches page preloaded with the source and target branches derived from the pull request. If there are no conflicts, then the Test Manager displays a pop-up window to confirm this.

Click Got it! to close the pop-up.
The Merge branches page shows all of the baselines that have changed in the source branch with respect to the target branch. That is, either they don't exist in the target branch, or they exist in the target branch but have changed in the source branch. Note that baselines that have changed in the target branch and were not changed in the source branch are not listed and are ignored in the merge process.
On the far left of each row, the merge status can show a value of Conflict, indicating that the baseline requires user intervention.
You can resolve conflicts by using the buttons on the right of each row, which allow you to choose whether to replace the target baseline with the source baseline or keep the target baseline unchanged. Choosing one of these changes the merge status from Conflict to Resolved. You can also compare the two baselines and manually edit the source baseline to include the changes from both branches.
An alternative to resolving each test individually is to use the checkboxes at the start of each row to select rows and then use the buttons in the toolbar at the top-left of the window to choose how to resolve the selected rows. The toolbar also has buttons that allow you to delete selected baselines in the source branch or undo the resolution made for the selected baselines.
Once you have resolved all conflicts, the merge status of the scm/applitools item in the GitHub pull request page changes to green (passed), and you can proceed to merge the branches, either from within the Test Manager by clicking the Merge button, or via the GitHub pull request page, as described above.


