Native Mobile Library
Introduction
Many mobile test frameworks, such as Appium, XCUI, Espresso, and WebDriver IO, have a number of limitations that prevent them from taking full-page screenshots of native applications. The Applitools Native Mobile Library utilizes sophisticated algorithms to overcome these limitations and produce a full page screenshot of your application to validate it.
Native Mobile Library is currently only available in iOS.
Prerequisites
Before using Native Mobile Library, you need to instrument your application. You can do this dynamically if the application is already compiled, as part of an automatic build process, or statically if you have access to the source code.
Dynamically instrument your application with the Applitools Native Mobile Library
This option is recommended and is suitable if you need to add the library to an app that has already been compiled. Every time you run this option, the latest version of the library is installed.
iOS
Download the applitoolsify instrumentation tool from the Applitools Jfrog repository: https://applitools.jfrog.io/ui/native/mobile/ios/applitoolsify/release
Add execution permissions to applitoolsify:
chmod +x applitoolsifyRun one of the following commands as suitable for your operating system:
./applitoolsify-ios-macos-x86_64 <app/ipa file path here>
./applitoolsify-ios-Linux-x86_64 <app/ipa file path here>
./applitoolsify-ios-macos-arm64 <app/ipa file path here>
applitoolsify-ios-win-x86_64.exe <apk file path here>If you are running on a local real device, you need to re-sign the app. For details, see Re-signing the App.
This step is not required if your target is a simulator or a real device in the cloud.
Statically compile the Applitools Native Mobile Library with your application
iOS
Download the Applitools Native Mobile Library from the Applitools Jfrog repository:
https://applitools.jfrog.io/ui/native/mobile/ios/framework/release/Applitools_iOS.xcframework.zipIn the Xcode Project Navigator, add the file
Applitools_iOS.xcframework.In the Xcode target settings, under Frameworks, Libraries, and Embedded Content, tap
+and select Applitools_iOS.xcframework.Embed and sign.
Build and run the app.
In the console, verify that Applitools_iOS loaded appears at launch.
Re-signing the App
If you are running on a local real device, after instrumenting the app you need to re-sign the app. To do this you need a signing certificate and provisioning profile. Re-signing is not required if your target is a simulator or a real device in the cloud.
Download the IOS App Signer from https://dantheman827.github.io/ios-app-signer/
Install and open IOS App Signer.
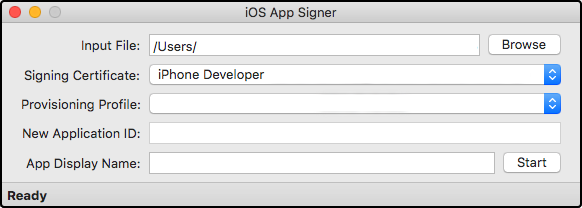
Click Browse and navigate to the app you are testing.
Enter the signing certificate and provisioning profile and click Start.
Testing with Applitools Native Mobile Library
Before the app is launched, in your test suite you need to configure the Applitools Native Mobile Library one time before the driver creation. Use the Eyes.setMobileCapabilities static method and pass your driver capabilities, Applitools apiKey, Applitools ServerUrl, and Proxy as parameters.
The Applitools library must be loaded when the app starts, and cannot be loaded into an already running app. Therefore, when using appium, do not use the following capabilities, unless you know that the Applitools library was already loaded into the app:
autoRelunch=falsenoReset=truefullReset=false
DesiredCapabilities caps = new DesiredCapabilities();
Eyes.setMobileCapabilities (caps, apiKey, serverUrl = optional, proxy = optional)
If you use the public cloud, ignore the serverUrl parameter.
To take a full page screenshot, use the following code:
eyes.check(Target.Window())
Taking a System Screenshot
There are some rare cases where the test flow is outside of the application context, and therefore the Applitools Native Mobile Library cannot take a full page screenshot. To overcome this, use the useSystemScreenshot method and the SDK will take the screenshot instead:
eyes.check(Target.Window()).useSystemScreenshot()