Assigning tests to team members
Use the Assign test feature to assign test results listed in the Batch details view to team members. You can assign a single test result or several test results to a team member. You can also unassign tests from team members.
The assignment is persistent across all test runs (a test or a session with the same name and environment).
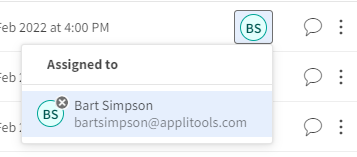
Eyes Test Manager highlights the icon in the Actions column to indicate that test results are assigned to team members. Eyes also informs team members about any test results assigned to them by sending an email notification. Hover over the highlighted icon and the team member's name and email address are displayed in a pop-up window.
Assigning a single test result
- Click Assign test in the Actions column next to the relevant test result.
- Enter the name of the team member in the Assign to dialog box.
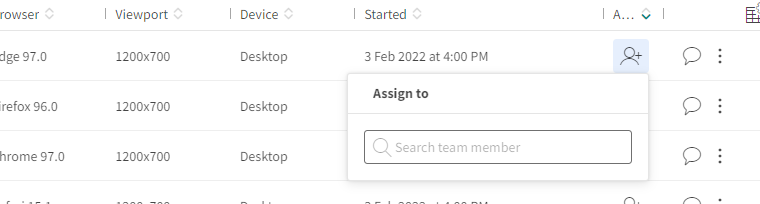
As you type, Eyes Test Manager filters the content of the drop-down list to only show team members that match the text string. - Click the team member's name in the list.
Assigning multiple test results
Tip: Where a batch contains a large number of test results, use the selection, filtering and grouping features to reduce the number of test results on display.
- Select two or more test results from the Test results table using the check-box options.
- Click Assign test in the view's toolbar.
- Enter the name of the team member in the Assign to dialog box.
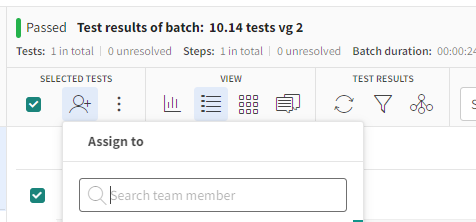
As you type, Eyes Test Manager filters the content of the drop-down list to only show team members that match the text string. - Click the team member's name in the list.
Unassigning tests
You can unassign users from a test by hovering on the user and clicking the x next to the user name.
- Click the highlighted icon in the Actions column next to the relevant test result.
- Click x next to the user name.
- Select two or more test results from the Test results panel.
- Click Assign test in the view's toolbar.
- Click x next to the user name.
The Test Manager removes the assignment from each of the selected test results and the icon is no longer highlighted.
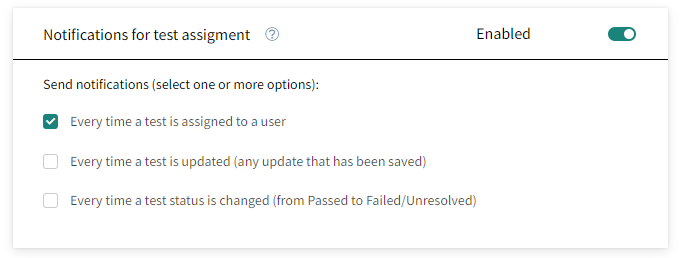
Configuring assignment notifications
The team administrator can configure email notification on test assignment. Use the Page navigator to display the Admin page. (You can only see this page in the Page navigator if you have Admin privileges.)
- Click on the Teams title.
- Click on the row of the team you want to configure.
- Click on the Integrations tab.
- In the email section go to Notification for test assignment and select the option that is appropriate for your team (default is to send email notification on manual test assignment).