So, you want to know about visual testing for your Vue.js app in Storybook using Applitools? So did I!
In this article, I’ll walk you through a complete, step-by-step guide of how to visually test a Vue.js app with Storybook and Applitools.
If you’re not already familiar, Applitools is an automated visual regression testing framework. It focuses on the visual aspects of your app and plays a major role in exposing the visual differences between baseline snapshots and both current and future snapshots.
Applitools integrates with dozens of development and testing frameworks, such as Cypress.io, Storybook, and Selenium. It provides SDKs for use in your projects to seamlessly communicate and interact with Applitools, in order to send both baseline and test screenshots.
So, let’s get started with some visual UI testing. Your visual testing project will depend on Vue.js, Storybook, and Applitools. You will also need the node.js tools. So, firstly, make sure you’re familiar with the following and have them installed on your machine:
Before we immerse ourselves in writing code, let’s look at how Applitools and Storybook work together.
How Applitools works with Storybook
No matter whether you use Vue.js, React, or Angular, Storybook doesn’t offer any extension points for third-party frameworks, such as Applitools, to integrate with. The Applitools team worked around this limitation by providing the Applitools Eyes Storybook SDK.
The behavior of this SDK is that once you run it locally on your machine, it will first start by collecting all stories in the application, run them all via the Storybook engine, generate DOM snapshots for each and every story, and finally upload these snapshots to the Applitools Eyes server. Here’s a visual of this flow:
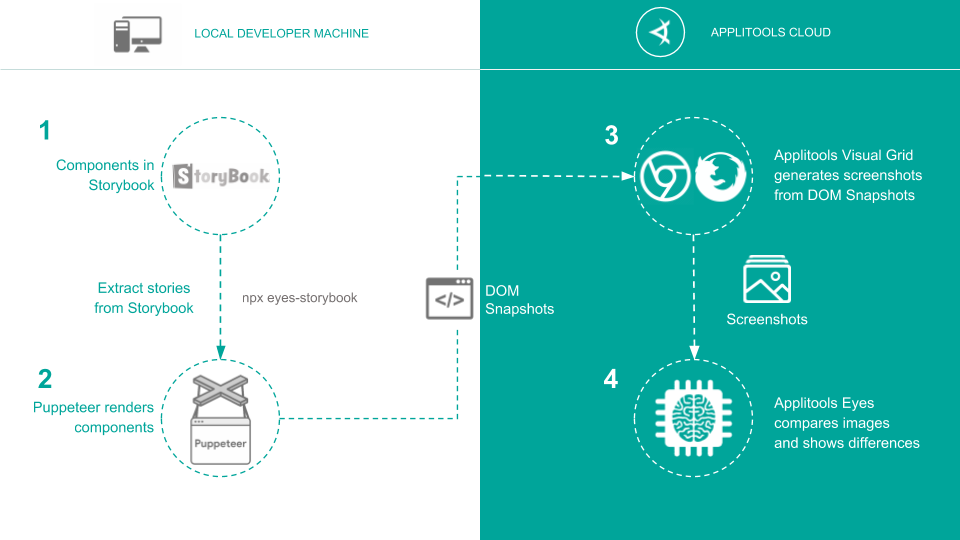
On the server, the tests are run and an actual image snapshot is generated. Each and every snapshot is compared to a baseline snapshot (if one exists) and results are displayed on the Test Manager Dashboard.
This kind of integration provides a smooth experience in terms of writing Storybook stories. Nothing changes in the way you write your Vue apps.
Now, let’s get on with it and start coding …
Step by Step Guide
For this demonstration of visual testing a Vue.js application with Storybook and Applitools, I’ve chosen the TodoMVC example, published as part of the examples projects on the Vue JS website.
Let’s follow the steps to run the TodoMVC app and add a few Storybook stories.
Step 1: Install the Vue CLI 3 on your machine by issuing this command:
npm install -g @vue/cli
# OR
yarn global add @vue/cli
Once the Vue CLI is installed, you can start creating the Vue JS app.
Step 2: Clone the Vue.js TodoApp app locally by issuing this command:
git clone git@github.com:bhaidar/todomvc-vue.git
Step 3: Install all the npm dependencies. Issue the following command:
yarn
Step 4: Checkout the Vue.js/Storybook branch. Enter:
git checkout --track origin/vuejs-testing-with-storybook
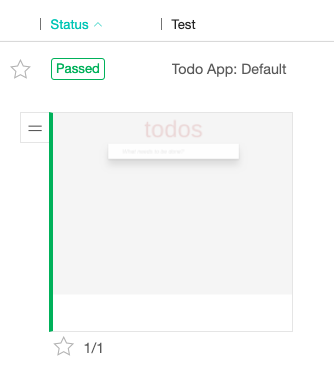
Step 5: Run the app.
yarn serve
And you should see something like this:
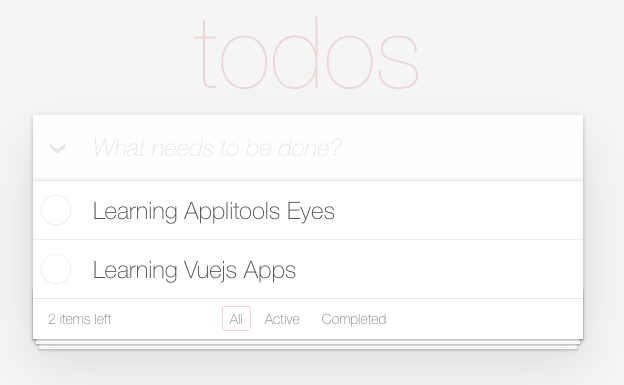
So, it works!
Step 6: To add the Storybook package to a Vue.js app, you issue the following command:
npx -p @storybook/cli sb init --type vue
The command takes care of automatically installing and configuring Storybook folders and files to your project. It even adds an NPM script in the Package.json file to make it easy to run Storybook stories.
There are two methods to set up Storybook in a Vue.js app. In our case, we’ve chosen the automatic setup. You can read more about setup modes on Storybook for Vue.
There is no need to install Storybook on this project. I’ve already taken care of that for you.
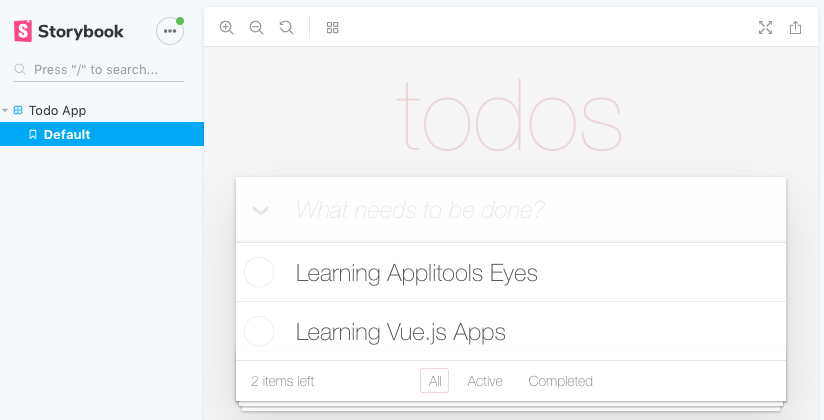
Step 7: Run the default stories added by Storybook by issuing this command:
yarn storybook
It opens the Storybook Dashboard to start running your stories.
Step 8: Refactor the code and extract a new Todo component. In general, and especially when writing Storybook stories, it’s recommended that you structure your code into a set of components that could exist on their own. Check the new Todo component on the repo:
Step 9: Add a new Storybook story to test the Todo component. Locate the “./stories/index.stories.js” file and replace the content with the following:
The code adds a default story to test the state of the Todo component. When defining Storybook stories for Vue.js, the callback function of the stories.add() function should return a Vue instance. Think of this Vue instance as a host component with a template to run the Todo component. You can customize this host Vue instance the way you want, using the standard Vue component methods and properties.
One important thing to note in relation to how a Storybook story communicates with a Vue.js component. Notice the code definition of the data () method that is defined on the host Vue instance? Since the Todo component expects two properties, you need to define these two properties inside the data() method and attach those properties on the Todo component inside the HTML template.
Now that the story is ready, let’s run it with Storybook by issuing this command:
yarn storybook
Step 10: Install the Applitools Eyes SDK for Storybook NPM package by issuing the following command:
npm i @applitools/eyes-storybook
Step 11: Run it with the command:
npx eyes-storybook
Make sure you get an Applitool API Key and store it on your machine. For a complete tutorial on how to install and run Applitools Storybook SDK for Angular, check out this article: Storybook Angular Tutorial.
The command simply opens the Storybook stories, runs them one by one, and then sends all the DOM snapshots to the Applitools Ultrafast Grid Server.
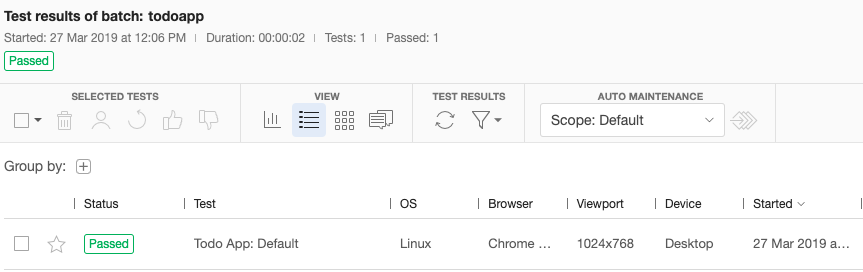
If you expand the single test run, you get the following result:
You can see how simple it is to add and configure Applitools Storybook SDK into your existing Vue.js application.
Let’s continue on and introduce a visual change and run our UI tests once again.
Step 12: Introduce a background color change to the header of the main input field on the page.
Open the /src/components/Todo.vue component and apply this change:
Step 13: Run the Eyes Storybook SDK once again with this command::
npx eyes-storybook
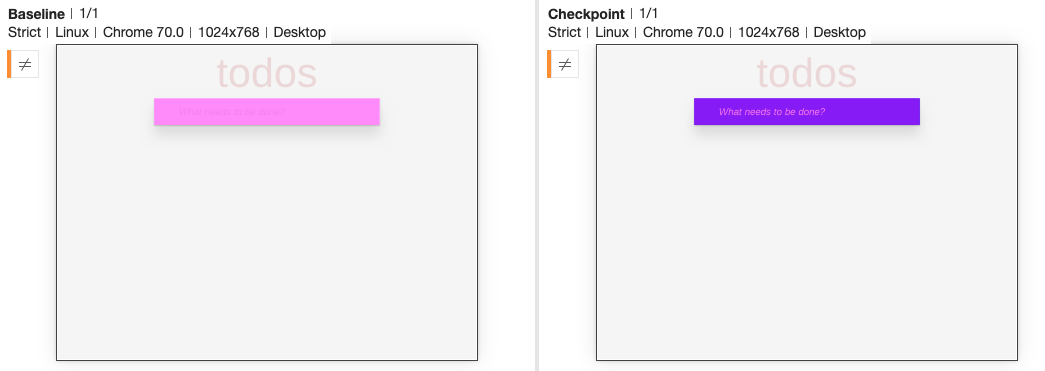
Looking at the test results on the Test Manager, you can see how Applitools captured the visual difference and marked the test results as a Mismatch.
So far, we’ve been running Applitools with Storybook using the default test configuration settings. Let’s see how we can customize the Applitools Eyes Storybook test configurations and run our Storybook stories with a variety of custom viewports.
Visual UI tests with custom viewports
Keeping in mind that visual testing Vue.js with Storybook and Applitools doesn’t need any kind of configuration, the important test configurations are auto-inferred by Applitools. However, if you want to play around with the test configuration, you have two options to specify:
- Environment variables
- The applitools.config.js file
For this demonstration, I will make use of the applitools.config.js file. For a full list of test configuration, check the Advanced Configuration section on the @applitools/eyes-storybook repo on Github.
When you’re using Applitools with Storybook, there’s no need to add any specific Applitools commands or set test configuration to enable visual testing.
In my previous article on How I ran 100 UI tests in just 20 seconds you learned that Applitools Eyes SDK runs the Storybook stories, takes a snapshot of each, and sends the DOM snapshots to the Ultrafast Grid backend server. It saves the test run with the default test configuration.
Step 1: Add a new JavaScript file to the root of your application. Give it a name of applitools.config.js.
Step 2: Add the appName and batchName configuration settings as follows:
Step 3: Run the test case on two different browsers with two different viewports by adding the following:
Consequently, Ultrafast Grid launches a set of instances for each of the browsers and runs the tests simultaneously. The first time these tests are run, we create baseline images to compare against during subsequent test runs.
Step 4: Save and run the tests again by issuing the following command:
npx eyes-storybook
Step 5: Check the test run in Applitools Test Manager.

I’ve switched the Test Manager view to the Batch Details View.
Notice how Applitools Ultrafast Grid ran your tests twice, as per the test configuration file above. The test configuration above specified two different browsers with two different viewports. This means that the Ultrafast Grid runs every test twice– once per browser configuration set.

Running this test yields an execution time of just two seconds! To be clear, this is what we spent rendering baseline images, once the DOM snapshots were uploaded. Even so, that’s really fast.
It’s the duty of the Ultrafast Grid to analyze the test configuration file attached to the test and spawn, in parallel, a number of browser instances to handle the test run efficiently.
Tweaking the Concurrency
Applitools Eyes SDK gives testers as well as developers the upper hand in configuring many aspects of the test configuration settings including the Concurrency field. By setting the value of this field, you can instruct the Ultrafast Grid component to use a certain number of parallel threads or processes in order to run and your visual UI tests.
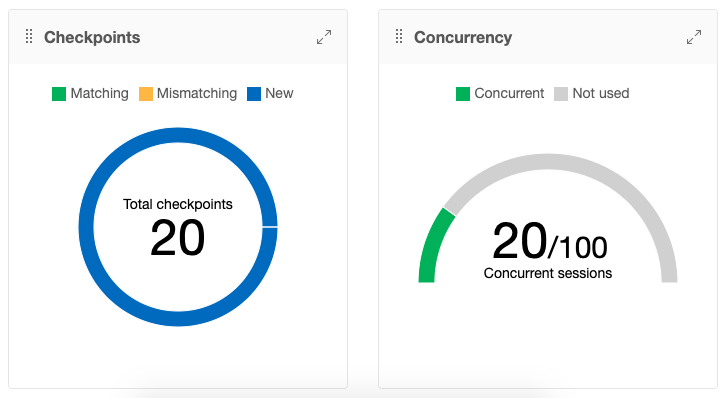
Let’s add more custom viewports into test configuration settings and also set the Concurrency field to a value of 100 and see the results.
Step 1: Replace the content of the applitools.config.js file with the following configuration:
In this test configuration, we are running 20 tests with 10 unique view ports on two major browsers: Firefox and Google Chrome.
Step 2: Save and run the tests by issuing the following command:
npx eyes-storybook
During this time, the Eyes Storybook SDK will read all Storybook stories in the application, run them one by one using the Storybook engine, generate a DOM snapshot for each test, and finally upload the results to the Eyes server. At this moment, the Eyes server will run each and every DOM snapshot, render an image snapshot, and store it as a baseline snapshot.
The Eyes SDK/Server took only 15 seconds to complete all the above tasks, create baselines, and report the results on Applitools Test Manager Dashboard, for the entire batch of 20 test runs for a single Storybook story.

Step 3: Check the test run in Applitools Test Manager.
I’ve switched the Test Manager view to the Batch Summary View.
Let’s see the power of the Eyes server when running a regression testing cycle.
Step 4: Introduce a background color change to the header of the main input field on the page.
Open the /src/components/Todo.vue component and apply this change:
Step 5: Run the Eyes Storybook SDK once again with this command::
npx eyes-storybook
Once again, the Eyes SDK/Server took only 17 seconds to upload the DOM snapshot, run the entire batch of visual UI tests, and display the results on the Applitools Test Manager Dashboard.

Step 6: Check the test run in Applitools Test Manager.
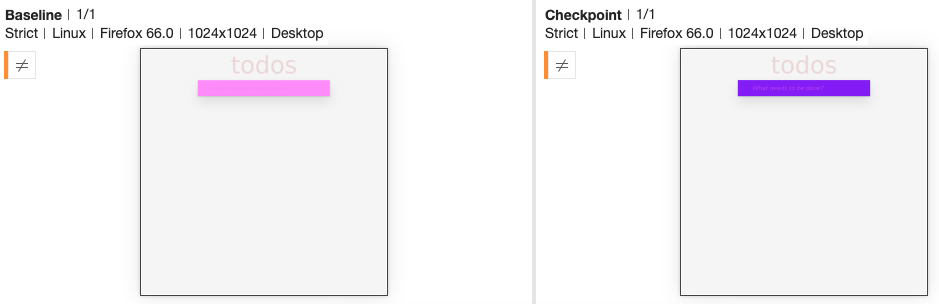
The Test Manager highlights the differences between the baseline snapshot and the current test run and displays a mismatch icon near the snapshots.
At this moment, you can either accept the new changes and make them the new baseline or reject them and keep the old baseline.
Once again, it takes the power of the Ultrafast Grid to analyze the test configuration file and set up the testing environment as needed.
In conclusion
Whether you are developing in Angular, Vue.js, React, or any other technology of choice, Applitools have you covered, in running your visual UI tests, by providing a rich set of SDKs to cover many test frameworks out there!
Happy Testing!
Find out more about Applitools. Setup a live demo with us, or if you’re the do-it-yourself type, sign up for a free Applitools account and follow one of our tutorials.
More Reading for you
Here are a few more related posts you might want to read through.
DevOps & Quality in The Era Of CI-CD: An Inside Look At How Microsoft Does It
The Joy of Testing in Production – with expert Amber Race
Visual UI Testing at the Speed of Unit Testing, with new SDKs for Cypress and Storybook
How to Visually Test React Components Using Our Storybook SDK