As a genre, fantasy is often looked down upon by fans and writers of science fiction. There are some who argue that the worlds created by JRR Tolkien were influenced by the events of the early twentieth century. No matter how you interpret his works, one of the central themes of The Hobbit and The Lord of the Rings that remains timeless is that if you come into possession of and use something powerful, like an all-powerful magic ring, you should be prepared for the harm it can cause.
Before we get too carried away with Tolkien references, this post is about visual UI testing, not hobbits. Similar to Tolkien’s central theme, the goal of this post is to inform you that any time you use visual UI testing, you should consider the broader issues it involves. Specifically, this post explores the reasons why developers who use visual testing need to think about more than simply testing the parts of a web app that they can see. It’s the things you cannot see that will trip you up, not the things you can see. Many of these unseen page elements have very little to do with the application itself or its underlying code, but are caused by the display technologies that are used to present the application to users.
This post explains how the hardware and software technologies that are designed to make displayed content look better will cause your visual tests to fail. We also offer Applitools Eyes as a solution that can help you avoid these problems and their consequences.
A Brief Introduction to Visual UI Testing
The purpose of visual UI testing is to verify that the user interface is rendered so that it appears correct to its users. It factors in the many different environments, operating systems, devices, and sizes in which modern apps run. On the macro level, visual testing checks that the entire user interface is rendered properly. On the micro level, it verifies that elements appear in the right shapes, positions, and sizes. Visual tests are run on different platforms, devices, and display sizes to ensure that the application is displayed correctly within the target environment (e.g., desktop browsers running on PCs and laptops, smartphones, and tablets).
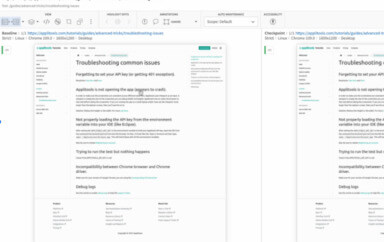
Using test frameworks, developers write code that simulates real user actions, such as typing text into a field or clicking a button. At relevant points in the test code, they will insert commands that capture a screenshot. The first time the test is run, an initial set of screenshots is captured. These screenshots serve as a baseline against which all changes are compared. Once the baseline is determined, the developer runs the test code in the background. When a change is detected, an image of the change is captured. The test runner compares this image to the baseline image for this area of the code, and if differences are detected between the images, the test is failed.
If you want a more in-depth introduction to visual testing, see this post or this YouTube video by Adam Carmi. For a developer’s perspective on this topic, read this post by Gil Tayar.
What You See Is Not Always What You Get
In the early days of visual computing, somebody coined the expression “what you see is what you get,” or WYSIWYG. No matter when this expression was created, the idea it expresses has never been true. No matter how good a GUI was, the technology used to display it was so primitive that it always looked terrible.
Over time, technology has improved. Modern display technologies are bigger and they pack more pixels into smaller spaces (pixel density) than ever before. Hardware can only go so far, so to overcome any remaining hardware-related display issues, advanced algorithms and clever software were created. To better understand the full meaning of this post’s title, we need to know what this software is doing, how it fools us into believing that the quality of the displayed image is never as good as we think, and why it causes false positives.
False positives are one of the major reasons why one does not simply do bitmap comparisons. A false positive is generated when a test performs as expected, but it fails a test that should have been passed. There are many reasons why image comparison tools generate false positives. In most cases, we get a false positive when the tool detects something that is invisible to humans.
To illustrate this point, let’s look at how an application renders text and how this can generate a false positive test result. Suppose we have created a web page and stylesheet that specifies that all text must be black. In order to hide any jagged lines, the browser has applied a text smoothing, anti-aliasing algorithm. The text appears black to the human eye, but if we magnify the text, we’ll see that extra colors have been added to each letter at the pixel level. Since we can’t see the changes with our own eyes, we expect the test to be passed. But, since the tool sees the added color pixels, the test is failed. By default, the easiest way to compare two images is to count the total number of similar pixels. Assuming that two images of the same size are being compared, if the number of colored pixels in each image is the same, the test is passed.
Unlike machines, human beings perceive the world in relative and not absolute terms. To a human tester, if the text appears to be black, it’s black. To limit visual tests from generating unexpectedly high numbers of false positives, we try to make the tools a little bit more human. The easiest way to do this doesn’t involve machine learning or AI—instead, it involves adding a defined margin of error to the image comparison algorithm.
The margin of error allows the two images to differ by an amount that is small enough to avoid a false positive result. This margin of error is defined by counting the number of pixels in a defined area of the image. The number of pixels is divided by the total number of pictures in the image and expressed as a percentage of the total area. This margin of error is referred to as the error ratio. The image comparison tool lets the developer set a threshold for this ratio.
If the error ratio for two compared images is below the threshold, the test is passed; otherwise, it is failed. Ideally, this number should be as small as possible. By using the error ratio threshold, developers can compensate for minor differences between the baseline and captured images that have been captured by the testing tool. The problem is that, for the sake of convenience, many testers will increase this threshold beyond where it should be. Over time, as more changes are detected, the threshold will be raised to the point that a serious defect could escape detection.
The Applitools Solution
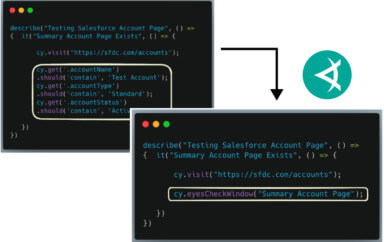
Applitools Eyes offers a number of solutions for false positive visual testing results. It solves the issues that occur during the image capture, comparison, and reporting stages of a visual test run. Applitools Eyes also has the ability to analyze the structure and layout of images, and it uses this analysis as the basis for passing or failing a test (as opposed to counting pixels or measuring image area).
To understand how this would be helpful in practice, let’s say you have captured your baseline images of a web page using the previous generation of a mobile device and the tests are run on the latest version of the device. The older device has a wider screen, but the newer one is slightly longer than its predecessor. Even if both devices run the exact same operating system, each device will display the web page differently.
Applitools is able to determine which differences are caused by the way a page is rendered, as well as the display-related constraints of the device they are rendered on. It has been designed to account for the differences caused by screen size, layout, and many other factors that generate unnecessary false positives. It also ensures that the visual test reports include the issues that need your attention.
Conclusion: Minimize False Positives and Maximize Test Results
Visual UI testing involves more than just comparing two images. As we have seen, tests that only compare the absolute differences between a baseline and current image can generate a large number of false positives. For small projects, it isn’t too hard to review each individual false positive instead of relying on an error ratio.
However, as your project grows and you create more visual tests, reviewing each false positive will require increasing amounts of time and energy. At this point, you might switch to an error ratio-based approach. In the early stages, this might yield good results, but this approach introduces its own, new set of issues.
There are no magic solutions in software testing. Even with advanced tools like Applitools Eyes, your visual tests might still generate false positive results. However, Applitools Eyes handles most of these issues automatically, and it only shows you cases that actually require your attention. With the issue of false positives out of the way, you can concentrate on writing code and developing new features.
–HAPPY TESTING–
To learn more about Applitools’ visual UI testing and application visual management (AVM) solutions, check out the tutorials on the Applitools website. To get started with Applitools, request a demo, or sign up for a free Applitools account.