 It is probably safe to assume that any developers reading this article are already testing their applications. At the bare minimum, you’re testing the feature you’re working on as you develop it and checking that it works with any existing code. Many of you are probably using some form of automated functional testing as well. These types of testing are certainly important and they help to ensure that your applications work as expected, but adding visual testing into the mix will improve your testing significantly.
Today, users access applications in a variety of ways, including wearables, smartphones, tablets, laptops, desktop PCs and an increasing range of smart devices. Now, developers need to account for the ways in which these new and diverse technologies change how their software is presented to and perceived by their users. The typical forms of testing we’ve relied upon for so long simply can’t detect the problems that may exist on every possible device. This is why developers now need to test the visual aspects of their applications. In recent years, developers have started using visual testing methods, tools, and frameworks to meet these new challenges.
In this post, we make the case that it’s wise to use visual testing. Even if you, your team, or your organization are old hands at automated functional testing, we’ll explain why you should add visual testing into your existing infrastructure. We also offer advice about available tools, frameworks and solutions that will help you get started. Whether you’re a novice developer or a seasoned veteran, the information presented in this post will help you deliver the best experience for your users.
What Is Visual Testing and Why Is it Important?
We are taught from a very early age that looks shouldn’t matter. Most developers test their code with a similar assumption—that what matters is how the code works, not how it looks. Visual testing verifies that the user interface appears correct to its users.
Even though you invested many hours to make your application work and wrote tests to prove that your code functions as expected, and even if everything appears to be working on your end, none of that matters if the application isn’t working properly for your users. Don’t assume that your tests see exactly what your customers do. At best, your tests are a crude approximation of a real human user’s interactions with your software.
The developer’s job is to solve real problems for real people with their software. If developers do a good job, users will pay for their product. Problems that appear to be superficial or cosmetic on your end can make it difficult—or even impossible—for users to achieve their desired end results. From their perspective, even if the reason for the problem is out of your control and is really being caused by the way a certain device is rendering your application, it’s still broken.
Imagine that you created a new insurance company website. The company wants to improve the user experience by letting them file claims online. They believe that their existing paper-based system is inefficient and costly, and that the new system will both attract new customers and reduce operational expenses. You were responsible for creating the online claims form. Your automated developer tests and internal tests in many designated sites showed that the system works so well that when the site goes live, the old paper-based system will be shut down.
When the system went live, the insurance company’s phone lines were immediately overwhelmed by irate customers. They all had the same complaint: they were trying to file a claim, they entered all of the relevant information, but they can’t find a button to submit the form. You investigate the problem and you find that when your form is displayed in a mobile browser, the button that should be visible is being obscured by a large text box because of the device’s space restrictions. This problem did not show itself in your testing, but when the system went live, the users were let down by your software.
This example may seem exaggerated, but it’s an entirely plausible situation. It highlights one of the key reasons for visually testing your software: even if your current tests show that the software is functioning as intended on your device/s, it must also run as expected on the users’ devices. You need to check that the software functions as expected on all possible target devices your users have. This involves testing individual page elements and checking that each one appears in the right shape, position, and size.
By using visual testing combined with your existing developer tests, you’ll be able to detect visual issues in the early stages of your development cycle. Visual testing factors in how different environments, operating systems, devices, and sizes will affect your software.
How Visual Testing Works
Today, there are more than 30 open-source tools and commercial visual test automation tools available. Most of these tools work the same way, but they follow a different workflow depending on the target audience. For front end web developers, this will involve using two types of frameworks. First, you need a test runner that enables you to write and run the tests. Second, you need a browser automation framework to simulate user interactions. For the sake of brevity, we’ll treat these two types of frameworks as a single unit and refer to them as (visual) test code.
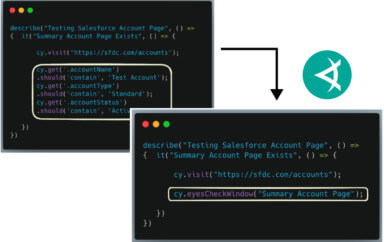
Using the test frameworks, developers write code that simulates real user actions, such as typing text into a field or clicking a button. At relevant points in the test code, they’ll insert commands that capture a screenshot. The first time the test is run, an initial set of screenshots is captured. These screenshots serve as a baseline against which all changes are compared.
Once the baseline has been established, the developer runs the test code in the background. When a change is detected, an image of the change is captured. The test runner compares this image to the baseline image for this area of the code. If differences are detected between the images, the test is failed.
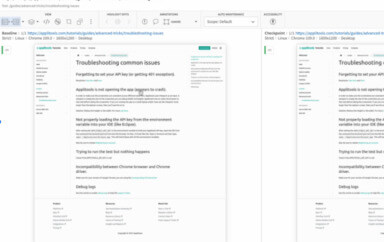
When all of the test code has been run, a report is automatically generated. A human tester reviews all of the images in the report that are different than the baseline. Many testing tools will generate an image that highlights the differences between the expected baseline and actual image captured in a test run. The image highlights all of the differences in pink. If the difference was caused by a bug, the developer can fix the bug and rerun the test to check that the bug was, indeed, fixed. If the difference was caused by a real change in the UI, the developer can review the screenshot and update the baseline so that future test runs will be passed.
Getting Started with Visual Testing
We can’t cover all of the available tools for visual testing in this short post, but here’s a brief overview of what you need to get started.
As we previously mentioned, the first thing you’ll need is a test runner, which will let you write tests to be executed by machines. Test runners, such as Jest or Mocha, let you write Javascript code to describe and organize testing tasks. Each test includes assertions that define a condition that either passes or fails. Tests can be organized into blocks, and these blocks are often put into a single file that is used to test a specific module and/or application functionality.
You will recall that once you have a way to write and run tests, you need a tool to interact with the browser. Tools like Puppeteer, Webdriver.io, and Cypress.io provide a headless browser that allows your test to perform the same interactions as a human user. They also support visual testing and can generate screenshots and PDFs of web pages.
You will also need a tool that lets you manage the testing process. Currently, there are a number of companies providing web-based solutions in this space. The best place to start is with Applitools Eyes. To effectively manage visual testing, Applitools manages your baseline images and the potentially large number of images generated during each test run. It generates reports that not only show you what passed and what failed, but that also give you useful insights from current test runs and from all previous test runs.
Any visual testing solution must also help you effectively maintain your baseline. In addition, it must ensure that any misleading information is removed from specific test runs, but that it isn’t propagated in a way that leads to information overload or hides potentially damaging issues. Applitools checks the boxes for all of these qualities and more.
Take Your First Steps Toward Visual Testing
Visual testing can’t replace your current testing practices, tools, or infrastructure, but it can help you test areas that you’re currently unable to with functional testing alone. In today’s world, where you don’t know where and how your software will run, visual testing will help you discover problems that matter to today’s users.
There are many tools that can help you get started with visual testing. Applitools Eyes is an excellent option for managing your visual testing process. In addition to the features that were previously mentioned in this post, Applitools is designed to handle the many labor-intensive tasks and obstacles that exist with other tools. Considering the many benefits of visual testing, and with the help of accessible, web-based tools like Applitools, your organization should be ready to take its first steps into the world of visual testing.
— HAPPY TESTING —
To learn more about Applitools’ visual UI testing and application visual management (AVM) solutions, check out the tutorials on the Applitools website. To get started with Applitools, request a demo, or sign up for a free Applitools account.