What does it take to add UI tests in your CICD pipelines?
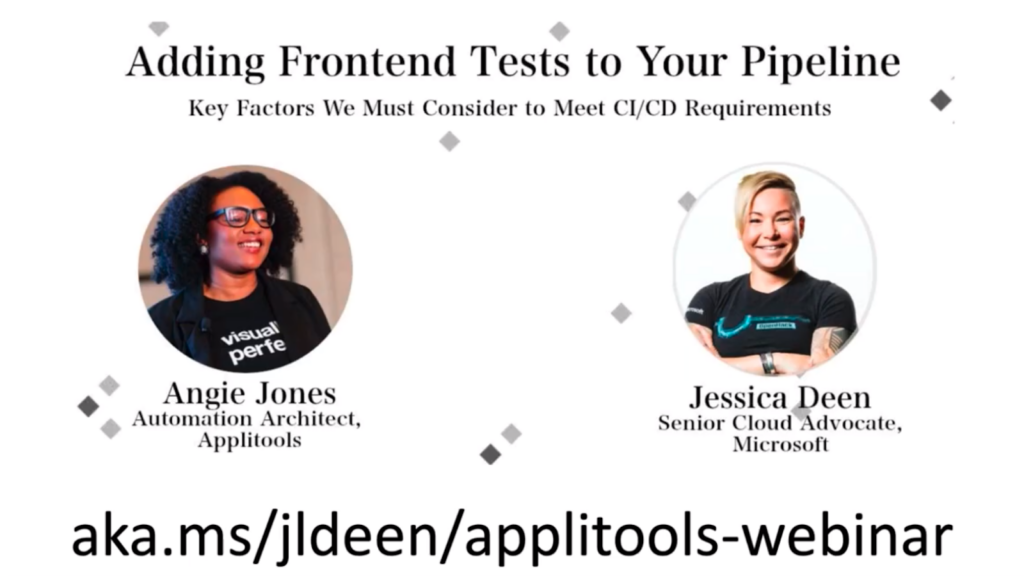
On March 12, Angie Jones, Senior Developer Advocate at Applitools, sat down with Jessica Deen, Senior Cloud Advocate for Microsoft, held a webinar to discuss their approaches to automated testing and CI.
Angie loves to share her experiences with test automation. She shares her wealth of knowledge by speaking and teaching at software conferences all over the world, as well as writing tutorials and blog posts on angiejones.tech.
As a Master Inventor, Angie is known for her innovative and out-of-the-box thinking style which has resulted in more than 25 patented inventions in the US and China. In her spare time, Angie volunteers with Black Girls Code to teach coding workshops to young girls in an effort to attract more women and minorities to tech.
Jessica’s work at Microsoft focuses on Azure, Containers, OSS, and, of course, DevOps. Prior to joining Microsoft, she spent over a decade as an IT Consultant / Systems Administrator for various corporate and enterprise environments, catering to end users and IT professionals in the San Francisco Bay Area.
Jessica holds two Microsoft Certifications (MCP, MSTS), 3 CompTIA certifications (A+, Network+, and Security+), 4 Apple Certifications, and is a former 4-year Microsoft Most Valuable Professional for Windows and Devices for IT.
The Talk
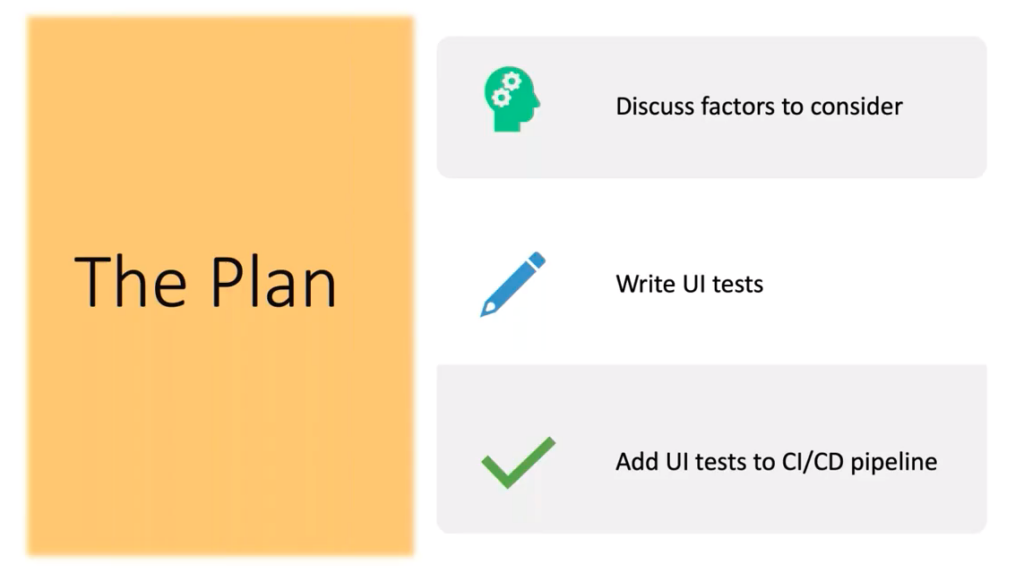
Angie and Jessica broke the talk into three parts. First, Angie would discuss factors anyone should consider in creating automated tests. Second, Angie and Jessica would demonstrate writing UI tests for a test application. Finally, they would work on adding UI tests to a CI/CD pipeline.
Let’s get into the meat of it.
Four Factors to Consider in Automated Tests
Angie first introduced the four factors you need to consider when creating test automation:
- Speed
- Reliability
- Quantity
- Maintenance
She went through each in turn.
Speed
Angie started off by making this point:
“When your team checks in code, they want to know if the check-in is good as quickly as possible. Meaning, not overnight, not hours from now.”
Angie points out that the talk covers UI tests primarily because lots of engineers struggle with UI testing. However, most of your check-in tests should not be UI tests because they run relatively slowly. From this she referred to the testing pyramid idea
- Most of your tests are unit tests – they run the fastest and should pass (especially if written by the same team that wrote the code)
- The next largest group is either system-level or business-layer tests. These tests don’t require a user interface and show the functionality of units working together
- UI tests have the smallest number of total tests and should provide sufficient coverage to give you confidence in the user-level behavior.
While UI tests take time, Angie points out that they are the only tests showing user experience of your application. So, don’t skimp on UI tests.
Having said that, when UI tests become part of your build, you need to make sure that your build time doesn’t become bogged down with your UI tests. If all your conditions run over 15 minutes, that’s way too long.
To keep your testing to a minimum, Angie suggests running UI tests in parallel. To determine whether or not you need to split up one test into several parallel tests, give yourself a time limit. Let’s say your build needs to complete in five minutes. Once you have a time limit, you can figure out how many parallel tests to set up. Like – with the 15 minute example, you might need to divide into three or more parallel tests.
Reliability
Next, you need reliable tests. Dependable. Consistent.
Unreliable tests interfere with CI processes. False negatives, said Angie, plague your team by making them waste time tracking down errors that don’t exist. False positives, she continues, corrupt your product by permitting the check-in of defective code. And, false positives corrupt your team because bugs found later in the process interfere with team cohesion and team trust.
For every successful CICD team, check-in success serves as the standard for writing quality code. You need reliable tests.
How do you make your tests reliable?
Angie has a suggestion that you make sure your app includes testability – which involves you leaning on your team. If you develop code, grab one of your test counterparts. If you test, sit down with your development team. Take the opportunity to discuss app testability.
What makes an app testable? Identifiers. Any test runner uses identifiers to control the application. And, you can also use identifiers to validate outputs. So, a consistent regime to create identifiers helps you deliver consistency.
If you lack identifiers, you get stuck with CSS Selectors or Xpath selectors. Those can get messy – especially over time.
Another way to make your app testable, Angie says, requires code that lets your test set initial conditions. If your UI tests depend on certain data values, then you need code to set those values prior to running those tests. Your developers need to create that code – via API or stored procedure – to ensure that the tests always begin with the proper conditions. This setup code can help you create the parallel tests that help your tests run more quickly.
You can also use code to restore conditions after your tests run – leaving the app in the proper state for another test.
Quantity
Next, Angie said, you need to consider the number of tests you run.
There is a common misconception that you need to automate every possible test condition you can think about, she said. People get into trouble trying to do this in practice.
First, lots of tests increase your test time. And, as Angie said already, you don’t want longer test times.
Second, you end up with low value as well as high-value UI tests. Angie asks a question to help triage her tests:
“Which test would I want to stop an integration or deployment? If I don’t want this test to stop a deployment, it doesn’t get automated. Or maybe it’s automated, but it’s run like once a day on some other cycle, not on my CICD.”
Angie also asks about the value of the functionality:
“Which test exercises critical, core functionality? Those are the ones you want in there. Which tests cover areas of my application that have a history of failing? You’re nervous anytime you have to touch that code. You want some tests around that area, too.”
Lastly, Angie asks, which tests provide information already covered by other tests in the pipeline? So many people forget to think about total coverage. They create repetitive tests and leave them in the pipeline. And, as many developers know, a single check-in that triggers multiple failures can do so because it was a single code error that had been tested, and failed, multiple times.
“Don’t be afraid to delete tests,” Angie said. If it’s redundant, get rid of it, and reduce your overall test code maintenance. She talked about how long it took her to become comfortable with deleting tests, but she appreciates the exercise now.
Maintenance
“Test code is code,” Angie said. “You need to write it with the same rules, the same guidelines, the same care that you would any production code.”
Angie continued, saying that people ask, “‘Well, Angie, why do I need to be so rigorous with my test code?’”
Angie made the point that test code monitors production code. In your CICD development, the state of the build depends on test acceptance. If you build sloppy test code, you run the risk of false positives and false negatives.
As your production code changes, your test code must change as well. The sloppier your test code, the more difficult time you will have in test maintenance.
Writing test code with the same care as you write production gives you the best chance to keep your CICD pipeline in fast, consistent delivery. Alternatively, Angie said, if your test code stays a mess, you will have a tendency to avoid code maintenance. Avoiding maintenance will lead to untrustworthy builds.
Writing UI Tests – Introduction
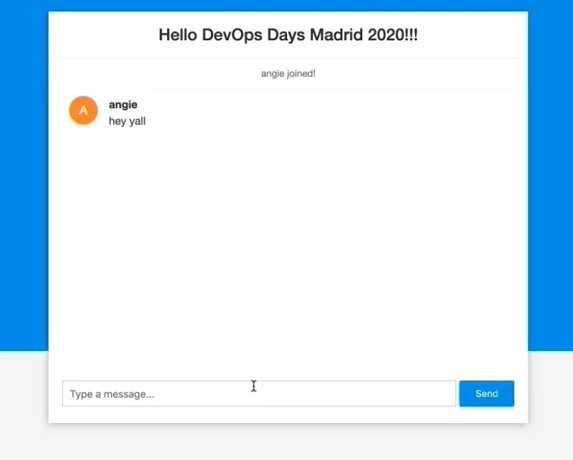
Next, Angie introduced the application she and Jessica were using for their coding demonstration. The app – a chat app, looks like this:
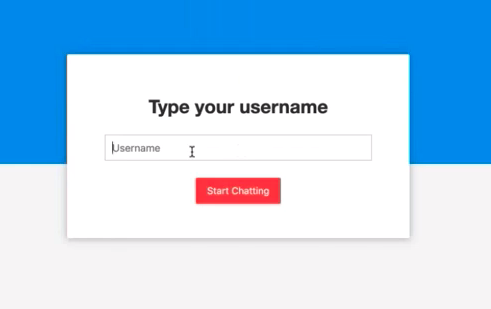
The welcome screen asks you to enter your username and click “Start Chatting” – the red button. Once you have done so, you’re in the app. Going forward, you enter text and click the “Send” button and it shows up on a chat screen along with your username. Other users can do the same thing.
With this as a starting point, Angie and Jessica began the process of test writing.
Writing UI Tests – Coding Tests
Angie and Jessica were on a LiveShare of code, which looked like this:

From here, Angie started building her UI tests for the sign-in functionality. And, because she likes to code in Java, she coded in Java.
All the objects she used were identified in the BaseTests class she inherited.
Her full code to sign-in looked like this:
public class ChattyBotTests extends BaseTests {
  private ChatPage chatPage:

  @Test
  public void newSession(){
     driver.get(appUrl);
     homePage.enterUsername("angie");
     chatPage = homePage.clickStartChatting();
     validateWindow();
  }
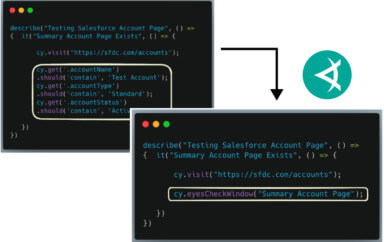
The test code gest the URL previously defined in the BaseTests class, fills in the username box with “angie”, and clicks the “Start Chatting” button. Finally, Angie added the validateWindow() method inherited from BaseTests, which uses Applitools visual testing to validate the new screen after the Start Chatting button has been clicked.
Next, Angie wrote the code to enter a message, click send message, and validate that the message was on the screen.
  @Test
  public void enterMessage(){
     chatPage.sendMessage("hello world");
     validateWindow():
 }
The inherited chatPage.sendMessage method both enters the text and clicks the Send Message button. validateWindow() again checks the screen using Applitools.
Are these usable as-is for CICD? Nope.
Coding Pre-Test Setup
If we want to run tests in parallel, these tests, as written, block parallel operation, since the enterMessage() depends on the newSession() being run previously.
So solve this, Angie creates a pre-test startSession() that runs before all tests. It includes the first three lines of newSession() which go to the app URL, enter “angie” as the username, and click the “Start Chatting” button. Next, Angie modifies her newSession() test so all it does is the validation.
  @Before
  public void startSession(){
     driver.get(appUrl);
     homePage.enterUsername("angie");
     chatPage = homePage.clickStartChatting();
  }

  @Test
  public void newSession(){
     validateWindow();
 }
With this @Before setup, Angie can create independent tests.
Adding Multi-User Test
Finally, Angie added a multi-user test. In this test, she assumed the @Before gest run, and her new test looked like this:
  @Test
  public void multiPersonChat(){

     //Angie sends a message
     chatPage.sendMessage(“hello world”);

     //Jessica sends a message
     WindowUtils.openNewTab(driver, appUrl);
     homePage.enterUsername("jessica");
     chatPage = homePage.clickStartChatting();
     chatPage.sendMessage("goodbye world");
     WindowUtils.switchToTab(driver, 1);
     validateWindow();
  }
Here, user “angie” sends the message “hello world”. Then, Angie codes the browser to:
- open a new tab for the app URL,
- create a new chat session for “jessica”
- has “jessica” send the message “goodbye world”
- Switch back to the original tab
- Validate the window
Integrating UI Tests Into CICD
Now, it was Jessica’s turn to control the code.
Before she got started coding, Jessica shared her screen from Visual Studio Code, to demonstrate the LiveShare feature of VS Code:
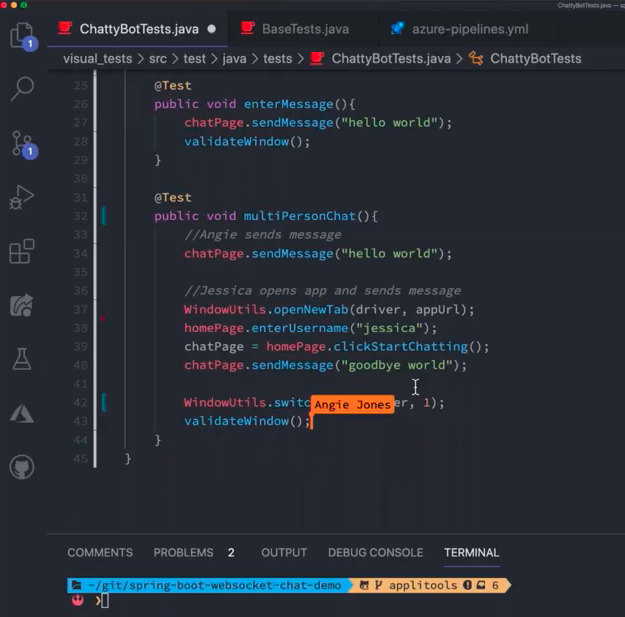
Angie and Jessica were working on the same file using LiveShare. LiveShare highlights Angie’s cursor on Jessica’s screen.
When Angie selects a block of text, the text gets highlighted on Jessica’s screen.
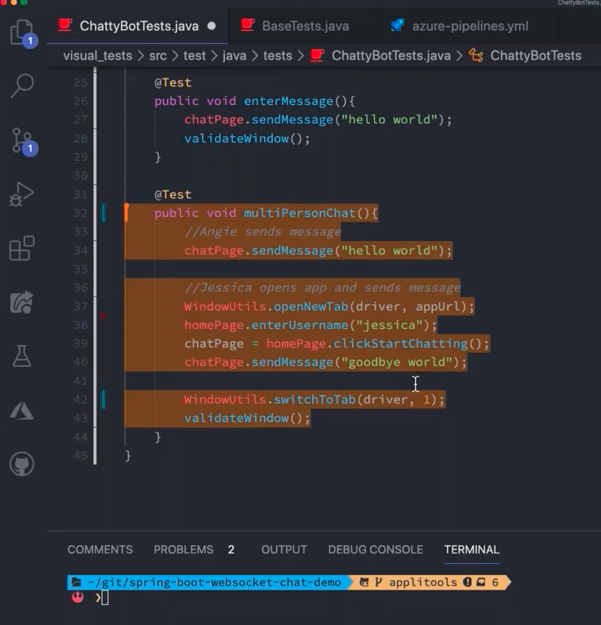
This extension to Visual Studio Code makes it easy to collaborate on coding projects remotely. It’s available for download on the Visual Studio Code Marketplace. It’s great for pair programming when compared with remote screen share.
To begin the discussion of using these tests in CICD, Jessica started describing the environment for running the tests from a developer perspective versus a CICD perspective. A developer might imagine running locally, with IntelliJ or command line opening up browser windows. In contrast, CICD needs to run unattended. So, we need to consider headless.
Jessica showed how she coded for different environments in which she might run her tests.
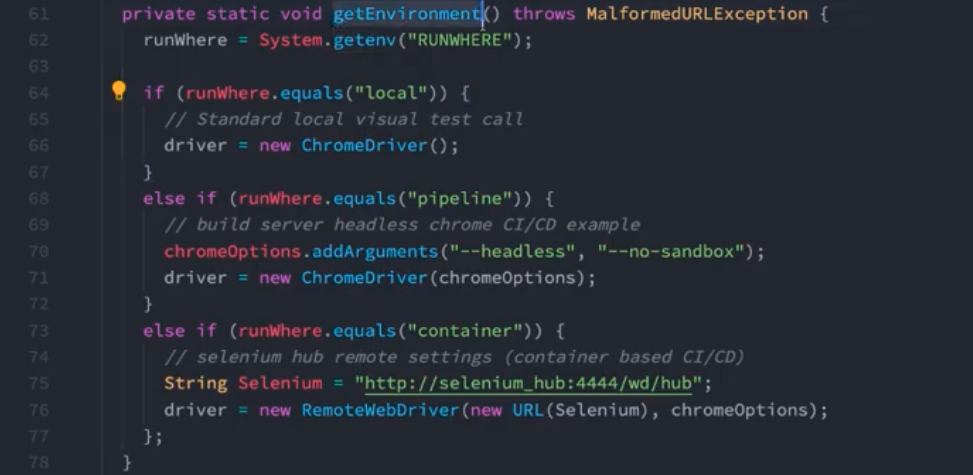
Her code explains that the environment gets defined by a variable called runWhere, which can equal one of three values:
- local – uses a ChromeDriver
- pipeline – uses a dedicated build server and sets the options –headless and –no-sandbox for ChromeDriver (note: for Windows you add the option “–disable-gui”)
- container – instructs the driver to be a remote web driver based on the selenium hub remote URL and passes the –headless and –no-sandbox chromeOptions
Testing Locally
First, Jessica needed to verify that the testa ran using the local settings.
Jessica set the RUNWHERE variable to ‘local’ using the command
export RUNWHERE=local
She had already exported other settings, such as her Applitools API Key, so she can use Applitools.
Since Jessica was already in her visual test folder, she run her standard maven command:
mvn -f visual_tests/pom.xml clean test
The tests ran as expected with no errors. The test opened up a local browser window and she showed the tests running.
Testing Pipeline
Next, Jessica set up to test her pipeline environment settings.
She changed the RUNWHERE variable using the command:
export RUNWHERE=pipeline
Again, she executed the same maven tests
mvn -f visual_tests/pom.xml clean test
With the expectation that the tests would run as expected using her pipeline server, meaning that the tests run without opening a browser window on her local machine.
This is important because whatever CICD pipeline you use – Azure DevOps, Github Actions, Travis CI, or any traditional non-container-based CICD system – will want to use this headless interaction with the browser that keeps the GUI from opening up and possibly throwing an error.
Once these passed, Jessica moved on to testing with containers.
Testing Containers
Looking back, the container-based tests used a call to RemoteWebDriver, which in turns called selenium_hub:

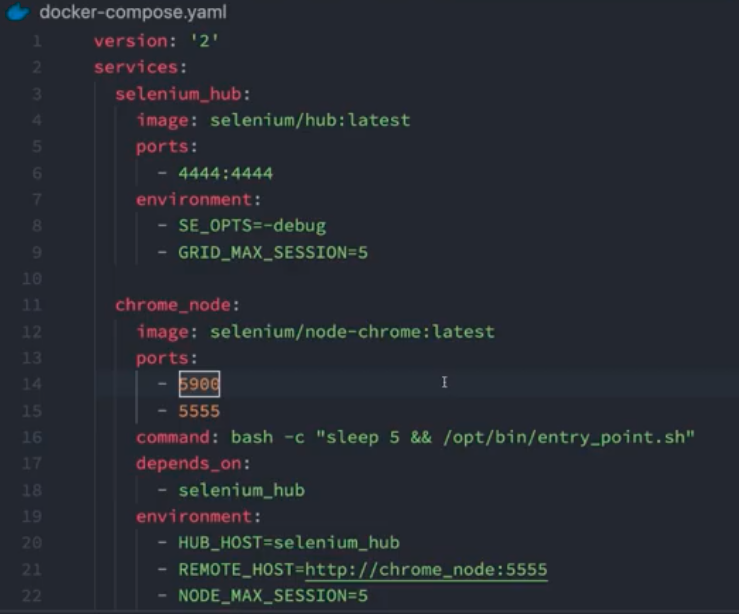
Selenium_hub let Jessica spin up whatever browser she wanted. To specify what she wanted, she used a docker-compose file, docker-compose.yaml:
These container-based approaches align with the current use of cloud-native pipelines for CICD. Jessica noted you can use Jenkins, Jenkins X for Kubernetes native, and CodeFresh, among others. Jessica decided to show CodeFresh. It’s a CICD pipeline dedicated to Kubernetes and microservices. Every task runs in a container.
Selenium_Hub let Jessica choose to run tests on both a chorme_node and a firefox_node in her container setup.
She simply needed to modify her RUNWHERE variable
export RUNWHERE=container
However, before running her tests, she needed to spin up her docker-compose on her local system. And, because selenium_hub wasn’t something that her system could identify by DNS at that moment (it was running on her local system), she ensured that the selenium_hub running locally would port forward onto her local system’s 127.0.0.1 connection. Once she made these changes, and changed the container definition to use 127.0.0.1:4444, she was ready to run her maven pom.xml file.
When the tests ran successfully, her local validation confirmed that her tests should run in her pipeline of choice.
Jessica pointed out that CICD really comes down to a collection of tasks you would run manually.
After that, Jessica said, we need to automate those tasks in a definition file. Typically, that’s Yaml, unless you really like pain and choose Groovy in Jenkins… (no judgement, she said).
Looking at Azure DevOps
Next, Jessica did a quick look into Azure DevOps.
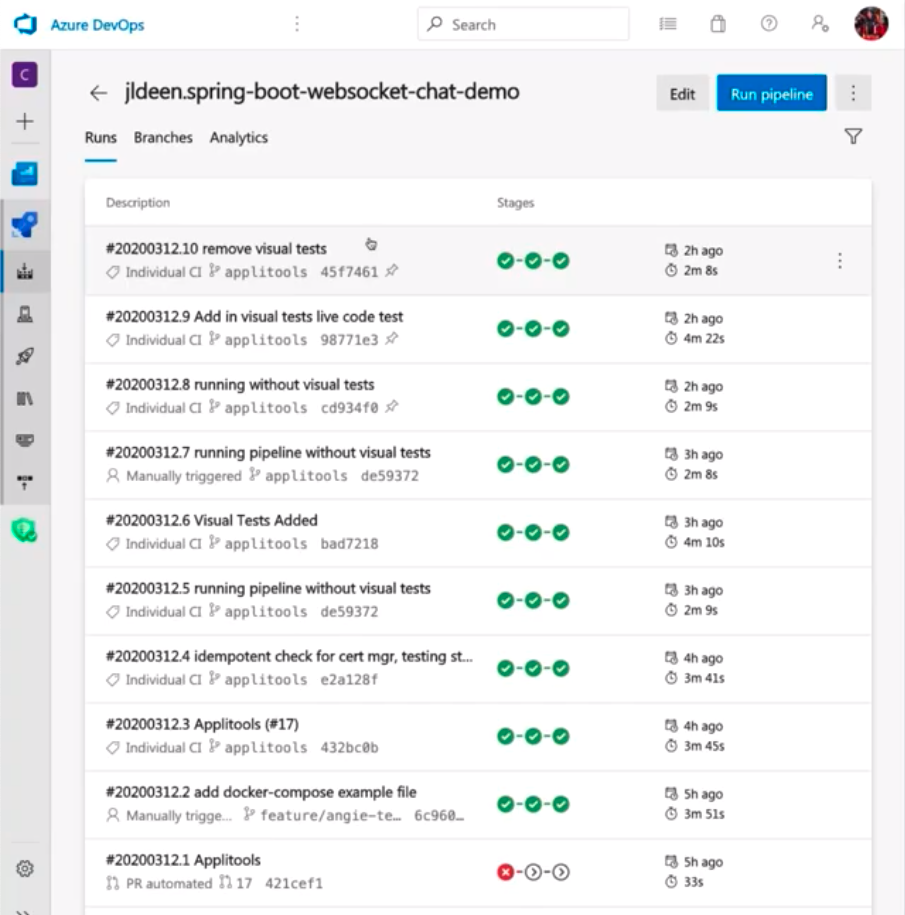
Inside Azure DevOps, Jessica showed that she had a number of pipelines already written, and she chose the one she had set aside for the project. This pipeline already had three separate stages:
- Build Stage
- Deploy to Dev
- Deploy to Prod
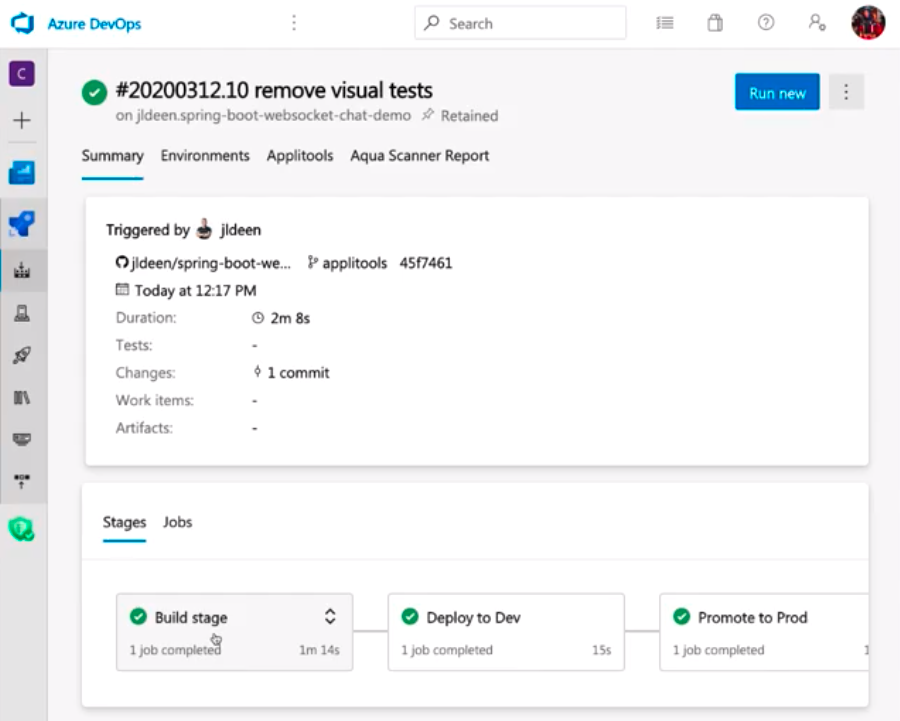
Opening up the build stage shows all the steps contained just within that stage in its 74 seconds of runtime:
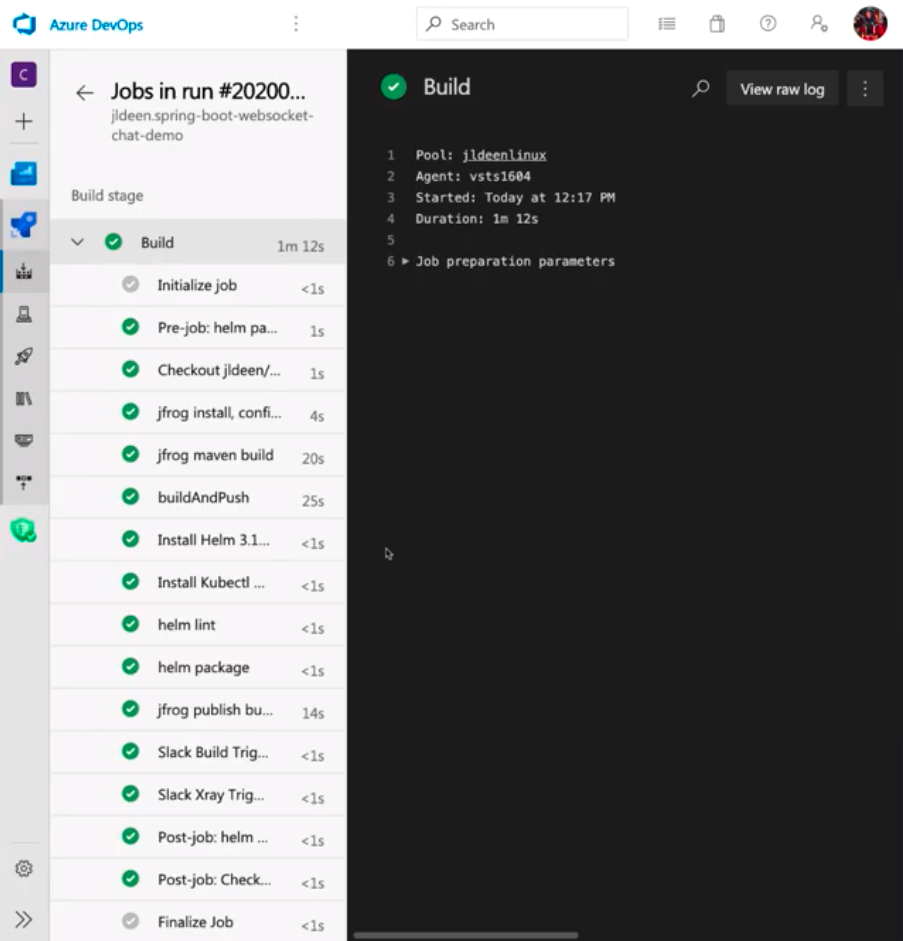
Jessica pointed out that this little ChattyBot application is running on a large cluster in Azure. It’s running in Kubernetes, and it’s deployed with Helm. The whole build stage includes:
- using JFrog to package up all the maven dependencies and run the maven build
- jfrog xray to make sure that the dependencies don’t result in security errors,
- Creating a helm chart and packaging that,
- Sending Slack notifications
This is a pretty extensive pipeline. Jessica wondered how hard it would be to integrate Angie’s tests into an existing environment.
But, because of the work Jessica had done to make Angie’s tests ready for CICD, it was really easy to add those tests into the deploy workflow.
First, Jessica reviewed the Deploy to Dev stage.
Adding UI Tests in Your CICD Pipeline
Now, Jessica started doing the work to add Angie’s tests into her existing CICD pipeline.
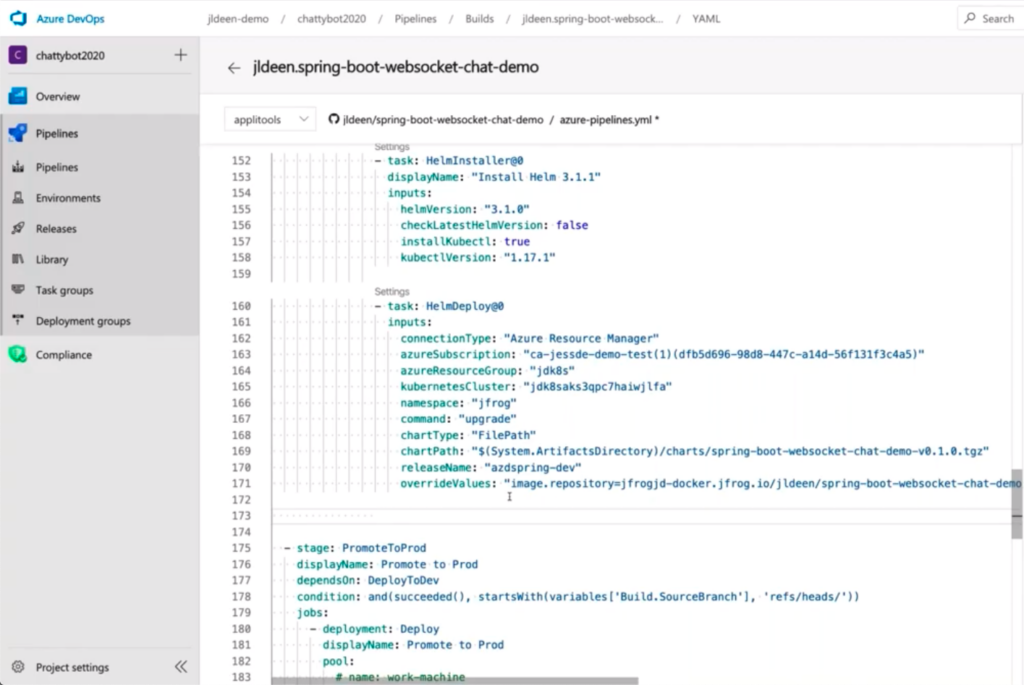
After the RUNWHERE=container tests finished successfully, Jessica went back into VS Code, where she started inspecting her azure-pipelines.yml file.
Jessica made it clear that she wanted to add the tests everywhere that it made sense prior to promoting code to production:
- Dev
- Test
- QA
- Canary
Jessica reinforced Angie’s earlier points – these UI tests were critical and needed to pass. So, in order to include them in her pipeline, she needed to add them in an order that makes sense.
In her Deploy to Dev pipeline, she added the following:
   - bash:
     # run check to see when $(hostname) is available
     attempt_counter=0
     max_attempts=5
     until $(curl --output /dev/null --silent --head --fail https://”$(hostname)”/); do
       if [ ${attempt_counter} -eq ${max_attempts} ]; then
         echo “Max attempts reached”
         exit 1
       fi

       printf “.”
       attempt_counter=$((attempt_counter+1))
       sleep 20
     done
   displayName: HTTP Check
This script checks to see if the url $hostname is available and gives up if not available after five tries after sleeping 20 seconds. Each try it displays a “.” to show it is working. And, the name “HTTP Check” shows what it is doing.
Now, to add the tests, Jessica needed to capture the environment variable declarations and then run the maven commands. And, as Jessica pointed out, this is where things can become challenging, especially when writing the tests from scratch, because people may not know the syntax.
Editing the azure-pipelines.yml in Azure DevOps
Now, Jessica moved back from Visual Studio Code to Azure DevOps, where she could also edit an azure-pipelines.yml file directly in the browser.
And, here, on the right side of her screen (I captured it separately) are tasks she can add to her pipeline. The ability to add tasks makes this process really, really simple and eliminates a lot of the errors that can happen when you code by hand.
One of those tasks is an Applitools Build Task that she was able to add by installing an extension.
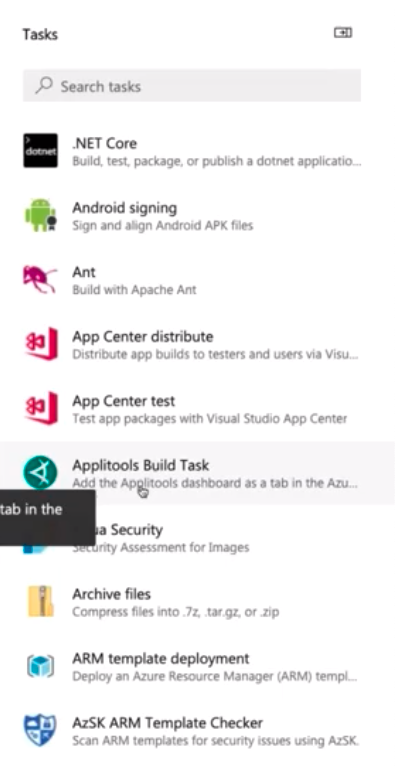
Just clicking on this Applitools Build Task adds it to the azure_pipelines.yml file.
And, now Jessica wanted to add her maven build task – but instead of doing a bash script, she wanted to use the maven task in Azure DevOps. Finding the task and clicking on it shows all the options for the task.
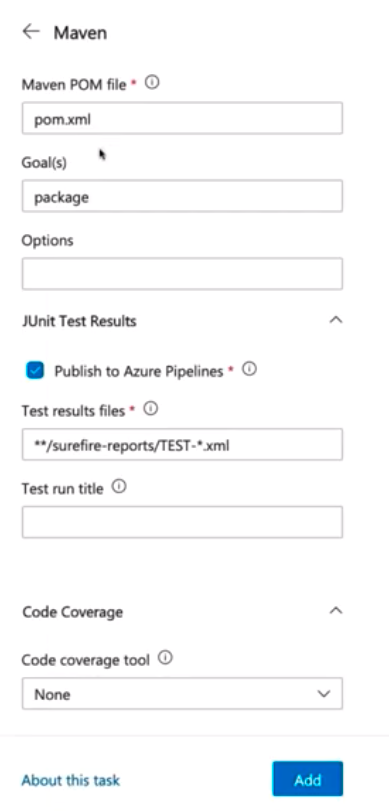
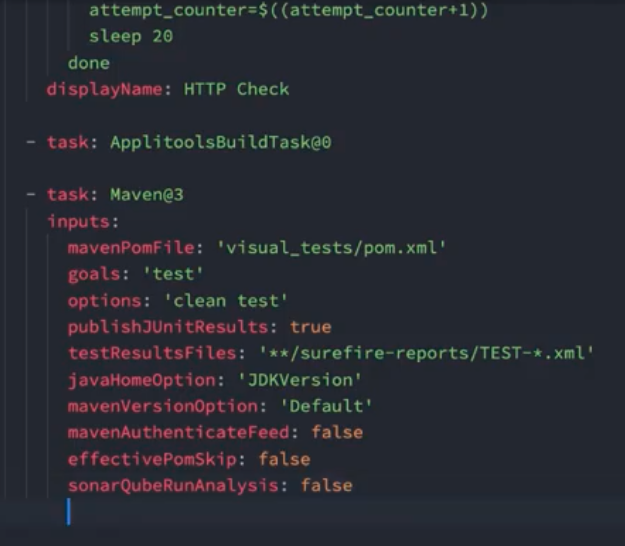
The values are all defaults. Jessica changed the address for her pom.xml file to visual_tests/pom.xml (the file location for the test file), set her goal as ‘test’ and options as ‘clean test’. She checked everything else, and since it looked okay, she clicked the “Add” button. The following code got added to her azure-pipelines.yml file.
  - task: Maven
     inputs:
       mavenPomFile: ‘visual_tests/pom.xml’
       goals: 'test'
       options: 'clean test'
       publishJUnitResults: true
       testResultsFiles: '**/surefire-report/TEST-*.xml'
       javaHomeOption: 'JDKVersion'
       mavenVersionOption: 'Default'
       mavenAuthenticationFeed: false
       effectivePomSkip: false
       sonarQubeRunAnalysis: false
Going Back To The Test Code
Jessica copied the Applitools Built Task and Maven task code file back into the azure-pipelines.yml file she was already editing in Visual Studio Code.
Then, she added the environment variables needed to run the tests. This included the Applitools API Key, which is a secret value from Applitools. In this case, Jessica defined this variable in Azure DevOps and could call it by the variable name.
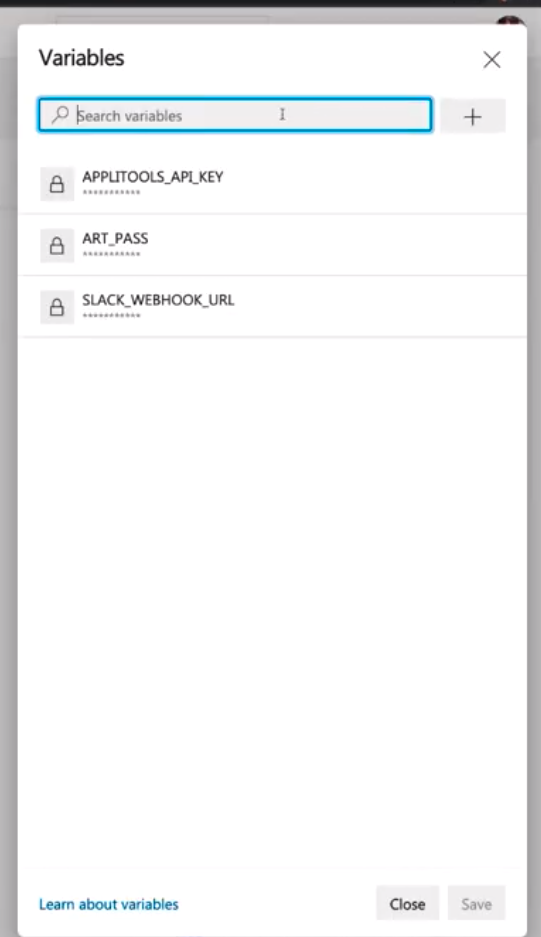
Beyond the Applitools API Key, Jessica also set the RUNWHERE environment variable to ‘pipeline’ and the TEST_START_PAGE environment variable to the $hostname – same as used elsewhere in her code. All this made her tests dynamic.
The added code reads:
     env:
       APPLITOOLSAPIKEY: $APPLITOOLS_API_KEY
       RUNWHERE: pipeline
       TEST_START_PAGE: https://($hostname)/
So, now, the tests are ready to commit.
One thing Jessica noted is that LiveShare automatically adds the co-author’s id to the commit whenever two people have jointly worked on code. It’s a cool feature of LiveShare.
Verifying That UI Tests Work In CICD
So, now that the pipeline code had been added, Jessica wanted to demonstrate that the visual validation with Applitools worked as expected and found visual differences.
Jessica modified the ChattyBot application so that, instead of reading:
“Hello, DevOps Days Madrid 2020!!!”
it read:
“Hello, awesome webinar attendees!”
She saved the change, double-checked the test code, saw that everything looked right, and pushed the commit.
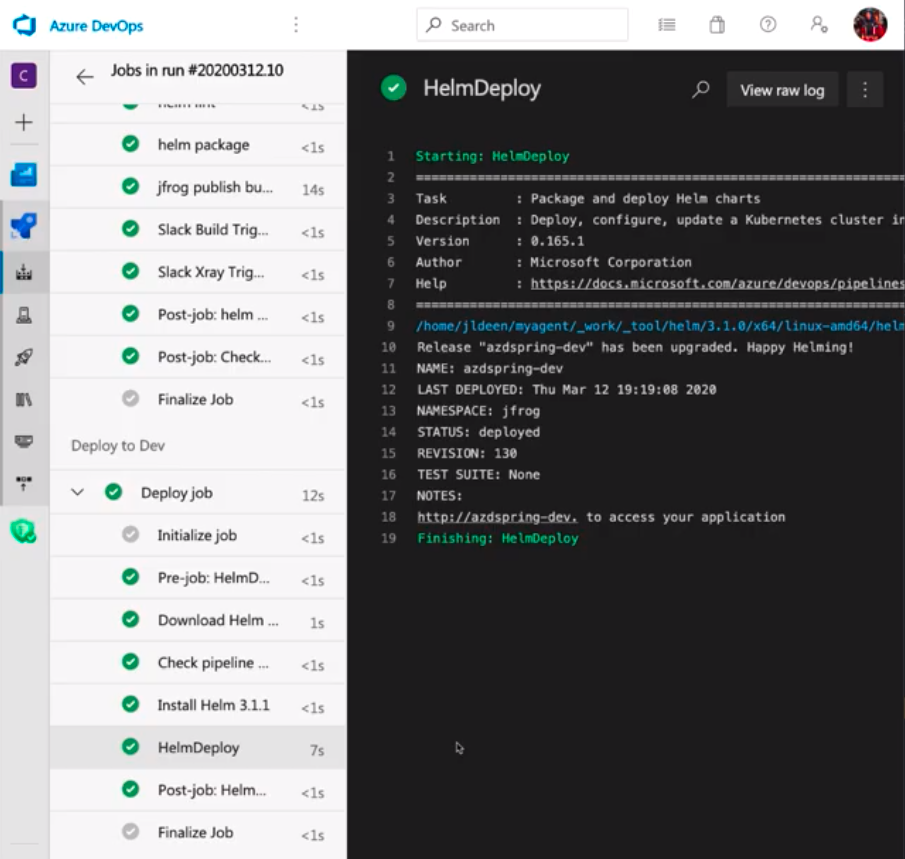
This kicked off a new build in Azure DevOps. Jessica showed the build underway. She said that, with the visual difference, we expect the Deploy to Dev pipeline to fail.
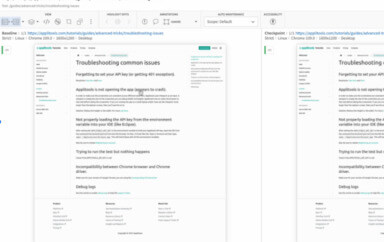
Since we had time to wait, she showed what happened on an earlier build that she had done just before the webinar. During that build, the Deploy to Dev passed. She was able to show how Azure DevOps seamlessly linked the Applitools dashboard – and, assuming you were logged in, you would see the dashboard screen just by clicking on the Applitools tab.
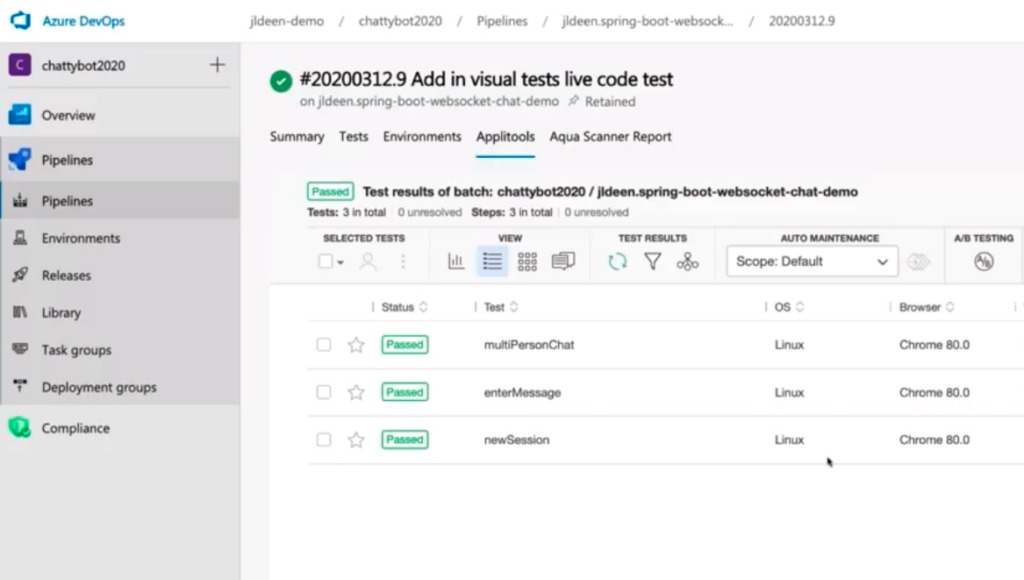
Here, the green boxes on the Status column show that the tests passed.
Jessica drilled into the enterMessage test to show how the baseline and the new checkpoint compared (even though the comparison passed), just to show the Applitools UI.

As Jessica said, were any part of this test to be visually different due to color, sizing, text, or any other visual artifact, she could select the region and give it a thumbs-up to approve it as a change (and cause the test to pass), or give it a thumbs-down and inform the dev team of the unexpected difference.
And, she has all this information from within her Azure DevOps build.
What If I Don’t Use Azure DevOps?
Jessica said she gets this question all the time, because not everyone uses AzureDevOps.
You could be using Azure DevOps, TeamCity CI, Octopus Deploy, Jenkins – it doesn’t matter. You’re still going to be organizing tasks that make sense. You will need to run an HTTP check to make sure your site is up and running. You will need to make sure you have access to your environment variables. And, then, finally, you will need to run your maven command-line test.
Jessica jumped into Github Actions, where she had an existing pipeline, and she showed that her deploy step looked identical.
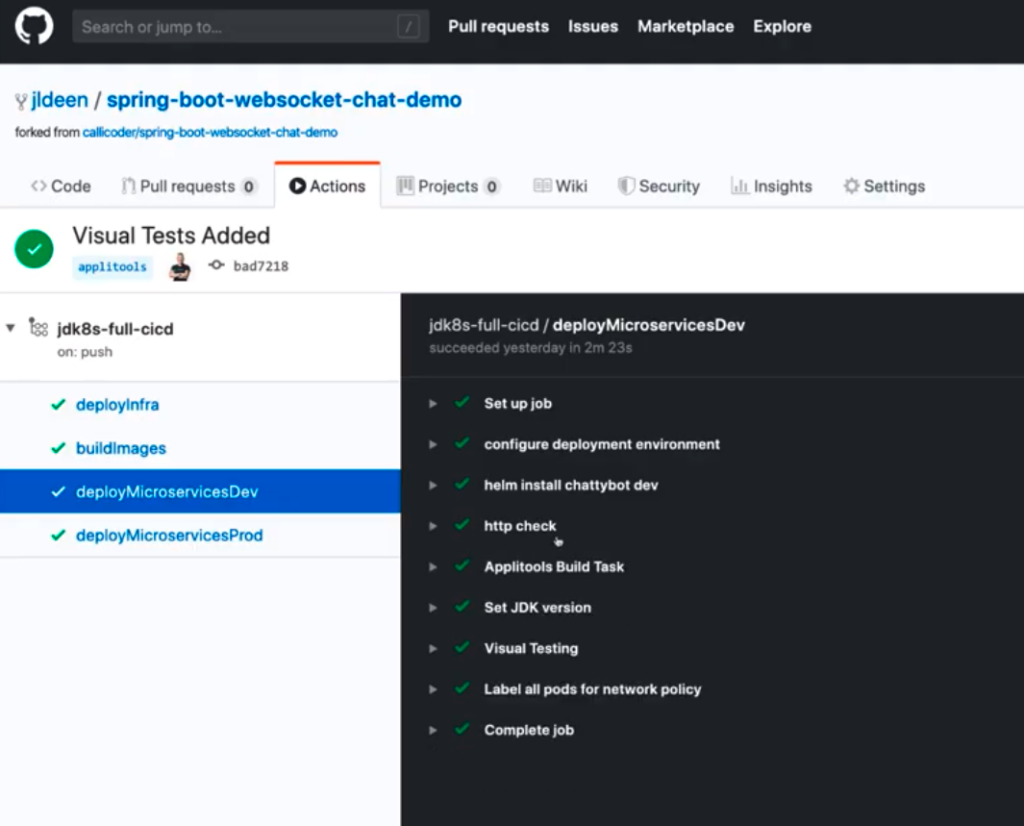
It had an http check, an Applitools Build Task, and a call for Visual Testing. The only difference was that the Applitools Build Task included several lines of bash to export Applitools environment variables.
The one extra step she added, just as a sanity check, was to set the JDK version.
And, while she was in Github Actions, she referred back to the container scenario. She noted the challenges with spinning up Docker Compose and services. For this reason, when looking at container tests, she pointed to CodeFresh, which is Kubernetes-native.
Inside her CodeFresh pipelines, everything runs in a container.
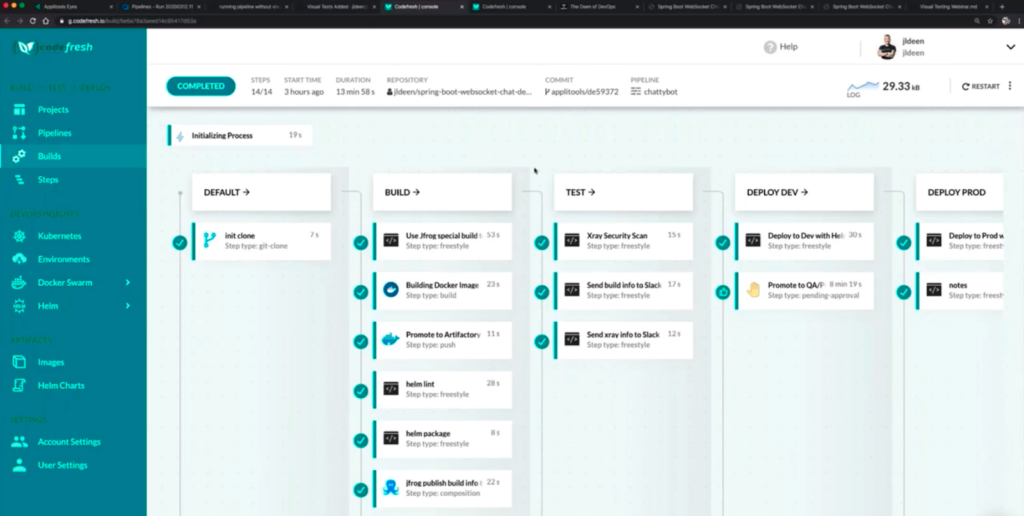
As she pointed out, by running on CodeFresh, she didn’t need a huge server to handle everything. Each container handled just what it needed to handle. Spinning up Docker Compose just requires docker. She needed just jFrog for her Artifactory image. Helm lint – again, just what she needed.
The image above shows the pipelines before adding the visual tests. The below image shows the Deploy Dev pipeline with the same three additions.
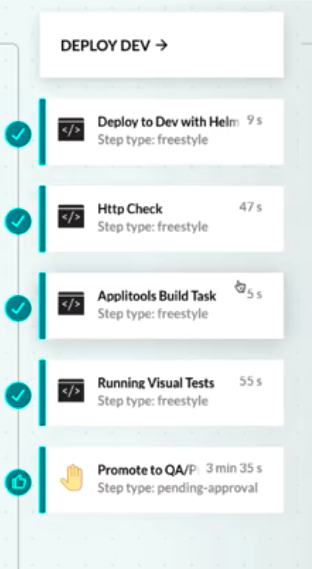
There’s the HTTP check, the Applitools Build Task, and Running Visual Tests.
The only difference really is that the visual tests ran alongside services that were spinning up alongside the test.
This is really easy to do in your codefresh.yml file, and the syntax looks a lot like Docker Compose.
Seeing the Visual Failure
Back in Azure DevOps, Jessica checked in on her Deploy to Dev step. She already knew there was a problem from her Slack notifications.
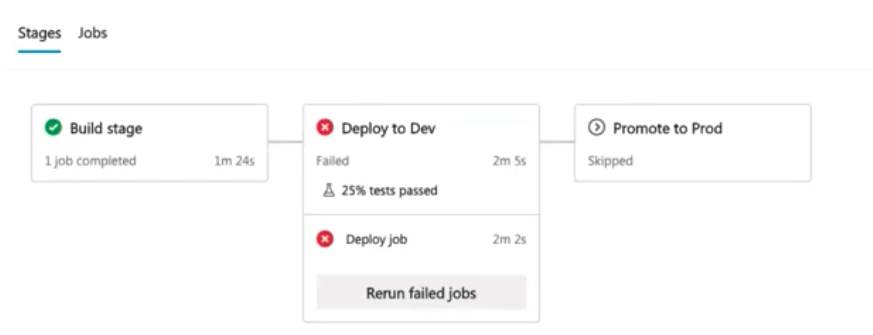
The error report showed that the visual tests all failed.
Clicking on the Applitools tab, she saw the following.
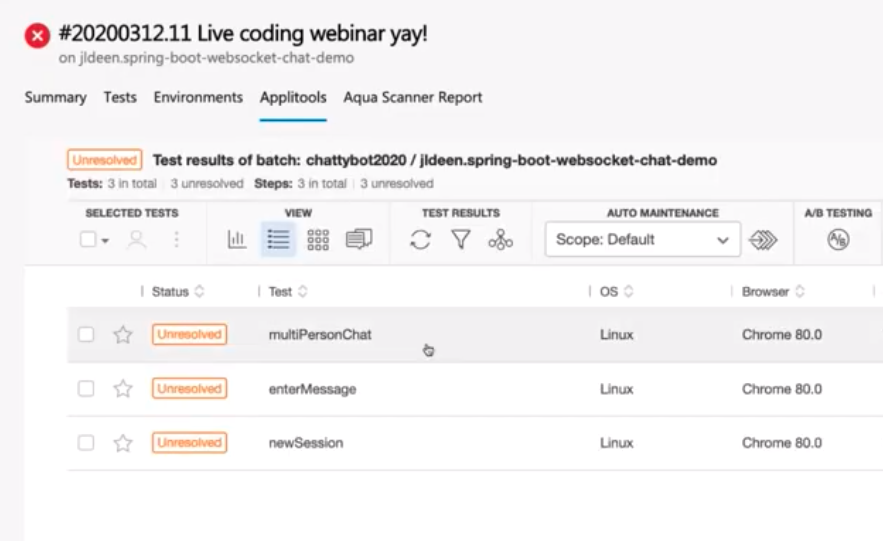
All three tests showed as unresolved. Clicking in to the multiPersonChat test, Jessica saw this:
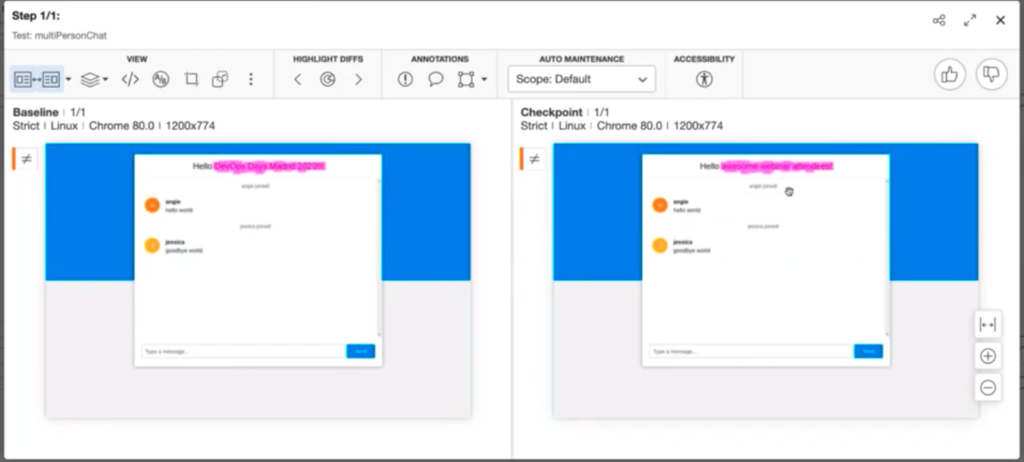
Sure enough, the text change from “Hello, DevOps Days Madrid 2020!!!” to “Hello, awesome webinar attendees!” caused a difference. We totally expected this difference, and we would find that this difference had also shown up in the other tests.
The change may not have been a behavioral change expected in your tests, so you may or may not have thought to test for the “Hello…” text or check for its modification. Applitools makes it easy to capture any visual difference.
Jessica didn’t go through this, but one feature in Applitools is the ability to use Auto Maintenance. With Auto Maintenance, if Jessica had approved the change on this first page, she could automatically approve identical changes on other pages. So, if this was an intended change, it would go from “Unresolved” to “Passed” on all the pages where the change had been observed.
Summing Up
Jessica handed back presentation to Angie, who shared Jessica’s link for code from the webinar:
All the code from Angie and Jessica’s demo can be downloaded from:
https://aka.ms/jldeen/applitools-webinar
Happy Testing!
For More Information
- Read Ask 288 Of Your Peers About Visual AI
- Read How I ran 100 UI tests in just 20 seconds
- Take Angie Jones’s course on Removing Visual Blind Spots
- Sign up for Test Automation University and start taking classes
- Take Raja Rao’s Course on Modern Functional Testing
- Sign up for a free Applitools account
- Request an Applitools demo