For some of us, it’s hard to believe how long smartphones have existed. I remember when the first iPhone came out in June 2007. I was working at my first internship at IBM, and I remember hearing in the breakroom that someone on our floor got one. Oooooooh! So special! That was 15 years ago!
In that decade and a half, mobile devices of all shapes and sizes have become indispensable parts of our modern lives: The first thing I do every morning when I wake up is check my phone. My dad likes to play Candy Crush on his tablet. My wife takes countless photos of our French bulldog puppy on her phone. Her mom uses her tablet for her virtual English classes. I’m sure, like us, you would feel lost if you had to go a day without your device.
It’s vital for mobile apps to have high quality. If they crash, freeze, or plain don’t work, then we can’t do the things we need to do. So, being the Automation Panda, I wanted to give mobile testing a try! I had three main goals:
- Learn about mobile testing for Android – specifically how it relates to other kinds of testing.
- Automate my own Appium tests – not just run someone else’s examples.
- Add visual assertions to my tests with Applitools – instead of coding a bunch of checks with complicated locators.
This article covers my journey. Hopefully, it can help you get started with mobile testing, too! Let’s jump in.
Getting Started with Mobile
The mobile domain is divided into two ecosystems: Android and iOS. That means any app that wants to run on both operating systems must essentially have two implementations. To keep things easier for me, I chose to start with Android because I already knew Java and I actually did a little bit of Android development a number of years ago.
I started by reading a blog series by Gaurav Singh on getting started with Appium. Gaurav’s articles showed me how to set up my workbench and automate a basic test:
- Hello Appium, Part 1: What is Appium? An Introduction to Appium and its Tooling
- Hello Appium, Part 2: Writing Your First Android Test
- Appium Fast Boilerplate GitHub repository
Test Automation University also has a set of great mobile testing courses that are more than a quickstart guide:
- Mobile Automation with Appium in Java
- Mobile Automation with Appium in JavaScript
- Automated Visual Testing with Appium
- Introduction to iOS Test Automation with XCUITest
- Android Test Automation with Espresso
Choosing an Android App
Next, I needed an Android app to test. Thankfully, Applitools had the perfect app ready: Applifashion, a shoe store demo. The code is available on GitHub at https://github.com/dmitryvinn/applifashion-android-legacy.
To do Android development, you need lots of tools:
- The Java Development Kit (JDK)
- Android Studio
- Android SDK (can be installed with Android Studio)
- Android Emulator (can also be installed with Android Studio)
I followed Gaurav’s guide to a T for setting these up. I also had to set the ANDROID_HOME environment variable to the SDK path.
Be warned: it might take a long time to download and install these tools. It took me a few hours and occupied about 13 GB of space!
Once my workbench was ready, I opened the Applifashion code in Android Studio, created a Pixel 3a emulator in Device Manager, and ran the app. Here’s what it looked like:
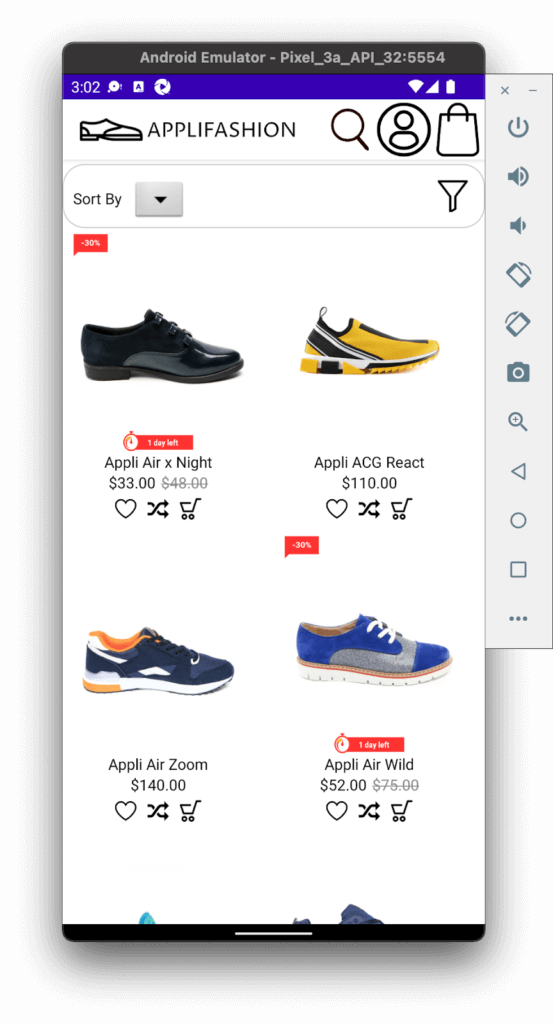
I chose to use an emulator instead of a real device because, well, I don’t own a physical Android phone! Plus, managing a lab full of devices can be a huge hassle. Phone manufacturers release new models all the time, and phones aren’t cheap. If you’re working with a team, you need to swap devices back and forth, keep them protected from theft, and be careful not to break them. As long as your machine is powerful and has enough storage space, you can emulate multiple devices.
Choosing Appium for Testing
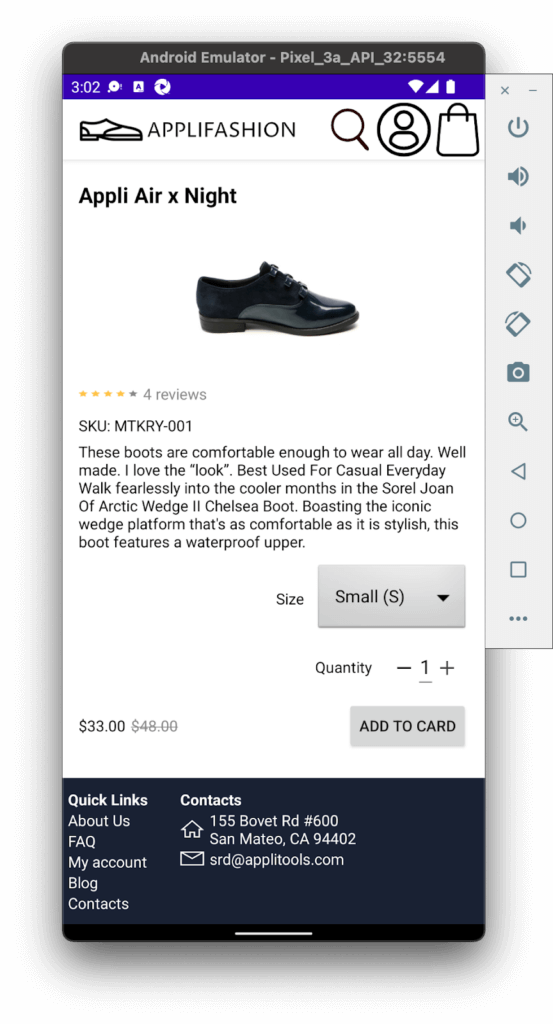
It was awesome to see the Applifashion app running through Android Studio. I played around with scrolling and tapping different shoes to open their product pages. However, I really wanted to do some automated testing. I chose to use Appium for automation because its API is very similar to Selenium WebDriver, with which I am very familiar.
Appium adds on its own layer of tools:
- Node.js for running Appium
- The Appium server (either the NPM module or Appium Desktop)
- Appium Doctor for validating your Appium setup
- Appium Inspector for inspecting mobile app pages
Again, I followed Gaurav’s guide for full setup. Even though Appium has bindings for several popular programming languages, it still needs a server for relaying requests between the client (e.g., the test automation) and the app under test. I chose to install the Appium server via the NPM module, and I installed version 1.22.3. Appium Doctor gave me a little bit of trouble, but I was able to resolve all but one of the issues it raised, and the one remaining failure regarding ANDROID_HOME turned out to be not a problem for running tests.
Before jumping into automation code, I wanted to make sure that Appium was working properly. So, I built the Applifashion app into an Android package (.apk file) through Android Studio by doing Build → Build Bundle(s) / APK(s) → Build APK(s). Then, I configured Appium Inspector to run this .apk file on my Pixel 3a emulator. My settings looked like this:
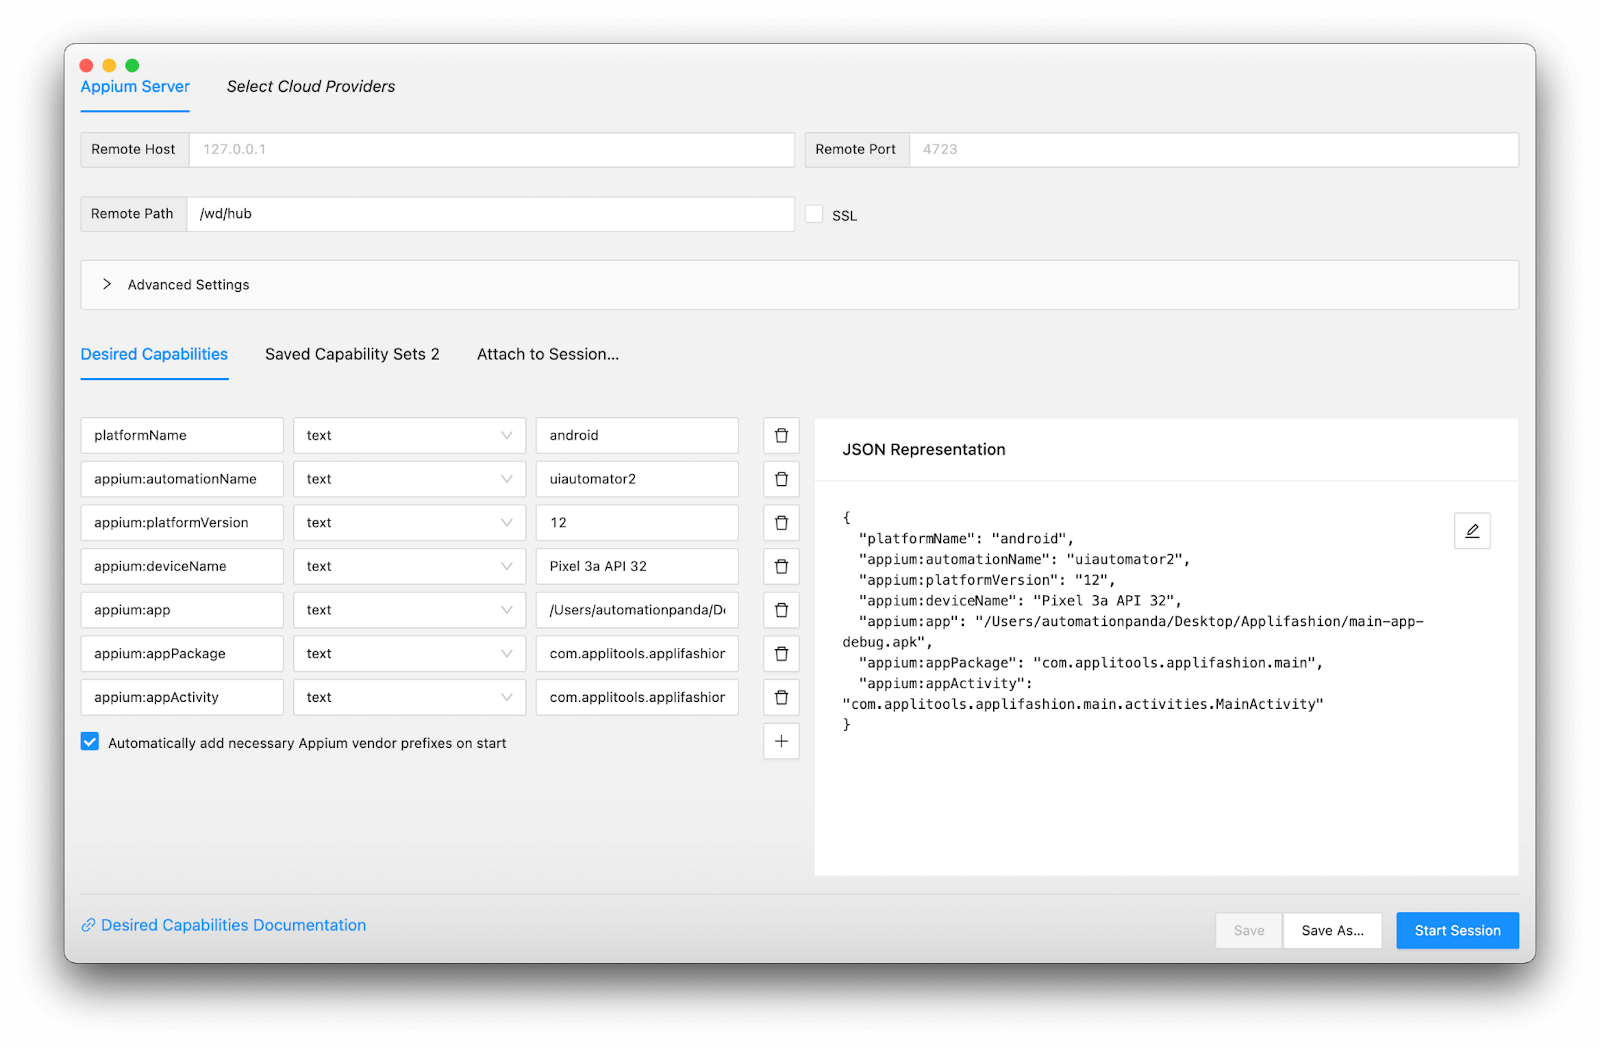
Here were a few things to note:
- The Appium server and Android device emulator were already running.
- I used the default remote host (127.0.0.1) and remote port (4723).
- Since I used Appium 1.x instead of 2.x, the remote path had to be
/wd/hub. appium: automationNamehad to beuiautomator2– it could not be an arbitrary name.- The platform version, device name, and app path were specific to my environment. If you try to run this yourself, you’ll need to set them to match your environment.
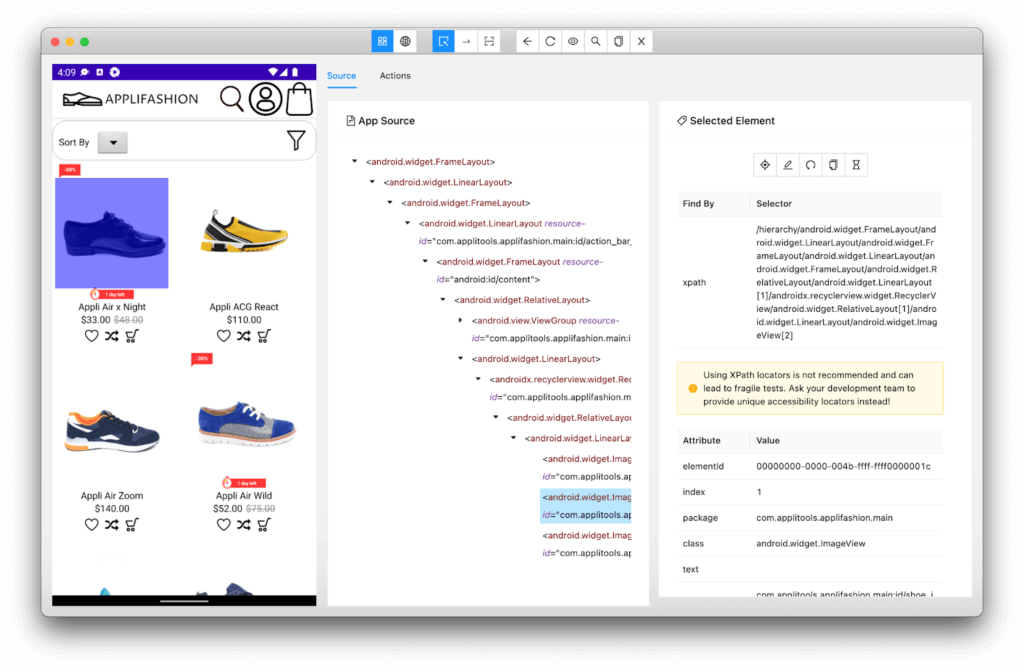
I won’t lie – I needed a few tries to get all my capabilities right. But once I did, things worked! The app appeared in my emulator, and Appium Inspector mirrored the page from the emulator with the app source. I could click on elements within the inspector to see all their attributes. In this sense, Appium Inspector reminded me of my workflow for finding elements on a web page using Chrome DevTools. Here’s what it looked like:
Writing my First Appium Test
So far in my journey, I had done lots of setup, but I hadn’t yet automated any tests! Mobile testing certainly required a heftier stack than web app testing, but when I looked at Gaurav’s example test project, I realized that the core concepts were consistent.
I set up my own Java project with JUnit, Gradle, and Appium:
- I chose Java to match the app’s code.
- I chose JUnit to be my core test framework to keep things basic and familiar.
- I chose Gradle to be the dependency manager to mirror the app’s project.
My example code is hosted here: https://github.com/AutomationPanda/applitools-appium-android-webinar.
Warning: The example code I share below won’t perfectly match what’s in the repository. Furthermore, the example code below will omit import statements for brevity. Nevertheless, the code in the repository should be a full, correct, executable example.
My build.gradle file looked like this with the required dependencies:
plugins {
    id 'java'
}

group 'com.automationpanda'
version '1.0-SNAPSHOT'

repositories {
    mavenCentral()
}

dependencies {
    testImplementation 'io.appium:java-client:8.1.1'
    testImplementation 'org.junit.jupiter:junit-jupiter-api:5.8.2'
    testImplementation 'org.seleniumhq.selenium:selenium-java:4.2.1'
    testRuntimeOnly 'org.junit.jupiter:junit-jupiter-engine:5.8.2'
}

test {
    useJUnitPlatform()
}
My test case class was located at /src/test/java/com/automationpanda/ApplifashionTest.java. Inside the class, I had two instance variables: the Appium driver for mobile interactions, and a WebDriver waiting object for synchronization:
public class ApplifashionTest {

    private AppiumDriver driver;
    private WebDriverWait wait;

    // …
}
I added a setup method to initialize the Appium driver. Basically, I copied all the capabilities from Appium Inspector:
    @BeforeEach
    public void setUpAppium(TestInfo testInfo) throws IOException {

        // Create Appium capabilities
        // Hard-coding these values is typically not a recommended practice
        // Instead, they should be read from a resource file (like a properties or JSON file)
        // They are set here like this to make this example code simpler
        DesiredCapabilities capabilities = new DesiredCapabilities();
        capabilities.setCapability("platformName", "android");
        capabilities.setCapability("appium:automationName", "uiautomator2");
        capabilities.setCapability("appium:platformVersion", "12");
        capabilities.setCapability("appium:deviceName", "Pixel 3a API 31");
        capabilities.setCapability("appium:app", "/Users/automationpanda/Desktop/Applifashion/main-app-debug.apk");
        capabilities.setCapability("appium:appPackage", "com.applitools.applifashion.main");
        capabilities.setCapability("appium:appActivity", "com.applitools.applifashion.main.activities.MainActivity");
        capabilities.setCapability("appium:fullReset", "true");

        // Initialize the Appium driver
        driver = new AppiumDriver(new URL("http://127.0.0.1:4723/wd/hub"), capabilities);
        wait = new WebDriverWait(driver, Duration.ofSeconds(30));
    }
I also added a cleanup method to quit the Appium driver after each test:
    @AfterEach
    public void quitDriver() {
        driver.quit();
    }
I wrote one test case that performs shoe shopping. It loads the main page and then opens a product page using locators I found with Appium Inspector:
    @Test
    public void shopForShoes() {

        // Tap the first shoe
        final By shoeMainImageLocator = By.id("com.applitools.applifashion.main:id/shoe_image");
        wait.until(ExpectedConditions.presenceOfElementLocated(shoeMainImageLocator));
        driver.findElement(shoeMainImageLocator).click();

        // Wait for the product page to appear
        final By shoeProductImageLocator = By.id("com.applitools.applifashion.main:id/shoe_image_product_page");
        wait.until(ExpectedConditions.presenceOfElementLocated(shoeProductImageLocator));
    }
At this stage, I hadn’t written any assertions yet. I just wanted to see if my test could successfully interact with the app. Indeed, it could, and the test passed when I ran it! As the test ran, I could watch it interact with the app in the emulator.
Adding Visual Assertions
My next step was to write assertions. I could have picked out elements on each page to check, but there were a lot of shoes and words on those pages. I could’ve spent a whole afternoon poking around for locators through the Appium Inspector and then tweaking my automation code until things ran smoothly. Even then, my assertions wouldn’t capture things like layout, colors, or positioning.
I wanted to use visual assertions to verify app correctness. I could use the Applitools SDK for Appium in Java to take one-line visual snapshots at the end of each test method. However, I wanted more: I wanted to test multiple devices, not just my Pixel 3a emulator. There are countless Android device models on the market, and each has unique aspects like screen size. I wanted to make sure my app would look visually perfect everywhere.
In the past, I would need to set up each target device myself, either as an emulator or as a physical device. I’d also need to run my test suite in full against each target device. Now, I can use Applitools Native Mobile Grid (NMG) instead. NMG works just like Applitools Ultrafast Grid (UFG), except that instead of browsers, it provides emulated Android and iOS devices for visual checkpoints. It’s a great way to scale mobile test execution. In my Java code, I can set up Applitools Eyes to upload results to NMG and run checkpoints against any Android devices I want. I don’t need to set up a bunch of devices locally, and the visual checkpoints will run much faster than any local Appium reruns. Win-win!
To get started, I needed my Applitools account. If you don’t have one, you can register one for free.
Then, I added the Applitools Eyes SDK for Appium to my Gradle dependencies:
testImplementation 'com.applitools:eyes-appium-java5:5.12.0'I added a “before all” setup method to ApplifashionTest to set up the Applitools configuration for NMG. I put this in a “before all” method instead of a “before each” method because the same configuration applies for all tests in this suite:
    private static InputReader inputReader;
    private static Configuration config;
    private static VisualGridRunner runner;

    @BeforeAll
    public static void setUpAllTests() {

        // Create the runner for the Ultrafast Grid
        // Warning: If you have a free account, then concurrency will be limited to 1
        runner = new VisualGridRunner(new RunnerOptions().testConcurrency(5));

        // Create a configuration for Applitools Eyes
        config = new Configuration();

        // Set the Applitools API key so test results are uploaded to your account
        config.setApiKey("<insert-your-API-key-here>");

        // Create a new batch
        config.setBatch(new BatchInfo("Applifashion in the NMG"));

        // Add mobile devices to test in the Native Mobile Grid
        config.addMobileDevices(
                new AndroidDeviceInfo(AndroidDeviceName.Galaxy_S21),
                new AndroidDeviceInfo(AndroidDeviceName.Galaxy_Note_10),
                new AndroidDeviceInfo(AndroidDeviceName.Pixel_4));
    }
The configuration for NMG was almost identical to a configuration for UFG. I created a runner, and I created a config object with my Applitools API key, a batch name, and all the devices I wanted to target. Here, I chose three different phones: Galaxy S21, Galaxy Note 10, and Pixel 4. Currently, NMG supports 18 different Android devices, and support for more is coming soon.
At the bottom of the “before each” method, I added code to set up the Applitools Eyes object for capturing snapshots:
    private Eyes eyes;

    @BeforeEach
    public void setUpAppium(TestInfo testInfo) throws IOException {

        // …

        // Initialize Applitools Eyes
        eyes = new Eyes(runner);
        eyes.setConfiguration(config);
        eyes.setIsDisabled(false);
        eyes.setForceFullPageScreenshot(true);

        // Open Eyes to start visual testing
        eyes.open(driver, "Applifashion Mobile App", testInfo.getDisplayName());
    }
Likewise, in the “after each” cleanup method, I added code to “close eyes,” indicating the end of a test for Applitools:
    @AfterEach
    public void quitDriver() {

        // …

        // Close Eyes to tell the server it should display the results
        eyes.closeAsync();
    }
Finally, I added code to each test method to capture snapshots using the Eyes object. Each snapshot is a one-line call that captures the full screen:
@Test
public void shopForShoes() {
// Take a visual snapshot
eyes.check("Main Page", Target.window().fully());
// Tap the first shoe
final By shoeMainImageLocator = By.id("com.applitools.applifashion.main:id/shoe_image");
wait.until(ExpectedConditions.presenceOfElementLocated(shoeMainImageLocator));
driver.findElement(shoeMainImageLocator).click();
// Wait for the product page to appear
final By shoeProductImageLocator = By.id("com.applitools.applifashion.main:id/shoe_image_product_page");
wait.until(ExpectedConditions.presenceOfElementLocated(shoeProductImageLocator));
// Take a visual snapshot
eyes.check("Product Page", Target.window().fully());
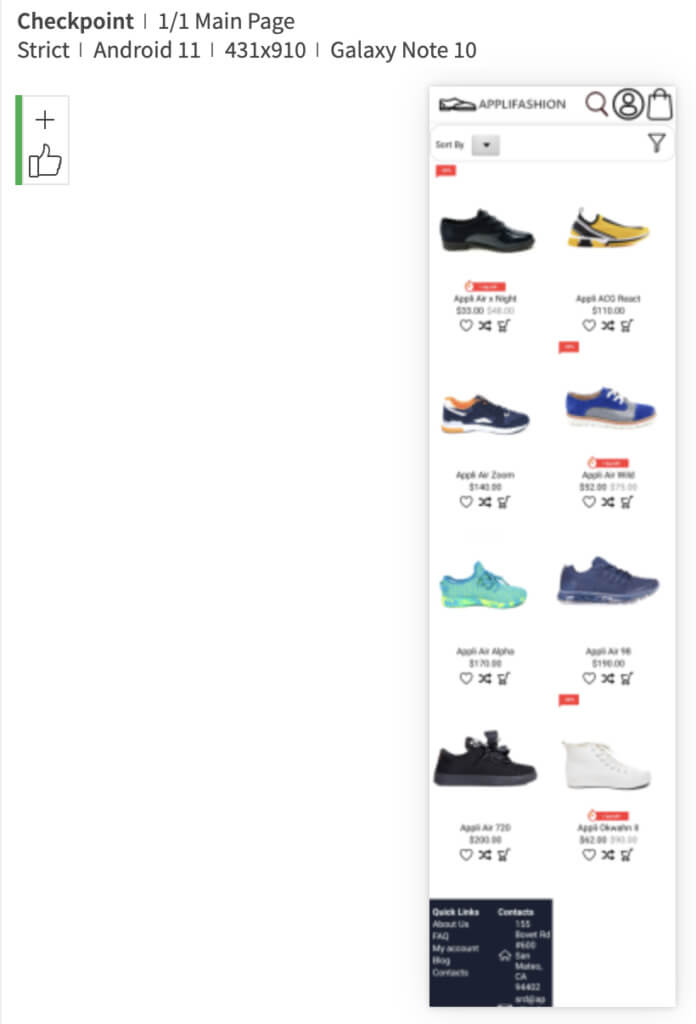
}When I ran the test with these visual assertions, it ran one time locally, and then NMG ran each snapshot against the three target devices I specified. Here’s a look from the Applitools Eyes dashboard at some of the snapshots it captured:
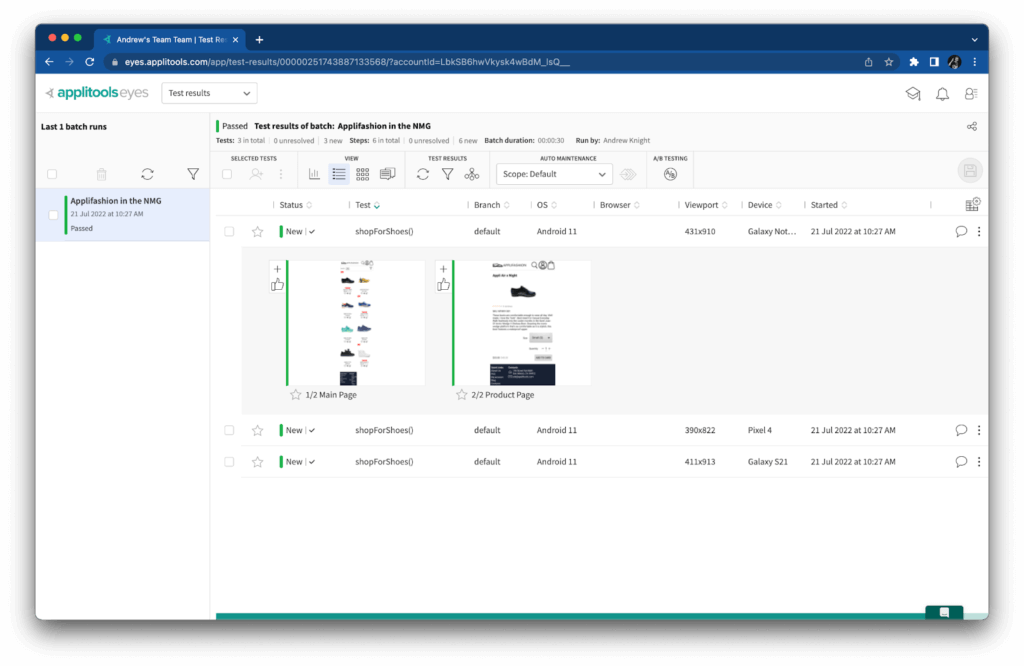
The results are marked “New” because these are the first “baseline” snapshots. All future checkpoints will be compared to these images.
Another cool thing about these snapshots is that they capture the full page. For example, the main page will probably display only 2-3 rows of shoes within its viewport on a device. However, Applitools Eyes effectively scrolls down over the whole page and stitches together the full content as if it were one long image. That way, visual snapshots capture everything on the page – even what the user can’t immediately see!
Injecting Visual Bugs
Capturing baseline images is only the first step with visual testing. Tests should be run regularly, if not continuously, to catch problems as soon as they happen. Visual checkpoints should point out any differences to the tester, and the tester should judge if the change is good or bad.
I wanted to try this change detection with NMG, so I reran tests against a slightly broken “dev” version of the Applifashion app. Can you spot the bug?
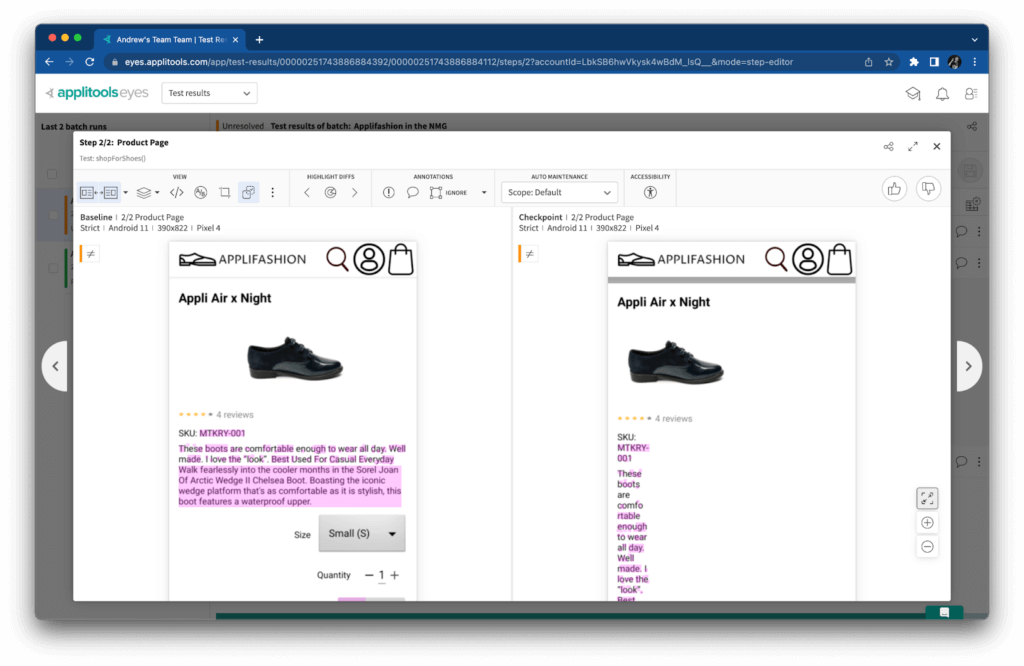
The formatting for the product page was too narrow! “Traditional” assertions would probably miss this type of bug because all the content is still on the page, but visual assertions caught it right away. Visual checkpoints worked the same on NMG as they would on UFG or even with the classic (e.g. local machine) Applitools runner.
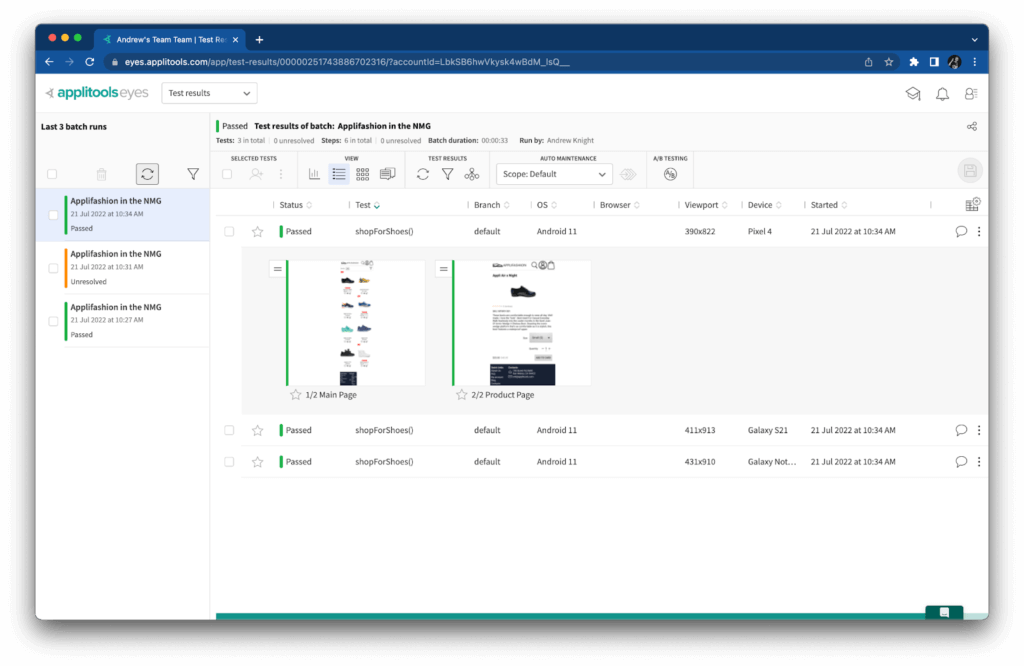
When I switched back to the “main” version of the app, the tests passed again because the visuals were “fixed:”
While running all these tests, I noticed that mobile test execution is pretty slow. The one test running on my laptop took about 45 seconds to complete. It needed time to load the app in the emulator, make its interactions, take the snapshots, and close everything down. However, I also noticed that the visual assertions in NMG were relatively fast compared to my local runs. Rendering six snapshots took about 30 seconds to complete – three times the coverage in significantly less time. If I had run tests against more devices in parallel, I could probably have seen an even greater coverage-to-time ratio.
Conclusion
My first foray into mobile testing was quite a journey. It required much more tooling than web UI testing, and setup was trickier. Overall, I’d say testing mobile is indeed more difficult than testing web. Thankfully, the principles of good test automation were the same, so I could still develop decent tests. If I were to add more tests, I’d create a class for reading capabilities as inputs from environment variables or resource files, and I’d create another class to handle Applitools setup.
Visual testing with Applitools Native Mobile Grid also made test development much easier. Setting everything up just to start testing was enough of a chore. Coding the test cases felt straightforward because I could focus my mental energy on interactions and take simple snapshots for verifications. Trying to decide all the elements I’d want to check on a page and then fumbling around the Appium Inspector to figure out decent locators would multiply my coding time. NMG also enabled me to run my tests across multiple different devices at the same time without needing to pay hundreds of dollars per device or sucking up a few gigs of storage and memory on my laptop. I’m excited to see NMG grow with support for more devices and more mobile development frameworks in the future.
Despite the prevalence of mobile devices in everyday life, mobile testing still feels far less mature as a practice than web testing. Anecdotally, it seems that there are fewer tools and frameworks for mobile testing, fewer tutorials and guides for learning, and fewer platforms that support mobile environments well. Perhaps this is because mobile test automation is an order of magnitude more difficult and therefore more folks shy away from it. There’s no reason for it to be left behind anymore. Given how much we all rely on mobile apps, the risks of failure are just too great. Technologies like Visual AI and Applitools Native Mobile Grid make it easier for folks like me to embrace mobile testing.