JavaScript? It’s a standard. Selenium? It’s this great WebDriver. So, why do I get visual errors?
In this article, I will go back to basics and share a step by step tutorial on how to UI test for native JavaScript applications using Applitools and its powerful integration with the Selenium WebDriver library.
Applitools is an automated visual regression testing framework. It focuses on the visual aspects of your app and plays a significant role in exposing the visual differences between baseline snapshots and both current and future snapshots.
Applitools integrates with dozens of testing frameworks, such as Cypress.io, Storybook, and Selenium. It provides SDKs for use in your projects to seamlessly communicate and interact with Applitools.
Terminology
Throughout the article, I will use some terminology repeatedly. You need to know these terms to get the most from this article.
WebDriver
“WebDriver is a remote control interface that enables introspection and control of user agents. It provides a platform and language-neutral wire protocol as a way for out-of-process programs to remotely instruct the behavior of web browsers.” WebDriver W3C Recommendation 05 June 2018.
WebDriver aims at writing a standard set of instructions to query for DOM elements and to control the behavior of browsers in a cross-browser and cross-platform fashion.
Chrome, FireFox, IE, Edge, and many other browsers provide their own implementation for the WebDriver Standard. Hence, they implement the same standard API and provide browser-specific functionality.
Selenium WebDriver
“Selenium is a browser automation library. Most often used for testing web-applications, Selenium may be used for any task that requires automating interaction with the browser.” Selenium WebDriver NPM
Selenium WebDriver is a layer on top of the WebDriver standard that provides seamless programmatic access to any browser that supports a WebDriver implementation. Once you have ChromeDriver installed on your machine in its correct path, a Selenium script will detect the ChromeDriver automatically. Selenium can then send all the instructions to the ChromeDriver to control the Chrome browser. Similarly, if you wish to use FireFox and install the FireFox Driver, Selenium would automatically interact with that driver to control the FireFox browser. Rather than requiring developers and testers to maintain separate WebDriver implementations, Selenium Webdriver provides a standard API for running test scripts multiple browsers and platforms.
Applitools Eyes SDK for Selenium and JavaScript
Applitools Eyes SDK is a thin layer on top of Selenium WebDriver. The Eyes SDK extends Selenium WebDriver and lets developers and testers the tools to incorporate visual and UI testing into their applications.
To write a visual e2e (end-to-end) test using the Applitools Eyes SDK, the script starts by initializing a Selenium driver object that is passed to the eyes.open() method as a first parameter. The SDK wraps the driver with easy to use methods. This allows the developer to start a test, capture a snapshot and finally close the test.
We’ll cover Applitools Eyes SDK in the step by step guide below.
Source code
In this article, I will demonstrate the Applitools Eyes SDK by building a visual e2e test script to test out the Wikipedia website. The script starts by navigating the browser to the Wikipedia website. It then locates and clicks on the English version of Wikipedia, searches the Wikipedia for the term “Software Testing” and finally verifies the results. The source code for this article is available on this Github repo. Wikipedia Testing with Applitools and Selenium.
Prerequisites
First, ensure that these are properly installed on your machine:
Before we start coding, let’s ensure that you’re ready with ChromeDriver and Applitools.
Prerequisite Steps 1-4: ChromeDriver / Chrome Browser
Step 1: Install Google Chrome browser from https://www.google.com/chrome/
Step 2: Install a Chromedriver that’s appropriate for your operating system and your Chrome browser’s version from:
http://chromedriver.chromium.org/downloads.
For example, if your Chrome browser is v67-v69, download ChromeDriver 2.41.
Step 3: Unzip ChromeDriver to any folder of your choice.
Step 4: Add ChromeDriver’s path to your system’s PATH so Selenium can find it.
On a Mac:
- Open ~/.bash_profile file (Create one if it’s missing).
- Add export PATH=”<PATH_TO_YOUR_CHROME_DRIVER>:$PATH”
- Run source ~/.bash_profile.
For example, if the ChromeDriver is in /Users/apps/chromedriver, then it would be export PATH=”/Users/apps/:$PATH
On a Windows:
- Navigate to Computer (Right click) | Properties | Advanced System Settings | Advanced (Tab) | Environment variables | System Variables.
- Select the line with Path key.
- Click on Edit.
- Add a semicolon ; to the end of the values and add the path where you have unzipped ChromeDriver.
For example, if the ChromeDriver is in c:\selenium\chromedriver, then append ;c:\selenium to the end of the Path. Finally, save it.
If everything went fine, and if you typed chromedriver in the command prompt, you should see something like this:

Prerequisite Step 5: Configure Applitools API KEY
Before you can locally run Applitools Eyes SDK, make sure you get an Applitool API Key and store it on your machine as an environment variable.
To set the APPLITOOLS_API_KEY environment variable you can use the export command on Mac or set command on Windows as follows:
Demo Steps 1-3: Clone, Install Selenium and Applitools SDK
The section below will guide you step by step in writing your first Applitools Selenium e2e test.
Step 1: Clone the application repo.
git clone git@github.com:bhaidar/wikipedia-testing-applitools-selenium.git
Step 2: Install the Selenium WebDriver package as a dev dependency by issuing the following command:
npm install selenium-webdriver --save-dev
Step 3: Install the Applitools Eyes SDK for Selenium as a dev dependency by issuing the following command:
npm install @applitools/eyes-selenium --save-dev
Demo Steps 4-7: Prepare JavaScript for E2E Test With Selenium
Step 4: Let’s start creating our first e2e test. Create a new file wikipedia.spec.js at the root of the solution folder and paste the following two lines at the very beginning:
The code snippet starts by importing a few objects from the Selenium WebDriver NPM package. The second line imports the main Eyes object from the Eyes SDK for Selenium.
Step 5: Build a new driver object inside an IIFE (Immediately Invoked Function Expression) so that our code is isolated from the Global environment in JavaScript.
The code snippet makes use of the Selenium WebDriver API to build a new Chrome browser object.
Step 6: Initialize an instance of the Eyes object as follows:
The code simply creates a new object instance of the Eyes class.
The code snippet then sets the Applitools API Key by making use of the APPLITOOLS_API_KEY environment variable.
Finally, the code configures the Eyes object instance to show logs while running. I enable logging intentionally while writing my e2e tests. As a result, I get the chance to see all the logs generated by Eyes SDK that could help me trace any bug in my code.
Step 7: Let’s start a new Eyes SDK test by calling the eyes.open() method as follows:
The code snippet above defines a try/catch block so that we guarantee a safe closure for any opened test.
To start using the Eyes SDK, you call the eyes.open() method passing to it the WebDriver object defined above together with test configuration settings. Calling this method initiates communication with the Applitools backend servers to start processing your tests.
Remember, the Eyes SDK for Selenium is a thin wrapper on top of the Selenium WebDriver; hence, the need to pass the driver object to the Eyes SDK.
The App Name, Test Name, and Viewport settings are the essential configuration settings that you need to pass to the eyes.open() method.
Towards the bottom of the try block, it is essential to close the test safely. The finally block closes the browser instance opened by the Selenium WebDriver and makes sure the Eyes test is completely closed by aborting it in case it is still pending.
Now with that out of the way, let’s write our test!
Demo Steps 8-14: Create Applitools Checks In the Selenium JavaScript Test Script
Step 8: Navigate to the Wikipedia Website by adding this line of code into your e2e test script:
Step 9: Take a visual checkpoint using the Eyes SDK by adding this line of code into your e2e test script:
The eyes.check() method accepts a simple string that labels the snapshot taken.
Step 10: Locate the “English” hyperlink on the Wikipedia Home page and click it with this line of code:
The browser navigates to the English version of Wikipedia.
Step 11: Verify that the page the browser navigated to, has a header with text of “Welcome to Wikipedia”:
Step 12: Take a visual checkpoint using the Eyes SDK by adding this line of code into your e2e test script:
Step 13: Locate the search box, type the text “Software Testing” and hit Enter. The code below demonstrates the three steps:
Step 14: Wait until the Wikipedia Software Testing page loads and then take a new snapshot:
Every page in Wikipedia has a title element with ID of “firstHeading”.
Finally, we close the current test and quit the browser.
Demo Steps 15-16: Verify Test Results for Selenium and Javascript in Applitools
Step 15: Run the e2e test script by issuing this command:
node wikipedia.spec.js
As you can see this is a simple Node.js script that starts executing the instructions from top to bottom.
As a result, you should see the following output once the script runs.
Step 16: With that done, we’ll visit the Applitools Dashboard and verify the test run results.
Navigate to https://www.applitools.com and Sign In to access your account.
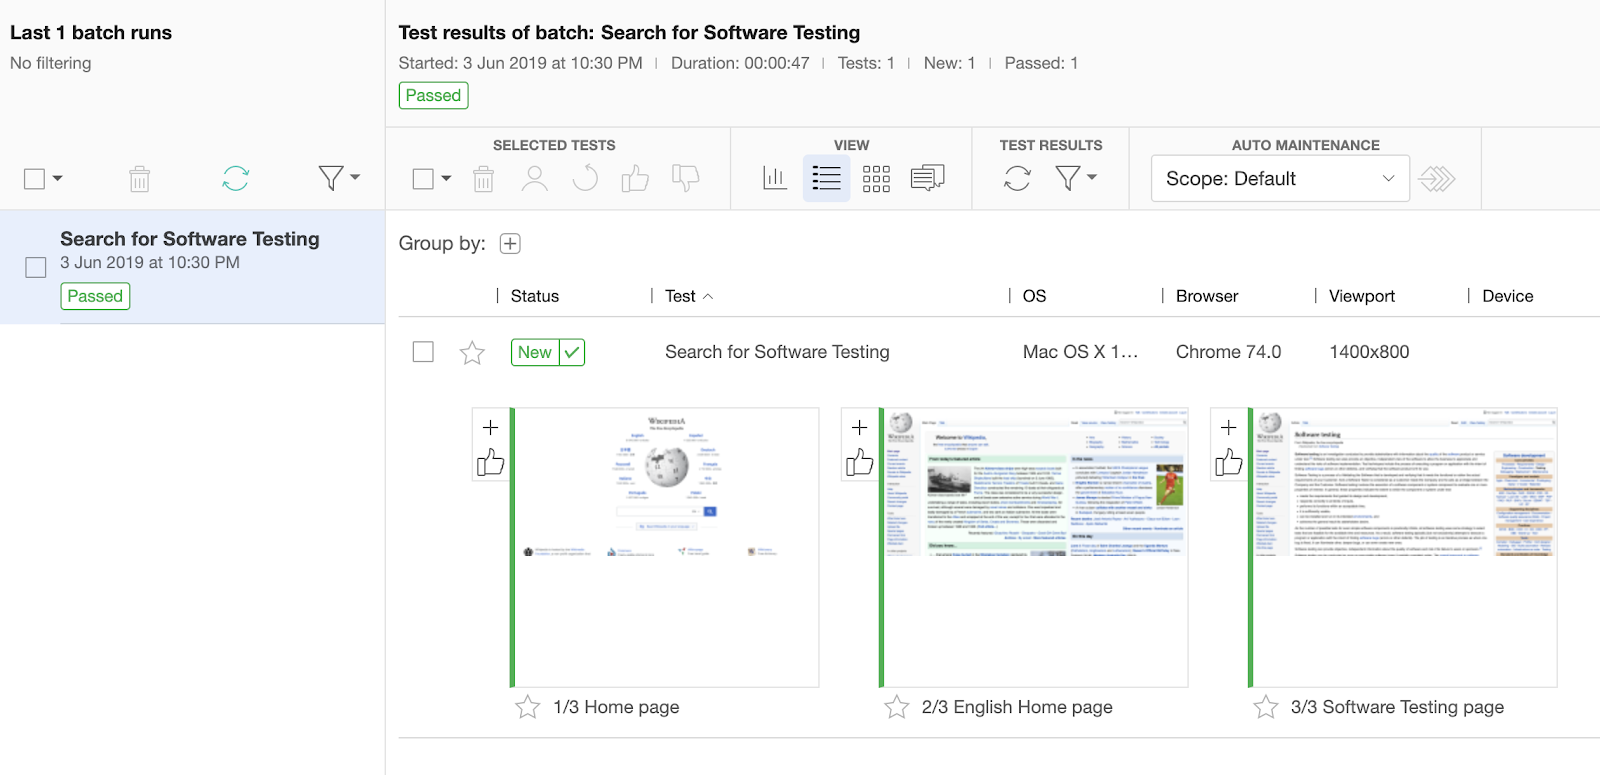
The Dashboard lists all test runs on the left-side of the page. By clicking a test run, you can then check all the snapshots that were taken during the test run.
In our case, there are three snapshots representing the Wikipedia Home page, Wikipedia English page and Wikipedia Software Testing page.
The test has a status of Passed. The snapshots are stored as baseline snapshots and everything seems to be working fine.
Let’s now introduce a visual change in the test run by running our e2e test to demonstrate how visual regression testing works with Applitools.
Demo Steps 17-18: Make Changes And Validate Differences
Step 17: Let’s change the search term from “Software Testing” to “Software Testability” and run the e2e test again by issuing the following command:
node wikipedia.spec.js
Running the above command results in the following error:

That’s great news! The Applitools Eyes SDK was able to detect visual differences between the two test runs and that’s exactly what we want.
Step 18: Let’s switch back to the Applitools Dashboard and check the new test run results there.
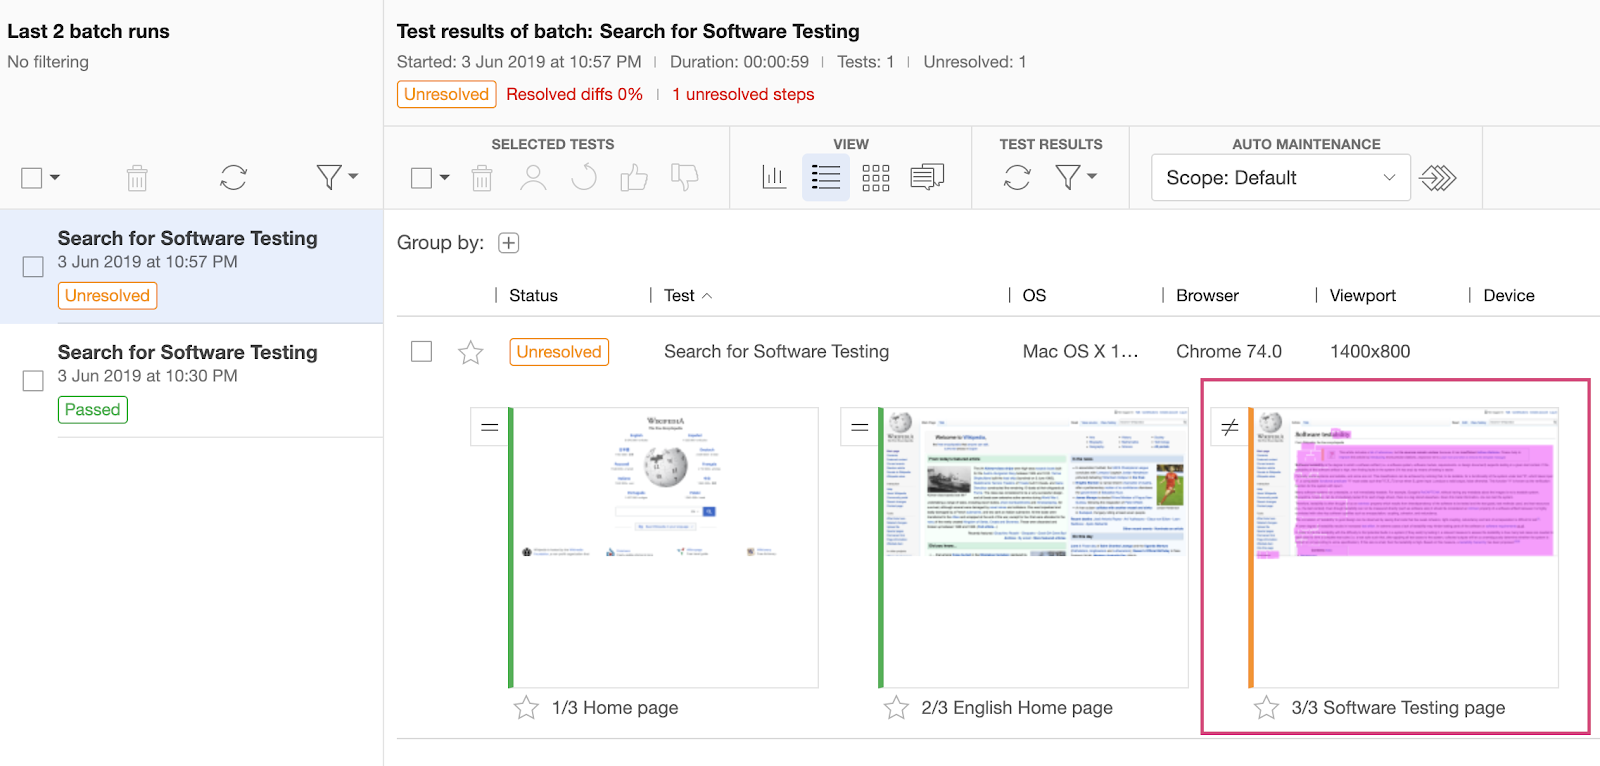
Notice how Applitools was able to detect some visual changes in the third snapshot taken.
Let’s expand on the third snapshot to see the visual differences detected:
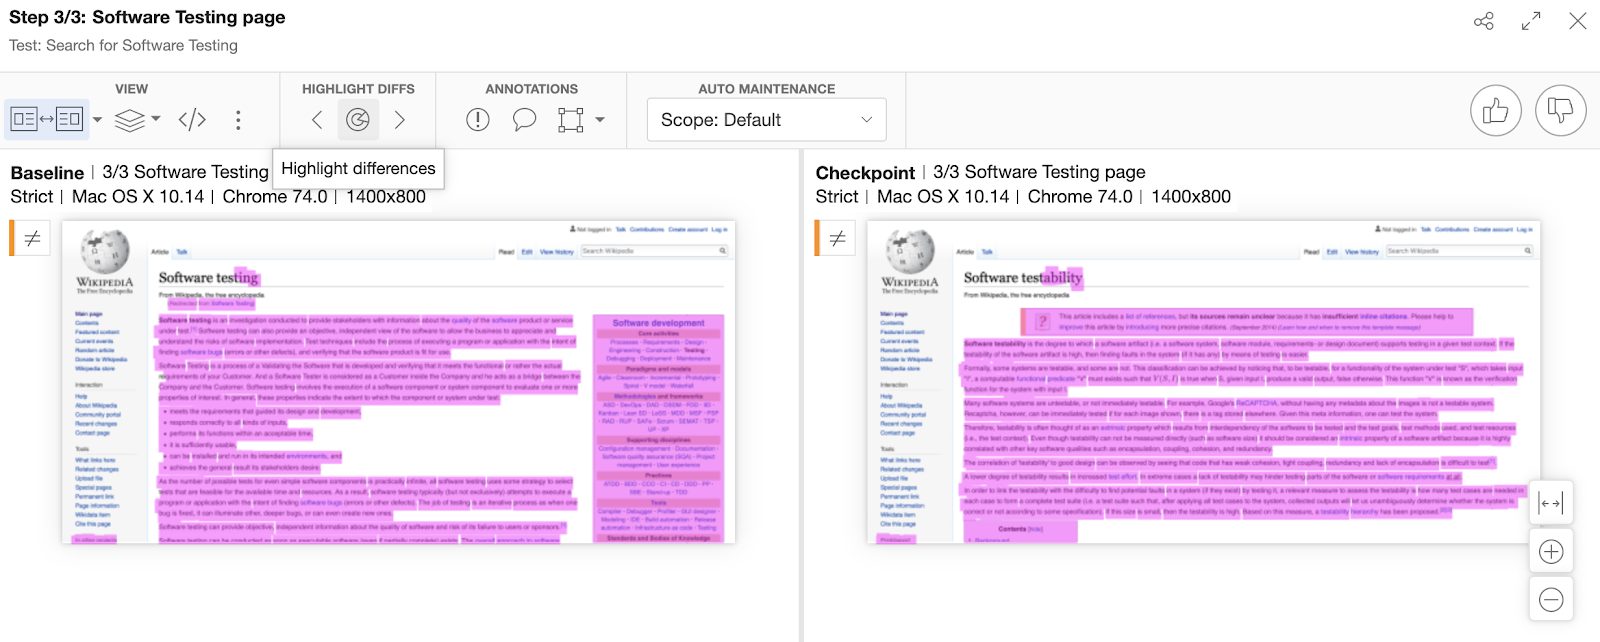
The visual differences are clear between the snapshots. One snapshot displays the Software Testing page and the other displays the Software Testability page.
The power of Applitools lies in the visual regression testing capabilities that make it not only a visual testing framework, but an obvious choice to run all regression tests in your application. Applitools will ensure there are no intentional changes across the life cycle of the software under development.
Here’s the source code repo for completed e2e test application.
Conclusion
You now have some insight on how Applitools speeds up your visual testing experience when you’re developing apps with native JavaScript/Node.js and Selenium WebDriver.
My upcoming articles will explore Applitools further, unveil more features and allow you to carry on with E2E and Visual UI Testing easily.
Happy Testing!
Other Posts I Have Written
Here is a recap of the previous Applitools topics I’ve touched on:
- Applitools – The automated visual regression testing framework
- Mixing Storybook with Angular with a sprinkle of Applitools
- Troubleshoot and fix React bugs fast
- Visually test VueJS apps using Cypress.io and Applitools
- How I ran 100 UI tests in just 20 seconds
- Visually Test Vue.js application using Applitools and Storybook
- React UI Testing, step by step, with Applitools and Cypress.io
- Angular UI Testing, step by step, with Applitools and Cypress.io
This article was previously published on dzone.com.
Want To Know More About Applitools?
- You can request a demo.
- You can sign up for a free account.
- You can check out their tutorials.